Glare on glasses can ruin an otherwise perfect portrait. Whether you’re a photographer, designer, or just editing your own photos, knowing how to remove glare from glasses in Photoshop is essential. This guide will walk you through various methods to fix glare from glasses manually in Photoshop using various tools like Clone Stamp, Healing Brush, Patch, Adjustment Layers, and Frequency Separation.
Are you really ready to use Photoshop to remove glare from glasses? It's important to note that removing glare from glasses is not an easy task. Before you begin, understand the technical hurdles and time investment you might encounter. This will help you make a more informed decision.
💡 What You May Encounter When Removing Glare from Glasses in Photoshop?
- Steep learning curve and high skill required to master various of tools for removing glasses glare in PS.
- Glare removal is often pixel-level and time-consuming, especially for complex patterns, making it impractical for large batches.
- Improper use of Photoshop's tools can lead to visible artifacts and unnatural-looking areas on the glasses.
- Glare obscures vital details like eyes; restoring them is hard and often looks unnatural.
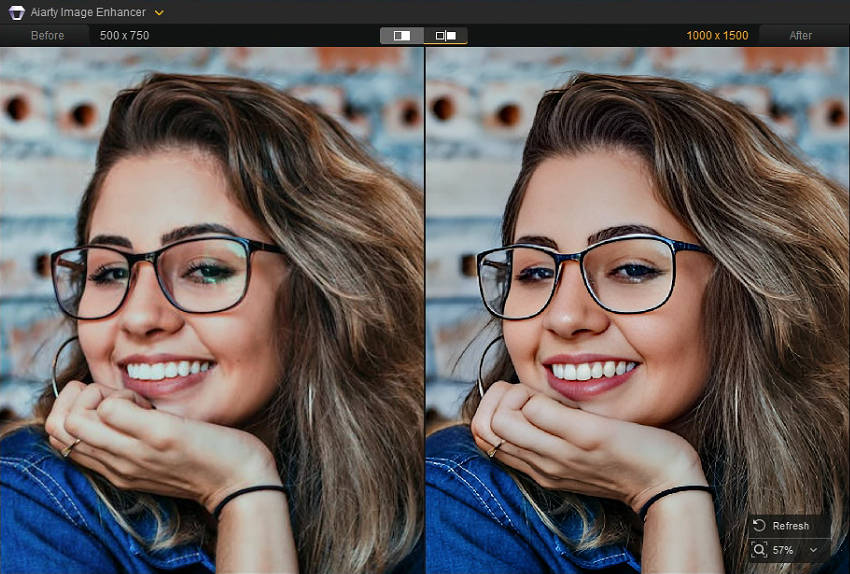
Instead of wrestling with Photoshop's complexity, Aiarty Image Enhancer offers an easier way to remove glare.
Aiarty Image Enhancer uses AI to intelligently remove glare from glasses and enhance your photos, eliminating complex edits. Achieve stunning, natural-looking results up to 32K, free from noise, blurriness, pixelation, and artifacts, with minimal effort.
Free download Aiarty Image Enhancer to remove glare from glasses now!
Why Does Glare Appear on Glasses?
Glare on glasses is a common photographic challenge, arising from the way light interacts with the curved, reflective surfaces of lenses. Essentially, it's a form of specular reflection, where a strong light source bounces off the lens and directly into the camera's view. This results in bright, often distracting spots that can obscure the wearer's eyes and distort the image. Common causes include:
- Direct Light & Angle: Direct light hitting glasses at an angle reflects. The incidence angle dictates the reflection angle, causing glare in the camera.
- Overhead/Flash: Overhead studio lights (especially with tilted heads) and direct camera flash often cause glare.
- Glossy Lens Coatings: While reducing reflections, glossy lens coatings can still cause glare under specific lighting.
How to Remove Glare from Glasses in Photoshop: Step-by-Step Guide
Fortunately, Photoshop offers a robust toolkit capable of mitigating and often completely removing glare from glasses. While the process can be intricate and demanding, particularly for complex glare patterns, mastering these techniques can significantly enhance the quality of your images. Here's a comprehensive breakdown of the typical steps:
1. Using the Clone Stamp Tool (Best for Small Glare Areas)
The Clone Stamp Tool is a fundamental Photoshop tool, ideal for meticulously replacing small, isolated glare spots with texture and color sampled from surrounding clean areas. Its precision makes it particularly effective for minor reflections that don't heavily obscure underlying details. Here's a detailed breakdown of the process:
Step 1. Select the Clone Stamp Tool (S): Begin by activating the Clone Stamp Tool from your Photoshop toolbar, or by pressing the "S" key, preparing to duplicate and paint over the glare.
Step 2. Adjust hardness to 0-50% for a smooth blend: Fine-tune the brush hardness to a soft setting, typically between 0 and 50%, ensuring that the cloned pixels blend seamlessly with the surrounding areas.
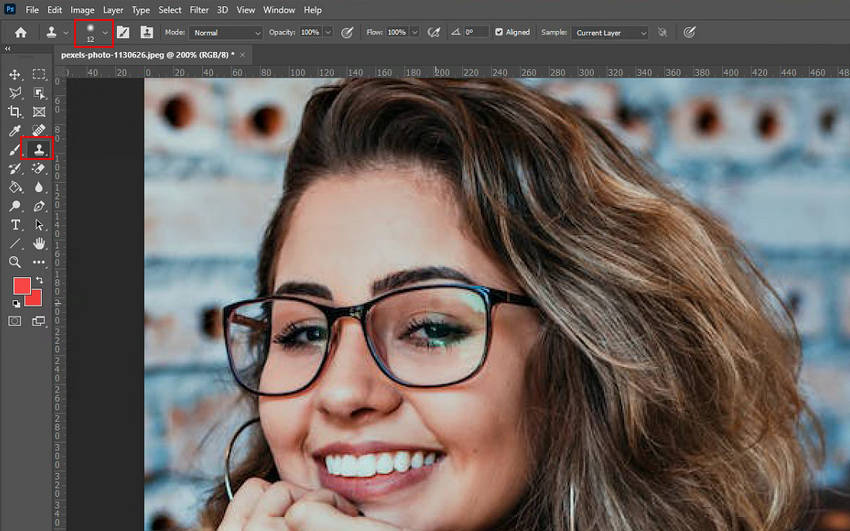
Step 3. Hold Alt (Windows) / Option (Mac) and click a clean area near the glare: Define the source of your cloned pixels by holding down the Alt key on Windows or the Option key on Mac, and then clicking on a clean, representative area adjacent to the glare.
Step 4. Gently paint over the glare to replace it: With the source area defined, carefully paint over the glare, using gentle strokes and frequently re-sampling as needed, to replace the unwanted reflection with cloned pixels that maintain the image's natural texture and appearance.
Related search: How to fix lazy eyes in pictures >>
2. Using the Healing Brush Tool (Quick & Easy Fix)
The Healing Brush Tool provides a more automated approach to glare removal, functioning similarly to the Clone Stamp Tool but with the added benefit of intelligent texture and lighting blending. This makes it a quicker and often easier solution for addressing glare, particularly in areas with consistent textures and lighting.
Step 1. Select the Healing Brush Tool (J): Begin by choosing the Healing Brush Tool from the toolbar, or press the "J" key, to activate this automatic blending tool.
Step 2. Choose a sample area free from glare: Define the source for your healing by clicking on a clean area of the image, free from glare, that closely matches the texture and lighting of the area you intend to repair.
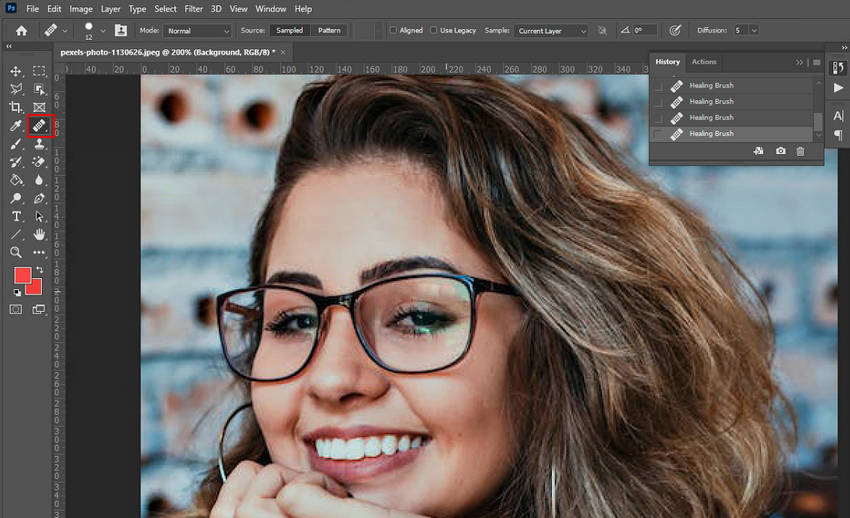
Step 3. Brush over the glare to seamlessly fix the affected area: Carefully paint over the glare with the Healing Brush Tool, allowing Photoshop to automatically analyze and blend the sampled texture and lighting with the surrounding pixels, fixing the glare in photos seamlessly with natural look.
3. Using the Patch Tool (Best for Larger Glare Areas)
The Patch Tool excels at addressing larger, more prominent glare reflections that cover a significant portion of the glasses' lens. Its selection-based approach allows for efficient replacement of entire glare areas with clean, matching textures, making it ideal for situations where the Clone Stamp or Healing Brush would be too time-consuming.
Step 1. Select the Patch Tool (J) from the toolbar: Begin by activating the Patch Tool, which shares a toolbar location with the Healing Brush Tool, or by pressing the "J" key, preparing to select and replace larger glare areas.
Step 2. Draw around the glare area: Precisely outline the complete glare area using the Patch Tool's selection feature, making sure to encompass all affected pixels. Take care not to include eyelashes in the selection, as this could lead to unwanted eye distortion when dragging.
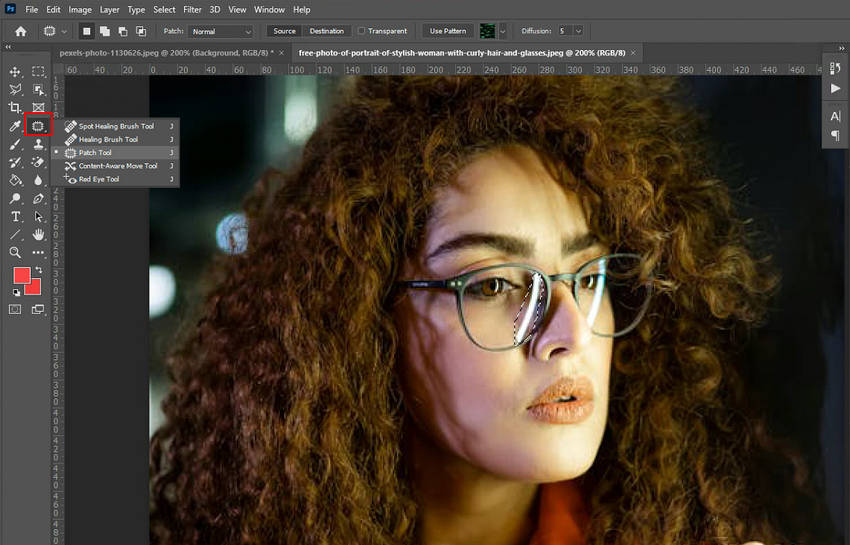
Step 3. Drag the selection to a clean area, and Photoshop will blend the fix: With the glare area selected, click and drag the selection to a clean, representative area of the image. Upon releasing the selection, Photoshop's intelligent algorithms will seamlessly blend the texture and lighting from the source area into the selected glare region, effectively removing the reflection.
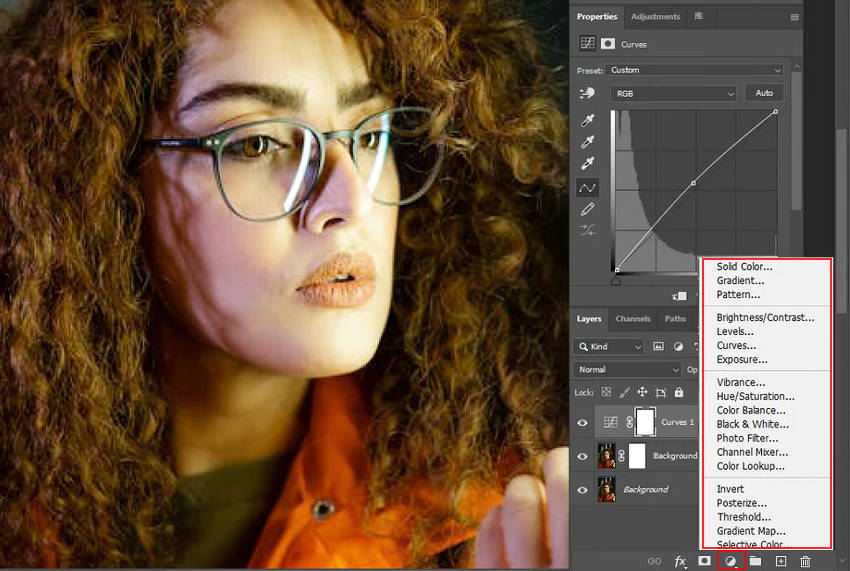
4. Using Adjustment Layers (For Color & Contrast Fixes)
Often, glare isn't just a matter of brightness; it can also introduce unwanted color shifts or contrast distortions to the affected area. Adjustment layers offer a non-destructive way to address these issues, allowing for precise control and easy adjustments without permanently altering the original image.
- Use Curves or Levels adjustments to fine-tune contrast.
- Apply a mask to limit the effect to the glare area.
For professional-level glasses glare removal that demands several tools combined for utmost precision, especially when dealing with complex textures and fine details, it offers an unparalleled level of control. This combination allows you to isolate the image's tonal and color information from its textural details, enabling targeted edits without compromising the integrity of the underlying structure.
Of course, achieving good results in removing glare from glasses requires a certain level of skill. Otherwise, you'll consistently find that the final result is always in an unnatural appearance.
Photoshop Too Complex? Try Aiarty for Effortless Glasses Glare Removal
If you're looking for a significantly faster and entirely hassle-free solution, Aiarty Image Enhancer is an AI-powered tool designed to streamline the glare removal process. Forget the time-consuming manual techniques required in Photoshop. Aiarty Image Enhancer adopts cutting-edge AI models to automatically and intelligently remove glare from glasses in seconds, providing natural-looking, professional results with minimal effort.
Why Aiarty Image Enhancer Excels at Removing Glasses Glare:
- High Quality & Natural Results: Removes the glare without blurring or distorting the underlying details, such as the eyes, and simultaneously improves image quality by fixing facial imperfections and upscaling up to 32K.
- Smart AI Processing: Automates complex adjustments, ideal for both beginners and professionals without requiring extensive Photoshop skills.
- Speed & Efficiency: Instantly removes glare in seconds and supports batch processing, allowing you to edit multiple images at once, significantly saving time compared to manual Photoshop methods.
Free download Aiarty Image Enhancer to fix glasses glare automatically with AI.
Step 1. Open up the glasses glare removal tool, then drag and drop to import your images with glasses glare. You can import multiple images for bulk processing.
Step 2. Choose an AI model based on your source image. Usually More-Detail GAN v3 is selected for better result. Also determine and Upscale scale as needed, with 2x selected in this instance.
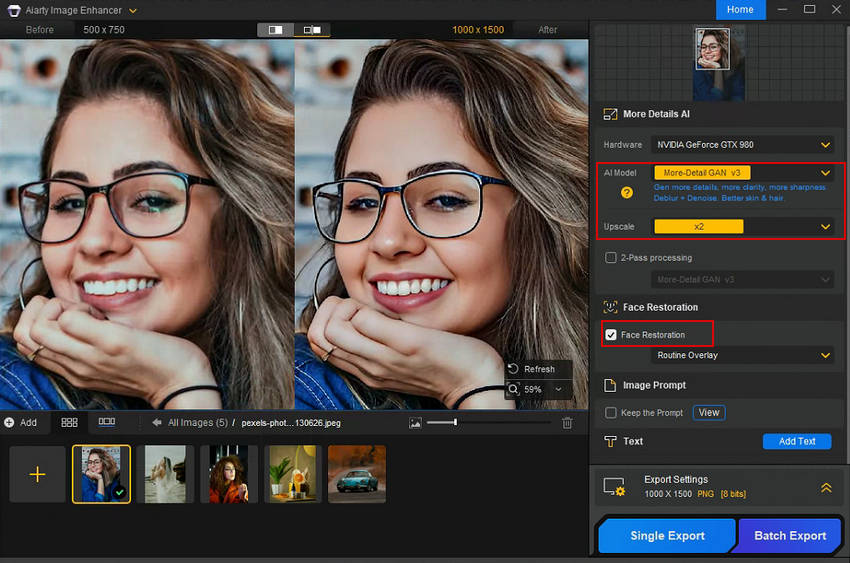
Step 3. Tick on the option of Face Restoration. This will help you reserve the underlying details like eyes.
Step 4. Wait for the AI automatic interferring and enhancing process done. Click Single Export or Batch Export to save the removed glare images individually or bulkly as needed.
Tips to Prevent Glare on Glasses Before Taking Photos
Prevention is better than cure. Before you even think about removing glare from glasses, taking a few proactive steps during your photoshoot can significantly reduce the amount of glare on glasses, saving you valuable time and effort in post-processing. Here are some tips to better initial results and a more natural look in your final images:
1. Adjust the Light Source – Position lights to avoid direct reflection:
The angle of your light source is a primary culprit for glare. Experiment with repositioning your lights (whether natural or artificial) so they are not directly hitting the subject's glasses head-on. Try angling the lights to the side, slightly above, or even behind the subject to minimize direct reflections bouncing back into the camera lens. Diffusing the light source with softboxes or umbrellas can also help to reduce harsh reflections and create a softer, more even illumination.
2. Change the Subject’s Angle – Slight head tilts can help minimize glare:
Even subtle adjustments to your subject's pose can make a big difference. Encourage them to slightly tilt their head up, down, or to the side. These minor changes in angle can often shift the reflection away from the camera's line of sight. Observe the glasses through your viewfinder or on the camera screen as you make these adjustments to find the position that minimizes glare.
3. Use a Polarizing Filter – This can cut down reflections significantly:
A polarizing filter is a valuable tool for photographers dealing with reflective surfaces like glass. This filter attaches to the front of your lens and can be rotated to selectively block polarized light waves, which are often the cause of glare. By rotating the filter, you'll see the glare diminish or disappear in your viewfinder or on the LCD screen. Remember that polarizing filters work best when the light source is at a roughly 45-degree angle to the reflective surface.
4. Opt for Anti-Glare Glasses – Special lens coatings can reduce unwanted reflections:
If you frequently photograph individuals who wear glasses, it's worth discussing the option of anti-glare (also known as anti-reflective or AR) lens coatings with them. These coatings are specifically designed to minimize unwanted reflections on the lens surface, allowing more light to pass through to the eye and reducing the likelihood of glare appearing in photographs.
Conclusion
If you've already got glare on your glasses in a photo, don't worry, just remove it. While Photoshop's detailed control is a boon for professional retouchers, the reality is that many users simply need a fast and easy way to eliminate glare from glasses. For this purpose, Aiarty Image Enhancer is the definitive best choice. Its automatic AI detection and removal capabilities bypass the time-consuming manual processes of Photoshop, delivering excellent results with minimal effort.
If your priority is quick, hassle-free glare removal, look no further than Aiarty Image Enhancer.
 FAQs
FAQs
The Clone Stamp Tool and Healing Brush Tool are best for minor glare, while the Patch Tool and Frequency Separation work well for larger glare areas.
Yes! Aiarty Image Enhancer can automatically detect and remove glare, making it a great alternative for quick edits.
Adjust lighting, change angles, use a polarizing filter, or choose anti-reflective glasses.
Ensure smooth blending, use a soft brush, adjust color tones, and apply layer masks for a more natural effect.
External sources:
- "Photographing People With Glasses – How To Avoid Glare in Eyeglasses". Written by Joe Edelman
- "Need to remove light glare in glasses. Is there any hope for me?". r/premiere from Reddit
You May Also Like
This post was written by Brenda Peng who is a seasoned editor at Digiarty Software who loves turning ordinary photos into extraordinary works of art. With AI assistance for brainstorming and drafting, the post is reviewed for accuracy by our expert Abby Poole for her expertise in this field.