Blending two images seamlessly is essential for photo editing, digital art, and graphic design. Photoshop offers powerful tools to merge images effortlessly for professional users. With features like Layer Masks, Blend Modes, and Opacity adjustments, you can create smooth transitions between images. Learn how to blend two images in Photoshop and troubleshoot common blending issues.
Too complicated? Any tips for making it look more natural easily? Have you ever encountered similar Photoshop blending frustrations to what Reddit fellows reported? Before proceeding, let’s explore some common issues and solutions for blending two images in Photoshop.
💡 Issues When Blending Two Images in Photoshop
- Complicated, at least 9 steps are required, with lots of adjusments.
- Misaligned edges or inconsistent textures make the merge look artificial.
- Default blending modes may not always create seamless results, requiring manual adjustments.
- High-resolution images can slow down processing, making blending operations sluggish.
Want to blend images seamlessly with precise control over colors, textures, and edges?
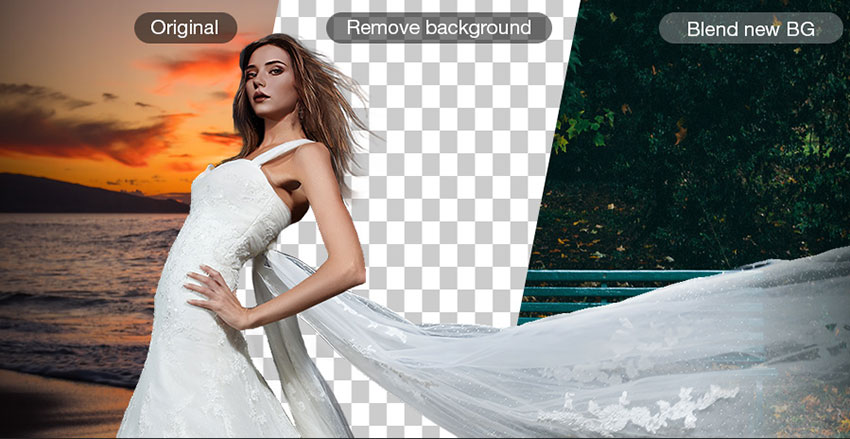
Only 4 steps! Aiarty Image Matting uses advanced AI to remove background, match background colors, and refine edges for foreground-background blending. It supports high-resolution blending in batch, making it ideal for individuals, designers, and photographers. It streamlines workflows with high-precision alpha matting.
Get Aiarty Image Matting and blend images with seamless precision:
How to Blend Two Images in Photoshop: A Step-by-Step Guide
Blending two images seamlessly in Photoshop allows you to create stunning compositions, double exposures, or smooth transitions between scenes. Whether you're merging landscapes, combining portraits, or creating artistic effects, Photoshop offers powerful tools to achieve professional results. This guide will walk you through the process step by step, using layer masks, gradients, and brush techniques to ensure a natural blend.
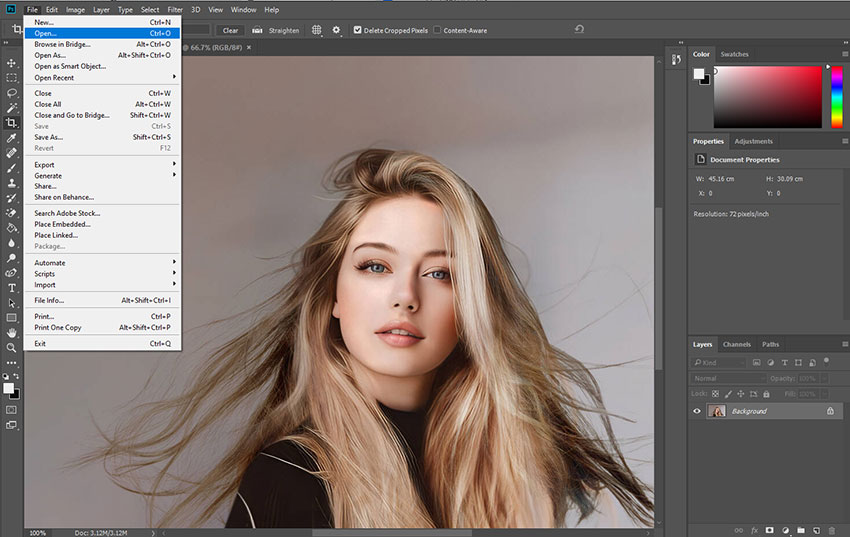
Step 1: Open Both Images in Photoshop
Launch Adobe Photoshop and open the two images you want to blend. Go to File > Open, select the images, and click Open. Each image will appear as a separate tab in Photoshop.
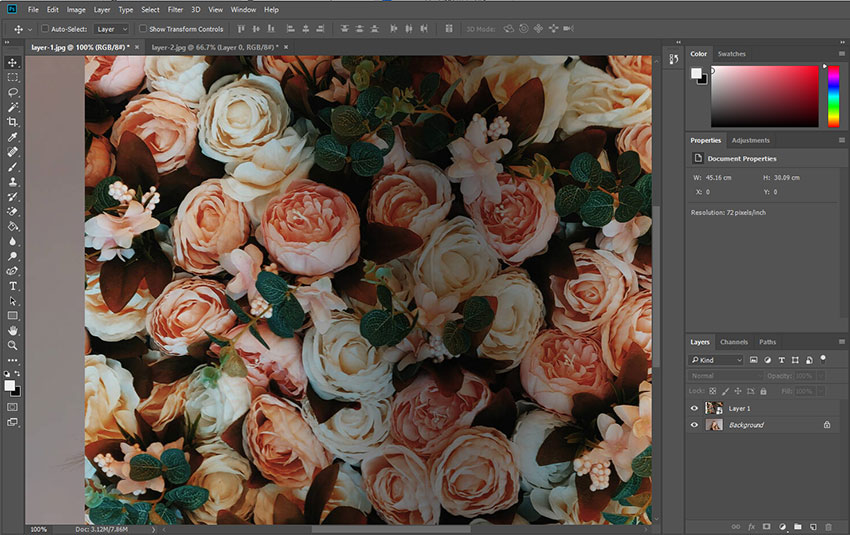
Step 2: Move Both Images to the Same Document
To blend them, place both images in the same document. The copied image will appear as a new layer in the Layers panel. From here, you can adjust the layer's position, size, and opacity, and apply various blending modes to achieve the desired effect.
- Select one image, press Ctrl + A (Windows) or Cmd + A (Mac) to select all, then press Ctrl + C (Windows) or Cmd + C (Mac) to copy.
- Switch to the other image’s tab and press Ctrl + V (Windows) or Cmd + V (Mac) to paste.
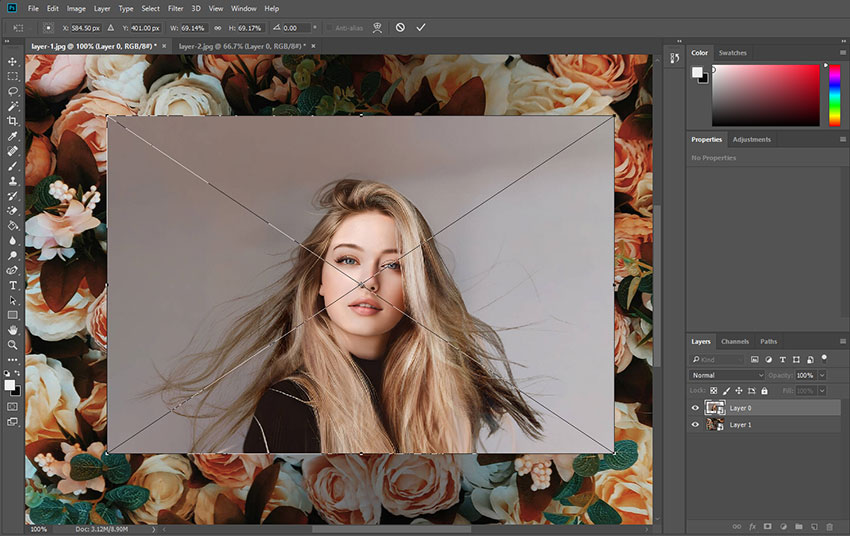
Step 3: Adjust the Image Placement
Ensure both images are aligned properly after blending in Photoshop. You can use the following ways to adjust the image replacement as you wish in Photoshop.
- Select the Move Tool (V) from the toolbar and drag the top layer to position it as needed.
- If required, resize it by pressing Ctrl + T (Windows) or Cmd + T (Mac), then dragging the corners while holding Shift to maintain proportions.
Read also: How to Extend Background in Photoshop? 4 Ways Here.
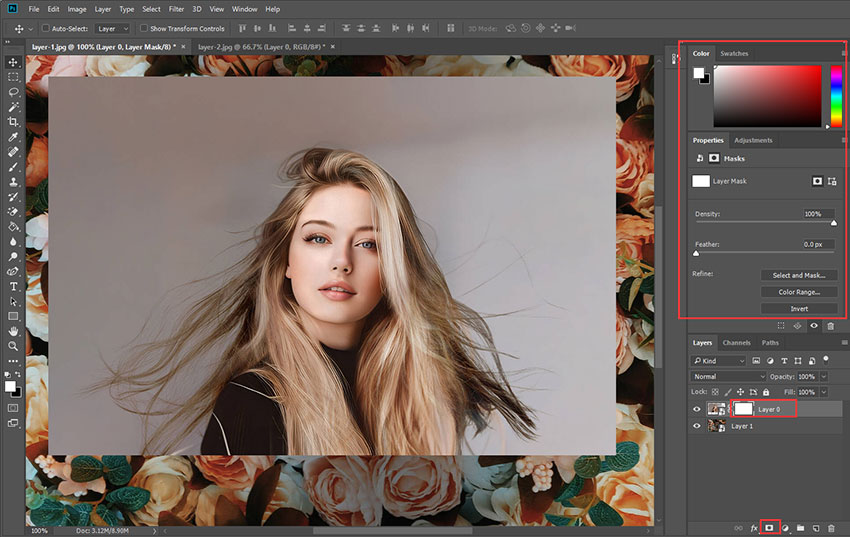
Step 4: Apply a Layer Mask
To blend the images smoothly, use a layer mask. Select the top layer and click the Add Layer Mask button at the bottom of the Layers panel. A white mask thumbnail will appear next to the layer.
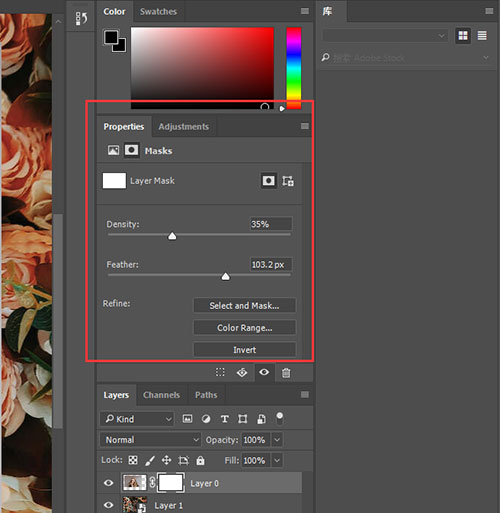
Step 5. Refine a Layer Mask in the Properties Panel
To fine-tune a layer mask, first, select it in the Layers panel. Then, use the adjustment options available in the Properties panel. (If the Properties panel is not visible, go to Window > Properties to enable it.)
- Adjust the Density slider by dragging it to the left to make the mask more transparent, revealing hidden parts of the masked layer.
- To soften the edges of the layer mask and blend it more seamlessly with the background, increase the Feather value by moving the slider to the right.
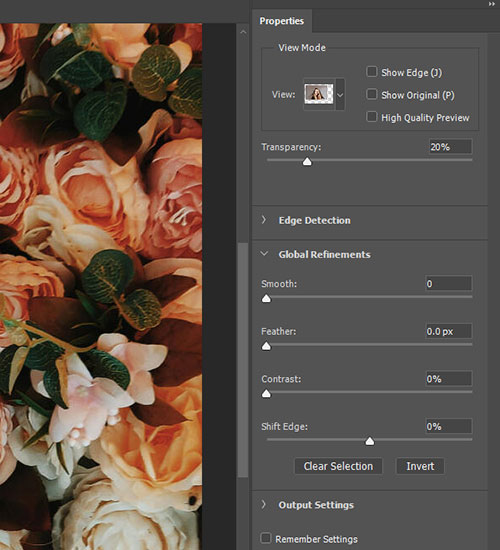
Step 6. Refine Mask Edges in the Select and Mask Workspace
Click the Select and Mask button in the Properties panel to open the Select and Mask workspace.
- Select the Refine Edge Brush Tool from the left toolbar and brush along the object’s edges to refine the mask.
- Use the Brush Tool, ensuring the Plus (+) icon is active at the top of the workspace, to reveal areas of the image. Switch to the Minus (-) icon to conceal unwanted areas.
In the Properties panel on the right:
- Increase the Smooth slider to soften the mask’s edges.
- Adjust the Contrast slider to make the edges crisper.
- Use the Shift Edge slider to shift the mask edge inward (left) to remove unwanted fringe or outward (right) to expand the selection.
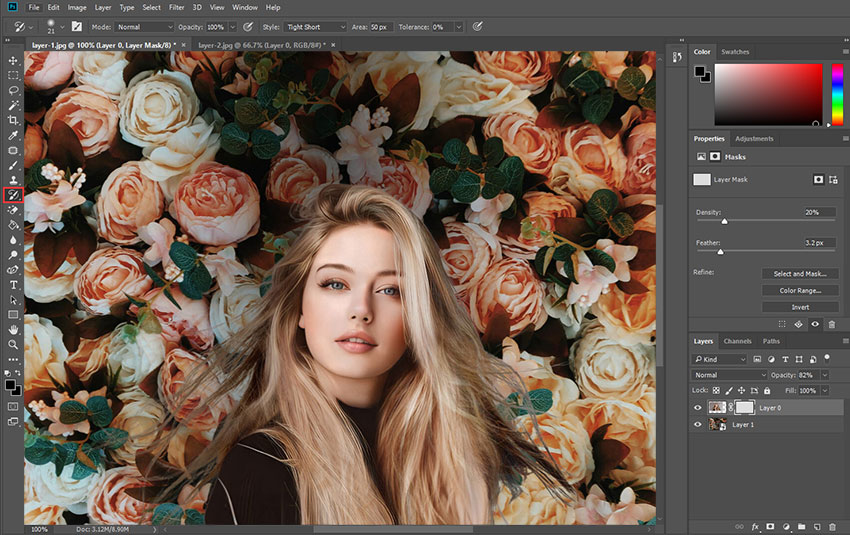
Step 7: Refine the Blend with a Soft Brush
If needed, further refine the blending with the Brush Tool (B). Set the foreground color to black and paint on the mask to hide parts of the top image. Use a soft, low-opacity brush for a natural blend.
Step 8: Adjust image further
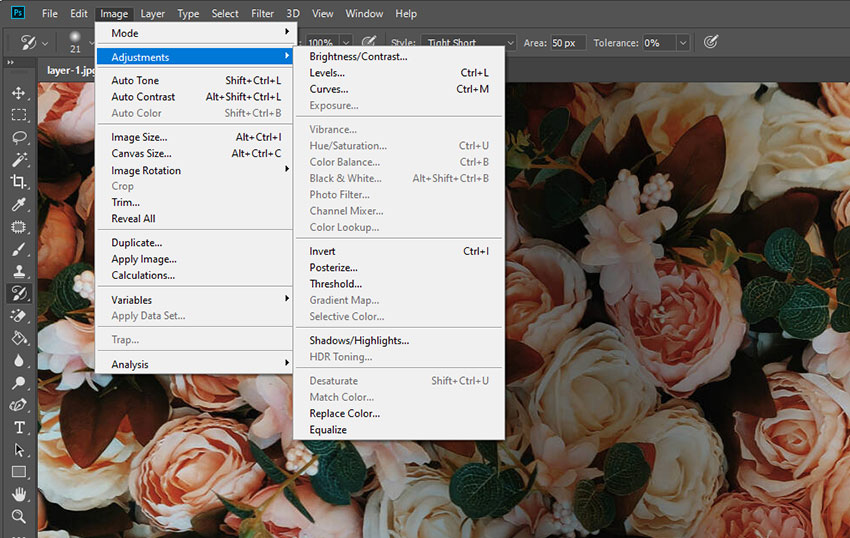
To fine-tune the blending, adjust the layer opacity in the Layers panel. For color consistency, use Image > Adjustments to make both images blend more seamlessly.
Step 9: Save the Final Image
Once satisfied with the blend, save your work. Go to File > Save As and choose PSD to keep layers editable. To export as a final image, select JPEG or PNG.
How to Blend Two Images More Effectively Than Photoshop?
Learing how to blend two images in Photoshop is often a complex, multi-step process demanding hours of precise selections, masking, and blending, requiring significant skill.
Aiarty Image Matting revolutionizes this task, offering a streamlined solution powered by AI. With just 4 simple steps and within a minute, it delivers professional-quality results: one-click background removal, refined edge detection even for complex details, and seamless background replacement.
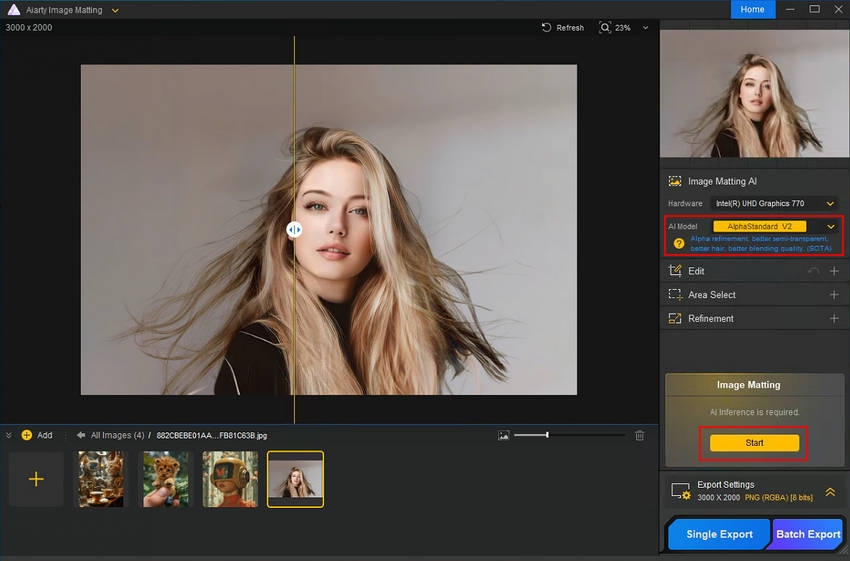
Step 1. Get Aiarty Image Matting by downloading and installing it. Open the software and drag your photo(s) into the workspace.
Step 2. Select an AI model and hit "Start" to let AI automatically remove the background. Adjust edges using the Alpha Mask curve or manual tools if necessary.
Step 3. Enable the “Background” option under “Effect.” Pick a solid color or upload a custom background to enhance your image.
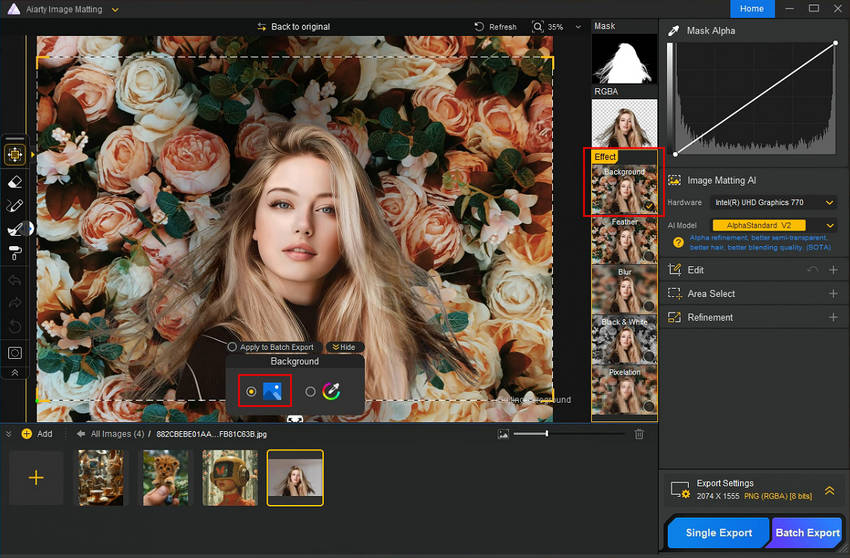
Step 4. Open the Export Settings to set the file format, quality, and save location. Click “Single Export” for one image or “Batch Export” to process multiple files at once.
Conclusion
While Photoshop offers blending tools, achieving truly seamless image merges is often hindered by lighting discrepancies, edge misalignment, deep learing curve, and processing limitations. Aiarty Image Matting addresses these issues with AI-powered background removal, ease of use, and edge refinement. By supporting high-resolution blending and batch processing, it offers a streamlined, efficient solution for creating natural-looking compositions, surpassing the limitations of manual Photoshop techniques.
 FAQs: Blending Images in Photoshop
To blend images, place them on separate layers. Use layer masks to selectively reveal or hide parts of each image. Adjust blending modes (e.g., Overlay, Soft Light) for different effects. For detailed steps, check Adobe's official tutorials or Photoshop forums like the Adobe Support Community.
Common issues include mismatched lighting and color tones, visible edges, and unnatural transitions. These can be addressed using color correction, feathering masks, and adjusting blending modes. Many Photoshop forums discuss these problems and provide solutions.
Use the Refine Edge tool or refine layer masks with a soft brush. Feathering the mask edges helps smooth transitions. For complex edges, consider using the Pen tool for precise selections. Check Photoshop user forums for advanced edge refinement techniques.
Use adjustment layers like Curves, Color Balance, or Match Color. Experiment with these tools to harmonize colors. For advanced color matching, explore tutorials on color grading in Photoshop, often discussed in photography and design forums.
You May Also Like
This post was written by Brenda Peng who is a seasoned editor at Digiarty Software who loves turning ordinary photos into extraordinary works of art. With AI assistance for brainstorming and drafting, the post is reviewed for accuracy by our expert Abby Poole for her expertise in this field.