How to Extend Background in Photoshop? 4 Proven Ways Here
Updated on
When working with photos, especially for design projects or social media posts, you might find yourself in need of extending the background. Whether you're adjusting the composition, adapting to different platform sizes, or enhancing the overall look, Photoshop offers several powerful methods for extending the background. In this guide, we will explore the most common methods to expand background in Photoshop, as well as how AI tools like Aiarty Image Matting can enhance your workflow and provide even more precise results.

Aiarty Image Matting is the perfect companion for extending backgrounds in Photoshop. It enhances the quality of subjects, isolates the subject and background with precision, replaces backgrounds seamlessly, and ensures no edge issues for incredibly natural results.
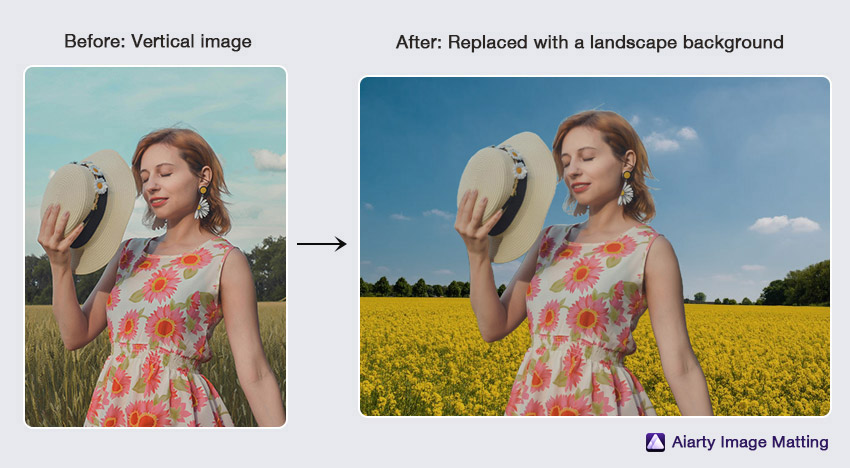
Key Features of Aiarty Image Matting:
- Extract any subjects and seamlessly blend with likewise backgrounds.
- Delicate AI models tailored to handle intricate details like hair and fur.
- Advanced alpha matting for precise subject isolation & edge refinement.
- Upscaling for enhanced resolution, up to 4K/8K/10K. Keep fine details and clear edges.

Part 1. How to Extend Background in Photoshop
Extending the background of an image is often necessary for various creative reasons. You might want to adjust the composition, make room for text or additional elements, or even modify the image for a different aspect ratio. Photoshop is an excellent tool for this purpose due to its wide range of features and flexibility.
In recent years, artificial intelligence (AI) tools have made the background extension process much faster and more efficient. While Photoshop remains the primary tool, incorporating AI solutions can provide smoother, more natural-looking results.
In this guide, we’ll explore various techniques to extend the background while preserving your subject and ensuring a seamless result.
1. Using Content-Aware Scale
Photoshop's Content-Aware Scale tool employs AI to intelligently analyze an image and identify areas with minimal detail, typically the background. By recognizing these regions, the tool can expand them while meticulously preserving the sharpness and detail of the foreground subject. This powerful tool demonstrates its greatest effectiveness when applied to images featuring simple backgrounds characterized by uniform colors, subtle textures, or repetitive patterns. Furthermore, optimal results are achieved when the background lacks intricate details that could hinder the AI's analysis and when the subject of the image is clearly defined and easily distinguishable from the surrounding background.
Tutorial to Extend Background in Photoshop Using Content-Aware Scale
Step 1. Open your image that you want to extend its background in Photoshop.
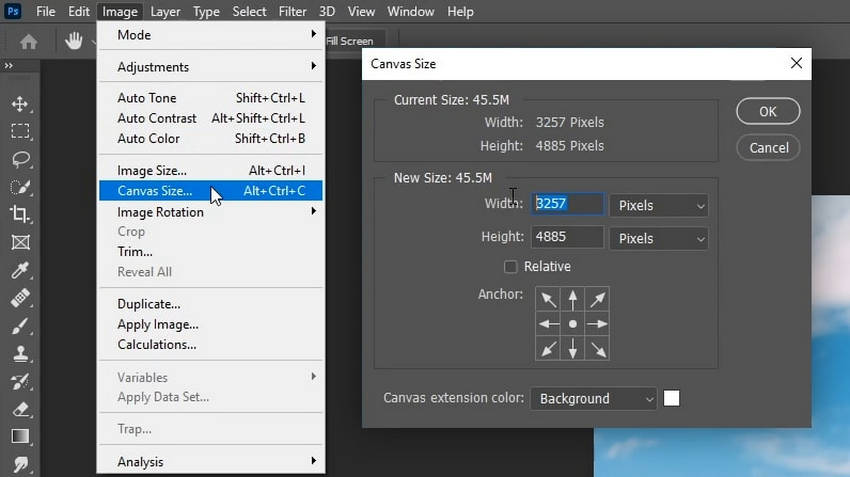
Step 2. Click on the "Image" tab in the menu bar, then select "Canvas Size" from the dropdown menu. Then a dialog box pops for you to adjust the canvas size, check the "Relative" option and enter the desired width value for your new image.
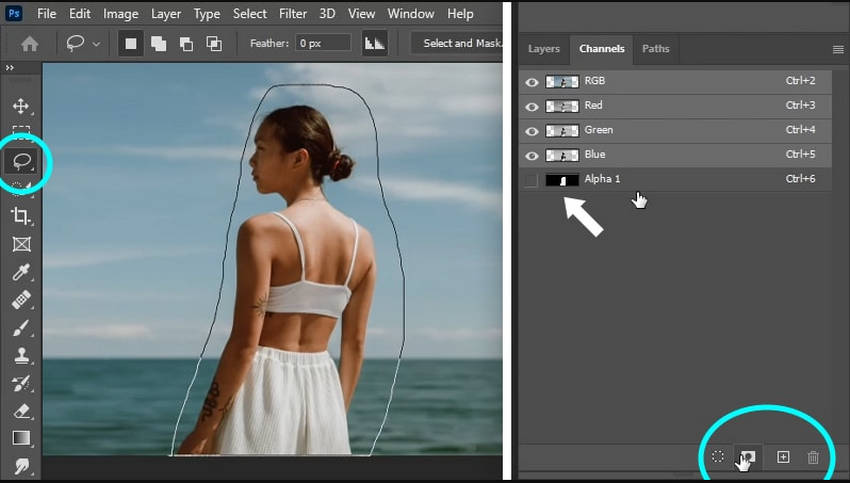
Step 3. Use the Lasso tool to roughly outline the subject within your image. Right-click within the selection and choose "Save Selection." In the dialog box, rename the selection and save it to a "New Channel" instead of a layer for future use.
Step 4. Go to “Edit” in the Photoshop menu bar, and choose Content-Aware Scale from the drop-down menu.
Step 5. Before scaling, locate and activate the "Protect" section in the toolbar. In the "Protect" section, select the channel you previously saved containing the subject's selection.
Step 6. Now, you can freely extend the background by dragging the handles around the image. The "Protect" function will ensure that the subject remains undistorted during the scaling process.
Key advantages
- Preserves Important Elements: Protects subjects (e.g., people, objects) from distortion while extending the background.
- Intelligent Background Extension: Automatically fills extended areas naturally based on surrounding pixels.
- Quick and Efficient Workflow: Fast, automated process without the need for manual cloning or painting.
- Customizable Protect Areas: Allows you to protect specific elements from distortion for better control over the edit.
Content-Aware Scale is the ideal choice for quickly and easily extending simple backgrounds with minimal effort, offering a time-efficient solution for expanding images with uniform colors, subtle textures, or repetitive patterns.
For more: How to crop an image in Photoshop to adjust composition >>
2. Using Content-Aware Fill
Content-Aware Fill is a powerful and intuitive tool within Adobe Photoshop that revolutionizes image editing. It leverages sophisticated algorithms to intelligently analyze the surrounding pixels within an image and seamlessly fills in selected areas with visually plausible content. This remarkable functionality proves invaluable for background extension. It seamlessly extend existing backgrounds, such as a sky or a landscape, to create larger compositions or remove unwanted elements.
Step-by-step guide to extend background using Content-Aware Fill in Photoshop.
Step 1. Open your image in Photoshop.
Step 2. Use the Crop Tool to extend the canvas size by dragging the borders outward.
Step 3. Select the area you want to fill (the newly created space).
Step 4. Go to Edit > Content-Aware Fill. Or right-click to choose Fill, then drop down the list of Contents to select Content-Aware option and tap OK.
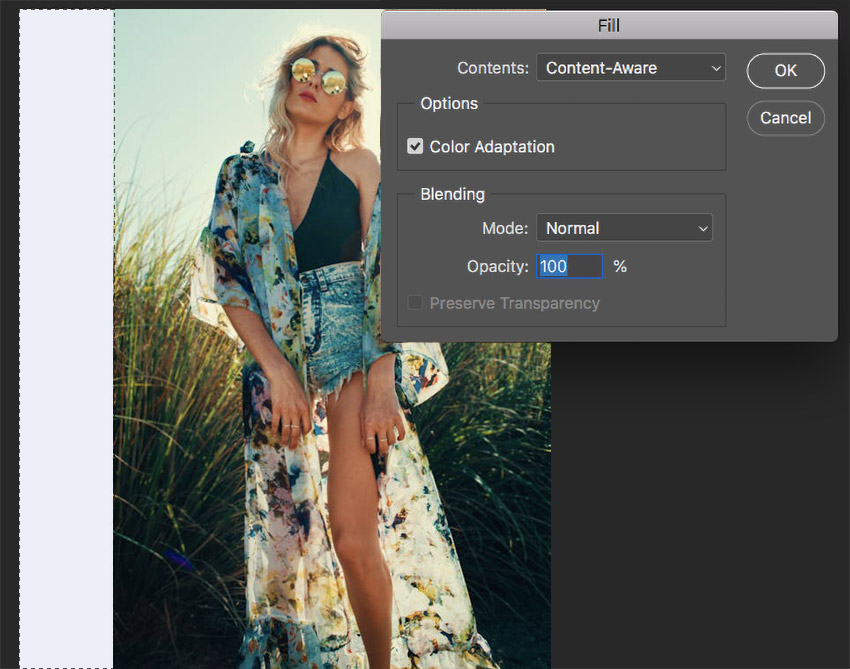
Step 5. Photoshop will automatically fill the space with a background that blends seamlessly with the rest of the image.
Key Advantages:
- Intuitive and User-Friendly: The tool is remarkably easy to use, requiring minimal user input and technical expertise.
- Time-Saving: Automates a complex and time-consuming process, significantly accelerating image editing workflows.
- High-Quality Results: Often produces highly realistic and natural-looking results, making it an indispensable tool for professional and amateur photographers alike.
In essence, Content-Aware Fill represents a significant advancement in image editing technology, empowering users to achieve professional-quality results with unprecedented ease and efficiency.
3. Using Clone Stamp Tool
The Clone Stamp Tool offers precise control over background extension. By selecting a source area within the existing background and "cloning" its pixels, you can meticulously "paint" these replicated elements into empty spaces. This manual approach allows for fine-tuning brush size, opacity, and sampling points to achieve a seamless and natural extension, especially valuable for intricate or unique backgrounds that may not be suitable for automated methods.
Detailed steps for extending background using Clone Stamp tool.
Step 1. Choose the Clone Stamp Tool from the toolbar (or press the "S" key).
Step 2. Hold down the Alt key (or Option key on Mac) and click on the part of the existing background you want to use as the source for cloning. This defines the area that will be sampled and replicated.
Step 3. Release the Alt key and carefully "paint" over the empty space where you want to extend the background. As you paint, the tool will replicate the source pixels, effectively extending the background.
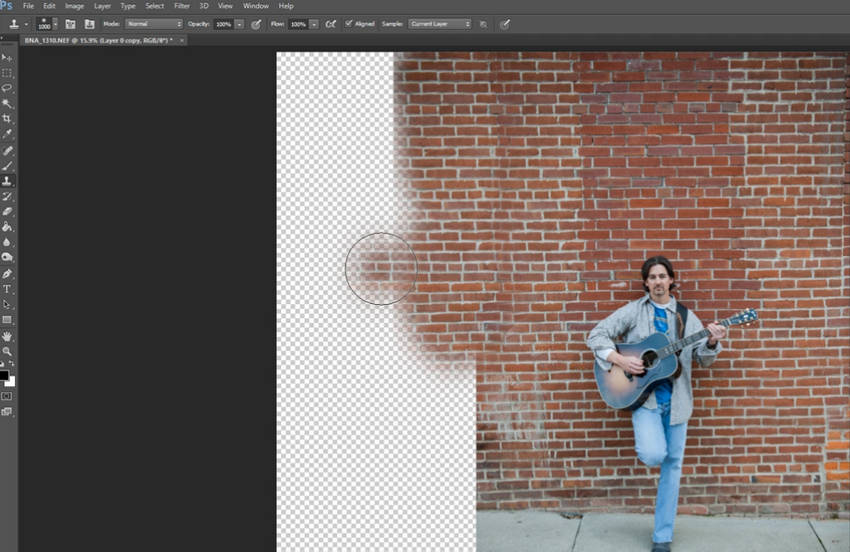
Step 4. Fine-tune the brush settings for optimal results. Adjust the brush size to match the scale of the area you're cloning. Experiment with brush hardness to control the transition between the cloned area and the original background. Adjust opacity to control how strongly the cloned pixels are applied.
Step 5. Continue the cloning process, adjusting the source point and brush settings as needed to achieve a seamless and natural-looking extension. You may need to repeat these steps multiple times to refine the extension and ensure a smooth transition.
Key advantages
- Full Control: Precisely manipulate background elements, achieving unique and customized results.
- Ideal for Complex Backgrounds: Effectively handles intricate patterns, textures, and varying colors.
The Clone Stamp Tool offers unparalleled control for extending complex backgrounds by allowing users to meticulously replicate and "paint" existing background elements, providing superior results for intricate patterns and textures that may be challenging for automated methods.
4. Using Generative Expand (Update Adobe MAX 2024)
Generative Expand is a revolutionary AI-powered feature within Adobe Photoshop that allows users to seamlessly expand the background of an image. Unlike traditional methods of background extension, which often require manual labor and intricate techniques, Generative Expand utilizes Adobe's cutting-edge generative AI technology to intelligently analyze the existing image content.
This analysis enables the tool to generate new background content that seamlessly blends with the original image, creating a natural and visually convincing extension. By understanding the patterns, textures, colors, and overall composition of the image, Generative Expand effectively "predicts" and creates plausible new elements that extend the scene in a realistic manner.
How to expand a background using Generative Expand in Photoshop
Step 1. Open your image in Photoshop.
Step 2. Unlock the background layer if it’s locked.
Step 3. Use the Crop Tool to extend the canvas by dragging the borders outward.
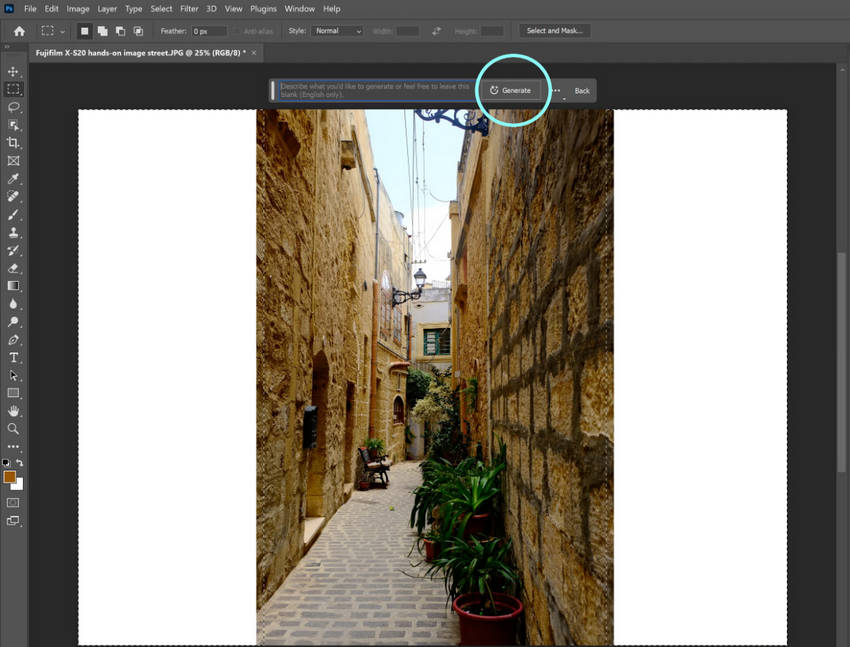
Step 4. Click on the marquee tool, and select the areas outside of the original image. Make sure to slightly overlap your selection over the original image.
Step 5. Click Generate in the Contextual Task Bar to fill your expanded canvas with newly generated content that blends seamlessly with the original image.
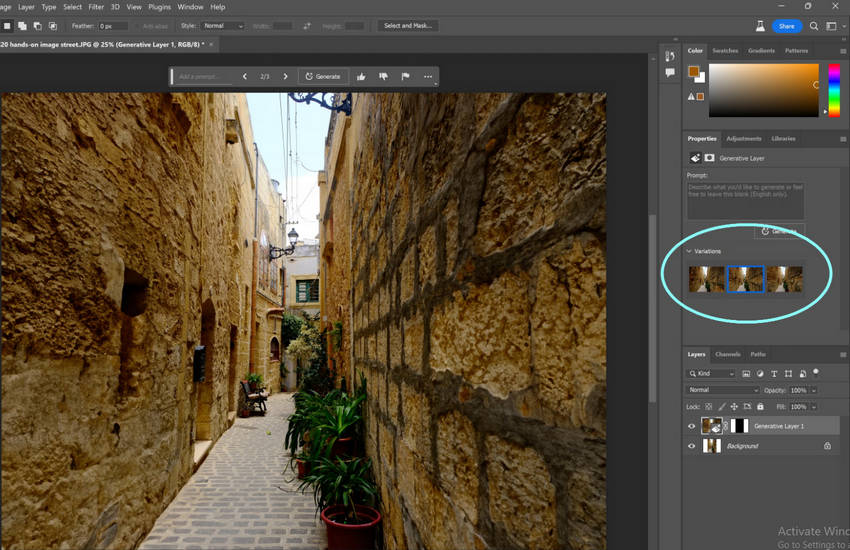
Step 6. Click through the variation options in the Contextual Task Bar or Properties panel to choose the one you like best. You can also tweak the area by providing a brief description of the scene or adjusting the results manually.
Key advantages
- Seamless Integration: The generated background seamlessly integrates with the existing image, minimizing any noticeable transitions or artifacts.
- Creative Flexibility: Users can easily expand the canvas in any direction and explore various creative possibilities, such as increasing the scale of a landscape or adding more space around a subject.
- Time-Saving: Automates a complex and time-consuming process, significantly accelerating image editing workflows.
- Enhanced Creativity: Unleashes new creative potential by enabling users to effortlessly manipulate and expand their images in ways previously unimaginable.
Generative Expand represents a significant leap forward in image editing technology, empowering users to achieve professional-quality results with unprecedented ease and creativity.
Part 2. Fine-tune Your Work to Improve Its Quality
While Photoshop offers powerful tools for extending backgrounds, sometimes the results may require extra refinement, especially if you're dealing with intricate details or fine edges. This is where AI tools like Aiarty Image Matting come in.
Here are some adjustments you can make with it:
1. Remove improper background
Aiarty Image Matting excels at precisely isolating subjects from their original backgrounds. It employs advanced AI algorithms to accurately identify the subject's edges and create a clean, professional-looking cutout. This is invaluable for removing unwanted backgrounds, such as distracting elements, clutter, or imperfections.

2. Replace with another likewise background
Once the subject is isolated, Aiarty Image Matting makes it incredibly easy to seamlessly place the subject onto a new background. The precise subject isolation ensures a smooth and realistic integration with the new backdrop. This background changer opens up a world of creative possibilities, allowing you to reimagine your images in new and exciting ways, such as placing a person on a different location, integrating products into different scenes, or creating artistic composites.

3. Enhance the resolution of your image
Aiarty Image Matting can be used to enhance the resolution of your subject. By isolating the subject from the background, you can upscale the subject independently. This allows you to increase the overall resolution of the image without compromising the quality of the subject itself, resulting in sharper details and a more professional appearance.

Get Aiarty Image Matting to have a free try!
Conclusion
Extending the background in Photoshop doesn’t have to be a difficult task. Whether you’re using basic tools like Content-Aware Fill or more advanced AI-driven options like Photoshop’s Generative Expand, there are plenty of ways to extend your background and improve your image’s composition.
For more complex scenarios, where fine details and precise adjustments are needed, tools like Aiarty Image Matting can be incredibly helpful. By combining Photoshop’s editing features with AI-powered solutions, you can achieve professional results faster and with greater accuracy.
Experiment with different methods, and don’t be afraid to integrate multiple tools to get the best results for your specific project.
 FAQs
FAQs
To protect the subject from distortion, use the Content-Aware Scale tool and select the Protect option. You can paint over areas like the subject to preserve their proportions while extending the background.
Yes, you can manually extend the background using the Clone Stamp Tool or Healing Brush Tool. These tools allow you to clone parts of the existing background and blend them into the extended area.
The background may look unnatural if the content-aware tools don’t correctly analyze textures or lighting. In such cases, manually adjusting the area with tools like the Clone Stamp or Healing Brush can improve the result.
Yes, Photoshop allows non-destructive editing, so you can easily undo or modify any background extensions by using layers or the History Panel.

