Feathering is a crucial Photoshop technique, used by 89% of Adobe users[1], that softens edges and blends selections smoothly for seamless compositions. This significantly enhances image quality in various tasks, including portrait editing, graphic design, and background removal. It plays a vital role in eliminating hard shadows from items like jewelry and glass, creating natural transitions in hair and skin, and producing smooth transparent backgrounds for posters and banners.
In this guide, we’ll walk you through how to feather in Photoshop step by step, and introduce a faster and more efficient AI-powered solution - Aiarty Image Matting to address potential challenges encountered with Photoshop's feathering technique.
💡 Mastering Feathering in Photoshop: Best Practices and Common Pitfalls
Photoshop offers precise feathering for seamless edges, but manual adjustments can be slow for many images or complex selections.
- Steep Learning Curve: Understanding feather radius, layer masking, and refining edges requires practice.
- Limited Batch Efficiency: Photoshop’s manual approach makes large-scale processing labor-intensive.
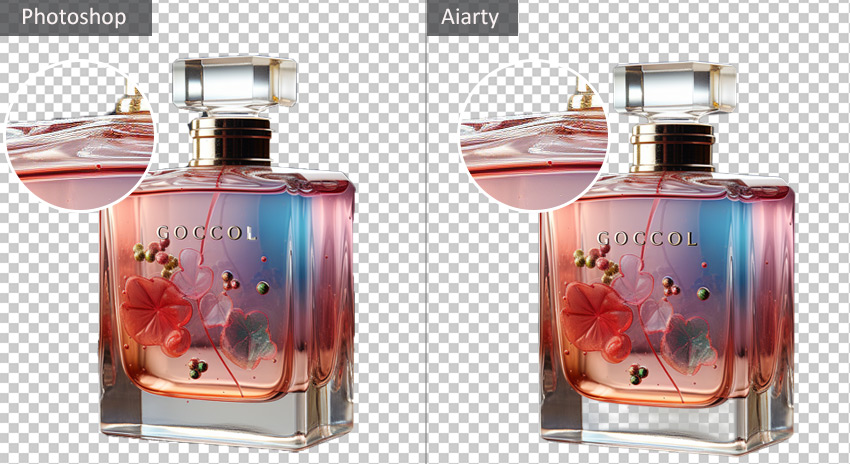
- Edge Consistency Challenges: Variability in selection complexity can result in white halos or hard edges[2], requiring extra refinements.
For those handling bulk edits or seeking AI automation, consider this AI Co-Pilot for Photoshop.
Designed to enhance your inefficient feathering workflow with Photoshop, Aiarty Image Matting uses AI for accurate background removal and intelligent automatic feathering, eliminating white borders and ensuring natural transitions. This auto process saves time and effort with batch processing, complementing Photoshop's feathering capabilities for high-quality results.
Free download Aiarty Image Matting for automatic feathering with AI.
How to Feather in Photoshop (Step-by-Step Guide)
Want to soften those harsh selection edges in Photoshop? You've come to the right place. This step-by-step guide will show you exactly how to use Photoshop's feathering tools to achieve smooth and natural transitions in your images.
1. Using the Feather Selection Tool
For a quick and straightforward approach to softening selection edges in Photoshop, the Feather Selection Tool offers the most direct method. This is particularly useful for creating subtle blends or softening the outline of a relatively simple selection.
Step 1. Open your image in Photoshop, then start by importing the image you want to edit.
Step 2. Use any selection tool to choose the area you want to feather. Here are some options:
- Elliptical/Rectangular Marquee Tool – For circular and rectangular selections.
- Lasso Tool – For freehand selections.
- Magic Wand Tool – For selecting similar-colored areas.
- Pen Tool - For precise selection of complex elements.
Step 3. Go to Select > Modify > Feather or press Shift + F6 to apply feathering.
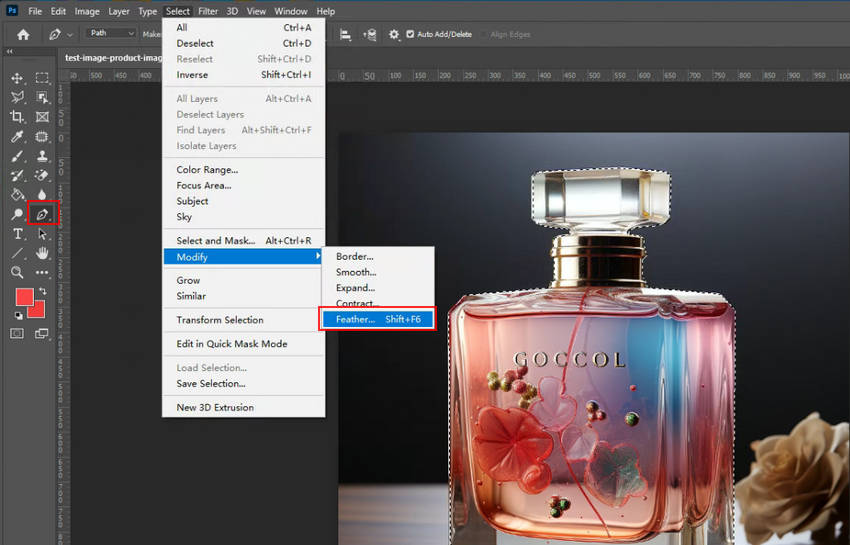
Step 4. Adjust the feather radius[3] according to your needs.
- For web images, set the radius between 2-5 pixels.
- For print images, use the formula: Feather Radius (px) = DPI ÷ 50.
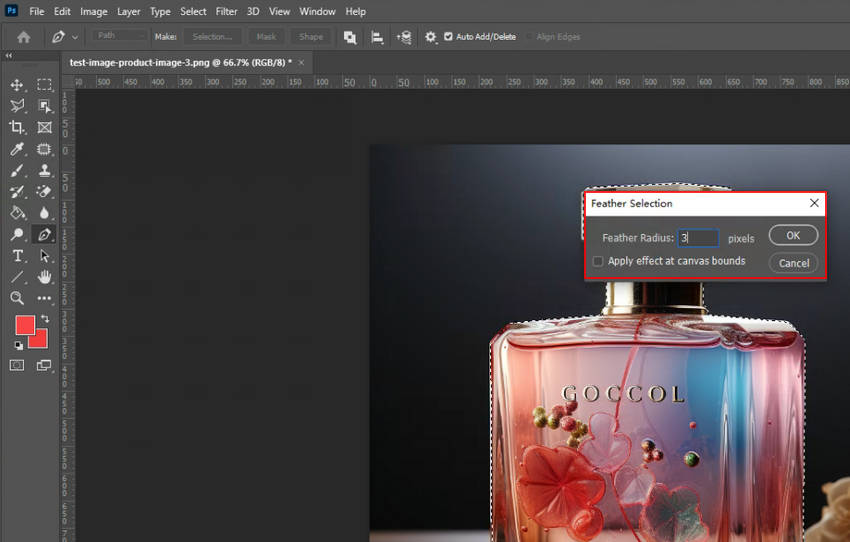
Step 5. Press OK to confirm and refine the selection, and you'll see a softer selection border.
2. Using Layer Masks and Blur for Advanced Feathering
For situations demanding finer control over the feathering effect, the combination of Layer Masks and Gaussian Blur offers a powerful and precise technique. This method allows for non-destructive editing, enabling you to adjust the feather amount and shape even after it's been applied.
Step 1. Create a selection and add a Layer Mask. You can make this done by using the Quick Selection Tool or Pen Tool to define the subject. Then click Layer > Layer Mask > Reveal Selection.
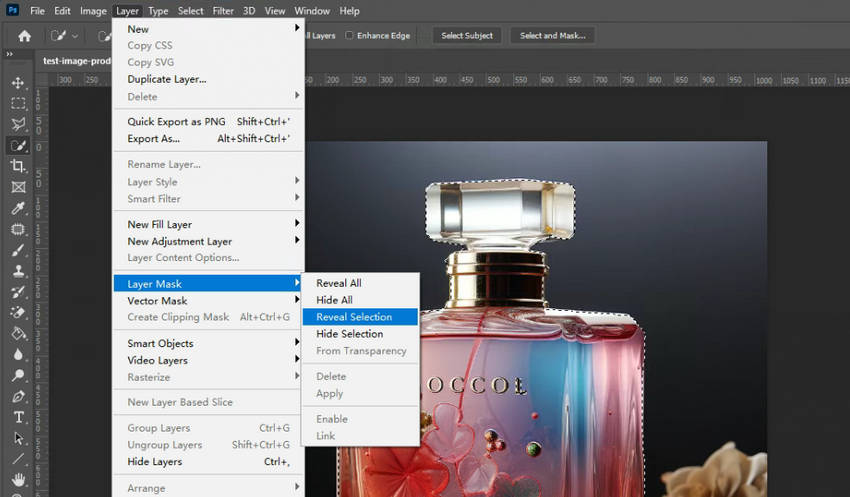
Step 2. Apply Gaussian Blur for smoother edges. Just select the layer mask. Go to Filter > Blur > Gaussian Blur and adjust the intensity as you prefer.
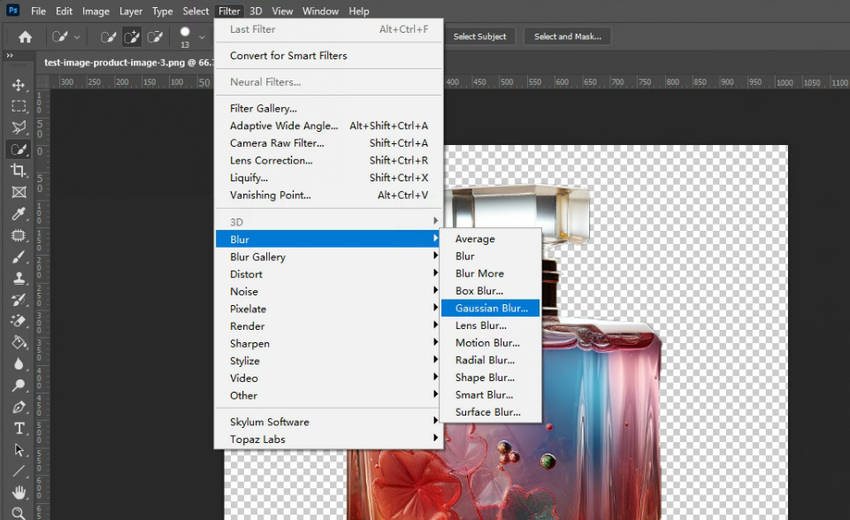
This technique is best suited for portrait retouching, where it allows for a natural softening of skin edges, avoiding harsh lines and creating a more flattering and professional look. It's also ideal for blending images, enabling the seamless integration of adding new backgrounds or the combining multiple images by creating smooth transitions between the different layers, ensuring a cohesive and believable final result.
3. Using the Refine Edge Tool for Complex Selections
When dealing with subjects featuring complex details like hair strands, fur texture, or other intricate edge work, the Select and Mask tool in Photoshop offers significantly enhanced control over the selection and subsequent feathering process. Its dedicated workspace and specialized refinement brushes allow for precise manipulation of these challenging areas.
Step 1. Use any selection tool to select the subject, then click Select and Mask.
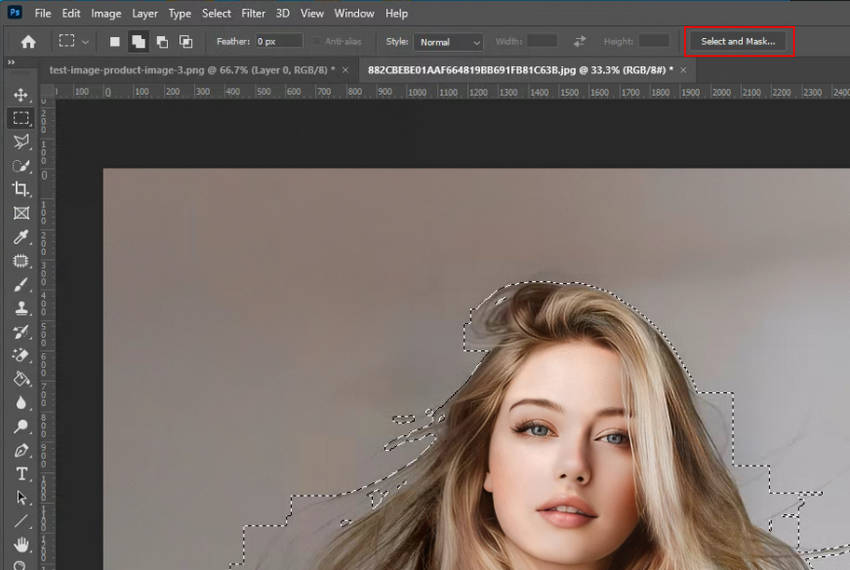
Step 2. Adjust feathering and edge properties. At the left panel, increase the Feather slider for softer transitions. You can also adjust Smooth and Contrast for sharper details.
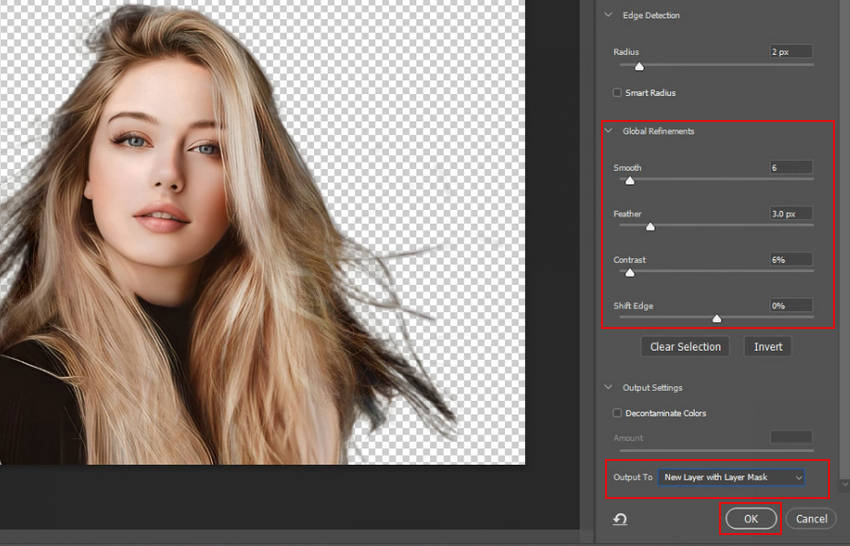
Step 3. Output the selection Choose New Layer with Layer Mask for non-destructive editing.
Tired of Cumbersome Photoshop Feathering? Aiarty Saves The Day
Frustrated by Photoshop's complex and time-consuming feathering? Tired of manual adjustments and unpredictable results, especially with intricate edges or batch processing? If you're looking for a simpler, faster, and more reliable way to achieve perfect feathered selections, it's time to explore the AI-powered solution: Aiarty Image Matting.
Why Aiarty Image Matting Excels at Feathering:
- AI Automatic Feathering: Utilizing a deep-learning AI model, Aiarty intelligently detects and refines edges, applying optimal feathering to diverse materials like hair, metal, and glass.
- Seamless Blending with Backgrounds: Aiarty's intelligent feathering ensures smooth, natural subject integration, eliminating harsh edges for professional composites.
- One-Click & Batch Processing: One-click to apply feathering for batch image processing, improving efficiency, and ideal for designers, e-commerce sellers, and other users.
- Beyond Feathering: Not only does it feather, but it can also increase resolution up to 10K, remove background, and crop image with 100% privacy.
Free download Aiarty Image Matting to soften edges automatically with feathering.
Step 1. Open up Aiarty Image Matting, then drag and drop to import your images. You can import multiple images for bulk processing.
Step 2. Choose an AI model based on your source image. Then click the Start button to remove background instantly.
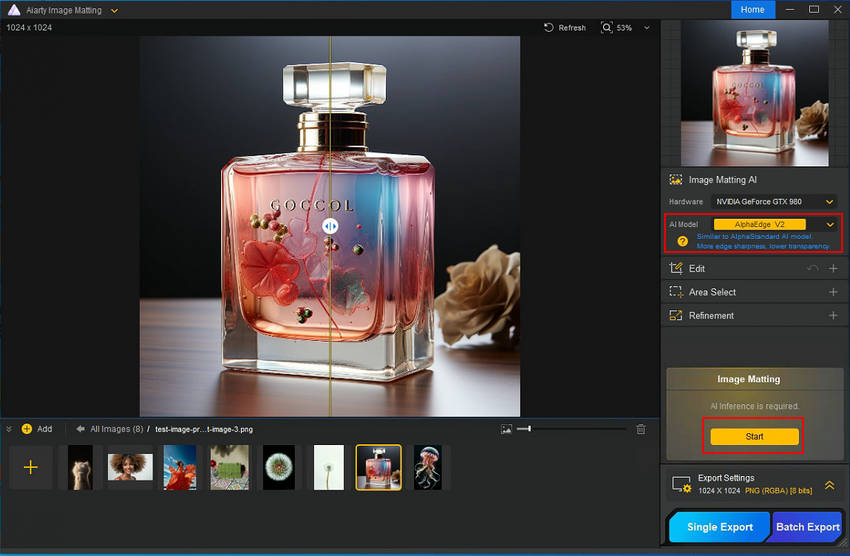
Step 3. Tick on the Feather option under Effect. Then slide the slider to Width and Strength to adjust the density of feathering. For batch feathering, just tick on the option of Apply to Batch Export.
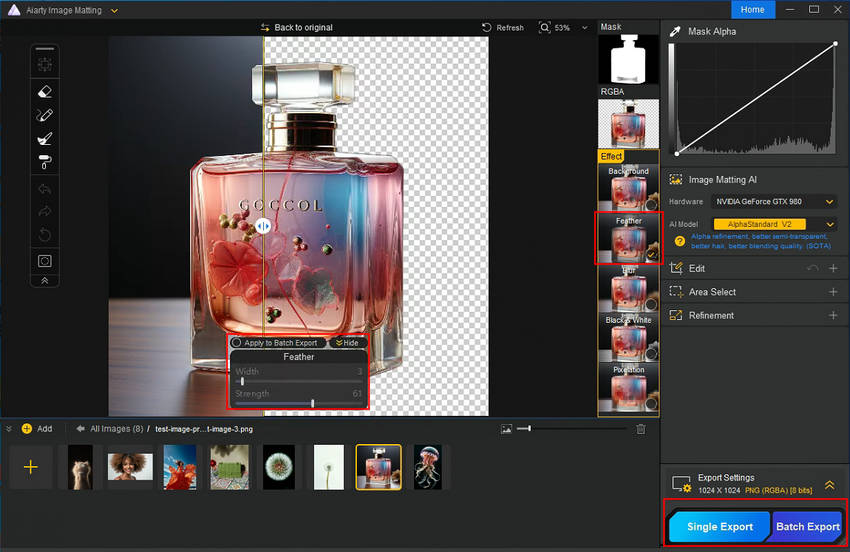
Step 4. Once you've done, click Single Export or Batch Export to export your feathered image individually or in bulk.
Conclusion
Feathering in Photoshop is essential for smooth transitions, but traditional methods can be complex and time-consuming. While Photoshop provides manual feathering tools, an AI-powered solution like Aiarty Image Matting makes the process faster and more precise.
- For simple tasks – Photoshop’s built-in feathering tools work well.
- For bulk editing & high precision – Aiarty Image Enhancer is the better choice.
Ready for smarter, more natural feathering and a boost in productivity? Try Aiarty Image Matting today!
 FAQs
FAQs
1. How do I know the right feather radius to use?
For web images, use a subtle 2-5px feather to smooth edges without obvious blur, ensuring a cleaner online look. For print, calculate the Feather Radius (px) using DPI ÷ 50 to achieve natural softened edges at the intended print resolution.
2. Does AI feathering reduce image quality?
No, Aiarty Image Matting uses lossless AI processing, enabling users to upscale image resolution by 2X (up to 10K) and also fix imperfections like noise, blur, compression artifacts etc. You can edit multiple times without significantly degrading image quality (PSNR > 45dB[4]).
3. Feather tool grayed out and can’t select in Photoshop?
You have to make a selection around the pixels you want to feather before the Feather option under Select -> Modify will become active. So, just make sure you use the select tool to select around your top layer and then the Feather option should become available.
4. Why the white/colored fringe after feathering in Photoshop?
This can happen when blending with a background that has a different color profile or when the original selection wasn't perfectly accurate. Using the Decontaminate Colors option in the Select and Mask workspace can sometimes help.
External sources:
- "Adobe State of Creativity Report 2024". 82% of creatives are currently using and plan to continue using generative AI with 74% believing it is helping them to work more efficiently.
- "Help... Edges always feathered on selections from "Select subject"." r/photoshop from Reddit
- "How to feather edges in Adobe Photoshop." Start with a small radius like 0.5-2px first. Go higher at 5-20px for wide feathery edges.
- "Peak Signal-to-Noise Ratio as an Image Quality Metric". Updated Jun 28, 2024