8 Methods for Deleting White Background in Photoshop
Updated on
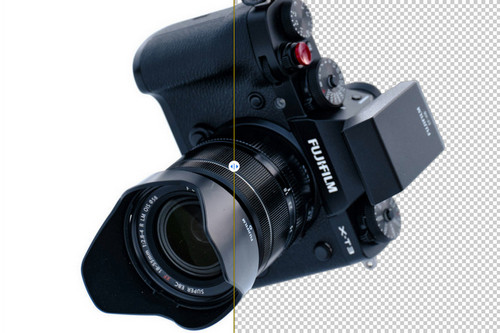
Removing white background from images is a common task in various fields, including graphic design, e-commerce, and photography. To achieve professional results, using a reliable background remover is essential. Photoshop, a powerful image editing software, offers a variety of tools and techniques to accomplish this task effectively.
In this guide, we'll walk you through several methods on how to remove white background from portrait photos, logo graphics, drawings, and other pictures in Photoshop, each offering distinct advantages for different types of images. Whether you're dealing with simple product photos or complex portraits, there's a method that will help you achieve the desired result.
- Comparison of Photoshop Methods for Removing White Backgrounds
- How to Remove White Background from Image in Photoshop
- Method 1: Using the Remove Background Quick Action
- Method 2: Using the Object Selection Tool
- Method 3: Using the Magic Wand Tool
- Method 4: Using the Quick Selection Tool
- Method 5: Using the Select and Mask Feature
- Method 6: Using the Pen Tool
- Method 7: Using Color Range
- Method 8: Using the Background Eraser Tool
- Final Tips for Removing White Backgrounds in Photoshop
- Photoshop Alternative for Removing White Background
Comparison of Photoshop Methods for Removing White Backgrounds
Before diving into the detailed steps for each method, it’s helpful to understand the differences between the tools Photoshop offers for erasing white backgrounds. Each method has its own strengths and is suited for different types of images, depending on factors like precision, speed, and ease of use. The table below provides a quick comparison of these methods, helping you choose the best one for your specific needs. Whether you're working with simple shapes or more complex subjects like hair or fur, there's a tool that fits your requirements.
Method 1: Using the Remove Background Quick Action
The Remove Background feature in Photoshop is a fast, one-click solution to remove the background of an image. It leverages Adobe's AI to detect the subject and automatically apply a layer mask, hiding the background. While it's not always perfect for complex edges or intricate details, it’s a great time-saving option for simpler images or when you need a quick result.
This method is ideal for users who want to quickly remove a background without going through multiple steps, though it might require further refinement for professional-level precision.
How to Delete White Background with Remove Background Quick Action
Step 1. Open Your Image
Go to File > Open and select the image you want to edit.
Step 2. Unlock the Layer
In the Layers Panel, if your image is locked (you'll see a lock icon next to the layer), click on the lock icon to unlock the layer. This allows you to make edits.
Step 3. Open the Properties Panel
With the layer selected, go to Properties if the panel isn't already open.
Step 4. Click on Remove Background
In the Quick Actions section of the Properties panel, click Remove Background. Then, you should see your white background disappear.
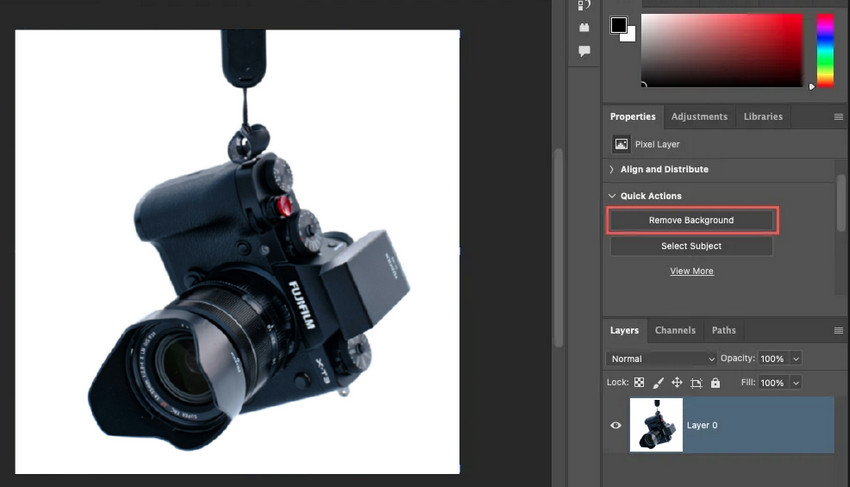
Step 5. Adjust the Mask if Necessary
Photoshop will automatically create a layer mask that hides the background. You can fine-tune the mask by selecting it and using the Brush Tool or Select and Mask for more detailed adjustments.
Best for: Simple images or when you're in a hurry and need a quick background removal.
Pros and Cons: Fast and automatic, but not as precise as manual methods for more complex images or fine details like hair.
Method 2: Using the Object Selection Tool
The Object Selection Tool is a smart tool in Photoshop that allows you to automatically select an object based on its boundaries. It's perfect for isolating subjects from their backgrounds, even when there are multiple objects in the image. By hovering your cursor over the image, Photoshop intelligently detects and highlights the subject, allowing you to select it with a single click. This is particularly useful for removing white backgrounds from images with distinct subjects.
How to Remove White Background with Photoshop’s Object Selection Tool
Step 1. Open Your Image
Go to File > Open and select the image.
Step 2. Select the Object Selection Tool
In the Tools Panel on the left, choose the Object Selection Tool (shortcut: W).

Step 3. Hover Over the Subject
Move your cursor over the image. Photoshop will automatically detect the subject and highlight it. Once highlighted, click to select the subject.
Step 4. Inverse the Selection
Go to the Select menu at the top and choose Inverse. This will reverse the selection, selecting the background instead of the subject.
Step 5. Unlock the Layer
In the Layers Panel on the right, click the padlock icon to unlock the layer if it's locked. This ensures you can make changes to the image.
Step 6. Delete the Background
Press the Delete key to remove the white background. The subject will remain intact, and the background will be removed.
Best for: Images where the subject is clearly distinguishable from the background, especially with well-defined objects.
Pros and Cons: Quick and intuitive, great for a variety of images, but may still need refinement for very detailed areas like hair or soft edges.
Method 3: Using the Magic Wand Tool
The Magic Wand Tool is one of the simplest tools in Photoshop for selecting areas of an image based on color. It works best when there’s a clear contrast between the subject and background, making it ideal for images with solid white backgrounds and well-defined edges. The tool automatically selects pixels of a similar color value, allowing you to easily isolate and remove large sections of the background.
How to Remove White Background with Photoshop's Magic Wand Tool
Step 1. Select the Magic Wand Tool
In the toolbar on the left, select the Magic Wand Tool (shortcut: W). If it’s hidden, right-click the Quick Selection Tool and choose the Magic Wand.

Step 2. Click on the White Background
Click anywhere on the white background. The Magic Wand will select all areas of the image that share a similar color value.
Step 3. Adjust the Tolerance
In the top menu, you'll see the Tolerance setting. This controls how similar the selected pixels need to be. A lower tolerance selects only pixels that are very close in color to what you clicked on, while a higher tolerance selects a broader range of colors.
Step 4. Refine the Selection
Use Shift to add to the selection or Alt (Option on Mac) to subtract areas if necessary.
Step 5. Press Delete
Once the background is selected, press Delete (or Backspace) to remove it, revealing transparency.
Best for: Simple images with solid white backgrounds and clear object edges, such as product photos or basic graphics.
Pros and Cons: The Magic Wand Tool is very easy to use and works quickly for images with strong contrast between the subject and background. However, it is less effective for complex or detailed images, as it may struggle to capture fine edges or gradients accurately. Manual adjustments with Shift or Alt might be required to improve precision.
Method 4: Using the Quick Selection Tool
The Quick Selection Tool is a more dynamic and intuitive tool compared to the Magic Wand. It automatically detects edges as you drag over the image, making it particularly useful for selecting objects with irregular shapes. Photoshop's AI will attempt to detect the edges of the subject, making this tool faster for simple selections but still requiring some refinement for more complex images.
How to Remove White Background with Photoshop's Quick Selection Tool
Step 1. Select the Quick Selection Tool
From the toolbar, choose the Quick Selection Tool (shortcut: W).
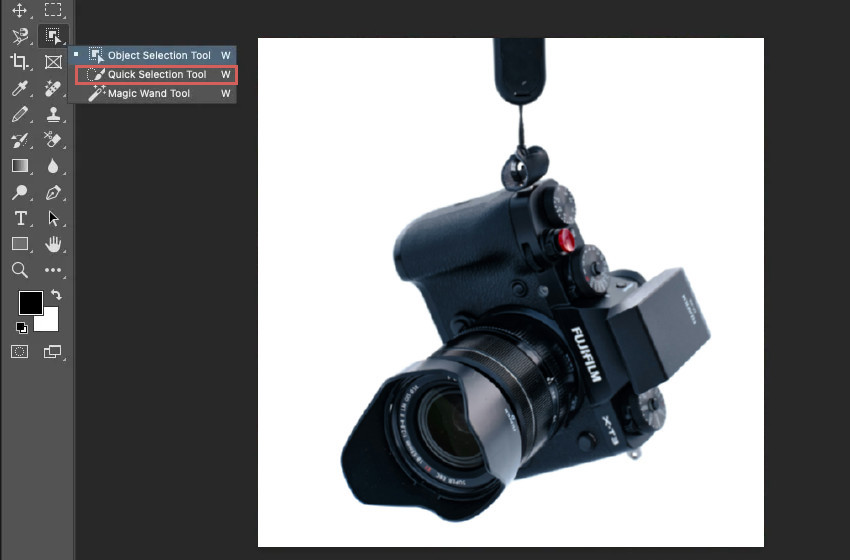
Step 2. Drag Over the Object
Click and drag over the subject of your image. The tool will intelligently detect and highlight the subject as you move your cursor over it.
Step 3. Fine-Tune the Selection
If parts of the white background are accidentally selected, hold Alt (Option on Mac) and drag over those areas to deselect them.
Step 4. Use Refine Edge/Select and Mask
Click on Select and Mask to further refine the edges using tools like Smooth or Feather.
Step 5. Remove the White Background
Once you’re satisfied, either press Delete or output the selection to a mask to remove the white background.
Best for: Images with subjects that have irregular shapes or clear edges, where a more dynamic selection method is needed. It is particularly useful for mid-complexity photos, such as objects with some intricate edges but without too many fine details like hair or fur.
Pros and Cons: The Quick Selection Tool is faster and more intuitive than other methods like the Magic Wand and works well for images with relatively simple edges. However, it may not be as precise when dealing with very complex images, requiring additional refinements using the Refine Edge or Select and Mask features. For highly detailed subjects, the tool may need careful adjustments to ensure accuracy around edges.
Method 5: Using the Select and Mask Feature
The Select and Mask feature is a powerful tool for refining complex selections. It allows you to clean up tricky areas like hair, fur, or semi-transparent edges with great precision. This method is particularly useful for images with detailed or soft edges, where more basic selection tools might struggle to create clean, natural-looking cutouts.
Moreover, since this workflow outputs the result to a new layer with a layer mask, it serves as a non-destructive way to remove background—allowing you to make further adjustments without permanently altering the original image.
How to Remove White Background Using Photoshop's Select and Mask Feature
Step 1. Make a Rough Selection
Start by roughly selecting the subject using any selection tool (Quick Selection, Lasso, etc.).
Step 2. Click Select and Mask
With your selection active, click Select and Mask in the top toolbar.
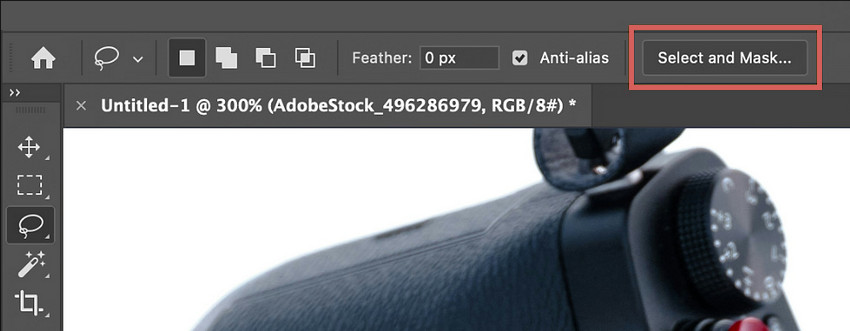
Step 3. Use the Refine Edge Brush Tool
In the Select and Mask workspace, choose the Refine Edge Brush Tool to brush over areas like hair or fur for a more accurate selection.
Step 4. Adjust Edge Settings
Use Smooth, Feather, and Contrast sliders to refine the edges of your selection.
Step 5. Output to a New Layer with Layer Mask
Set the Output to New Layer with Layer Mask to hide the background and create a clean, isolated subject.
Best for: Images with detailed or soft edges, such as portraits with hair or fur, where basic selection tools may struggle to produce clean cutouts.
Pros and Cons: The Select and Mask feature provides excellent precision for complex selections, allowing for fine-tuning of edges. However, it can be more time-consuming than simpler methods and may require practice to master effectively.
Method 6: Using the Pen Tool
The Pen Tool is Photoshop's most precise tool for making selections. It allows you to manually draw paths around the edges of an object, making it ideal for objects with sharp, well-defined edges. Although it requires more effort and practice, the Pen Tool provides unmatched accuracy for isolating objects from their backgrounds, especially in cases where other selection tools might struggle with intricate shapes.
How to Remove White Background with Photoshop's Pen Tool
Step 1. Select the Pen Tool
In the toolbar, select the Pen Tool (shortcut: P).
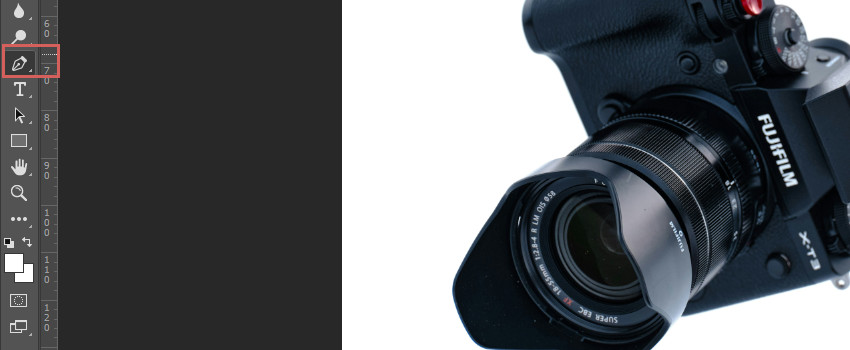
Step 2. Draw a Path Around the Object
Click around the object’s edges to create a path, placing anchor points and adjusting curves as necessary.
Step 3. Close the Path
Once the path surrounds the subject, right-click inside the path and choose Make Selection.
Step 4. Adjust the Selection
In the Make Selection window, set the Feather Radius to smooth the edges slightly.
Step 5. Remove the White Background
With the subject now selected, press Delete to get rid of the white background or create a layer mask.
Best for: Objects with sharp, well-defined edges, such as logos, graphics, or products that require high accuracy in selection.
Pros and Cons: The Pen Tool offers unparalleled precision and control over selections, making it perfect for intricate shapes. However, it requires a steeper learning curve and more time to create paths compared to other selection tools, which may be less suitable for beginners.
Method 7: Using Color Range
The Color Range tool allows you to select areas of an image based on color, making it useful when the subject is clearly distinguishable from the white background by color contrast. This tool is ideal for situations where the white background has slight variations in tone that other tools may miss. It is also a quick solution for simpler images but may require further refinement on more complex images.
How to Remove White Background with Photoshop's Color Range Tool
Step 1. Go to Select > Color Range
From the top menu, go to Select > Color Range.
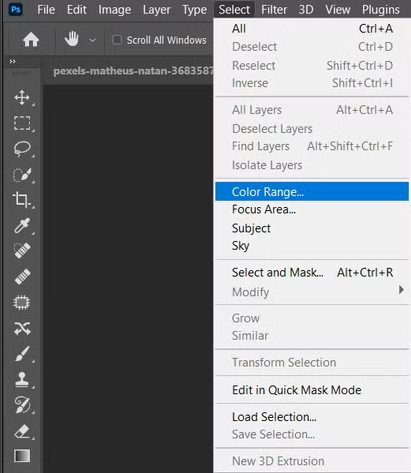
Step 2. Click on the White Background
Use the eyedropper tool to click on the white background, selecting all similar tones.
Step 3. Adjust the Fuzziness Slider
Adjust the Fuzziness to control the range of colors selected. Lower fuzziness selects fewer similar colors, while higher fuzziness selects more.
Step 4. Refine the Selection
Add or subtract areas by using the additional eyedropper tools.
Step 5. Remove the White Background
Once you've made your selection, press Delete to take off the white background.
Best for: Images where the subject has clear color contrast against the white background, particularly those with slight variations in tone.
Pros and Cons: The Color Range tool offers a quick and effective way to select and remove backgrounds based on color. However, it may lack precision for complex images with varying shades or details, requiring additional refinement to achieve a clean cutout.
Method 8: Using the Background Eraser Tool
The Background Eraser Tool in Photoshop is a highly effective option for manually removing backgrounds by erasing pixels based on color sampling. It allows you to precisely remove the background color (in this case, white) while preserving the subject, making it ideal for images with detailed edges like hair or fine textures.
How to Remove White Background with Photoshop's Background Eraser Tool
Step 1. Select the Background Eraser Tool
In the Tools Panel on the left, right-click the Eraser Tool and choose the Background Eraser Tool from the list.
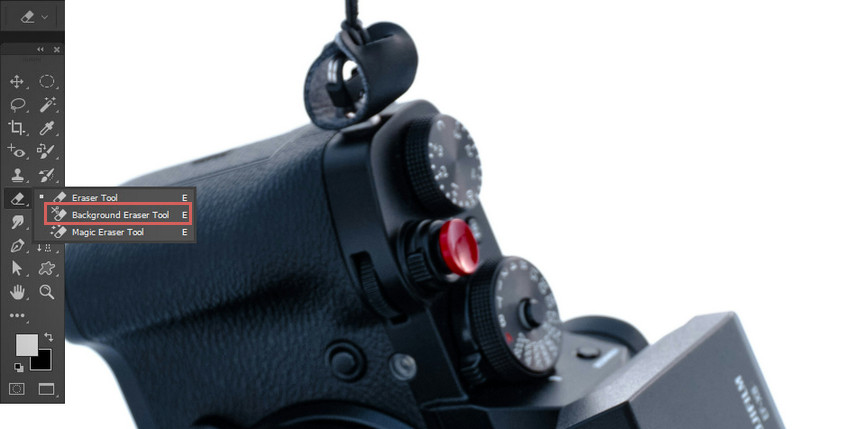
Step 2. Unlock the Layer
In the Layers Panel on the right, click the padlock icon to unlock the layer, allowing you to edit the image.
Step 3. Adjust the Tool Settings
In the Application Bar at the top, adjust the following settings for more control:
- Brush Size: Choose a smaller brush size for detailed edges or a larger size for quicker removal of broad areas.
- Sampling: Continuous: This option allows the tool to continuously sample the white background as you drag the brush. If your image has only one white area to remove, you can also choose Sampling: Once.
- Limits: Find Edges: Select this option to ensure the tool detects and preserves the edges of your subject.
- Tolerance: Set the tolerance to control how closely the tool samples colors. A lower tolerance (around 25%) will only erase colors very similar to white, while a higher tolerance will erase a broader range of colors.
Step 4. Erase the Background
Drag your brush around the subject of the image. As you move the brush, the white background will become transparent (indicated by the gray and white checkerboard pattern). The tool will automatically preserve the edges of the subject.
Step 5. Continue Erasing
Keep dragging the brush over the remaining white areas of the background until it is fully removed.
Best for: Images with detailed edges, such as hair or textured objects, where precision is needed.
Pros and Cons: Offers high control and precision over background removal but can be time-consuming and requires manual effort, especially for complex images.
So above are the methods that Photoshop offers for removing white background from pictures. Choosing the best method for deleting a white background in Photoshop depends on the complexity of your image, the nature of the subject's edges, and your familiarity with each tool. For simple images with clean edges, faster methods like the Magic Wand Tool or the Remove Background Quick Action will often suffice. If your image has irregular shapes or more detailed subjects, you'll want to use more advanced tools like the Quick Selection Tool or Select and Mask.
Final Tips for Removing White Backgrounds from Images in Photoshop
Here are a few additional tips to ensure your white background removal looks professional:
Combine Tools for Complex Images: Sometimes, using just one tool isn’t enough. For more complex images, try starting with the Quick Selection Tool or Color Range, then switch to the Select and Mask feature to refine the edges. You can even use the Pen Tool for tricky parts that need higher precision.
Zoom In for Precision: When working on fine details around the subject's edges, zooming in (up to 300% or more) can help you get a more accurate selection. This is especially useful when using tools like the Pen Tool or when refining edges with the Refine Edge Brush Tool.
Feathering and Smoothing Selections: To avoid harsh, unnatural edges, it’s important to feather or smooth your selection slightly. This can be done using the Feather setting in the Select and Mask workspace. A small feather (1–3 pixels) can make your cutout blend more naturally into new backgrounds.
Refine Hair or Soft Edges: For subjects with hair, fur, or soft edges, always use the Select and Mask feature to refine these tricky areas. The Refine Edge Brush is specifically designed to handle these challenging parts and will result in a cleaner, more professional cutout.
Test Different Tolerances: When using tools like the Magic Wand or Background Eraser, adjusting the tolerance can make a big difference in the accuracy of your selection. A lower tolerance selects fewer colors, which can help with precise edges, while a higher tolerance speeds up selection but risks cutting into your subject.
By following these tips and choosing the right method for your image, you'll be able to remove white backgrounds in Photoshop with ease and precision, producing polished and professional results.
Photoshop Alternative for Removing White Background from Images
While Photoshop is a powerful tool for removing white backgrounds, it can be overwhelming for beginners and time-consuming for simple tasks. Many users may find Photoshop's learning curve steep, especially if they only need a quick solution for basic background removal. For those seeking a more efficient, beginner-friendly option, alternatives like Aiarty Image Matting provide a streamlined experience.
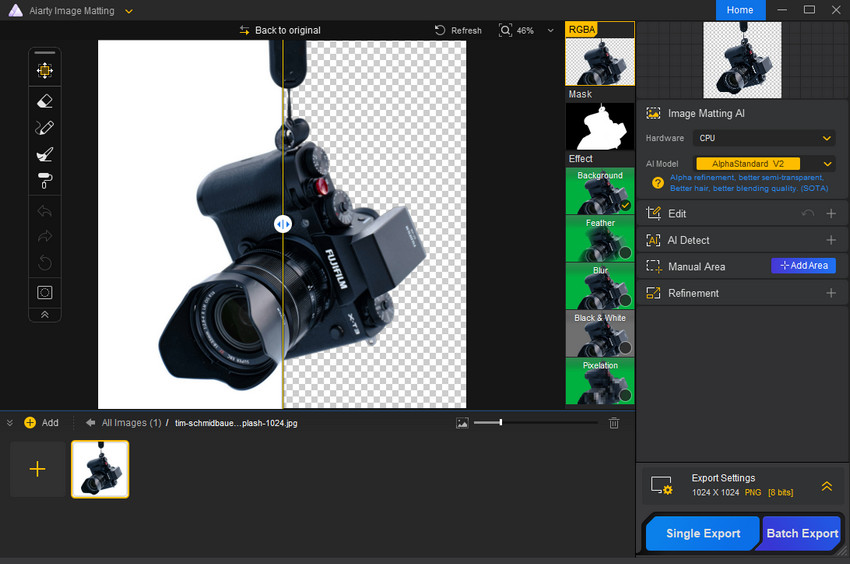
Aiarty Image Matting is an excellent alternative to Photoshop, especially for users who want fast, accurate results without the complexity. This AI-powered tool is specifically designed for background removal, making it easy to use for all skill levels. With Aiarty, the process is largely automatic, saving you time and effort. Its dedicated background remover leverages four specialized AI models to adapt to different image types, ensuring high-quality results regardless of the image's complexity. For creative flexibility, Aiarty provides the option to change backgrounds entirely.
In addition to automatic background removal, Aiarty allows for manual selection and refinement, giving users greater control when working with more intricate details.
What makes Aiarty even more convenient is its batch removal feature, which lets you process multiple images at once, saving time on repetitive tasks.
The tool also supports image upscaling and enhancement, meaning you can improve the quality of your images while removing the background.
Overall, Aiarty Image Matting is a lightweight, efficient, and user-friendly alternative for those looking for a simpler yet powerful tool to delete white backgrounds.

