How to Change Background Color in Photoshop
Updated on
Summary: This post shares how to change the background color of a new image in Photoshop, as well as how to replace the background of an existing image—whether it's transparent or solid. If you’re not a fan of Photoshop's steep learning curve, you can try Aiarty Image Matting instead. With just one click, this AI-powered tool lets you easily remove the image background and swap it with any new color or background of your choice.
Ever wished you could give your photos a whole new mood with a simple color change? Imagine swapping a dull gray sky for a vibrant sunset orange, or replacing a busy background with a calming shade of blue. With Photoshop, you can! In this guide, you'll discover how to change the background color of images in Photoshop, whether you're creating a new design or editing existing photos. We'll cover techniques for changing the background color of images with transparent backgrounds, as well as those with non-transparent backgrounds.

Part 1. Change the Background Color from a New Image in Photoshop
Starting a new project in Photoshop? It's surprisingly easy to set your desired background color right from the beginning! This eliminates the need for any complex editing later and ensures your canvas is perfectly prepared for your creative vision. Here's how:
Step 1. Customize Image Settings
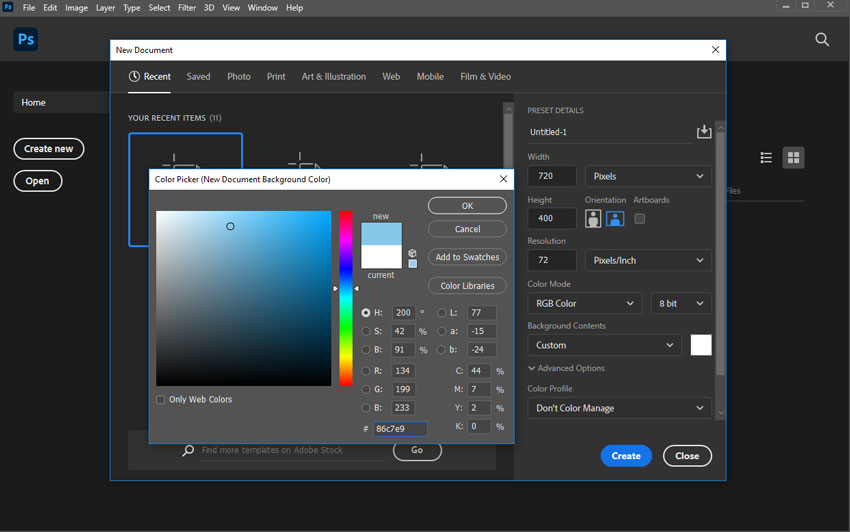
After opening up Photoshop, click File located on the top menu bar, and then hit New. In the New Document window, you'll see options to customize your image. Specify your desired resolution, color mode (RGB, CMYK, etc.), and any other relevant parameters for your project.
Step 2. Change the Background Color
Locate the Background Contents drop-down menu and choose Background Color. A color picker window will appear. Select your desired background color from the spectrum or enter a specific color code if you have one in mind.
Step 3. Start Your Design
Once you've chosen your color, click Create. Your new Photoshop document will open with your chosen background color already in place, ready for you to start your design.
Part 2. Change the Background Color from An Existing Image with Transparent Background in Photoshop
Working with an image that already has a transparent background? Photoshop makes it super easy to add a touch of color. This is especially handy for logos, icons, or graphics that you want to place on different colored backgrounds. Here's how:
Step 1. Add Color Fill Layer
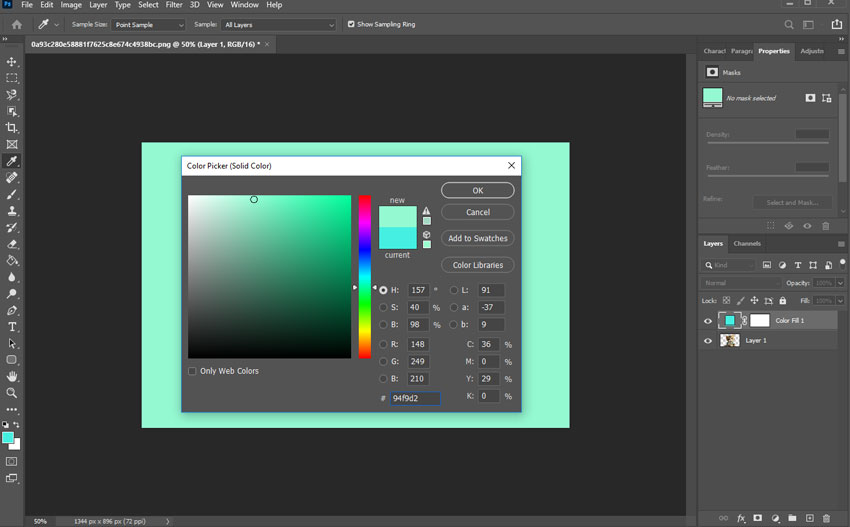
Step 1. Open Photoshop and import your image. Simply drag and drop the image file with the transparent background into the Photoshop workspace. In the Layers panel (usually on the right side of your screen), click the Create new fill or adjustment layer icon. It looks like a half-black, half-white circle. From the menu, select Solid Color.
Step 2. Pick the New Background Color
A color picker will appear. Choose your desired background color. You can explore the spectrum, enter a specific hex code, or even use the eyedropper tool to sample a color from another image. Click OK.
Step 3. Bring the Color Fill Layer Down
You'll notice a new color fill layer has been added in the Layers panel. Click and drag this layer below your main image layer. This ensures that the color appears as the background without covering your image.

Part 3. Change the Background Color from An Existing Image with Solid Background in Photoshop
It's relatively straightforward to change the background color in images that already have a transparent background. However, more often than not, we encounter images with existing backgrounds, whether they are solid colors or complex scenes. In these cases, you need to select the subject you want to keep in the foreground and then apply a layer mask to the background of the image. Only after these steps can you adjust the background without affecting the foreground. Sound complicated? It can be. That's why, in the guide below, we outline not only the step-by-step method for changing background color in Photoshop but also introduce a 1-click solution that allows you to change background colors quickly and in bulk - no matter the type of image.
Step 1. Duplicate the Image Layer
Open your image in Photoshop. In the Layers Panel, select the image layer. Press Ctrl + J (Windows) or Command + J (Mac) to duplicate the layer. This creates a backup so you can work non-destructively.
Step 2. Select the Forground
The next step is to select the subject you want to keep in the foreground. This is where things become challenging. Photoshop offers several tools for this:
Option 1. Use the Subject Selection Tool
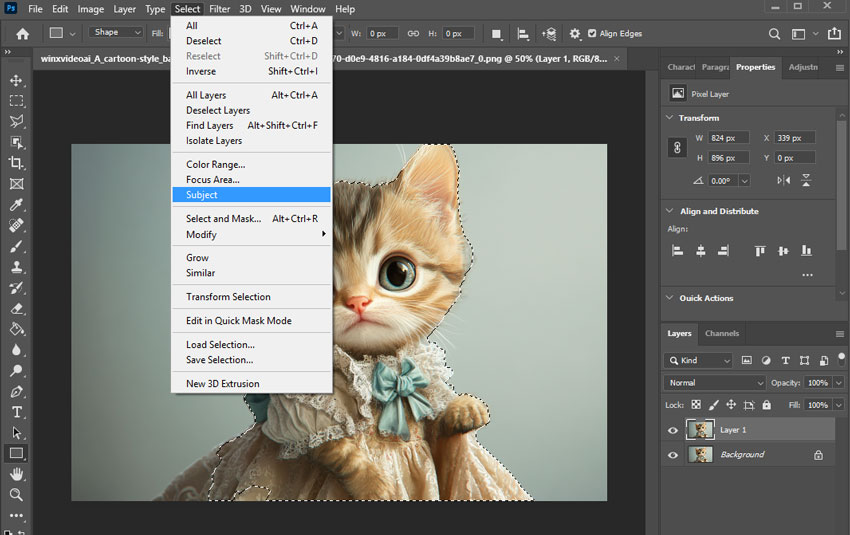
If the subject is clearly defined in your image, the Subject Selection Tool can quickly select it. Go to the top menu, and click Select > Subject. Photoshop will automatically detect and highlight the main subject in the image.
Option 2: Use the Object Selection Tool
Choose the Object Selection tool from the selection toolbox, c and draw a rectangle or lasso around the subject. Photoshop will identify and select the main part of the selected range.

Note:
However, these selection tools are just for cutting out simple subjects from their backgrounds and are only ideal for subjects with well-defined edges, such as products, logos, or objects with clear outlines. For complex subjects where preserving fine details is crucial, such as portraits with detailed hair or objects with transparent parts, Photoshop does offer a few tools like Radius (detect and refine complex edges.), Smooth (Reduces jagged edges), Feather( Softens edges for smoother transitions), and Control (Sharpens the edge boundaries.).
Unfortunately, manual adjustments in Photoshop can be tedious, and achieving high-precision matting often requires significant experience, with limited ability to preserve complex details like transparency or semi-transparent effects in challenging scenarios (e.g., sheer fabrics, glass, or thin materials). That's where Aiarty Image Matting excels.

Step 3. Mask the Background
Right-click on the selection and choose Select Inverse. In the Layers Panel, click the Mask Icon (at the bottom of the panel). This will create a mask that hides the background, leaving only your subject visible.
Step 4. Change the Background Color
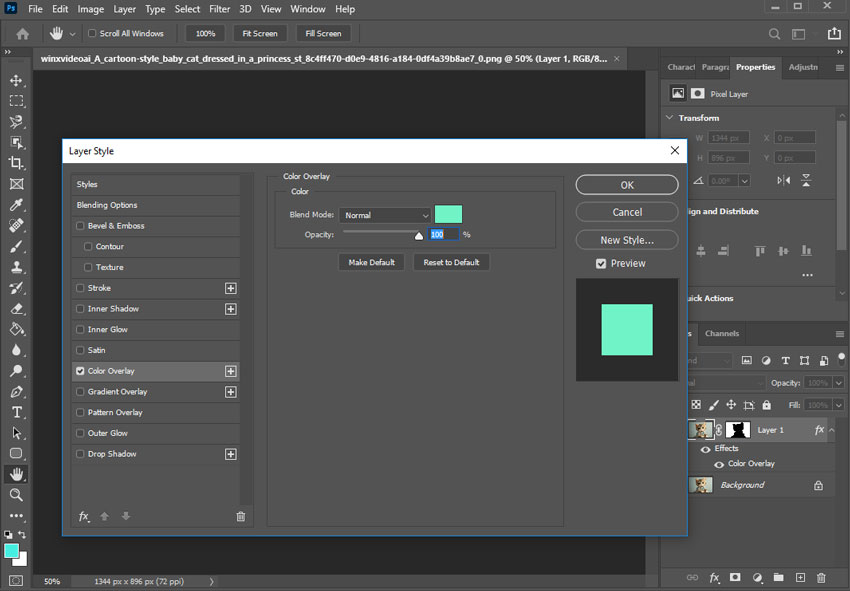
With the background masked, select the image layer. Click the Effects Icon (fx) at the bottom of the Layers Panel and choose Color Overlay. In the pop-up panel, click the color swatch to open the color picker and choose your desired background color. Click OK > OK to confirm your changes.
Step 5. Refine the Outcome
You may notice some imperfections around the edges of your subject. To fix this, click on the Mask Thumbnail in the Layers Panel. Use the Brush Tool with a soft edge to refine the mask:
- Black Brush: Hides parts of the image.
- White Brush: Reveals parts of the image.

Refining the mask is especially important when dealing with detailed edges, such as hair or fur. However, this step can be time-consuming and requires patience and precision. Even with careful adjustments, the results may still fall short of perfection, especially for highly detailed or complex areas. For these challenging cases, it's worth considering AI-based tools like Aiarty Image Matting, which can handle fine details effortlessly and deliver professional-quality results without manual effort. Once you are satisfied with the result, you can export it to your computer.
Part 4. Change the Background Color from Any Image with AI: Automaticaly, Precise, and Seamless
Aiarty Image Matting is a state-of-the-art AI-driven software designed for precise background removal and seamless foreground-background blending. With just one click, you can replace backgrounds seamlessly - no need for manual edge tracing or mask adjustments. Its 4 state-of-the-art (SOTA) Image Matting AI models can handle everything from intricate lighting and crowded scenes to architectural elements and detailed textures. One of the most alluring things about Aiarty Image Matting is it can accurately preserve transparent areas and fine details. This means you can achieve amazing results, even when changing the background color for images with semi-transparent or transparent subjects.
- Accurate subject separation with transparent details and fine edges in a click
- Produce smooth, gradient-based alpha edges for natural background blending
- Obtain the original quality. Upscale/enhance images to maximize quality with AI
- Provide an AI-powered brush for quick, easy, and flexible manual adjustments
- Bulk processing. Run entirely locally to ensure user data privacy and security
Step 1. Import Your Image(s)
Download, install, and run Aiarty Image Matting on your computer. Drag and drop the image(s) into the workspace. Click the Start button to let the AI-powered program analyze and process the image. The software will automatically detect the subject and perform precise matting.

Step 2. Change the Background Color
Hit the Background option. Click the Change the background color icon and pick the desired color. Hit Done.
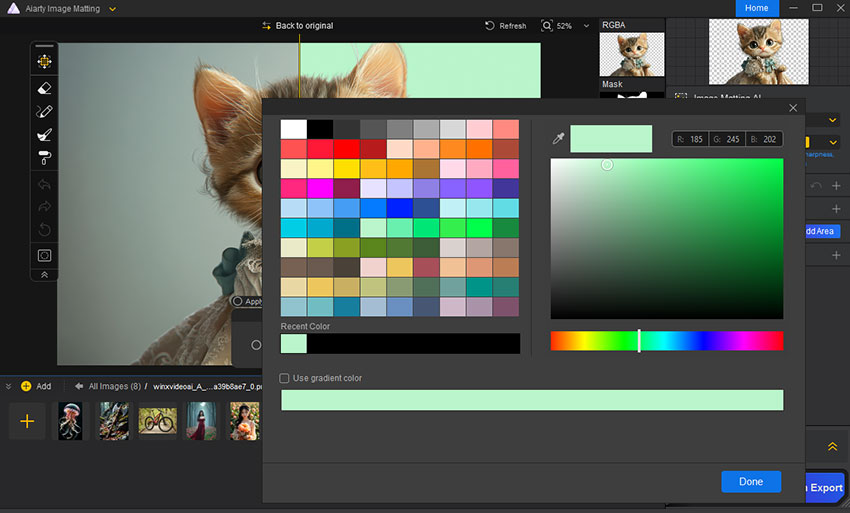
Step 3. Preview and Export
Use the Preview Slider to compare the changes and see how seamlessly the details have been preserved. The result will look as if the image was originally created with the new background. Click Single Export to save one image at a time. For multiple images, use Batch Export to process and save them all at once.


