Manual Background Removal: Top Tools and an AI Alternative
Removing backgrounds from images is an essential task in e-commerce, social media, and digital marketing. On average, each product image undergoes background editing at least 3 times[1] before going live. Traditionally, manual background removers like Adobe Photoshop, GIMP, and Affinity Photo were the go-to solutions. However, these tools come with steep learning curves, time-consuming workflows, and challenges in handling fine details like hair, shadows, and transparent materials.
With the rise of AI background removers like Aiarty Image Matting, creators can now eliminate backgrounds in just seconds, saving up to 80% of their editing time. In this article, we will explore three popular manual background removers, their step-by-step processes, and how they compare to AI-based solutions.
![]() Why 82%[2] Traditional Users Are Switching to Aiarty AI Background Remover?
Why 82%[2] Traditional Users Are Switching to Aiarty AI Background Remover?
- Single image can take 20+ minutes for manual background removal.
- Tools like Photoshop/GIMP/Affinity requires knowledge of multiple tools and techs.
- Difficult to achieve precision in hair, shadows, and transparent objects.
- Cannot efficiently handle 100+ product images at once.
💡 Forget these frustrations, you can remove background easily and accuately with an AI background remover!
Aiarty Image Matting offers a revolutionary approach to background removal, delivering one-click simplicity, fast processing speeds, exceptionally natural edge handling, and efficient bulk processing capabilities, addressing all the limitations of manual background removers.
Click to download Aiarty Image Matting to remove background in bulk automatically by AI.
How to Remove Background Manually: Top 3 Tools & an AI Alternative
For those considering manual background removal, several tools stand out. We'll outline three of the best (Adobe Photoshop, GIMP, and Affinity Photos), and then introduce Aiarty as a compelling AI-powered alternative for those seeking a more efficient solution.
How we test:
We spent hours to select every tool listed here, which were cited by most editors. To ensure an accurate comparison, we tested each tool under identical conditions:
- My PC’s specs: Windows 10, Intel (R) Core i7-13700K CPU, 32GB RAM, AMD Radeon RX 7600 Graphics.
- Test Image: A portrait with fine details (hair and transparent areas).
- Skill Level: Intermediate knowledge of Photoshop, limited experience in other tools.
#1. How to Remove Background Manually Using Photoshop
Adobe Photoshop is widely regarded as the industry standard for photo editing, offering powerful tools for background removal. The software provides multiple techniques to make background transparent, including the Pen Tool, Quick Selection Tool, Layer Masks, Select and Mask, and Background Eraser Tool. While Photoshop allows precise extractions, it's common to need a blend of concentrated methods to remove background, and this necessitates substantial professional skill and expertise.
How to Remove Background in Photoshop [Step-by-Step Guide]
Since the test picture had really fine details, like hair and transparent areas, we used the pen tool and select and mask to get the best cutout possible.
Step 1. Launch Adobe Photoshop. Go to File > Open and select your photo.
Step 2. Using the Pen Tool, place anchor points to select the subject, roughly selecting complex details like hair and semi-transparency, and then create a selection.
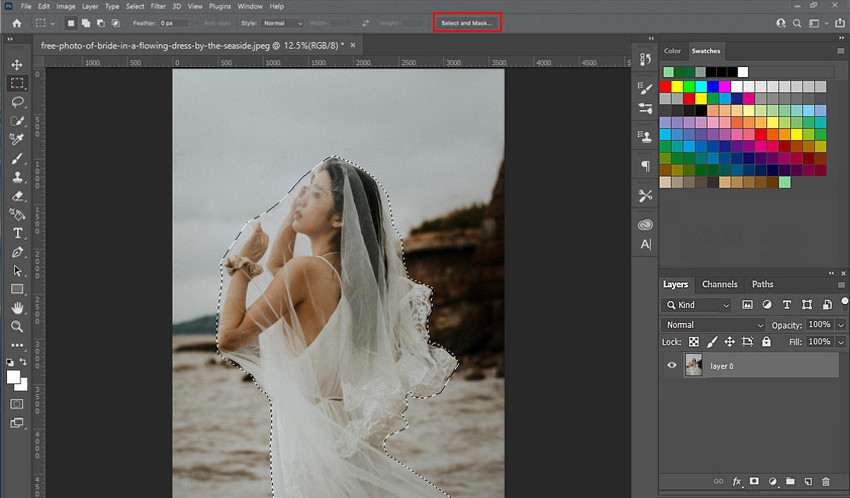
Step 3. Select the Rectangular Marquee Tool from the left toolbar, then click Select and Mask that appears in the top toolbar to refine the selection.
Step 4. Use the Refine Edge Brush Tool and Brush Tool on the right-hand side to smooth edges and remove any background residue.
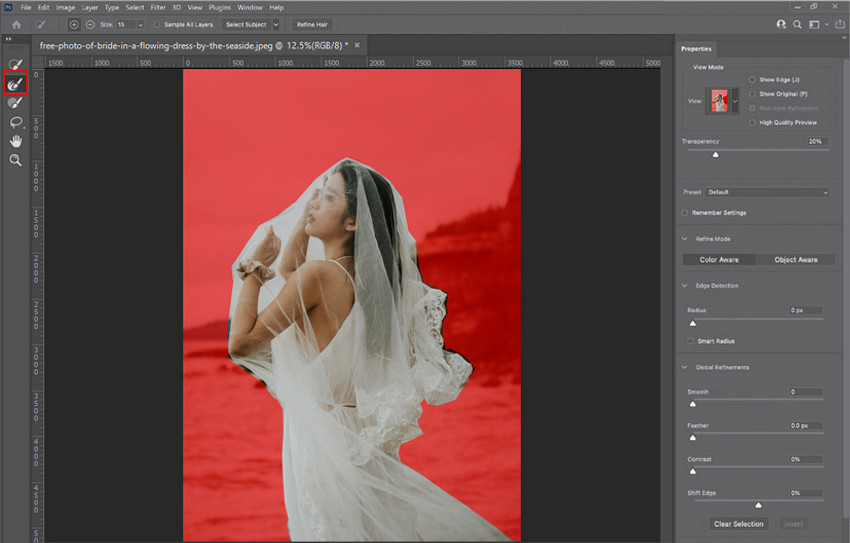
Step 5. Check the Decontaminate Colors option under the Output Settings, then click OK to convert the selection into a Layer Mask to preserve non-destructive edits.

Step 6. Next, go to File > Export and save your final image in PNG format.
Also learn: how to change background color with Photoshop
My Experience of Manually Removing Background in Photoshop:
Alright, I get some seriously high-quality results with Photoshop, but it's a real time-sink. I'm talking 20 to 40 minutes per image, sometimes even more if it's got a ton of intricate details. And don't even get me started on the learning curve! You gotta know a whole arsenal of tools, and it took me forever to wrap my head around them all. Sure, the precision is top-notch, but all that manual effort? It's just so draining.
#2. How to Remove Background Manually Using GIMP
GIMP (GNU Image Manipulation Program) is a free, open-source alternative to Photoshop, offering a range of manual background removal tools such as the Paths Tool, Fuzzy Select Tool, and Foreground Select Tool. This is ideal for creating layered designs, allowing you to seamlessly integrate text and shapes by removing unwanted backgrounds. While GIMP is a powerful tool, it lacks the automation and refinement features available in Photoshop, making manual extractions more tedious.
Steps to Remove Background Manually Using GIMP
Step 1. Start by opening the desired image within the GIMP software. Right-click on the image layer in the Layers panel and select Add Alpha Channel.
Step 2. Employ the Paths Tool to meticulously trace the outline of your subject, placing anchor points along its edges to create a path. This step requires patience and attention to detail.
Step 3. Convert the created path into an active selection by clicking on Selection from Path, which will define the area to be isolated.

Step 4. For challenging areas, particularly those with fine details like hair or fur, and utilize the Eraser Tool to further refine the edges of your selection.
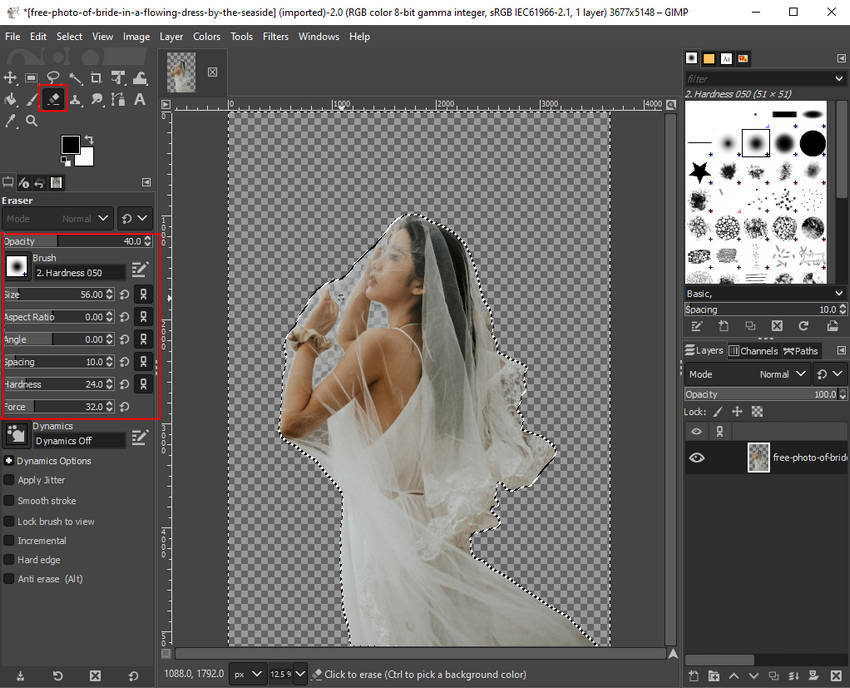
Step 5. Also you can utilize the Foreground Select Tool to further refine the edges of your selection, and adjust the Feathering and Transparency settings of the Layer Mask to create smoother and more natural transitions between the subject and the removed background.
Step 6. Once you are satisfied with the final result, Right-click the mouse, choose Select > Invert, then press Delete on the keyboard to erase the background.
Step 7. Click File > Export as... to choose the PNG as the output format, and specify an destination folder path to save the image for use in your project.
Learn More: How to Make Background Transparent in GIMP >>
My Experience of Manually Removing Background in GIMP:
Okay, GIMP manual background remover definitely gets the job done, but let's be real, it's a bit of a time suck. I'm talking around 30 minutes per image, easy, especially if you're dealing with something really intricate. Though it's not as steep as some other stuff I've used, but it still takes some practice to get the hang of it. The results are decent, good enough for basic cutouts, but if you've got something with a lot of fine details, like hair or shadows, it can really struggle.
#3. How to Remove Background Manually in Affinity Photo
Affinity Photo presents itself as a compelling, one-time purchase manual background removal tool. It offers a range of options to make photo background transparent, including the versatile Selection Brush Tool, Refine Selection, and Background Eraser. These tools allow for precise selection and masking, enabling users to isolate subjects from their backgrounds.
While Affinity Photo delivers powerful features and professional-grade results at a significantly lower upfront cost, it's important to note that achieving truly detailed and flawless background removals, especially with complex subjects, still necessitates a hands-on, manual approach and a degree of user expertise
Tutorial on How to Make Background Transparent in Aiffity Photo
Step 1. Begin by opening the image you wish to edit within Affinity Photo.
Step 2. Utilize the Selection Brush Tool to create a rough outline around the subject you want to isolate. Focus on capturing the main shape to start.
Step 3. Go to the Select > Invert Pixel Selection option to select the unwanted background inversely.

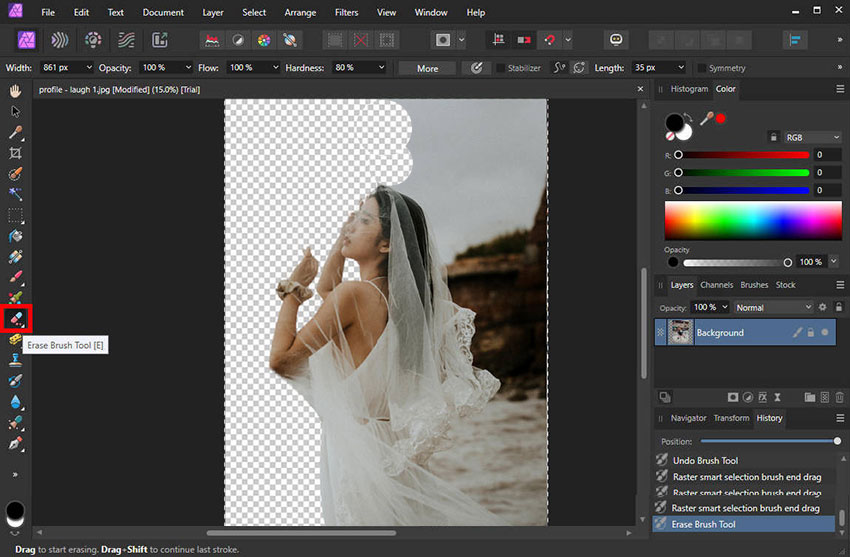
Step 4. Employ the Erase Brush Tool to carefully clean up any remaining unwanted areas around the subject. Adjust the brush size and hardness as needed to ensure a clean removal.
Step 5. Once you are satisfied with your cutout, export the final image in a transparent format, such as PNG, ensuring the background is completely removed and ready for use in other projects.
My Experience of Manually Removing Background in Affinity Photo:
I tried Affinity Photo for background removal, and it's not bad. It definitely took me like, 15-30 minutes per image, which is kinda long, but way less than some other stuff I've used. It's easier to pick up than Photoshop, for sure, but you're still doing a lot of the work yourself, you know? Like, you gotta be pretty hands-on. But hey, if you're a pro looking for a solid program that won't break the bank, this is a pretty sweet deal.
#4. Manual Editing Drives You Crazy? Aiarty Image Matting Is a Lifesaver!
As it shows above, Traditional manual background removers, while powerful, come with significant drawbacks—they are time-consuming, require extensive learning, and inconsistent background removal results due to manual operation. For professionals and businesses that need to process large volumes of images efficiently, these limitations can quickly become a bottleneck.
The real need is not just background removal, but a faster, smarter, and more scalable solution that reduces workload, enhances productivity, and ensures consistent. This is where Aiarty Image Matting comes in! It revolutionizes background removal with cutting-edge AI models that automate the entire process.
Why choosing Aiarty Image Matting for background removal?
- Speed: With 4 advanced AI models, Aiarty can automatically and rapidly remove backgrounds from images. It's a matter of seconds, not hours.
- Accuracy: Trained on over 320K high quality images, this AI background remover can precisely remove backgrounds from complex elements (automatically handling translucent/gradient areas/hair, etc.).
- Batch Processing: It can make the backgrounds of up to 3000 images transparent at once, increasing efficiency while ensuring consistency across images.
- Ease of Use: No manual selection, layer masks, or technical skills required. Though Aiarty also supports manual adjustments if you want to fine-tune the results.
Free download Aiarty Image Matting to automate the workflow of removing background!
3 Steps to Professional Background Removal with Aiarty Image Matting
Step 1. Open Aiarty Image Matting, drag and drop your photos into the software. You can process multiple images simultaneously for batch editing.
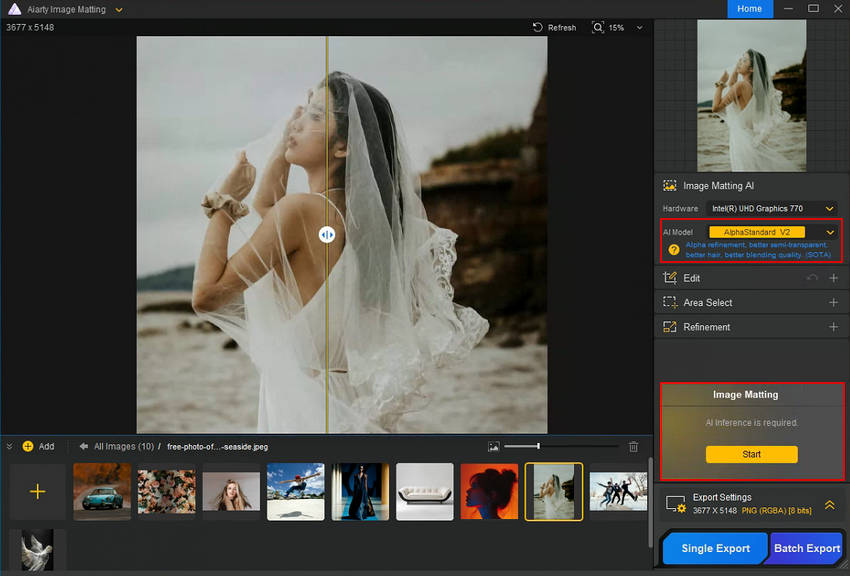
Step 2. Select an AI model based on your photo type. There are four AI models available, usually AlphaStandard V2 behaves better for general images. Then click Start to remove the background automatically.
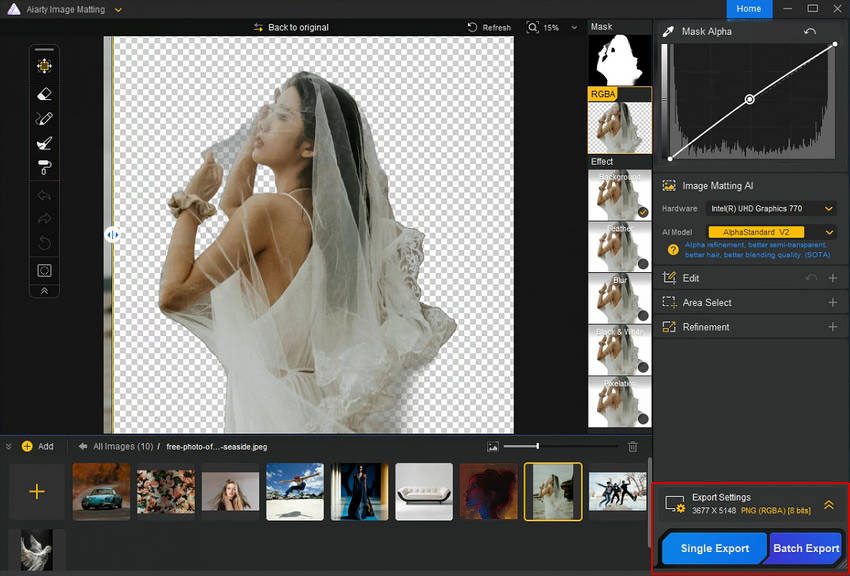
Step 3. Expand the Export Settings section to configure PNG transparency, quality, and destination folder. Click Single Export to export individually or Batch Export for bulk saving.
My Experience of Removing Background Automatically using Aiarty:
I tried Aiarty for background removal, and I have to say—it’s incredibly simple. With just one click, the background disappears instantly! The speed is insane, and the results are impressively natural, even around hair and transparent areas. What really amazed me was the bulk processing feature—I uploaded a large batch of images, and Aiarty handled them effortlessly, maintaining consistency across all of them while even allowing background replacements in any color and scene. If you're tired of struggling with manual tools, this is definitely the smarter choice.
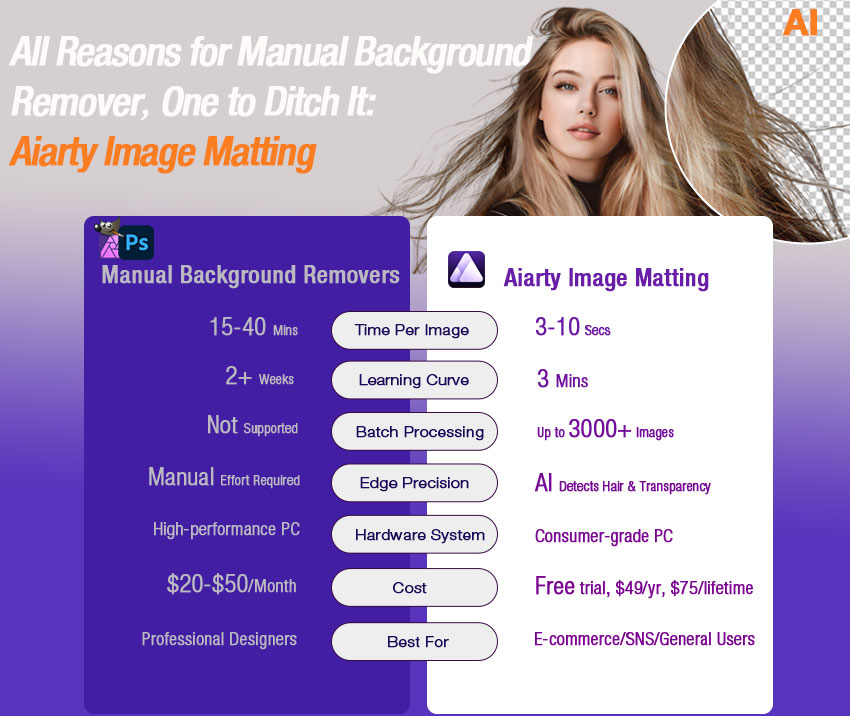
Test Results of Manual Background Removers vs Aiarty
Having explored the methods, let's now examine the results from different background removal tools. Choose the tool that best suits your needs.
| Tool | Photoshop | GIMP | Affinity Photo | Aiarty Image Matting |
|---|---|---|---|---|
| Time per image | 15-40 mins | 20-40 mins | 15-30 mins | 3-10 secs |
| Skill Level Required | Advanced | Moderate | Moderate | Beginner-Friendly |
| Batch Processing | ❌ | ❌ | ❌ | ✅ |
| Hair & Transparency Handling | Manual Effort | Manual Effort | Moderate | AI Precision |
| Cost | $22.99/mo, $263.88/yr | Free | $69.99 One-off payment | $49/yr, $75/lifetime |
| Best for | Pro Designers | Budget Users | Intermediate Users | E-commerce, Creators, General Users |
See the transparent background results from these 4 tools:
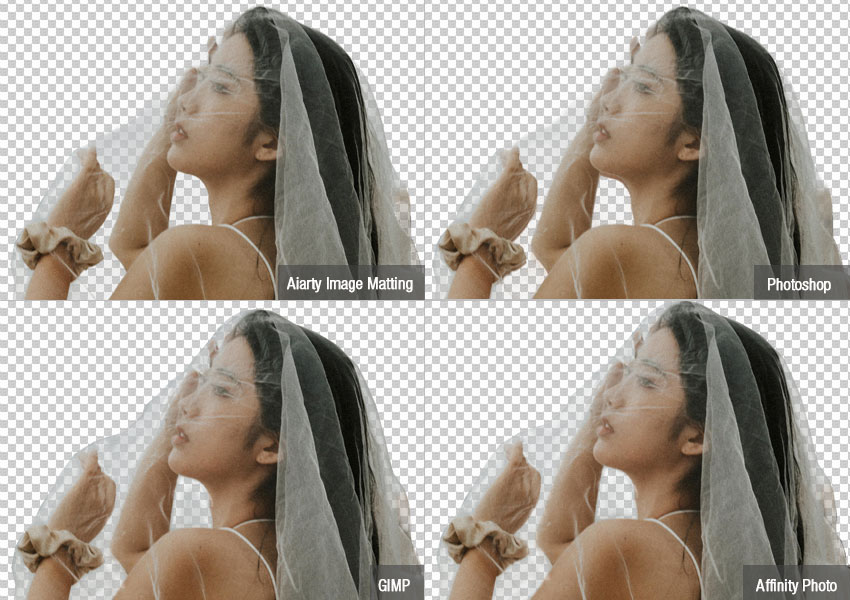
All four tools are capable of handling complex element cutouts, such as translucent areas, but the results vary slightly. Aiarty and Photoshop produce very natural-looking images, with no rough edges or uneven transitions. GIMP still leaves some harsh edges, while Affinity Photo fares better, but the handling of translucent areas is also uneven and the edges are slightly rigid.
Of course, due to my limitations in skill level, the best possible results from manual background removal tools may not be achieved. This truly requires a lot of patience and time.
Choose the background remover that fits you best:
- Photoshop – Ideal for designers needing precise manual control but requires time and expertise.
- GIMP – Best free option, a free Photoshop alternative with manual tools but a steep learning curve.
- Affinity Photo – One-time purchase with powerful tools for budget designers, but still time-consuming for background removal.
- Aiarty Image Matting – AI-powered, fast, and easy; perfect for high-volume image editing without manual effort.
While manual background removers offer flexibility and control, they are time-consuming, require advanced skills, and are inefficient for bulk processing. Aiarty Image Matting eliminates these issues by providing fast, precise, and automated background removal, making it the best choice for e-commerce sellers, social media creators, and anyone needing quick, professional results.
 FAQs
FAQs
For manual removal, Photoshop is the most powerful. For speed and efficiency, Aiarty Image Matting is the best.
For precise refinements, you have two options: leverage Photoshop's powerful Layer Mask functionality for granular control, or utilize Aiarty's intuitive manual adjust feature for quick, targeted edits.
You can utilize powerful professional image editing software like Photoshop, GIMP, or Affinity Photo, but be prepared to invest significant time and effort in overcoming a steep learning curve, as these tools offer extensive features with complex interfaces.
A solid-colored background, for instance, white or green, significantly improves the efficiency of both manual and AI background removal methods, as it reduces the complexity of edge detection and minimizes the need for intricate adjustments.
External sources:
- "Product image requirements". Have a pure white background (RGB 255, 255, 255) for consistent customer experience, with exceptions for lifestyle images on select product types.
- "Adobe State of Creativity Report 2024". 82% of creatives are currently using and plan to continue using generative AI with 74% believing it is helping them to work more efficiently.
You May Also Like
This post was written by Brenda Peng who is a seasoned editor at Digiarty Software who loves turning ordinary photos into extraordinary works of art. With AI assistance for brainstorming and drafting, the post is reviewed for accuracy by our expert Abby Poole for her expertise in this field.