How to Remove Background from Image on Mac (Preview, Photos & Best Methods)
How to Remove Background on Mac (Quick Answer)
To remove the background from an image on Mac, you have 3 main options:
- Use Preview (Free, built-in): Open the image → Click Markup > Instant Alpha → Drag to select the background → Press Delete
- Use Photos (macOS 13+): Open the image → Right-click the subject → Click Copy Subject → Paste into another app
- Use an AI background remover (Best for complex images): Automatically remove backgrounds with better edge detection for hair, shadows, and detailed objects
Now that you know the quickest ways to remove a background on Mac, the right method depends on your image.
Built-in tools like Preview and Photos work well for simple backgrounds, but they often struggle with hair, transparency, or complex edges. Below, we’ll walk through each method step by step, along with fixes if they don’t work as expected.
Remove Background with Preview on Mac (Free & Built-in)
For most Mac users, Preview is the fastest way to remove a background without installing anything. Built into macOS, Preview includes the Instant Alpha tool, which works best on images with solid-color backgrounds and clear subject edges.
Here’s how to remove a background in Preview step by step:
Steps to Remove Background in Preview
You can remove backgrounds in Mac Preview using either Instant Alpha or Smart Lasso depending on image complexity.
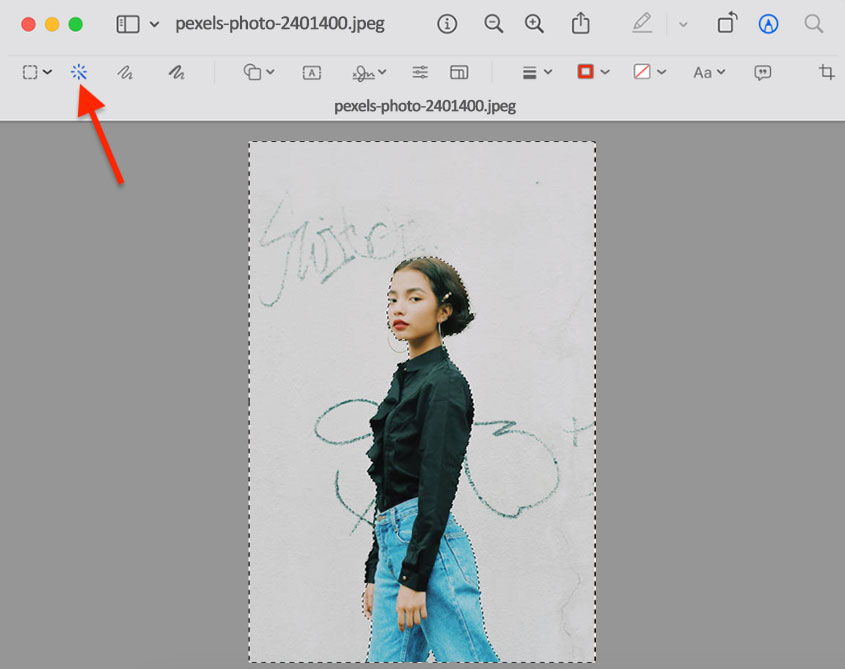
- Open your image in the Preview app on your Mac.
- Click the Markup toolbar to access editing tools.
-
Choose a selection method:
- Instant Alpha for solid or contrasting backgrounds: click and drag over the background to select similar colors.
- Smart Lasso for complex or similar colors: carefully trace around the subject to define the selection.
- Once the unwanted area is selected, press Delete to remove the background (or Command + C to copy the subject if needed).
- Save your edited image to apply the changes.
Limitations of Preview
Preview is a quick built-in tool to remove background on Mac, but it often struggles when:
- Background is complex or multi-colored
- Edges include hair, fur, or transparency
- The Instant Alpha tool is greyed out
If that happens, don’t worry, most of these issues can be fixed with a few simple steps below.
Remove Background Using Photos on macOS 13+ (1-Click Method)
For macOS Ventura (13+) users, the Photos app includes a built-in Copy Subject feature that quickly extracts the main subject directly from your image library. It works with a simple right-click and is ideal for fast, basic background removal within macOS.
To use it, follow these steps:
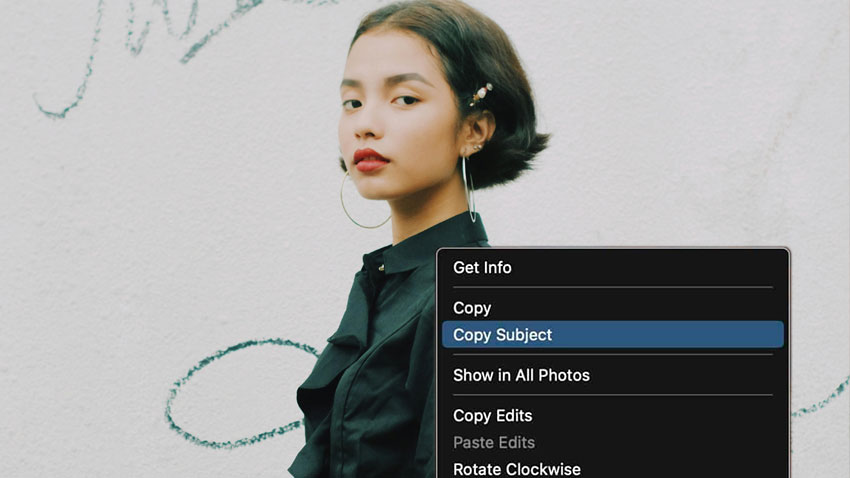
- Open the Photos app on your Mac (macOS Ventura or later) and select the image.
- Right-click on the subject in the image.
- Click Copy Subject from the menu.
- Paste the extracted subject into another app or document.
When to Use Photos Instead of Preview
Use the Photos app if you need a quick, one-click way to remove background on Mac, especially when the subject is clearly separated and you don’t require precise edge control.
- Best for simple subjects with clean backgrounds
- Fast, automatic results with no manual selection
Avoid it if you need more control over the final result—for example, when exporting transparent PNGs or refining edges and fine details.
- No direct transparent PNG export
- Limited control over edges and details
Why You Can’t Remove Background on Mac (Common Fixes)
If removing a background on Mac didn’t work as expected, you’re not alone. Many issues come from the limitations of built-in tools like Preview and Photos. Here are some common problems users run into—and how to fix them.
#1. “Instant Alpha” is greyed out in Preview
You open an image, click Markup, but the Instant Alpha tool is disabled or not clickable.
Fix: This usually happens when the image is in JPG format or the background lacks clear contrast. Convert the image to PNG, then try selecting a simpler area using smaller drag selections. If it’s still greyed out, the image may be too complex for Preview to detect properly.
#2. Background removal looks messy or incomplete
After removing the background, you may see jagged edges, missed spots, or leftover color around the subject—especially with hair or shadows.
Fix: Zoom in and refine the selection in smaller passes, repeating the process if needed. This can improve results, but for detailed images, manual fixes often become time-consuming and still don’t look clean.
#3. Background turns white instead of transparent
You remove the background, but after saving, it shows up as white instead of transparent.
Fix: Your image was likely saved as JPG, just switch to PNG to keep the background transparent.
Remove Background from Complex Images on Mac (When Preview Fails)
Built-in tools like Preview and Photos are great for simple edits, but they struggle with:
- Hair and fine edges
- Shadows and transparent objects
- Batch processing multiple images
In these cases, an AI-powered tool like Aiarty Image Matting can deliver cleaner edges, preserve fine details, and save significant time, especially when processing images in bulk. Featuring an enhanced CoreML model, it's able to remove and replace background of images with substantial faster macOS performance.
It's designed to:
- AI-powered auto background removal with high precision. No jagged edges for hair, transparency, hollow etc.
- Batch processing for handling up to 3000 images at once, ensuring efficiency and consistency across images.
- Seamless background replacement with solid colors like white or blue, gradients, or realistic scene backdrops, ensuring a natural and flawless blend.
- No technical skills required. Full offline functionality to protect user privacy.
Free download Aiarty Image Matting to remove photo background on your Mac now!
How to Achieve Professional Background Removal on Mac Using Aiarty Image Matting
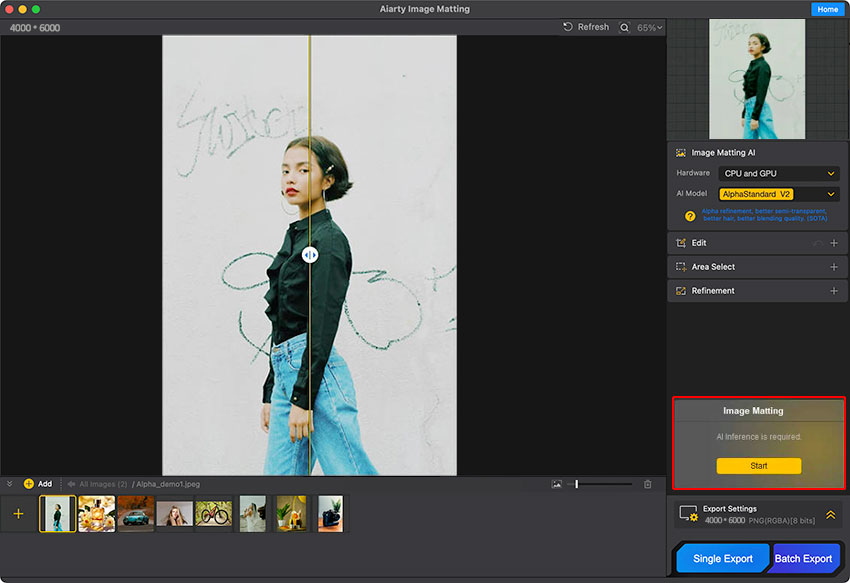
Step 1. Launch Aiarty Image Matting, drag and drop your photos into the software. You can process multiple images simultaneously for batch processing.
Step 2. Select an AI model based on your photo type. Usually AlphaStandard V2 is selected for better results. Then click Start to remove the background automatically on Mac.
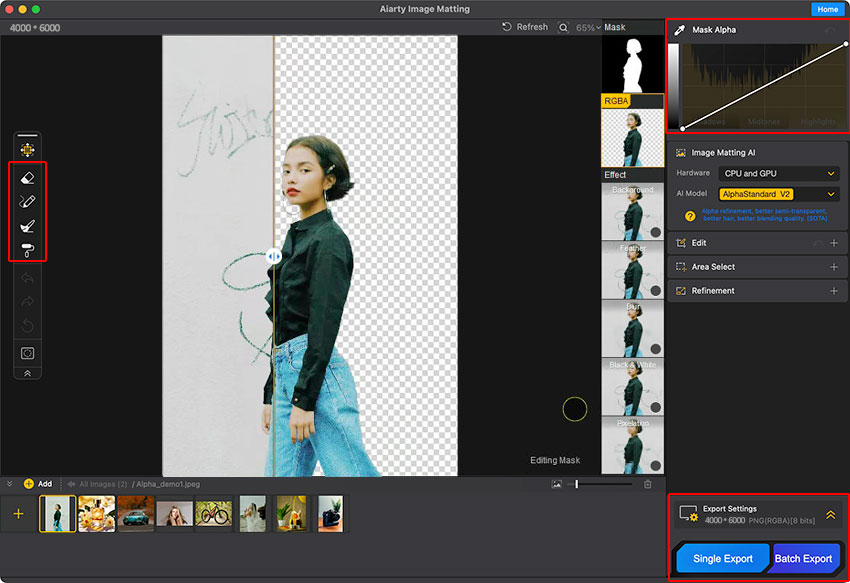
Step 3. Refine the edges and transparency using 4 manual options, and Mask Alpha curve if needed.
Step 4. Optionally, click Background after Effects, and select a solid color or upload a local scene to add a background for the isolated subject. This provides great convenience and utility for e-commerce users looking to replace backgrounds with white, or with blue or white for official ID photos.
Step 5. Expand the Export Settings section to configure PNG transparency, quality, and destination folder. Click Single Export to export individually or Batch Export for bulk saving.
Other Ways to Remove Background on Mac
Remove Background with Adobe Photoshop (Full Control)
Adobe Photoshop remains the industry standard for professional image editing, offering precise background removal through advanced selection tools and layer masking. It gives users full control to refine even complex edges, especially for detailed subjects like hair[2].
However, it requires a $22.99/month subscription and comes with a steep learning curve for beginners. Compared to AI tools, manual editing can also be more time-consuming. Still, Photoshop remains unmatched for users who need maximum control and professional-grade results.
How to Remove a Background in Photoshop for Mac Users
Step 1. Launch Adobe Photoshop and open the image you want to edit. Navigate to File > Open and select your image file.
Step 2. Choose the Select > Subject from the toolbar. It'll automatically detect and select the main subject of your image.
Step 3. Once the subject is selected, create a layer mask by clicking the Add layer mask icon at the bottom of the Layers panel. This will hide the background, revealing the selected subject on a transparent layer.
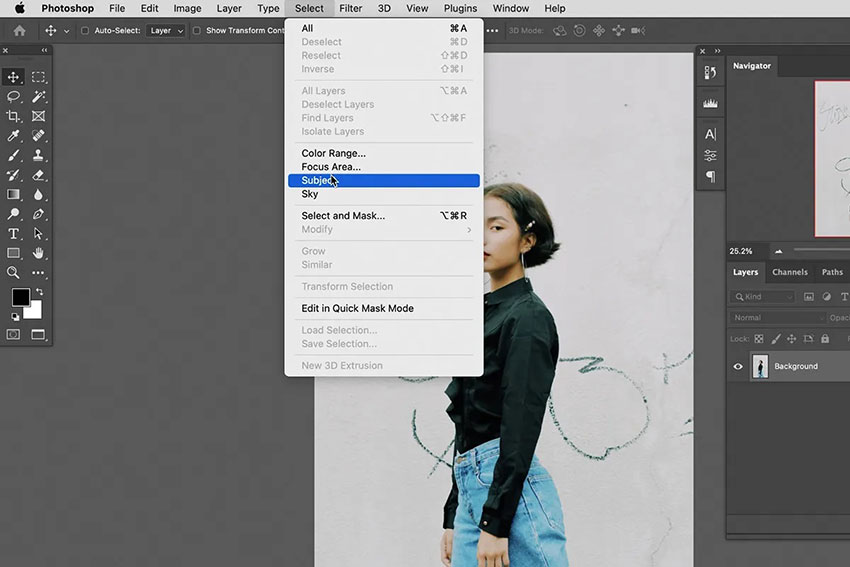
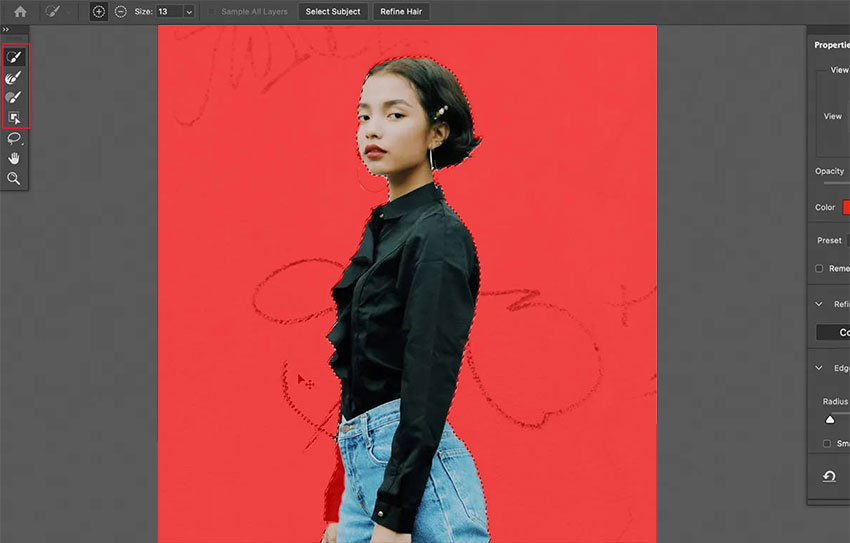
Step 4. For precise edge refinement, especially around complex areas like hair, go to Select > Select and Mask. This workspace offers tools to smooth, feather, and shift edges, ensuring a natural-looking extraction.
Step 5. Use tools like the Refine Edge Brush to meticulously clean up any remaining background artifacts. Adjust the Smooth, Feather, and Contrast sliders to achieve the desired level of refinement.
Step 6. Choose your output setting (e.g., Layer Mask, Selection, or New Layer with Layer Mask) and click OK.
Step 7. Save your edited image in your preferred format, such as PNG for transparency, by going to File > Save As.
Remove Background Online with remove.bg (Fast & Automatic)
remove.bg offers a web-based solution for instant background removal on macOS, using AI to automatically process images in the cloud. It works directly in the browser with no installation required, making it fast and easy to use.
A free version is available for quick testing, but it includes limitations such as watermarks and low-resolution output. Users also need a stable internet connection, and should consider potential privacy concerns when uploading images to the cloud.
How to Remove a Background Online Using Remove.bg
Step 1. Navigate to remove.bg official site, and upload an image.
Step 2. It will detect and remove the background automatically.
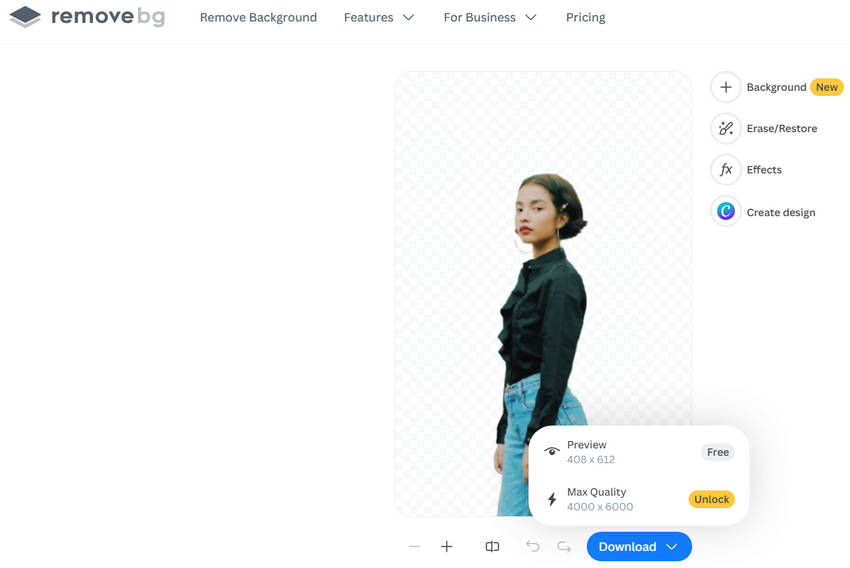
Step 3. Click Download button to save your removed background image offline. By expanding the drop-down option, you can find free users are limited to export in low-resolution (408 x 612 pixels), for original resolution (4000 x 6000 pixels) export, you have to pay for it.
Final Comparison: Best Mac Background Removers (2026 Tested Results)
We tested five popular Mac background removal tools and compared their performance in real scenarios. Here’s how they perform in terms of precision, usability, and workflow efficiency.
| Features | Preview | Photos | Aiarty | Photoshop | remove.bg |
|---|---|---|---|---|---|
| Precision | ⭐⭐⭐ | ⭐⭐⭐⭐ | ⭐⭐⭐⭐⭐ | ⭐⭐⭐⭐⭐ | ⭐⭐⭐⭐ |
| Ease of Use | ⭐⭐⭐⭐ | ⭐⭐⭐ | ⭐⭐⭐ | ⭐⭐⭐⭐⭐ | ⭐⭐⭐ |
| Batch Processing | ❌ | ❌ | ✅ | ❌ | ❌ |
| Privacy Protection | ✅ | ✅ | ✅ | ✅ | ❌ |
| Free Usability | ✅ | ✅ | ✅ | ❌ | ❌ |
Key findings from real testing:
- Aiarty Image Matting and Photoshop both deliver professional results with excellent detail preservation (hair, textures).
- Photoshop offers high precision but has a steep learning curve, while Aiarty enables one-click removal for faster workflow.
- Preview handled simple backgrounds well but missed details in complex hollow areas.
- Photos mistakenly included background graffiti as part of the subject.
- remove.bg produced clean results, but free export quality caused noticeable blur.
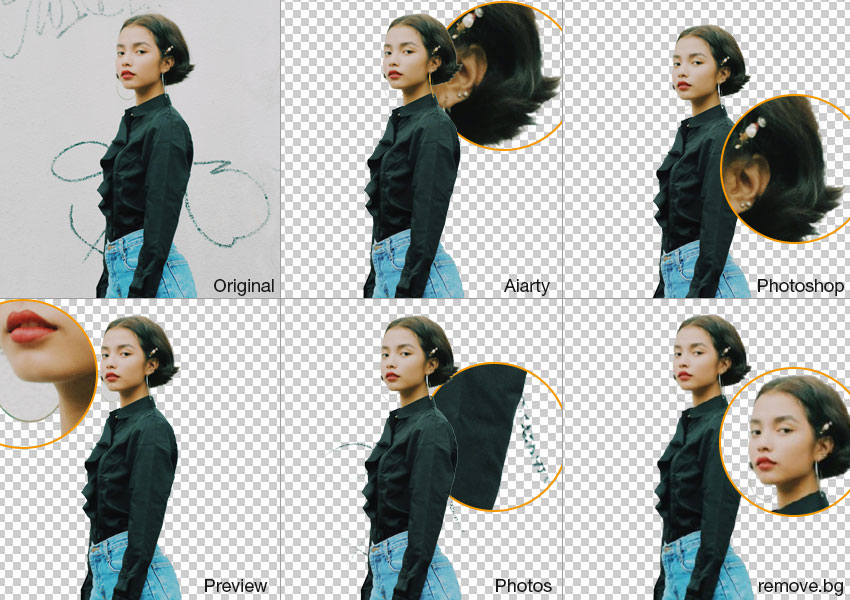
Verdict: If you're looking for a tool that balances quality, speed, and ease of use, Aiarty Image Matting a strong option for Mac background removal. It delivers results close to Photoshop but with a much simpler workflow.
Best Mac Background Remover by Use Case: Which Tool Fits Your Needs?
Different users need different tools. Choose your use case below to quickly find the right Mac background remover for your workflow.
For lossless background removal (designers & professionals)
- Aiarty Image Matting – Best for high-resolution, batch, and detail preservation
- Photoshop – Maximum control, but manual
- Affinity Photo – Good alternative for pro editing workflows
For free or built-in background removal
- Preview – Quick edits for simple backgrounds
- Photos (macOS 13+) – One-click subject isolation
- Photoshop (trial) – Best quality, but not fully free
For bulk background removal (e-commerce & ID photos)
If you're running an online store or handling ID photos, you'll need a tool that can remove backgrounds in bulk without quality degradation.
Bulk-capable background remover software for Mac:
For most users, Aiarty Image Matting is the most balanced choice, offering high accuracy, batch processing, and offline privacy. It is especially suitable for e-commerce, design, and high-resolution workflows.
 FAQs
FAQs
The best background remover depends on your needs. Aiarty Image Matting is best for fast, high-quality batch processing, Photoshop for professional manual control, and Preview or remove.bg for quick basic edits.
Yes. macOS includes Preview (Instant Alpha tool) and Photos (Copy Subject in macOS 13+). They are useful for simple images but limited for complex backgrounds.
Affinity Photo supports RAW background removal using non-destructive editing, selection tools, and layer masks, making it suitable for precise professional workflows.
Use tools like Photoshop or Aiarty Image Matting and export in PNG format to preserve full image quality and transparency.
AI tools like remove.bg or Photoshop can automatically detect and remove people. Built-in apps like Preview or Photos are not suitable for precise person removal.
Yes, remove.bg offers a free preview without watermarks, but high-resolution downloads require a paid plan or credits.
External sources:
- "Isolate and share a photo’s subject on Mac". from Apple Support
- "Advanced techniques for selecting hair". Learn advanced techniques to cut out hair from complicated backgrounds.
You May Also Like
This post was written by Brenda Peng who is a seasoned editor at Digiarty Software who loves turning ordinary photos into extraordinary works of art. With AI assistance for brainstorming and drafting, the post is reviewed for accuracy by our expert Abby Poole for her expertise in this field.