What is Textual Inversion in Stable Diffusion and How to Use It
Updated on
Textual Inversion (also called Embedding) is a technique that fine-tunes a pre-trained text-to-image model on a small set of images representing a specific concept or style. By doing so, the model learns to associate a new, user-defined token (the "pseudo-word") with the visual characteristics present in those images. Subsequently, when prompted with that token during text-to-image generation, the model can synthesize new images that mimic the learned concept or style.
This approach enables users to personalize the text-to-image generation process by introducing their own visual concepts or artistic styles into the model's vocabulary. For example, one could train the model to recognize a particular artist's painting style or a new artistic movement, and then generate novel artworks in that style by simply including the corresponding pseudo-word in the text prompt.
But How Exactly Textual Inversion Works?
At its core, Textual Inversion involves modifying the embedding space of a language model to incorporate new concepts or styles. The embedding space is a vector representation where each word or token is mapped to a unique embedding vector. By initializing a new embedding vector for a specific word or token, the model can learn to associate that vector with the desired concept or style, based on a set of example images provided during training.
The process begins by selecting a unique word or prompt to represent the new concept. This word is then assigned an initial embedding vector, which is iteratively updated during the training process. The model is trained on a dataset of images that exemplify the desired concept, adjusting the embedding vector to align with the visual characteristics present in those images.
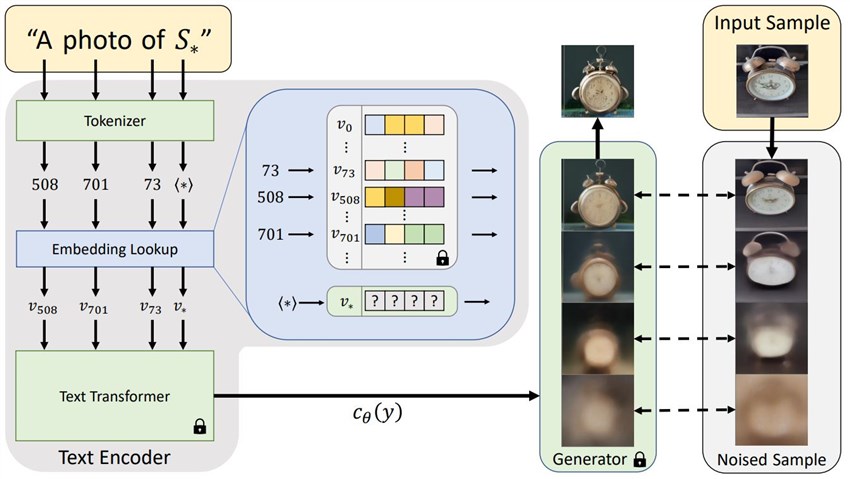
To be more specific:Tokenization and Embedding Initialization
The new concept or object you want to teach the model is first converted into a sequence of tokens that the model can understand. This is done using the same tokenizer that was used during the initial training of the Stable Diffusion model. For example, if you want to teach the model the concept of a "robot artist", the phrase "robot artist" would be tokenized into individual tokens like "robot" and "artist".
Then an embedding vector is created to represent the new concept. This vector is typically initialized with random values or by averaging the embeddings of related tokens from the model's text encoder. The embedding vector acts as a numerical representation of the new concept in the model's embedding space.
Training
A small dataset of images representing the new concept is provided, along with the corresponding text prompt containing the new concept token(s). For example, images of robot artists along with prompts like "a robot artist painting in the forest".
The model's image encoder is used to extract image embedding from the provided dataset images. And the text encoder is used to extract text embedding from the prompts, including the new concept token(s).
The embedding vector for the new concept is optimized to minimize the loss between the generated images (using the current embedding vector) and the target images in the dataset. This is done by backpropagating gradients through the model's U-Net and text encoder.
Optimization
During training, the embedding vector is updated using an optimization algorithm like Adam. The goal is to find an embedding vector that, when combined with the text prompt, guides the model to generate images closely matching the provided dataset for the new concept.
Cross-Attention
In Stable Diffusion, the text embedding and image embedding interact through cross-attention layers in the U-Net. By training the new embedding vector, it learns to modulate these cross-attention maps in a way that allows the model to generate images representing the desired new concept.
Inference
Once the embedding vector is trained, it can be combined with any text prompt during inference (image generation). The model will then generate images that incorporate the learned new concept, guided by the trained embedding vector and the text prompt. This allows you to generate images based on the new concept by simply including the corresponding token(s) in your prompts.
To get a better understanding of it, I will recommend you check this page for more details.
How to Use Stable Diffusion Textual Inversion AUTOMATIC1111
First, to use the Textual Inversion in Stable Diffusion, you need to get one or more Textual Inversion models that can help you present what you want to show in your AI art work. Mostly, users of Stable Diffusion download Textual Inversion models from the platform - Cvitai. Civitai is a popular website dedicated to hosting and sharing AI models, particularly for Stable Diffusion, including Checkpoint, LoRA, Hypernetwork, Textual Inversion (Embedding), and more.
After you get the Textual Inversion Model from Civitai, please move it into its right AUTOMATIC1111 installation folder, i.e. \stable-diffusion-webui\embeddings.
Then you can launch your Stable Diffusion AUTOMATIC1111 Web UI.
Head to txt2img, scroll down, and you will find the Textual Inversion tab. Click it and all Textual Inversion models will show up.
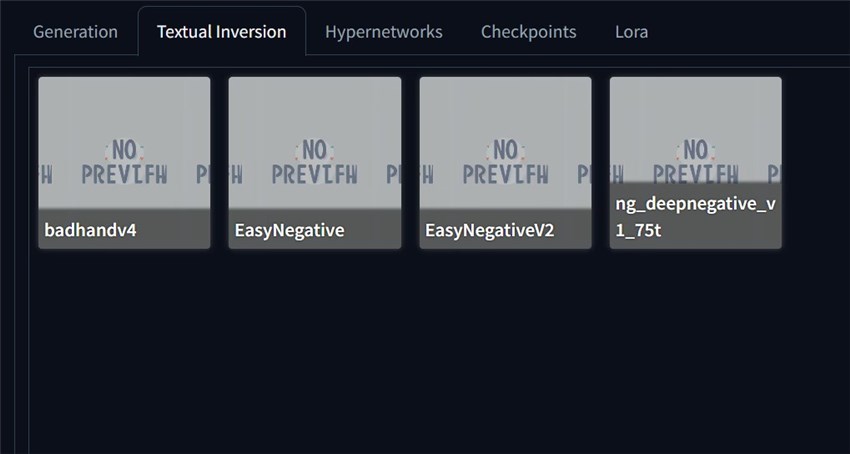
Choose one and the Textual Inversion will be inserted into your prompt. But please note that some Textual Inversion models are required to be in the negative prompt. When you download them from the Civitai, please check their descriptions, and all such information would be told there.
How to Train Textual Inversion in Stable Diffusion
Some readers might wonder "can I train my own Textual Inversion mode", right? The answer is YES. Even though it is not quite easy, especially for Stable Diffusion beginners, I will try my best to provide you with the detailed guide and you can follow it to easily train your own model.
Before we start, I would strongly suggest you check your computer hardware, especially the GPU. Even though there are no strict hardware requirements for training textual inversion models, having a GPU with sufficient VRAM can greatly speed up the process compared to using only a CPU.
Training textual inversion on a CPU is possible, but can be extremely slow, potentially taking 10x or more time compared to using a GPU.
For GPU training, 8GB of VRAM may not be sufficient, as some users reported running out of VRAM even on RTX 3070 GPUs with 8GB VRAM. 12GB or more VRAM is generally recommended.
Google Colab with a GPU runtime is also a popular option for training textual inversion models, as it provides free access to GPU acceleration, though VRAM limitations may still apply.
Now let's get started with how to train your own Stable Diffusion Textual Inversion in AUTOMATIC1111 Web UI.
Preparation
1. To train the Textual Inversion or Embedding model, you need to prepare training pictures in advance. The most important and troublesome part of training any model is the preparation of training data. Here are some advice for you:
- The number of training images does not need to be too many, only 5 - 10 pieces would be enough.
- Remove irrelevant text and watermarks from images.
- The resolution should not be too small (512*512 for SD1.5, and 1024*1024 for the latest SDXL).
- Save them all in a file folder.
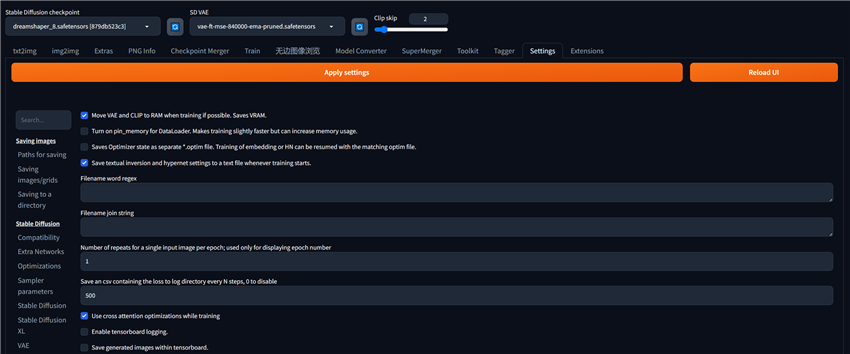
2. Because VAE will affect the training results of Textual Inversion, the VAE model needs to be transferred from video memory to memory in advance. Check "Move VAE and CLIP to RAM when training if possible. Saves VRAM." in Settings > Training. At the same time, check "Use cross attention optimizations while training" below which helps improve memory efficiency. Then save the settings and restart WebUI.
Training
Step 1. Head to the Train Menu and find Create embedding.
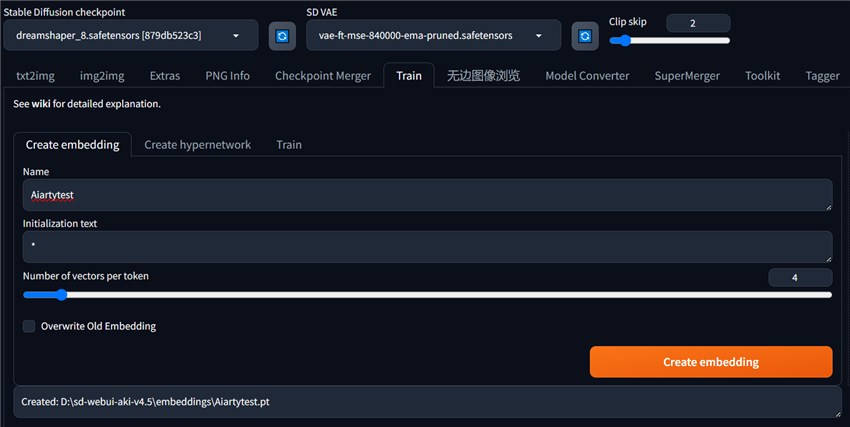
First, in the Name input box, give a name to the Embedding model. It must be unique and cannot be confused with the base model.
Initialization text input box: Enter a text for initialization. Basically, I would recommend you leave it as an asterisk.
Number of vectors per token: Use this parameter to adjust the slider to adjust the size of the Embedding. The larger the value, the more new concept information is embedded into the Embedding. The default maximum number of prompt words input in Stable Diffusion is no more than 75. If 10 tokens are embedded in Embedding, it means that the input space of 10 tokens is saved, that is, one Embedding word represents 10 tokens. However, the larger the value, the better. The larger the value, the more image samples corresponding to the new concepts that need to be provided when training Embedding.
Here are some personal recommendations. If there are 10 or less training pictures, adjust it to 2 to 3 tokens. If there are 10 to 30 training pictures, adjust it to 5 to 6 tokens. If there are 40 to 60 training pictures, adjust it to 8 to 10 tokens. If there are 60 to 100 training pictures, adjust it to 10 to 12 tokens. If there are more than 100 training pictures, adjust to 12 to 16 tokens.
Overwrite Old Embedding: When checked, the old file with the same Embedding name will be overwritten.
Step 2. Now go to the Train tab.
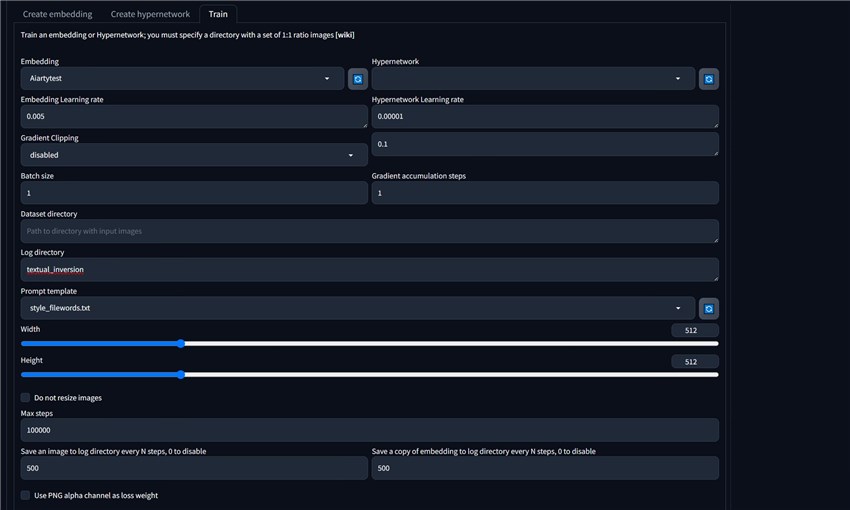
On this window, we will have many parameters to learn about.
Embedding: Select the previously created Embedding name.
Embedding Learning rate: The number entered here represents the training progress rate. When the setting is too high, the Embedding file will be at risk of collapse. For example, if the model learns to carve a large stone and uses a large knife to carve, it will easily cause the stone to be over-cut prematurely (when you enter the training info box) When you see the prompt Loss: nan, it means that the Embedding training failed and the training process is over). However, it is not good to set it too small, as it will cause extremely low efficiency, the training market will be very long, and it may not be able to achieve good results. The best way is to use a relatively high rate in the early stages of the total number of model training steps (usually between 3,000 and 30,000 steps), and use a relatively slow and delicate rate in the middle and late stages.
Gradient Clipping: Gradient clipping function, suitable for Hypernetwork super network models, not suitable for Embedding training, so the default disabled is selected here.
Batch size and Gradient accumulation steps: The value here refers to the number of sample images placed in the VRAM of the GPU each time. If your GPU performance is good enough, the VRAM will be relatively large. This item has a multiplicative relationship with the following item: Gradient Accumulation Steps. For example, if you have 20 training images, if your GPU is good enough, you can set the Batch size to 20, and the Gradient Accumulation Steps to 1. If the GPU is relatively general, you can set the Batch size to 2 and the Gradient Accumulation Steps to 10. Please set according to the actual capabilities of your GPU.
Dataset directory: fill in the directory where the image samples to be trained are located.
Log directory: A copy of the sample images and partial training embeddings will be written to this directory.
Prompt template: It is a prompt word template file used for training. It exists with a .txt extension. Each line in each .txt file is a prompt word. These files can be seen in the stable-diffusion-webui/textual_inversion_templates directory. If you are training a certain style, select style.txt. If it is something, choose subject.txt. In the .txt file [name] represents the name of the Embedding. [filewords] represents the words in the file names of generated images that are generated by the trainer into the target directory. In these .txt files (as shown below), there are several lines listed, marking the detailed type of training. Usually we first make a copy of the .txt file and change the file name, such as custom_subject_filewords. Then make changes in this copy. After opening the copy of the .txt file, you usually only keep the first line a photo of a [name], [filewords], delete the rest, and then save the .txt file. This photo of a [name], [filewords] is actually the training prompt word format, and [name] is the name of the model you chose. When you enter prompt words in the future, this format will activate the Embedding model. After this step is completed, click the brush button on the right side of the Prompt template drop-down menu and select the .txt file name in the drop-down menu: custom_subject_filewords.txt.
Width and height: Preferably 512*512.
Max steps: The value here indicates how many steps the training will stop after. During each training step, a picture is shown to the SD basic large model to improve text embedding. If the training process is interrupted midway, the previously completed steps will be saved. This maximum number of steps is usually related to the number of images used for training. The greater the number of training images, the larger the maximum number of steps will be. Usually 3000 is enough.
Save an image to log directory every N steps, 0 to disable: This means outputting an image representing the current training progress every N steps. The default is 500 steps. If the total number of steps is 3000, it is recommended to set 50 steps. This will make it easier for us to see at which point the images generated by the trained model begin to be overtrained. 50 steps will be relatively more detailed;
Save a copy of embedding to log directory every N steps, 0 to disable: This means outputting a phased training model file every N steps. . The default is 500 steps. Same as above, if the total number of steps is 3000, it is recommended to set 50 steps. This will make it easier for us to see at which point the model generated by training begins to be overtrained. 50 steps will be relatively more detailed.
Use PNG alpha channel as loss weight: Checking this option means that you need to add a PNG image with an alpha channel to the training image. This will cause the focus of training to focus on the image area specified by the alpha channel, thus improving training efficiency ( PNG images with alpha channel come into play when calculating the loss function). If you check this option, you need to do some extra work. First, perform image preprocessing in the normal way; Then you need to use Photoshop or other software to produce a PNG image with an alpha channel; NOTE: Make sure the alpha channel is 8-bit and not monochrome transparent.
Save images with embedding in PNG chunks: This item is to turn on the switch to store images and Embedding in the log directory every N steps. Generally, it is checked by default, and it is recommended to check it.
Read parameters (prompt, etc...) from the txt2img tab when making previews: After the image is generated by SD, the accompanying information It will also be displayed, such as parameters, prompt words, models, etc. This information can be displayed under the image preview box under the tex2img tag. If checked, the preview image generated during training can display parameters in the way mentioned above, so that you can easily observe the progress of training.
Shuffle tags by ', ' when creating prompts: When checked, when generating prompt words, ' will be added between the tags of the prompt words. , ' thereby disrupting the order of tags. Checking this box can help solve overfitting or "weight explosion" problems.
Drop out tags when creating prompts: This item can also help solve the problem of overfitting or "weight explosion", but it is recommended that the slider does not exceed a value of 0.3, generally 0.1.
Choose latent sampling method: select "Multiple Average" deterministic or "Random" random. Do not set it to "single multiplexing" once, otherwise VAE will not be able to sample correctly, which may lead to the death of the super network when training for multiple iterations;
Step 3. Finally, click the Training Embedding (Train Embedding) button to start training. During the training process, you can press the Interrupt button to stop it at any time. For example, if the quality of the output image just meets our expectations, it can be considered that the training has reached the goal in advance, and you can use the model directly.