A Complete Guide on Stable Diffusion ControlNet
Updated on
Stable Diffusion ControlNet is an innovative technology that enhances the Stable Diffusion image generation model by adding extra control inputs. Unlike traditional text-to-image models, ControlNet allows users to guide the image creation process with precise spatial control using inputs like edge maps, human poses, depth maps, and segmentation masks. This means you can shape the composition, pose, and structure of generated images more accurately while still using text prompts. ControlNet achieves this by attaching trainable modules to the original Stable Diffusion model without altering its core, enabling flexible conditioning on various tasks.
In this Stable Diffusion guide, we will delve into the fascinating world of Stable Diffusion ControlNet, exploring its underlying principles, architectural innovations, and the boundless creative potential it holds. Get ready to unlock a new era of artistic expression, where the fusion of human ingenuity and artificial intelligence knows no bounds.
How Stable Diffusion ControlNet Works
ControlNet operates by introducing a modular architecture that enables the incorporation of additional control signals into the Stable Diffusion model's generation process. This is achieved through the attachment of trainable network modules, referred to as ControlNet modules, to the U-Net architecture employed by Stable Diffusion models.
The core principle behind ControlNet is the preservation of the original Stable Diffusion model's weights, which are locked and remain unaltered. Concurrently, the attached ControlNet modules are trained on task-specific datasets to learn how to effectively integrate the additional control inputs provided during the generation process.
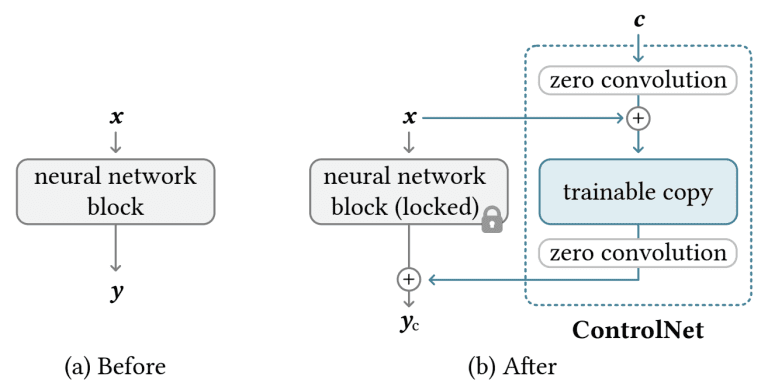
During training, ControlNet receives two distinct inputs: a text prompt and a control map. The control map can take various forms, such as OpenPose keypoints for pose control, Canny edges for edge guidance, or depth maps for depth-aware generation. The model learns to generate images that adhere to both the text prompt and the spatial constraints imposed by the control map, enabling users to exert precise control over the generation process.
The key architectural innovation of ControlNet lies in its modular design, which allows for the seamless integration of the control signals without compromising the original Stable Diffusion model's performance. This is achieved through a weight replication mechanism, where the Stable Diffusion model's weights are duplicated into two sets: a "locked" set that preserves the original model's capabilities, and a "trainable" set that learns the new conditioning introduced by the control inputs.
These two weight sets are connected through a specialized "zero convolution" layer, where the convolution weights are initialized to zero and evolve to optimal settings during the training process. This approach ensures that the original Stable Diffusion model remains intact, while the ControlNet modules learn to effectively incorporate the control signals without disrupting the model's core functionality.
Furthermore, ControlNet's modular design enables the same ControlNet architecture to be used with different diffusion models, as long as the underlying architecture is compatible. This flexibility allows for the seamless integration of ControlNet into various diffusion models, expanding its applicability and potential impact across a wide range of domains.
By adhering to these principles of operation, ControlNet introduces a novel and robust approach to incorporating control signals into the image generation process, enabling unprecedented levels of spatial consistency and user control while leveraging the powerful capabilities of Stable Diffusion models.
To summarize, there are three major steps happening during this process,
Step 1. Preprocessing
The control input, which can be an image, a sketch, or any other relevant data, is preprocessed to extract the desired spatial information as a control map.
Depending on the type of control, different preprocessing techniques are employed: For edge control, edge detection algorithms like Canny edge detection are used to extract edge maps from the input image. For pose control, pose estimation models like OpenPose are used to detect human poses and generate keypoint maps. For segmentation control, semantic segmentation models are used to generate segmentation masks for different objects or regions. For depth control, depth estimation models are used to generate depth maps from the input image.
The preprocessed control map is then encoded into a suitable format (e.g., a tensor) for input to the ControlNet module.
Step 2. Conditioning
During the diffusion process, ControlNet conditions the image generation on both the text prompt and the control map.
The text prompt is encoded using the Stable Diffusion model's text encoder, while the control map is processed by the ControlNet module.
The ControlNet module consists of trainable convolutional layers that learn to extract relevant features from the control map and fuse them with the text embeddings.
This fusion of text and control information is then used to condition the diffusion process at various stages of the U-Net architecture.
The conditioning is achieved through cross-attention mechanisms, where the control information modulates the attention maps of the diffusion model, allowing it to follow the specified spatial constraints.
Step 3. Generation
The conditioned diffusion model generates an image that matches the text prompt while adhering to the spatial guidance provided by the control map.
The generation process follows the standard Stable Diffusion pipeline, with the addition of the control information influencing the generation at various stages.
The final generated image is spatially consistent with the control map, while also reflecting the semantic content described in the text prompt.
See also: How to Face Swap in Stable Diffusion using ControlNet Extension
How to Install Stable Diffusion ControlNet in AUTOMATIC1111
By default, the newly installed AUTOMATIC1111 Web UI does not give you access to the ControlNet extension. And here are the steps to install it.
Step 1. Run your Stable Diffusion AUTOMATIC1111 Web UI.
Step 2. Go to the Extensions tab and choose the Available tab under it.
Step 3. Input this URL: https://github.com/Mikubill/sd-webui-controlnet into the URL for extension's git repository search box.
Step 4. Click the Install button and then wait for its installation.
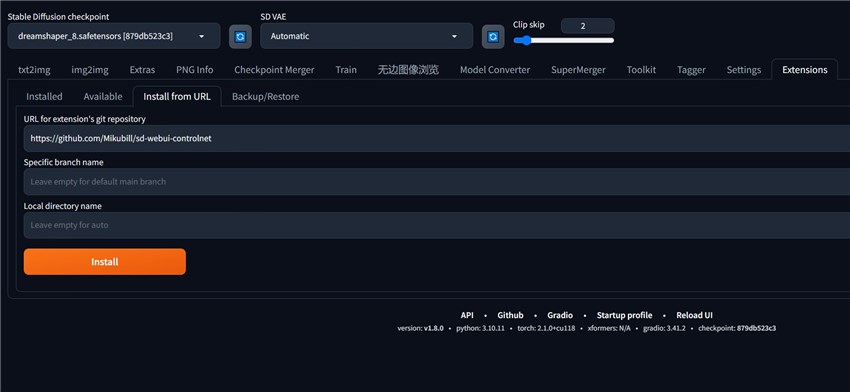
Step 5. When it is installed successfully, you will get the confirmation message. And then you can restart AUTOMATIC1111 and will see the ControlNet extension appearing in your Stable Diffusion.
Step 6. But the job has not finished yet. You then need to download the ControlNet models, so then you can use this extension for art generation.
Go to the ControlNet model page, and download the models which you prefer (Do not know which models to download and how they differ from each other? No worries. I will show you the details in the next part.). I would suggest you download both .pth and .yaml files. After the downloading finishes, move them into the ControlNet extension models directory, i.e. stable-diffusion-webui\extensions\sd-webui-controlnet\models.
Step 7. Now restart the AUOTOMATIC1111 Web UI and you will see the models.
Choose one and the Textual Inversion will be inserted into your prompt. But please note that some Textual Inversion models are required to be in the negative prompt. When you download them from the Civitai, please check their descriptions, and all such information would be told there.
Stable Diffusion ControlNet Types, Preprocessors, and Models
How many ControlNet types are there? By the time when we write this blog post, here are all the types,

Each ControlNet type has a corresponding model, but each type can have multiple different-purpose preprocessors. When you select a preprocessor, the model should match it, like the openpose preprocessor going for the openpose model. It is quite easy since you can tell it from their names.
OK, next, we will dig deeper into these types, preprocessors, and models, to find out what they are good at or work for specifically. But please note that we will not cover them all, but the most popular ones among Stable Diffusion users.
1. OpenPose
For the OpenPose ControlNet type, its purpose is to enable control over the pose and positioning of human figures in the generated images. It achieves this by leveraging human pose estimation models to detect and extract keypoints representing the locations of body joints and limbs from a reference image or user-drawn stick figure.
The OpenPose ControlNet type has several preprocessors, each designed to handle different aspects of human pose detection and control. Here are the key OpenPose preprocessors and their features:
1. OpenPose: This is the basic OpenPose preprocessor that detects the positions of key body joints such as eyes, nose, neck, shoulders, elbows, wrists, knees, and ankles. It allows for controlling the overall body pose while ignoring other details like clothing, hairstyles, and backgrounds.
2. OpenPose_face: In addition to the keypoints detected by OpenPose, this preprocessor also captures facial details like mouth, eyebrows, and facial contours. It is useful for controlling both the body pose and facial expressions.
3. OpenPose_hand: This preprocessor detects hand and finger keypoints in addition to the full body keypoints. It enables precise control over hand and finger positioning.
4. OpenPose_faceonly: As the name suggests, this preprocessor focuses solely on detecting facial keypoints and details, ignoring the rest of the body. It is useful for controlling only the facial features while leaving the body unconstrained.
5. OpenPose_full: This preprocessor combines the capabilities of OpenPose_face and OpenPose_hand, detecting keypoints for the full body, face, and hands.
6. dw_openPose_full: This is an enhanced version of OpenPose_full, utilizing a more accurate and robust pose detection algorithm called DWPose. It provides improved accuracy, especially for hand keypoint detection.
2. Canny
The Canny type excels at preserving the fine edge details and contours from the input edge map in the generated image. This makes it suitable for tasks like image illustration, line drawing coloring, and texture/color modification while retaining the original composition.
When the input edge map corresponds to a human figure, the Canny model can control the pose and positioning of the generated person very effectively. It can even generate images of different genders based on the same pose edge map.
3. Depth
The depth type in ControlNet is designed to control the positioning and depth of objects/elements in the generated image by providing depth guidance through depth maps as control inputs.
It works particularly well for tasks like positioning objects/elements at different perceived depths (near vs far), controlling the 3D structure and layout of the scene, and adding depth and perspective to flat images or artwork.
The depth type in ControlNet has three main preprocessors,
depth_midas: This preprocessor utilizes the MiDaS model for depth estimation. It excels at capturing fine details for objects closer to the camera but may lose some detail for objects further away. As such, the Midas preprocessor is recommended for non-realistic artwork or images where prioritizing detail on near objects is more important.
depth_leres: This preprocessor uses an improved depth estimation model over MiDaS. It performs better at retaining details of objects further away, such as windows and buildings. However, it may not perform as well as Midas for very close objects. The depth_leres preprocessor provides a more balanced overall detail capture across depth ranges, making it a suitable choice when detail on distant objects is crucial or when a balanced representation across depths is desired.
depth_leres++: Compared to depth_leres, this preprocessor can render more details.
4. Lineart
As its name can tell, the Lineart type is specifically designed to work with line art images or illustrations as control inputs. Its primary purpose is to guide the image generation process while preserving the composition, structure, and line details from the provided line art. This type excels at tasks such as colorizing line art drawings or illustrations, converting real-life photographs into illustrations or line art, and modifying textures and appearances while retaining the underlying line art composition.
For the Lineart type, ControlNet offers three main preprocessors. The first is the basic lineart_standard preprocessor, which extracts general line art or illustration details from the input image. This preprocessor is suitable for various line art coloring and conversion tasks, as it preserves the overall composition and structure defined by the lines in a versatile manner.
The second preprocessor is lineart_anime, which is specialized for anime-style line art. This preprocessor renders outlines in a clean, simplistic anime aesthetic, capturing distinctive features that are ideal for anime illustrations, manga art, or anime-inspired creations.
The third preprocessor is lineart_anime_denoise, which is a variant of the "Lineart_anime" preprocessor. This preprocessor further simplifies the line art by reducing details, producing a more abstract and minimalistic representation. It emphasizes the primary elements while removing unnecessary details, resulting in a cleaner and more streamlined aesthetic.
5. SoftEdge
SoftEdge type's primary objective is to guide the image generation process while preserving the overall composition, structure, and soft edge details from the provided input. This type excels at tasks such as colorizing soft line art drawings or illustrations, converting photographs into soft line art or illustrations, and modifying textures and appearances while retaining the underlying soft edge composition.
For the SoftEdge type, you have three major preprocessors that need to learn about and can be employed in most occasions.
One of the preprocessors is softedge_hed (Holistically-Nested Edge Detection), which extracts soft edges and line details from the input image. This preprocessor is suitable for general soft line art coloring and conversion tasks, as it preserves the overall composition and structure defined by the soft lines in a versatile manner.
Another preprocessor is softedge_pidinet (Pixel-Deconvolutional-Networks), which specializes in extracting smooth, continuous soft edges and contours. This preprocessor produces clean, unbroken line outputs, making it well-suited for soft line art and illustration tasks that require a seamless and polished appearance.
Additionally, the sources mention softedge_teed (Two-stage Edge Detector) as a preprocessor used in a specific ControlNet model for soft edges. TEED is another option for extracting soft edges and line details, although fewer details are provided about its specific capabilities.
6. Scribble/Sketch
The Scribble/Sketch type in ControlNet is designed to work with hand-drawn sketches or scribbles as control inputs. Its primary purpose is to guide the image generation process while preserving the overall composition and structure defined by the user's sketch or scribble lines.
This type excels at tasks such as generating images from rough hand-drawn sketches or doodles, allowing users to sketch out desired compositions and have the AI fill in the details, and enabling creative exploration by starting from simple scribbles.
The Stable Diffusion ControlNet Scribble type offers several preprocessors to extract edges and line details from the user's scribble or sketch input.
One of these preprocessors is Scribble_hed, which utilizes the Holistically-nested Edge Detection (HED) algorithm. This preprocessor tends to produce thicker, more pronounced edges, making it suitable for cases where you want the generated image to closely follow the overall structure defined by the scribble lines.
Another preprocessor option is Scribble_pidinet, which employs the PiDiNet (Pixel-Deconvolutional-Networks) algorithm for edge extraction. This preprocessor generates smoother, more continuous edges compared to HED, helping to preserve finer details and producing cleaner line outputs from the scribble input.
The Scribble_xdog preprocessor, on the other hand, uses the XDOG (Exponential gradient-based edge-detector using the Dog filter) algorithm for edge detection. It tends to produce thinner, more delicate edges compared to HED and PiDiNet, making it suitable for cases where you want the generated image to have a more artistic, sketchy look while still following the overall scribble structure.
Additionally, there is the t2ia_ketch_pidi preprocessor, which combines the T2I-Adapter (Text-to-Image Adapter) and PiDiNet algorithms. This preprocessor first downscales the scribble input using T2I-Adapter, creating a low-resolution representation, and then applies PiDiNet edge detection on this downscaled input. This approach helps in capturing both global and local edge details from the scribble while being more efficient in terms of computational resources.
How to Use Stable Diffusion ControlNet
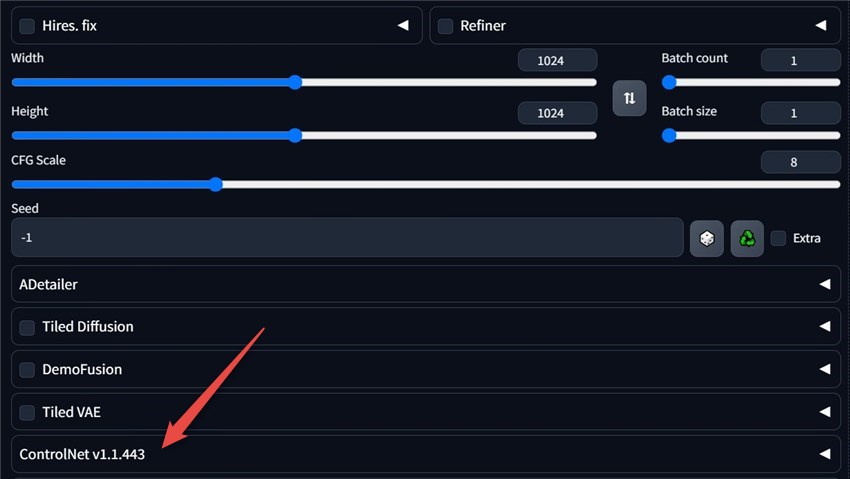
Now let's learn about how to use ControlNet and set all the parameters related.
Step 1. In your Stable Diffusion txt2img page, set everything except the ControlNet right, such as, prompts, Checkpoint, VAE, Clip Skip, LoRA, Textual Inversion, Sampling method and steps, width and height, CFG Scale, batch count and size, etc.
Step 2. Now go to the ControlNet section, and here are all the parameters.
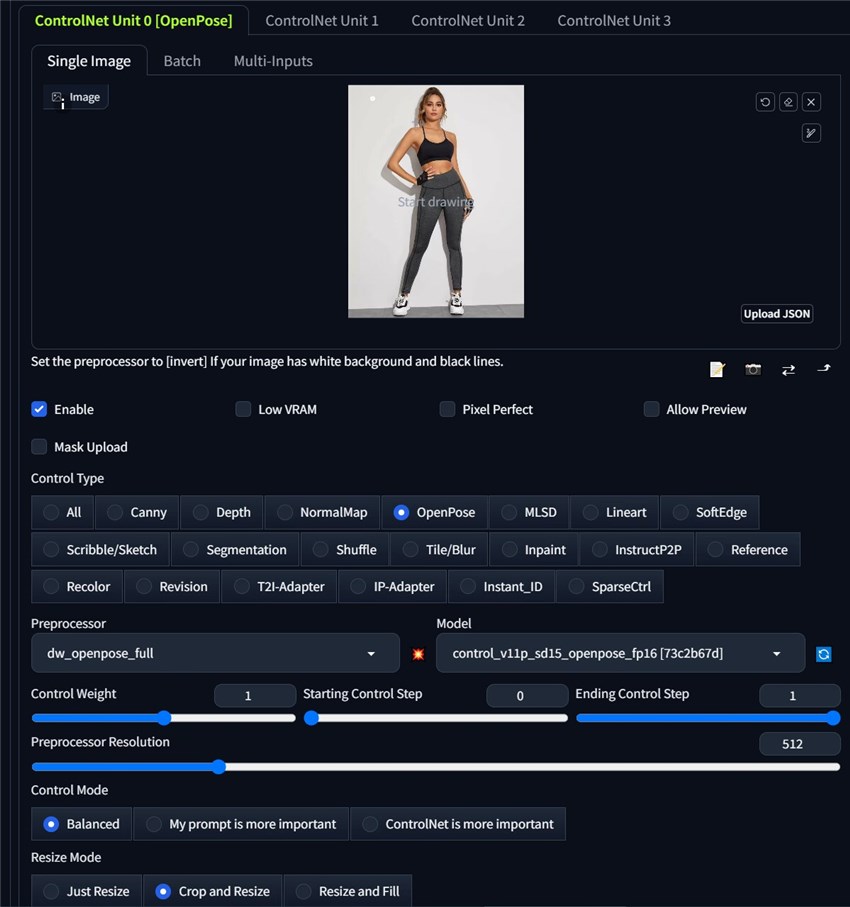
Let's learn all of them one by one.
First in the image uploading area, you need to upload your reference image.
Then check the Enable box, which means that you have enabled the ControlNet feature and it will work in your next AI art creation.
Check Low VRAM if your computer Video Random Access Memory, or GPU memory is not sufficient for the work.
Check the Pixel Perfect box if you want the control image and the generated image in the same size. Mostly, turning it on or off does not matter.
Then the Allow Preview feature allows you to preview the output of the selected preprocessor on the input image before generating the final image.
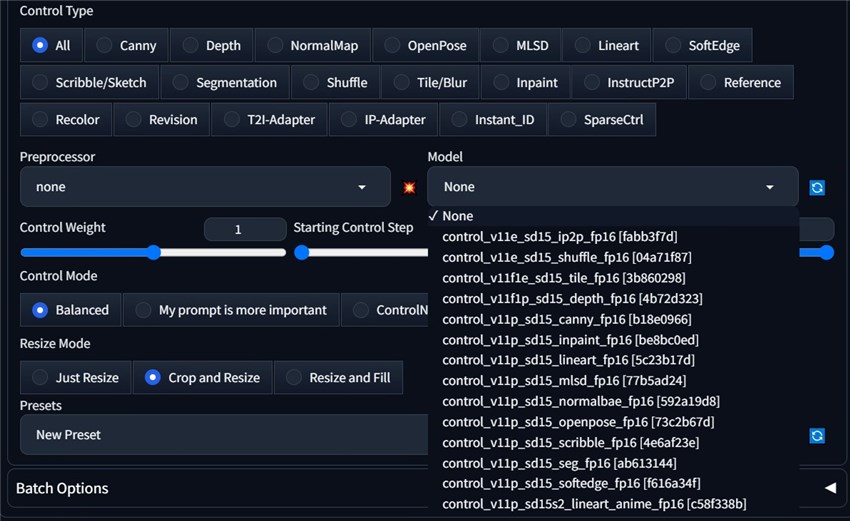
In the Control Type section, select one. When you make the decision, the preprocessor and model will automatically match the type. You can change the Preprocessor for sure if it is not what you want. Here we take OpenPose control type and the dw_openpose-full preprocessor as an example.
Then it comes to the three major features: Control Weight, Starting Control Step, and Ending Control Step, which allow users to fine-tune the balance and timing of ControlNet's influence during the image generation process. Adjusting them can help achieve the desired balance between adhering to the control input and the creative freedom of the text prompt and base model.
And here are the details:
Control weight determines how much influence the ControlNet input has on the final generated image compared to the text prompt. A higher control weight means the ControlNet input will have a stronger effect, and the generated image will adhere more closely to the control map. A lower control weight reduces ControlNet's influence, allowing the text prompt to have more impact on the output.
The starting control step specifies at what percentage of the diffusion process ControlNet should begin applying its conditioning effect based on the control input. A value of 0 means ControlNet starts influencing the generation from the very first step. Higher values delay when ControlNet kicks in, allowing the text prompt and base model to have more creative freedom initially before the control map takes effect.
The ending control step determines at what percentage of the diffusion process ControlNet should stop applying its conditioning effect from the control input. A value of 1 means ControlNet influences the generation until the very last step. Lower values cause ControlNet to stop its control earlier, giving the model a chance to further refine and blend the control map's effect in the remaining steps.
Proprecessor Resolution: It refers to the resolution at which the input image is processed by the selected preprocessor before being used as a control map for guiding the image generation. 512 would be good enough.
Control Mode: This is quite easy to understand. The Balanced mode considers both your reference image and the prompt you write; the My prompt is more important mode prioritizes the prompt you write; while the ControlNet is more important mode focuses more on the reference image rather than the prompt.
Resize Mode: Three options available, i.e. Just Resize, Crop and Resize, Resize and Fill.
Just Resize: This mode simply resizes (scales up or down) the control input image to match the output image dimensions specified in the width and height fields. It does not preserve the aspect ratio of the input image, which can result in distortion if the aspect ratios don't match between the input and output.
Crop and Resize: In this mode, the control input image is resized to fit within the output image dimensions while maintaining its original aspect ratio. If the aspect ratios differ between input and output, this results in letterboxing or pillaring (black bars on the sides or top/bottom) in the output image to accommodate the resized input.
Resize and Fill: This mode resizes the control input image to completely fill the output image dimensions while preserving its aspect ratio. If the aspect ratios don't match, a portion of the input image may get cropped off rather than adding letterboxing/pillaring.
OK, that is all about the ControlNet parameters. And here are my control image and final testing generating image controlled by the OpenPose type. Do they look same in the pose style?
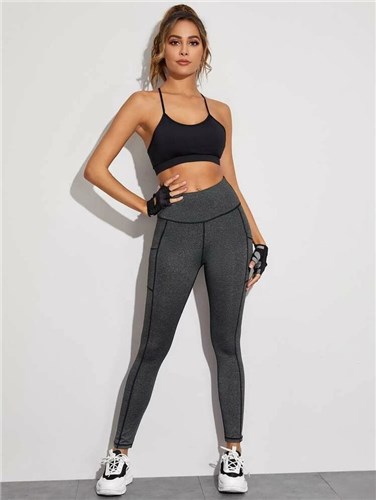
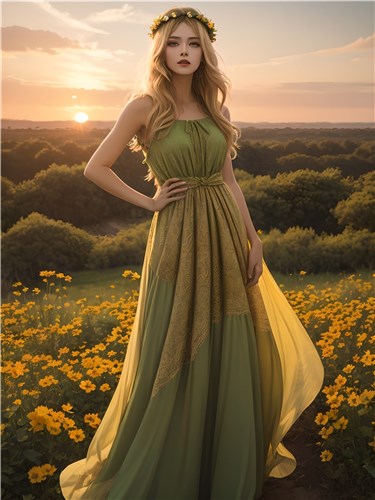
Prompt: portrait of a pretty blonde woman,a flower crown,earthy makeup,flowing maxi dress with colorful patterns and fringe,a sunset or nature scene,green and gold color scheme
You May Also Like
Rico Rodriguez is an experienced content writer with a deep-rooted interest in AI. He has been at the forefront of exploring generative AI tools like Stable Diffusion. His articles offer valuable insights into the world of AI, providing readers with practical tips and informative explanations.