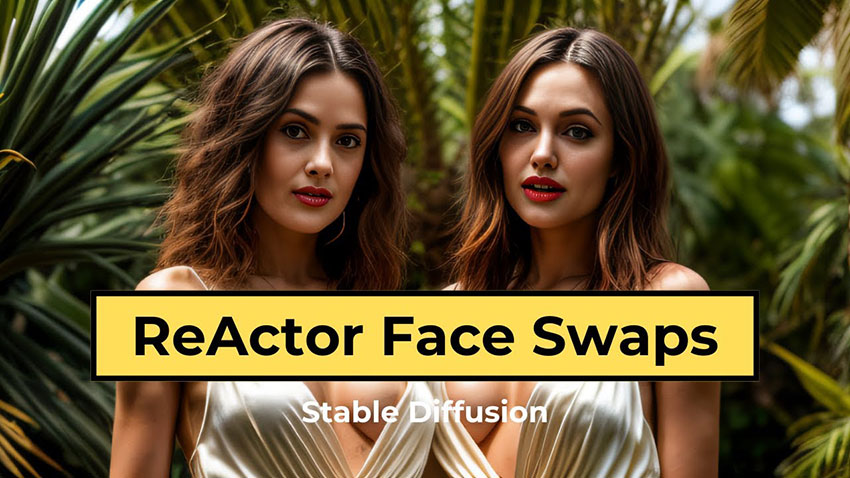
Morph Mania: The Ultimate Guide to Face Swapping in Stable Diffusion
Updated on
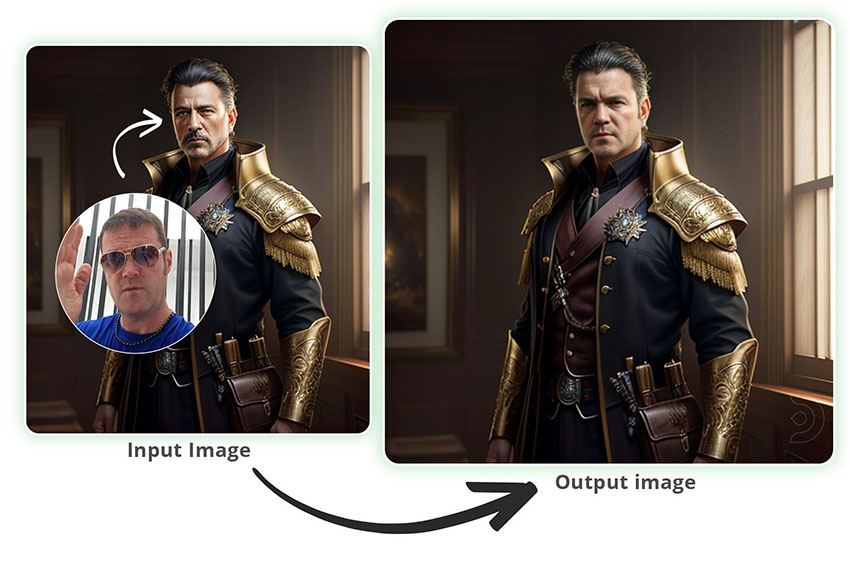
Show your inner prankster with Stable Diffusion's face-swapping feature! This powerful tool lets you easily swap faces in images, opening up endless creative possibilities. If you're looking to create hilarious mashups or dive into artistic experimentation, Stable Diffusion has got you covered. We'll walk you through installing the face swap extension, preparing your images, crafting effective prompts, and even troubleshooting common issues. So grab your favorite photos and let's have some fun with face swapping!
How to Face Swap in Stable Diffusion [Step-by-step Guide]
Before starting Stable Diffusion face swapping, ensure you have the necessary tools and knowledge in place to achieve stunning results.
How to Face Swap in Stable Diffusion: Preparation
1. Install Stable Diffusion and Face Swap Extensions
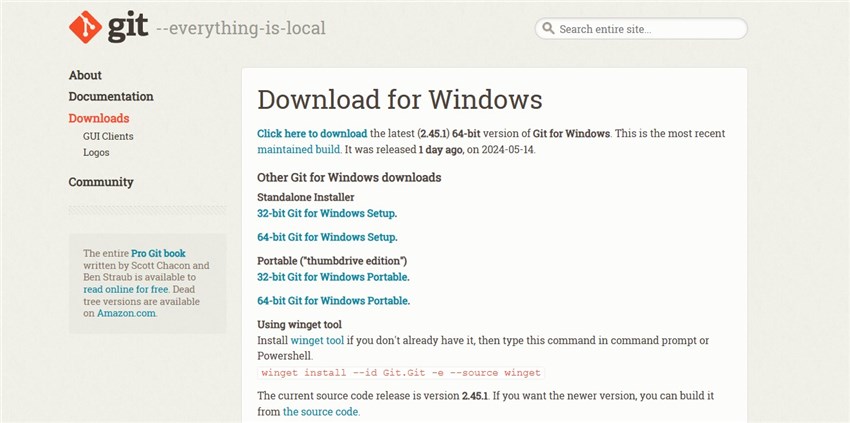
Stable Diffusion: Download and install the latest version of Stable Diffusion from the official GitHub repository: https://github.com/Stability-AI/stablediffusion.
Stable Diffusion does not have a native, built-in feature for face swapping. With a dedicated Stable Diffusion face swapping extensions like ReActor and Roop, Stable Diffusion can detect a face in a source image and apply it to a generated image. These extensions provide user-friendly interfaces and additional features to streamline the process.
To install, go to the Stable Diffusion web UI, click on the Extensions tab, find and install the
face swapping extension for Stable Diffusion.
2. Gather Source Images and Target Faces
Source Images: Prepare high-quality images of the individuals or objects whose faces you want to swap in Stable Diffusion. Ensure the images are well-lit, have a clear view of the face, and match the desired perspective for the final result.
Target Faces: Select high-resolution images of the faces you want to transplant onto the source images. Choose faces that are similar in lighting, angle, and expression to the source faces for a seamless blend.
3. Familiarize Yourself with Stable Diffusion Basics
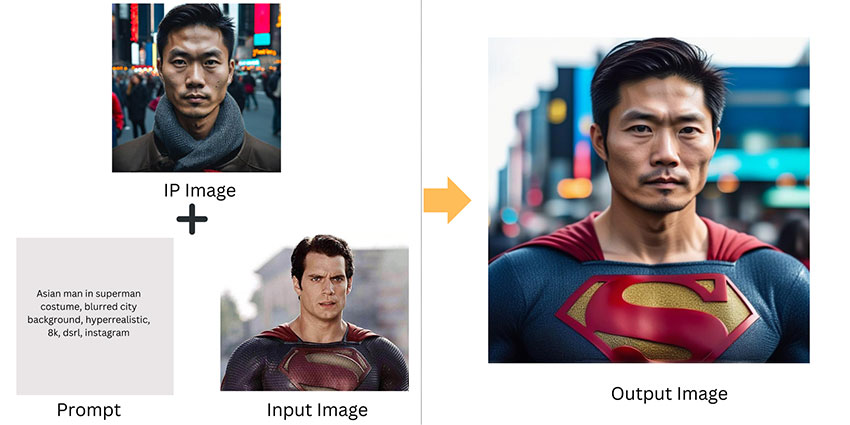
Text-to-Image Generation: Understand the fundamentals of generating images from text prompts in Stable Diffusion. This will be crucial for crafting effective prompts that accurately describe your desired face-swapped images.
Image Editing: Familiarize yourself with image editing software and Stable Diffusion image enhancer like Photoshop or Aiarty Image Enhancer. These tools will be useful for refining and enhancing the generated face-swapped images.
Choose the Face Swapping Method in Stable Diffusion
Stable Diffusion offers a variety of face-swapping techniques, each with its own strengths and applications. Selecting the right Stable Diffusion face swapping model will depend on your specific needs and desired outcomes.
For high-quality single-image swaps, ControlNet is a top choice. For complex multi-image transformations, LoRA models shine. For quick and simple experiments, random naming is a convenient option. And for a user-friendly and feature-rich experience, face-swapping extensions are worth exploring. Below we will talk about different Stable Diffusion's face swapping methods in details:
1. ControlNet Face Swapping: High-Quality Single-Image Swapping
ControlNet face swapping excels at transforming a single face in an image with remarkable precision and detail. It’s ideal for creating realistic face swaps, replicating famous faces onto historical figures, or seamlessly blending faces from different photographs.
See also: A Complete Guide on Stable Diffusion ControlNet
2. LoRA Model-Based Face Swapping: Complex Multi-Image Swapping
LoRA models enable the manipulation of multiple faces within an image, allowing for intricate and creative face-swapping scenarios. It’s suitable for swapping multiple faces in group photos, transforming entire scenes with different faces, or creating fantastical face-swapping scenarios.
3. Random Naming Face Swapping: Simple Yet Variable Results
Random naming face swapping provides a straightforward approach to face swapping, utilizing random names to identify faces and assign targets. This Stable Diffusion face swapping model is useful for quick experiments, exploring different face-swapping possibilities, or generating a variety of results with minimal effort.
4. Face Swapping Extensions: Streamlined Workflow and Enhanced Features
Face-swapping extensions like Stable Diffusion ReActor and Roop offer user-friendly interfaces, enhanced functionality, and streamlined workflows specifically designed for face swapping tasks. These tools cater not only to beginners seeking an intuitive user experience but also to advanced users who want to leverage features such as face blending and masking.
Both Stable Diffusion ReActor and Roop integrate intelligent algorithms that allow for highly natural facial synthesis across varying styles and expressions, significantly increasing the flexibility and precision of creative projects. The face blending feature enables users to seamlessly combine multiple facial images to create smoother transition effects, while the masking function allows for precise control over specific facial regions, further optimizing the composition.
The Face Swapping Process in Stable Diffusion
With the preparatory steps complete, it's time to start face swapping using Stable Diffusion. Follow these steps to transform faces in Stable Diffusion.
1. Launch Stable Diffusion and Choose Your Method
Fire up Stable Diffusion and navigate to the interface where you'll perform the face-swapping magic. Based on your desired outcome, choose the face-swapping method that aligns with your needs. For single-image swaps with high quality, opt for ControlNet. For intricate multi-image transformations, select LoRA models. For quick experiments, use random naming. And for a user-friendly experience, explore face-swapping extensions.
While other face-swapping extensions may exist, ReActor has emerged as a powerful and user-friendly option for Stable Diffusion. Here’s how to leverage ReActor for seamless face swaps within your images.

2. Install ReActor Extension
Automatic1111: Navigate to Extensions > Install from URL within your Automatic1111 WebUI. Paste this URL: https://github.com/Gourieff/sd-webui-reactor.git and click Install. Once installed, close and restart Stable Diffusion (webui-user.bat) for the extension to take effect.
Ensure you have Visual Studio 2022 or VS C++ Build Tools for successful installation. (Optional: Consider mentioning common installation errors and the troubleshooting guide for those who encounter issues.

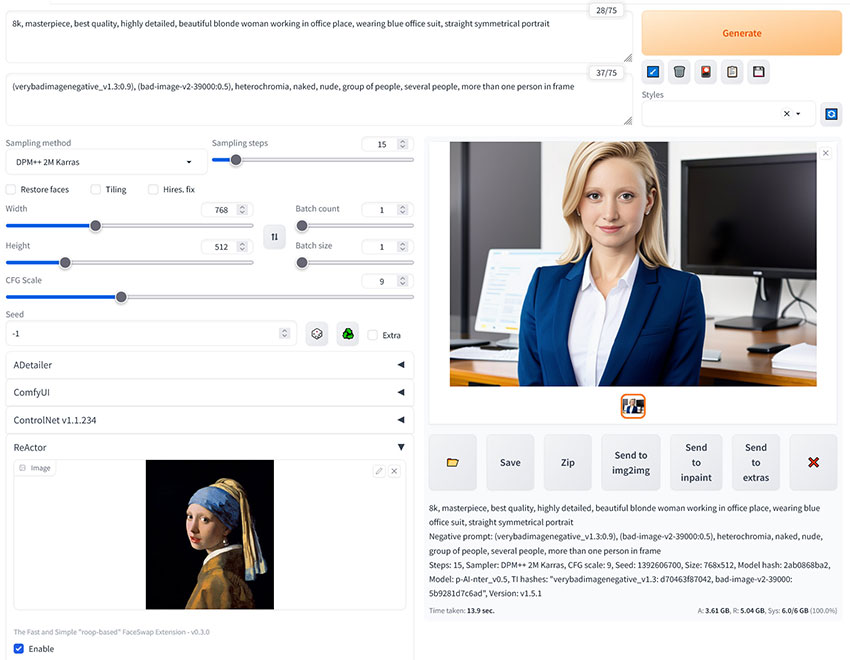
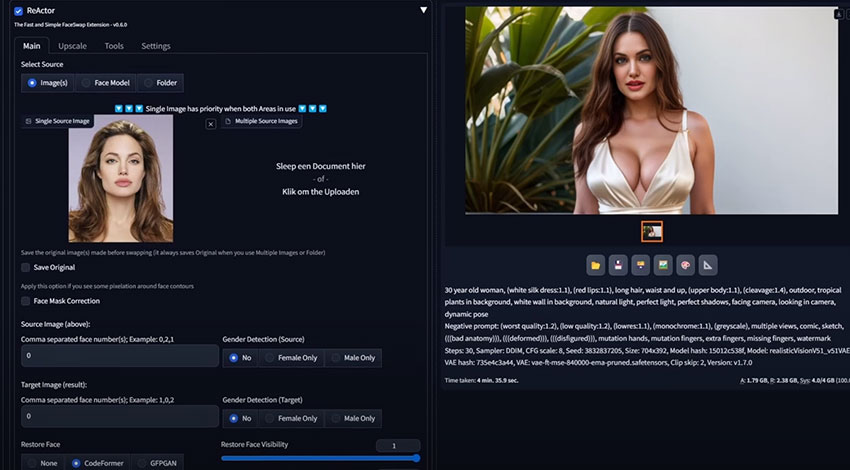
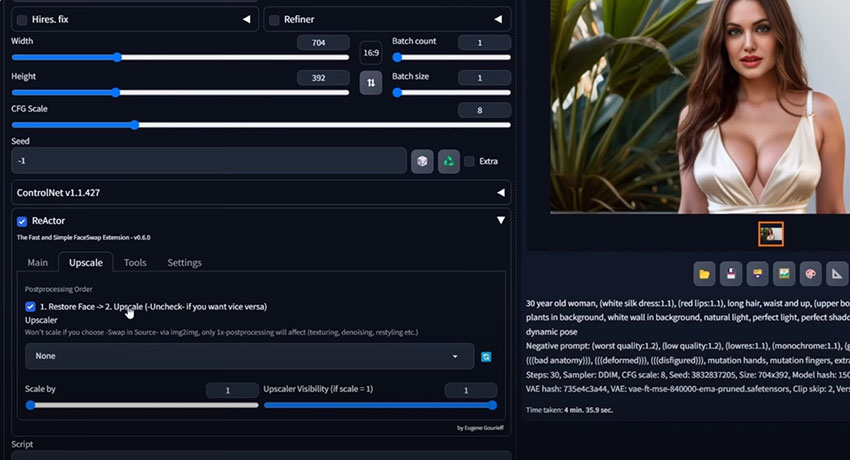
3. Set Up ReActor for Face Swapping
Automatic1111, switch to the txt2img tab and locate the new ReActor tab. Click the checkbox to activate it. Upload a high-resolution, close-up image of the face you want to swap. Clearer images ensure better results. In
ReActor settings, consider enabling the Face Mask Correction option for potentially improved results.

4. Craft a Descriptive Prompt
Compose a clear prompt. Write a text prompt that accurately describes the desired outcome of your face-swapped image. Include details about the facial expressions, positioning, and any specific modifications you want to achieve.
5. Fine-tune Parameters and Generate
Explore the various parameters available, such as steps, sampling method, and CFG scale. These settings can influence the image quality, style, and level of detail.
Click the "Generate" button and watch as Stable Diffusion brings your face-swapping vision to life. The generated image will appear in the output area.
6. Iterate and Refine
Don't hesitate to experiment with different prompts, parameters, and face-swapping methods to achieve the best results. Utilize image editing software to further enhance the face-swapped image. Adjust lighting, colors, and details to achieve a polished and professional look.
Conclusion
In summary, mastering a face swap in Stable Diffusion is a straightforward process once you've installed the right face swap extension for SD. By combining the powerful image generation capabilities of Stable Diffusion with specialized extensions like Roop, ReActor, or InsightFace, you can seamlessly replace faces in images while maintaining realism and style consistency. The ability to perform a Stable Diffusion face swap unlocks a new level of creative control, allowing you to personalize your generated images without losing any of their original artistic style. This guide provides all the knowledge you need to start face swapping in Stable Diffusion and elevate your creations to a more personalized and professional level.
 FAQs about Stable Diffusion Face Swap
While the Roop extension for Stable Diffusion is no longer actively maintained, there's a powerful alternative called ReActor that offers similar functionality. Here's a guide on how to face swap in Stable Diffusion using ReActor. Install ReActor extension in Automatic1111. Get high-res source image and target face (similar lighting/angle). Enable ReActor and upload target face. Write a prompt describing the desired face swap. Adjust Stable Diffusion settings (steps, sampler) for best results. Generate the image and refine with editing software if needed.
Select the face-swapping method and extension that aligns with your desired outcome. For high-quality single-image swaps, consider ControlNet. For complex multi-image transformations, LoRA models are suitable. For user-friendly experiences, explore extensions like ReActor.
Use high-resolution source images with clear facial features and target face images that match in lighting, angle, and expression for seamless blending. Write clear and detailed prompts that accurately describe the desired outcome. Specify facial expressions, positioning, and any specific modifications you want to achieve. Experiment with different parameters like steps, sampling method, and CFG scale to influence image quality, style, and detail. Generate multiple iterations to refine the results.
Blurry or Distorted Results: Try lowering the generation resolution or adjusting parameters like CFG scale and steps. Unnatural Facial Features: Revise the prompt text to provide more specific details or try using different face images. Inconsistent Swapping Effects: Experiment with different face-swapping methods or extensions to find the most suitable approach for your images.
Ensure you have the rights to use the images you employ for face swapping. Avoid using images of individuals without their consent or in a way that could infringe on their privacy or reputation. Refrain from generating face-swapped images that promote discrimination, violence, or any form of harm or offense.
LoRA (Low-Rank Adaptation) is the most effective method, particularly for personalized or target-based faces. Users prefer it over alternatives like ReActor, which often struggles with face realism, especially in non-photorealistic images such as anime or cartoons. FaceID and ipadapter are also popular, but they sometimes result in blurry or low-resolution faces. LoRA allows for more tailored face swapping, providing flexibility for both realistic and stylized images, including anime, without compromising quality. For SDXL, creating a custom LoRA model with 10-15 carefully selected images is an efficient approach, offering higher control and flexibility.
Yes, Stable Diffusion can swap faces by using dedicated face-swapping tools or extensions built on top of it. While the base Stable Diffusion model focuses on text-to-image generation, integrating add-ons like Roop or InsightFace enables precise face replacement in generated or existing images. These tools use facial recognition and alignment algorithms to ensure the swapped face matches the pose, lighting, and style of the original image, making the result look natural.
To improve face swapping, try FaceID V2 1.5 (or InstantID XL if it works for you). For better results, use Lineart/Tile/Inpainting ControlNet (without mask) and Iterative Mixer in ComfyUI. If not training a Lora, IP Adapter + Reactor is a solid option. For face detail, combine it with Flux and a Lora for optimal outcomes. To enhance consistency, use IPAdapter with unifiedloader-node. For advanced workflows, consider LoRa + Flux, or create virtual avatars with UE5 for higher flexibility and realism.
One of the most popular face swap extensions for Stable Diffusion is Roop, which allows you to replace a face in an image with another face using just a single reference photo. Another is InsightFace, known for more advanced facial alignment and editing. These extensions integrate seamlessly with Stable Diffusion’s UI (such as AUTOMATIC1111 WebUI), letting you combine AI image generation with realistic, high-quality face swaps.
You May Also Like
Rico Rodriguez is an experienced content writer with a deep-rooted interest in AI. He has been at the forefront of exploring generative AI tools like Stable Diffusion. His articles offer valuable insights into the world of AI, providing readers with practical tips and informative explanations.