How to Use Stable Diffusion to Remove & Change Clothes
Updated on
Stable Diffusion has taken the AI art world by storm, generating stunning visuals based on simple text prompts. But its capabilities extend beyond creating entirely new images. This powerful tool can also be used to manipulate existing photos, including the fascinating ability to change and remove clothing. This guide will delve into the exciting world of using Stable Diffusion to remove clothing in images with the inpainting features.
Note: It's crucial to acknowledge the ethical concerns surrounding AI-powered clothing removal. Stable Diffusion should only be used to remove clothes from images you own or have explicit permission to modify.
Part 1. How to Remove Clothes in Stable Diffusion
Stable Diffusion makes it possible to effortlessly remove clothing from photos. So everyone can become a fashion editor. The steps are simple. Here's the guide on using Stable Diffusion to remove clothing in images:

Removing or changing clothes in Stable Diffusion works best with sharp and detailed images. If your photo starts out pixelated or low-res, try Aiarty Image Enhancer.
It can upscale portraits to 4K, restore skin texture, fix noisy, blurry, and compression artifacts, giving Stable Diffusion a much cleaner reference to generate realistic clothing changes.
Step 1. Load your photo to Stable Diffusion
Launch your Stable Diffusion interface. Navigate to the img2img tab. This section focuses on manipulating existing images. Within the img2img tab, locate the inpaint sub-tab. This specific area is designed for editing and filling in specific portions of an image and you can remove cloth here.
Drag and drop your image into the designated image upload area, or click the area to select a file from your computer.
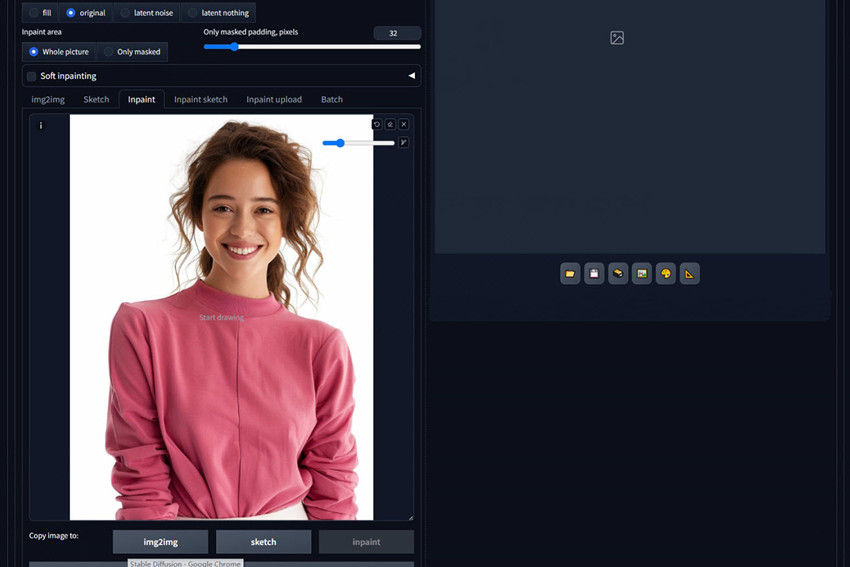
Step 2. Masking the clothing that you want to remove
After your photo is imported into Stable Diffusion, you need to choose the cloth that you want to remove. With the Draw mask option still active, you can meticulously paint over the clothing you want to remove. You can drag the provided slider to adjust the brush size for detailed masking.
Remember, avoid the face and any other element you want to remain unchanged. The more detailed and accurate your mask is, the better the final results will be.
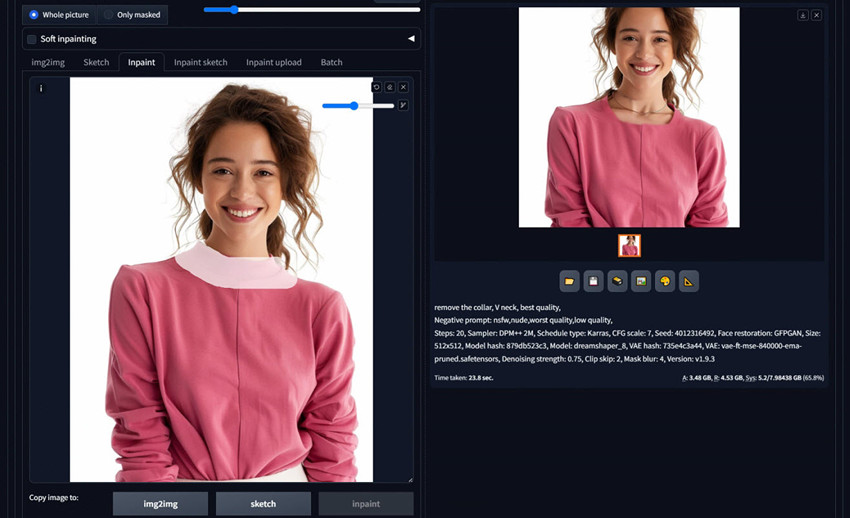
Step 3. Crafting the prompt and adjust the inpainting settings
Once you've meticulously masked the clothing you want to remove using the brush tool, you need to provide a prompt to remove the area.
- Describe the desired outcome: Provide clear and concise instructions. In my example, I want to remove the high collar of the cloth in my photo. So words like "remove collar," "no collar," or "V-neck" work well.
- Enhance quality: To encourage a high-quality result, you can add "high quality" or "realistic" to your prompt.
- Refine with negatives: While not always necessary, you can add negative words like worst quality, low quality, cartoon, etc. to avoid wrong result.
Fine-Tuning Inpainting Settings for Optimal Results
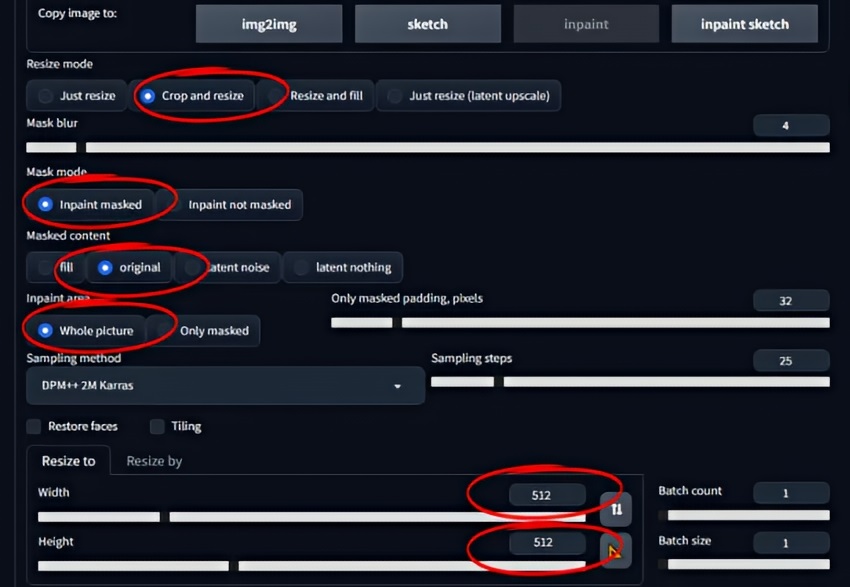
- Resize mode: Crop and resize
- Maks mode: Inpaint masked
- Masked content: original
- Inpaint area: Whole picture
- Denoising strength: it controls how much change it will make compared with the original image. Nothing will change when you set it to 0. You will get an unrelated inpainting when you set it to 1. 0.75 is usually a good starting point. Decrease if you want to change less.
- Latent noise or latent nothing: These advanced settings are for complete removal and creative exploration. Choose them if you want to generate something entirely new in the masked area, like removing a limb or hiding a hand.
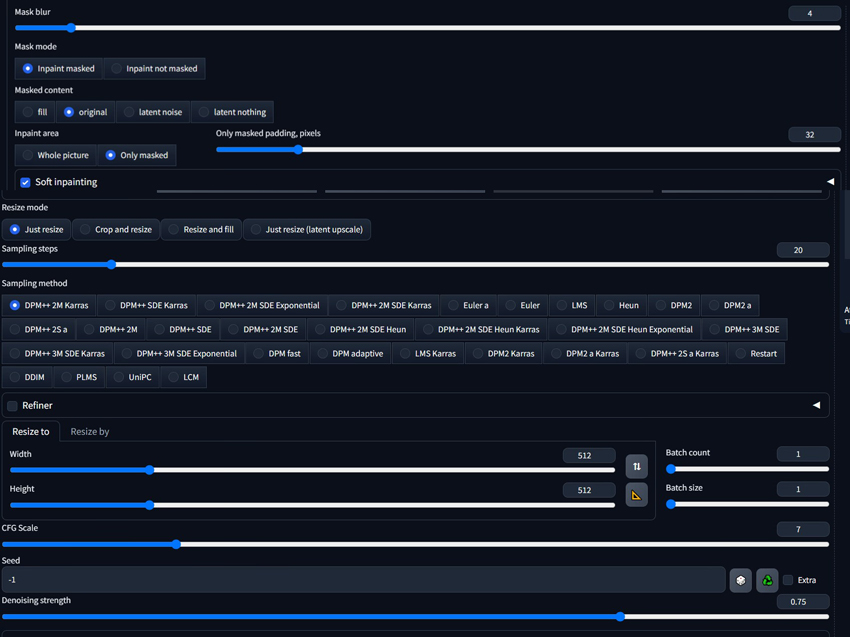
If you want to Stable Diffusion to remove clothes while keep the same pose, use the ControlNet open pose model. But you will need to have both ControlNet & OpenPose models installed.
- Scroll down your generation page to find the ControlNet panel.
- Check the Enable box.
- Select Pixel Perfect for the highest level of detail.
- Set the Control Weight to 1 to give the OpenPose model maximum influence over the pose.
- Choose Balanced for the Control Mode. This setting helps balance the influence between your text prompt and the pose provided by ControlNet.
Step 4. Start to remove clothes
Once you're satisfied with your mask and prompt settings, click the orange "Generate" button. Stable Diffusion will then take your image, analyze the masked area, and use your prompt to remove the clothing you selected.
The magic of Stable Diffusion lies in its iterative process. Here are some ways to achieve your desired outcome:
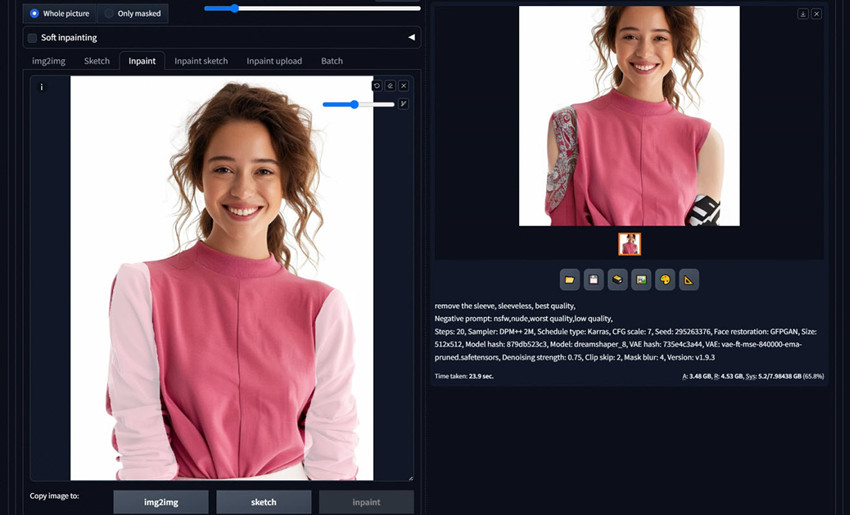
- Target Specific Areas: Want to remove just the sleeves? Simply adjust your mask to focus on those areas while leaving the rest of the clothing intact.
- Refine the Prompt: Don't be afraid to experiment with different prompts! Describing the desired result as "sleeveless" for this image is a great start. You can further refine it by specifying the style (e.g., tank top, off-the-shoulder) or adding details like straps or a bare midriff.
- Generate and Repeat: The first attempt might not be perfect. Based on the initial results, you can fine-tune the mask or prompt and try generating again for a more polished outcome.
With this approach, you can achieve precise clothing removal and explore a variety of creative possibilities in your images.
Part 2. How to Change Clothes in Stable Diffusion
Stable Diffusion's capabilities extend far beyond simply removing clothing. This AI tool empowers you to become a virtual fashion designer, allowing you to modify existing outfits and create entirely new looks within your images. Below are the steps to change clothes in Stable Diffusion:
Step 1. Open Stable Diffusion webui and click the img2img tab. Upload the image of the person whose clothes you want to change in Stable Diffusion.
Step 2. Next, use the brush tool in the inapinting interface to mask over the area that you want to change the clothes.
Step 3. Then define the inpainting settings as follows: crop and resize; inpaint masked; original; whole picture. Then set the size of the image.
Step 4. In the main prompt box, describe the new cloth that you want Stable Diffusion to change to.
Step 5. Now go to the controlnet tab and use the same photo as above. Then set the parameters as follows: Enable; Pixel Perfect; Allow Preview; and choose OpenPose as the Control Type. Once finished, click generate.
Step 6. Stable Diffusion will change the clothes and offer a preview. If there is any flaws to adjust, just drag the generated image as the original image to paint again.
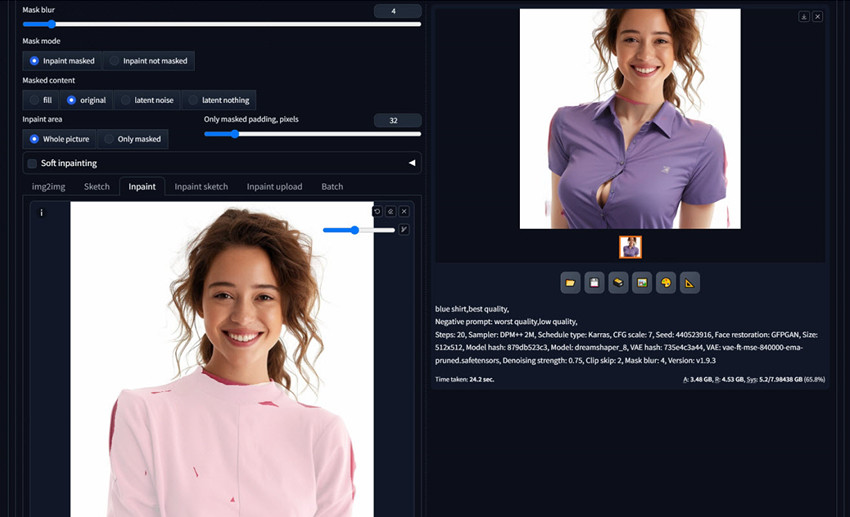
While the core steps remain similar to removing clothes, you need to provide a clear and detailed description of the desired clothing you want to replace the existing outfit in the prompts. When writing a prompt for changing clothes in Stable Diffusion, mention the type of clothing (e.g., dress, shirt, pants), style (e.g., casual, formal), and desired color. Here are some additional details that can enhance your prompt:
- Material: Specify the fabric (e.g., silk, cotton, leather) for a more realistic outcome.
- Style details: Include details like buttons, pockets, collars, or patterns for a more specific look.
- Context: Consider the overall scene in the image. Does the new outfit fit the environment?
The text above provides a detailed, step-by-step guide on how to remove or change clothing in Stable Diffusion. For a video tutorial, you can check out this YouTube video.
Conclusion
Stable Diffusion has opened up a captivating realm of possibilities, allowing you to effortlessly transform and manipulate clothing within your images. With the above steps, you should be able to seamlessly remove existing outfits, replace them with entirely new ensembles, and even explore a variety of creative fashion styles.
 FAQ
FAQ
Yes, it is possible to undress in Stable Diffusion. Various safety filters and mechanisms have been implemented in Stable Diffusion to prevent SD from generating inappropriate content, including nudity, violence, and other harmful material. That means, if you can bypass the safegurads, you can use Stable Diffusion to undress photos. However, you need to know that it's unethical to use Stable Diffusion to undress photos from real persons.
The steps to change the outfit in Stable Diffusion are quite the same as those with clothes removal. You need to paint over the clothing that you want to change, describe the new outfit that you want to wear, and adjust the inpainting settings. In addition, you can use inpaint ControlNet, Canny, or OpenPose to generate more consistent outfits.
Stable Diffusion is not designed to remove clothes. Instead, there are tools dedicated in removing clothes using AI. Some popular apps, such as Undress.app, Nudity, Clothoff, AI Clothes Remover, can undress clothes more efficiently than Stable Diffusion.
Use inpainting or controlnet in Stable Diffusion. Mask the clothing area, then prompt for the new outfit (e.g., “red silk evening gown,” “sportswear set”). This ensures results stay professional and avoid NSFW issues.
Yes. Commonly used extensions include:
- Inpaint Anything – Quick masking and replacement.
- ControlNet – Maintain body pose and proportions while changing clothing.
- Segment Anything – Auto-detect clothing areas for faster edits.
No, the official versions of Stable Diffusion models, such as those from Stability AI, are trained with safety filters designed to prevent the generation of NSFW content. You can use online tools that are based on Stable Diffusion to generate NSFW stuff.