A Quick Guide on How to Use Midjourney
Updated on
Welcome to the exciting world of AI-powered image generation! If you've been hearing buzz about stunning, imaginative artwork created from simple text descriptions, chances are you've encountered Midjourney. But what exactly is Midjourney, and why is it causing such a stir in the creative community?
Midjourney is a cutting-edge artificial intelligence tool that transforms text prompts into visual art. It's like having a digital artist at your fingertips, ready to bring your wildest ideas to life. Whether you're imagining a serene landscape, a futuristic cityscape, or an abstract representation of your emotions, Midjourney can create it with astonishing detail and creativity.
In this guide, we'll walk you through the basics of how to use Midjourney, from setting up your account to crafting the perfect prompts. Whether you're an artist looking to expand your toolkit or a curious beginner eager to explore AI-generated art, this post will help you get started on your Midjourney adventure. Let's dive in!
Before diving into the details of how to use Midjourney, consider enhancing your generated art with Aiarty Image Enhancer. One common challenge with Midjourney is achieving high-quality, high-resolution images directly from the generation process. Often, the initial outputs can suffer from noise, lack of sharpness, and lower resolution, which can detract from the overall impact of your artwork.
Aiarty Image Enhancer addresses these pain points by leveraging advanced AI technology to upscale, denoise, and sharpen your images. This software brings out the finest details, enhances textures, and ensures your artwork looks polished and professional. Whether you're looking to refine intricate designs or simply add a professional touch to your images, Aiarty Image Enhancer provides the tools you need for stunning results. Transform your Midjourney creations effortlessly and see the difference that professional-grade image enhancement can make.
Step 1. Getting Started with Midjourney
Now that you understand what Midjourney is, let's walk through the steps to get you up and running. The process is straightforward, but there are a few key steps you'll need to follow.
1. Sign Up for Discord
Midjourney operates primarily through Discord, a popular communication platform. If you don't already have a Discord account, you'll need to create one:
- Go to discord.com and click "Sign Up".
- Follow the prompts to create your account.
- Verify your email address.
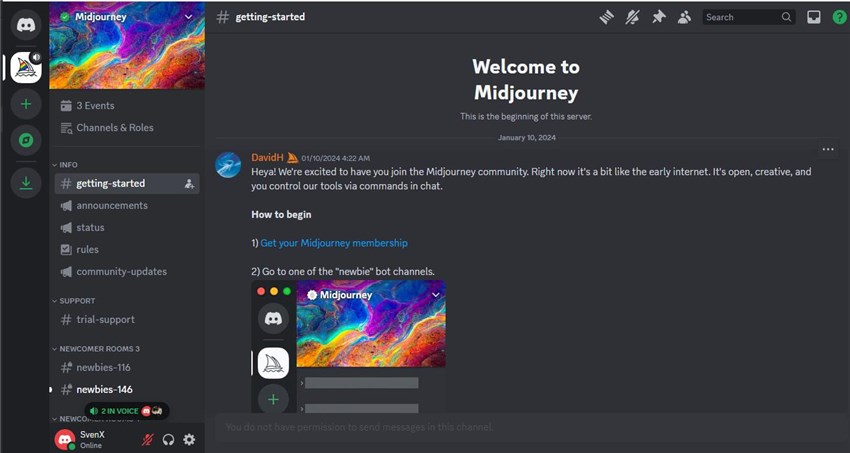
2. Join the Midjourney Discord Server
Once you have a Discord account:
- Go to midjourney.com
- Click on "Join the Beta" or look for a link to join their Discord
- You'll be redirected to Discord where you can accept the invitation to join the Midjourney server
3. Choose a Subscription Plan
Midjourney offers several subscription tiers:
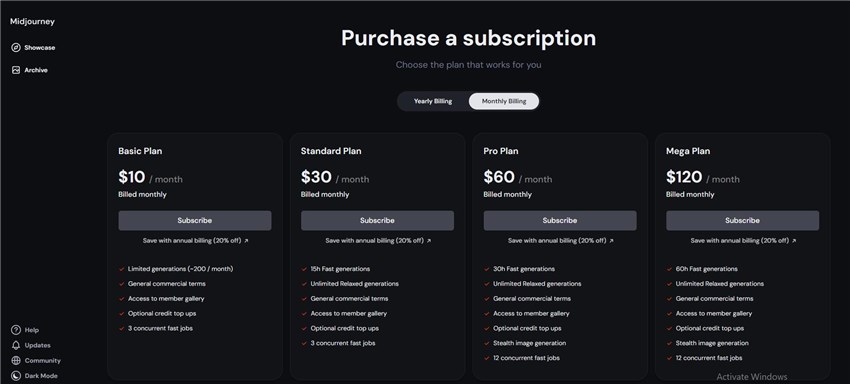
- Basic Plan: Ideal for casual users or those just starting out.
- Standard Plan: Offers more usage and faster image generation.
- Pro Plan: For heavy users, with maximum usage and privacy features.
- Mega Plan: For power users and businesses with extensive needs.
To subscribe:
- Type `/subscribe` in any Midjourney Discord channel.
- Follow the link provided to choose your plan and complete payment.
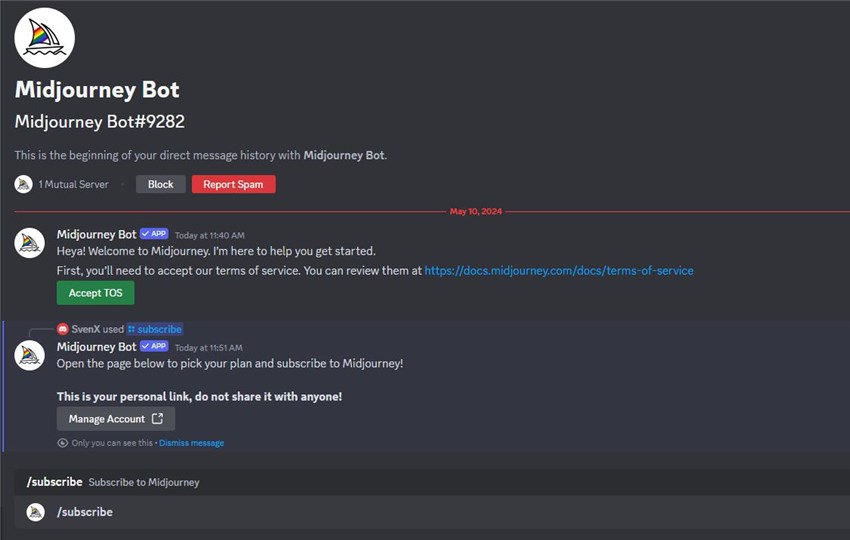
For your better understanding, here we have a very detailed guide on how to subscribe to Midjourney for you.
4. Familiarize Yourself with the Discord Interface
Once you're in the Midjourney Discord:
- Look for the "newbies" rooms channels to start generating images.
- Read the rules and guidelines in the information channels.
- Explore the community channels to see what others are creating.
5. Generate Your First Image
You're now ready to create your first image:
- Go to any "newbies" rooms channel.
- Type `/imagine` followed by your prompt (e.g., `/imagine a serene lake at sunset`).
- Hit enter and wait for Midjourney to generate your image.
Remember, your first few attempts might not be perfect. Midjourney has a learning curve, and part of the fun is experimenting and improving your prompts over time.
6. Understand Usage and Limits
Each plan comes with different usage limits:
- Be aware of your monthly quota of GPU minutes.
- Check your remaining time by typing `/info` in any Midjourney channel.
By following these steps, you'll be set up and ready to start your Midjourney adventure. In the next section, we'll dive deeper into how to use Midjourney effectively and create stunning images with your prompts.
Step 2. Basic Usage of Midjourney
Now that you're set up, let's dive into how to use Midjourney effectively. Understanding these basics will help you start creating impressive images right away.
1. The /imagine Command
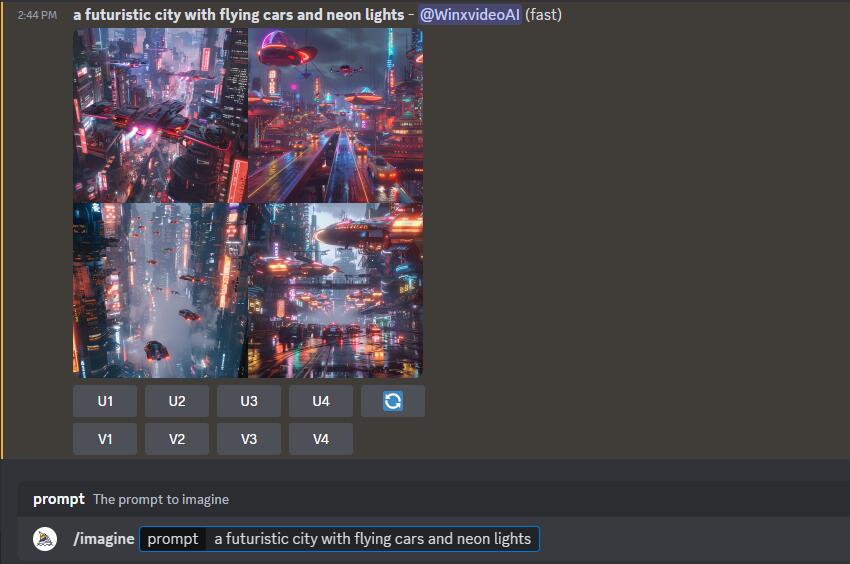
The core of Midjourney is the `/imagine` command. This is how you tell Midjourney what image you want to create.
In any Midjourney channel, type `/imagine` followed by your prompt, for example: `/imagine a futuristic city with flying cars and neon lights`. Then press Enter to submit your prompt.
2. Writing Effective Prompts
The key to getting great results is crafting good Midjourney prompts. Here are some tips:
- Be specific: Instead of "a dog," try "a golden retriever puppy playing in a field of sunflowers"
- Include details: Mention colors, lighting, mood, and style
- Reference art styles or artists: "in the style of Van Gogh" or "like a watercolor painting"
- Use descriptive adjectives: "vibrant," "moody," "ethereal," etc.
Note: In one of the following sections, we will talk about this with more details.
3. Understanding the Initial Results and Working with Generated Images
After submitting your prompt, Midjourney will generate a grid of four images. These are initial concepts based on your prompt. Each image will be labeled with a U1, U2, U3, or U4 button (for Upscale) and a V1, V2, V3, or V4 button (for Variation):
Learn detailed guide on how to use Midjourney upscalers x4
1. Upscaling (U buttons): Click a U button to create a higher-resolution version of that specific image. This is useful when you're happy with an image and want to see it in more detail.
2. Creating Variations (V buttons): Click a V button to generate four new variations based on that specific image. Use this when you like an image but want to explore similar options.
3. Regenerating Images (🔄 button): Click the 🔄 button to generate a completely new set of four images using the same prompt. Useful if you're not satisfied with any of the initial results.
4. Saving Your Images
To save an image: Right-click on the image. Select "Save image" or "Open image in new tab" (then save from there)
Remember, all images you create are also saved in your Midjourney account gallery, accessible via the website.
Step 3. Understanding Parameters
Parameters in Midjourney are special commands that you can add to your prompts to fine-tune your image generation. They give you more control over the output and can significantly impact the final result. Let's explore some of the most useful parameters:
Hot search: Midjourney parameter cheat sheet
Aspect Ratio (--ar)
The aspect ratio parameter determines the shape of your image.
- Usage: `--ar
: ` - Example: `A majestic castle --ar 16:9`
- Common ratios: 1:1 (square), 16:9 (widescreen), 9:16 (vertical, good for mobile), 3:2 (standard photo ratio)
Stylize (--stylize or --s)
This parameter controls how strongly Midjourney applies its default aesthetic style.
- Usage: `--stylize
` or `--s ` - Range: 0-1000 (default is 100)
- Example: `A serene lake at sunset --stylize 300`
- Lower values are more photorealistic, higher values are more artistic
Chaos (--chaos or --c)
The chaos parameter introduces more random elements into your image.
- Usage: `--chaos
` or `--c ` - Range: 0-100
- Example: `An abstract representation of joy --chaos 50`
- Higher values produce more varied and unpredictable results
Quality (--quality or --q)
This parameter affects the rendering time and detail level.
- Usage: `--quality
` or `--q ` - Options: .25, .5, 1 (default), 2
- Example: `A detailed cityscape --quality 2`
- Higher quality takes longer to render but produces more detailed images
Version (--v)
This parameter lets you specify which version of Midjourney's model to use.
- Usage: `--v
` - Example: `A futuristic car --v 6`
- Different versions may produce different styles or capabilities
No (--no)
Use this to exclude certain elements from your image.
- Usage: `--no
` - Example: `A peaceful beach scene --no people --no buildings`
Tile (--tile)
This creates images that can be repeated as seamless tiles.
- Usage: `--tile`
- Example: `A floral pattern --tile`
- Useful for creating textures or wallpapers
Remember, you can combine multiple parameters in a single prompt. For example:
A cyberpunk city at night --ar 16:9 --stylize 200 --chaos 20 --quality 2
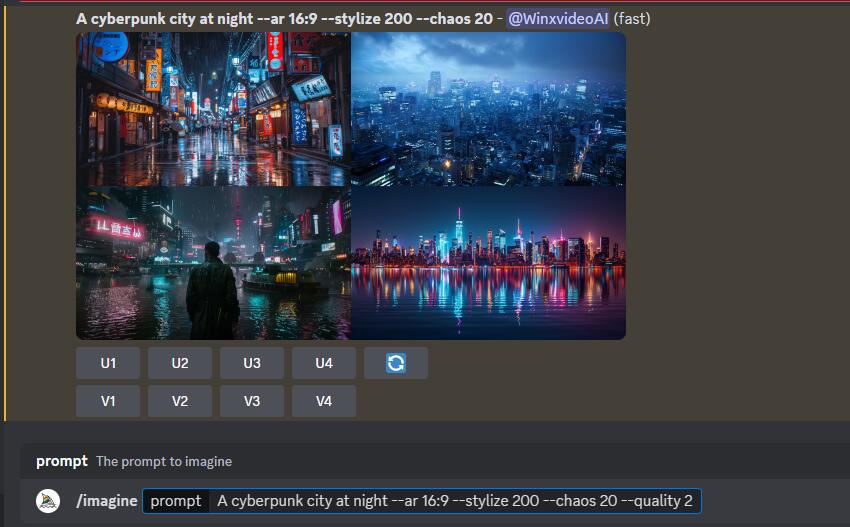
Experimenting with these parameters will give you much more control over your Midjourney creations. In the next section, we'll explore some advanced features that can take your Midjourney skills to the next level.
Step 4. Prompt Engineering Tips for Midjourney
Mastering the art of crafting effective prompts is key to getting the best results from Midjourney. Here are some essential tips to enhance your prompt writing skills:
1. Be Specific and Descriptive
The more detailed your prompt, the better Midjourney can interpret your vision. Instead of "a cat," try: "A fluffy orange tabby cat with green eyes, sitting on a windowsill overlooking a bustling city street at sunset"
2. Use Strong, Evocative Language
Incorporate vivid adjectives and adverbs to convey mood and atmosphere:
"A hauntingly beautiful abandoned castle, shrouded in mist, with twisted vines creeping up crumbling stone walls"
3. Specify Art Styles or Techniques
Reference specific artistic styles or techniques to guide the aesthetic:
"A portrait of a young woman in the style of Art Nouveau, with flowing lines and pastel colors"
"A cityscape rendered in the pointillism technique, reminiscent of Georges Seurat"
4. Incorporate Lighting and Color
Mentioning lighting and color can dramatically affect the mood of your image:
"A serene forest glade bathed in soft, dappled sunlight, with a palette of lush greens and golden hues"
5. Consider Composition and Perspective
Guide the composition by specifying viewpoints or framing:
"A bird's-eye view of a winding river cutting through a dense, autumn forest"
"A close-up macro shot of a dewdrop on a spider's web, with a blurred floral background"
6. Combine Unexpected Elements
Create unique images by merging contrasting concepts:
"A steampunk-inspired underwater city, with brass and copper buildings surrounded by schools of bioluminescent fish"
7. Use Negative Prompts
Specify what you don't want in the image using "--no" followed by the element to exclude:
"A peaceful meadow with wildflowers --no people --no buildings"
8. Experiment with Aspect Ratios
Use the "--ar" parameter to specify different aspect ratios for your image:
"A majestic mountain landscape --ar 16:9" (for a widescreen format)
"A tall, enchanted tree house --ar 9:16" (for a vertical format)
9. Iterate and Refine
Don't be afraid to generate multiple versions and refine your prompt based on the results. Sometimes, small tweaks can lead to significant improvements.
10. Learn from the Community
Explore the Midjourney community showcase to see how others craft their prompts. You can often find inspiration and new techniques by studying successful prompts.
Remember, prompt engineering is both an art and a science. The more you practice and experiment, the better you'll become at creating prompts that yield stunning results. In the next section, we'll dive into some advanced features that can take your Midjourney creations to the next level.
Step 5. Midjourney Version Differences
Midjourney has evolved rapidly since its inception, with each new version bringing significant improvements. Understanding these differences can help you choose the right version for your specific needs. Let's explore the key differences between the major versions:
Version 7
Released on April 3, 2025, Version 7 represents a major advancement with a rebuilt system designed to meet growing demands for AI-generated content, including video and 3D:
- Handles text and image prompts with greater precision and coherence
- Introduced Draft Mode feature
- Faster processing speeds and improved photorealism in generated images
- Enhanced interpretation of complex prompts for more accurate and nuanced outputs
- Designed to support dynamic visual projects for creators and businesses
- Released after extensive testing and community feedback to address shortcomings of Version 6
- Unlocking Version 7 requires ranking up for the V7 Global Personalization Profile on Midjourney
Version 6.1
Released on July 30, 2024, Version 6.1 is the current default model and builds upon Version 6 with several key improvements:
- Produces more coherent images with better anatomy (arms, legs, hands, bodies, plants, animals)
- Significantly improved image quality with reduced pixelation and enhanced textures, including skin details
- More precise and detailed small features such as eyes, small faces, and distant hands
- Introduces new 2x upscalers that deliver much better image and texture quality
- Approximately 25% faster image generation compared to Version 6
- Improved text rendering accuracy when using quotations in prompts
- Includes a new personalization model that enhances nuance, surprise, and accuracy in outputs
- Supports personalization code versioning, allowing reuse of personalization data from previous jobs for consistent results
Version 6 (Current Default)
Version 6, released in December 2023, is the latest and most advanced model:
- Enhanced prompt accuracy, especially for longer inputs
- Improved coherence and knowledge base
- Advanced image prompting and remixing capabilities
- More photorealistic results, particularly when using `--style raw` parameter
- Better handling of complex scenes and compositions
Version 5.2
Version 5.2 was a significant improvement over earlier versions:
- Higher resolution outputs (default 1024x1024 for single images)
- Sharper and more detailed results
- Better color reproduction and contrast
- Improved composition
- More responsive to the full range of the `--stylize` parameter
Niji Model 6
Niji is a specialized model developed in collaboration with Spellbrush:
- Tuned specifically for anime and illustrative styles
- Excellent at dynamic and action shots
- Better at character-focused compositions
- More knowledge of anime aesthetics and styles
Key Differences Across Versions
1. Realism: Each new version has improved in generating more realistic images, with V6 being the most photorealistic to date.
2. Resolution: Image resolution has increased from 256x256 in early versions to 1024x1024 in V5 and beyond.
3. Prompt Interpretation: Newer versions have better language understanding, requiring fewer descriptive words to generate high-quality images.
4. Artistic Style: While V5 and V6 are more "general" in style, they respond better to specific style prompts.
5. Detail and Coherence: Each version has shown improvements in generating more detailed and coherent images, especially for complex scenes.
6. Speed: Newer versions generally process prompts faster, with improvements in upscaling speed as well.
7. Hands and Faces: There have been significant improvements in rendering realistic hands and faces, though this remains an area of ongoing development.
How to Switch Versions
You can switch between versions using:
- The `--version` or `--v` parameter in your prompt (e.g., `--v 6` or `--niji 6`)
- The `/settings` command in Discord
- The settings menu on the Midjourney website
Remember, while newer versions generally offer improvements, each version has its strengths. Experimenting with different versions can help you find the best fit for your specific project or style.
Conclusion
As we wrap up this comprehensive guide on how to use Midjourney, it's clear that this powerful AI tool opens up a world of creative possibilities. From crafting your first prompt to mastering advanced techniques, Midjourney offers an exciting journey of discovery and artistic expression.
Remember, the key to success with Midjourney lies in experimentation and practice. Don't be afraid to try new prompts, play with different parameters, and push the boundaries of your imagination. Every image you generate is an opportunity to learn and refine your skills.
Whether you're an artist looking to expand your toolkit, a designer seeking quick concept visualizations, or simply someone who loves to create, Midjourney offers a unique and powerful way to bring your ideas to life. The only limit is your imagination.
So, dive in, start experimenting, and enjoy the process of turning your words into stunning visual art. Your Midjourney begins now – we can't wait to see what you'll create!