How to Print 2x3 Wallet Size Photos from Your iPhone
Updated on
Admit or not, our iPhones have become our go-to cameras for capturing life's special moments. It's great to have all those photos saved in the cloud, but there's nothing like holding a real, printed picture in your hand. A 2x3 inch photo is perfect for carrying around in wallet, putting in a scrapbook, or using for creative DIY projects. But how to print 2x3 photos from your iPhone?
In this article, we'll cover you a step-by-step guide to prin 2x3 photos from iPhone, including:
Step 1. Select your best shot in iPhone. Besides the content, composition, lighting, resolution should also be taken into consideration for wallet size photos printing.
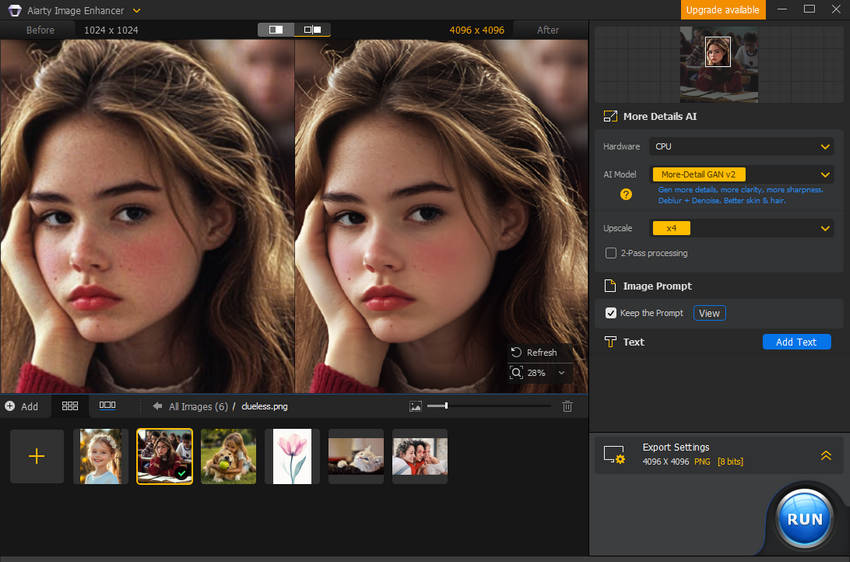
Step 2. Enhance your photos for high resolution, noise removal and better details.
This is a key step in ensuring high-quality printing, not only to improve the image resolution for later cropping in 2x3 inches, but also to remove noise, blur, pixelation and other imperfections. We'll guide you how to enhance iPhone photos using Aiarty Image Enhancer.
Step 3. Edit your photo. You need crop or zoom out your photos' resolution to fit the 2x3 inches, and adjust colors, contrast, brightness etc. to achieve your desired look.
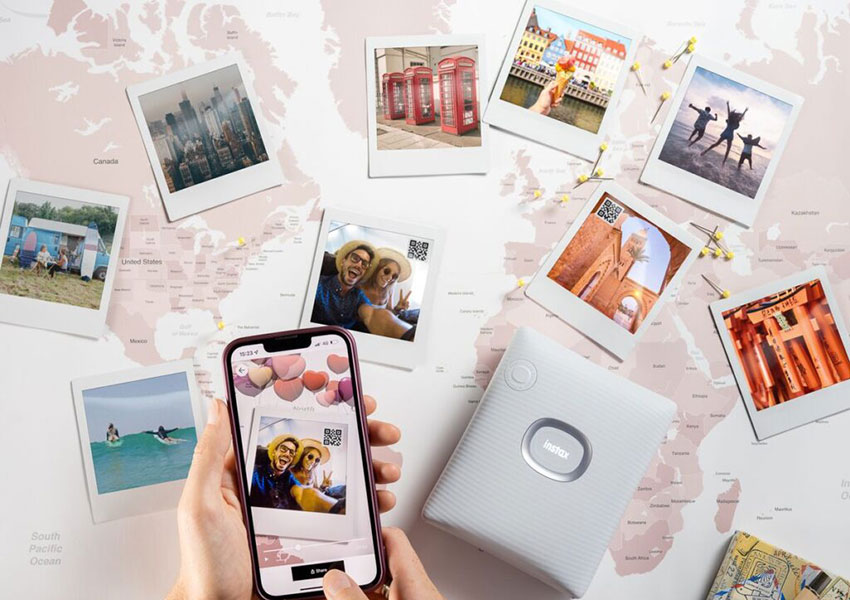
Step 4. Set up your printer and print now. This step will guide you how to connect your printer, adjust settings and print.
Step 1. Select Your Best Shot in iPhone
When choosing your a 2x3 photo from iPhone to print, you should not only care about the content itself, but also other factors like resolution, composition, color palette etc.
- Overall quality: Ensure the photo is clear, sharp, and free from excessive noise or distortion. For 2x3" printing, the resolution of your photo needs be at least 600 x 900 pixles. Even though iPhone photos are typically great, having a higher resolution gives you more freedom to crop or zoom in without sacrificing quality.
- Subject Matter: Choose a photo with a strong subject that is visually appealing and relevant to your purpose.
- Composition: Consider the arrangement of elements within the photo. A simple, well-balanced composition often works best for smaller prints.
- Color Palette: Evaluate the colors in the photo. A harmonious color scheme can enhance the overall aesthetic.
- Personal Significance: Select a photo that holds personal meaning to you, as it will make the print even more special.
Step 2. Enhance Photos for High-res, Noise Removal & Better Details
iPhone pics are usually good enough for 2x3 inch prints, but a higher resolution means you can crop or zoom in without losing quality. If you've got low-res photos from the web, using something like Aiarty Image Enhancer to boost them to 2K, 4K, or even 8K can really make a difference. It can clean up those blurry, noisy images.
Step 1. Download and launch this lightweight yet powerful AI enhancer software.
Click the Add image button or directly drag and drop to import your selected photos from iPhone. Aiarty supports bulk imports, so you can import multiple iPhone photos at once.
Step 2. Specify the AI Upscaling Model and Target Resolution.
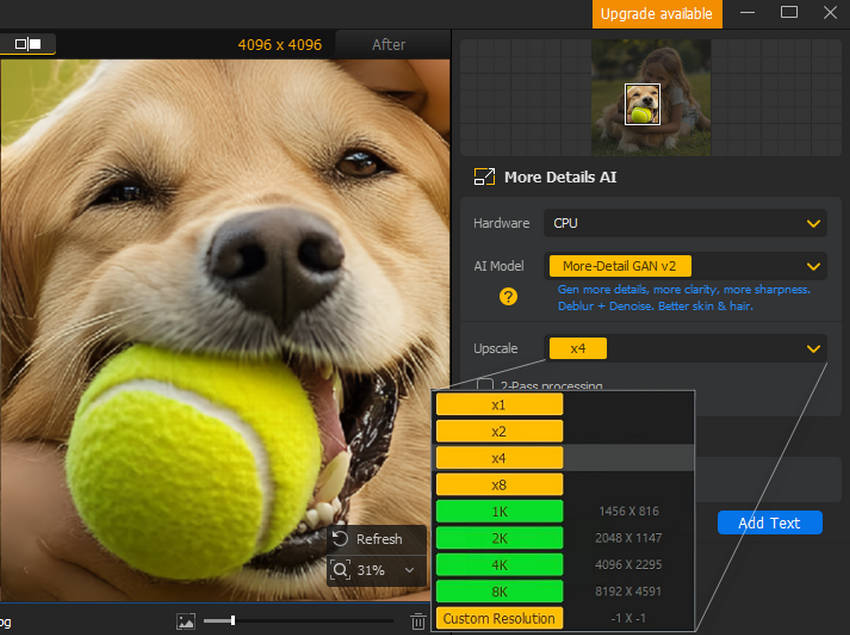
- Select from three AI models: More-detail for preserving intricate textures like skin and fur when upscaling, Smooth Model for those require less for details, and Real-Photo for restoring images to a more realistic appearance.
- Select your desired enhancement level: Choose 2X, 4X, or 8X for standard increases, or select 1K, 2K, 4K, or 8K for specific output resolutions.
Step 3. Upscale iPhone photos for print.
Hit "RUN" after selecting your preferred output format (PNG or JPG) to start enhancing your image.
Aiarty not only enhances your image resolution but also intelligently fixes flaws like blur, noise, and pixelation, keeping all the important details intact.
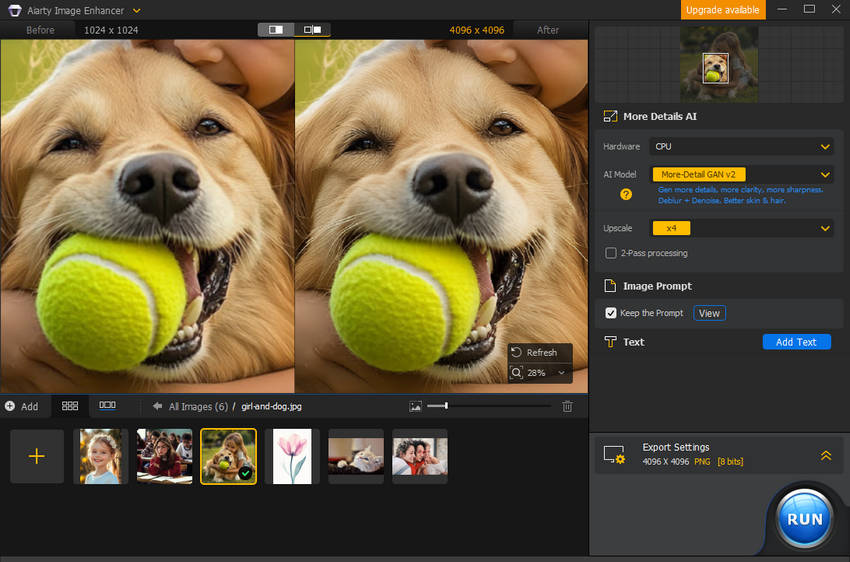
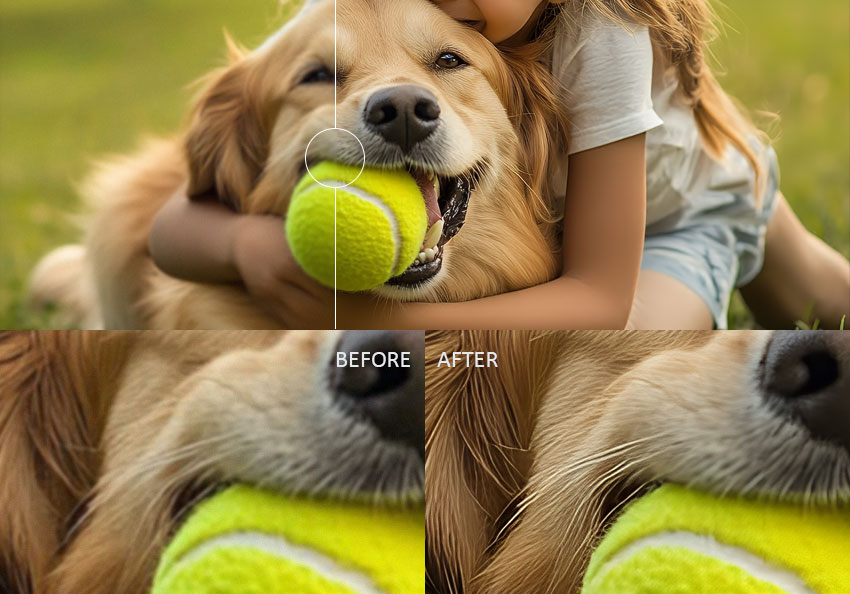
Before & After Comparison
The original photo was blurry and lacked detail, especially in the fur. Noise was also noticeable. While Aiarty improved clarity, reduced noise, and revealed hidden details like the tennis ball's texture. However, the fur might be overly sharp, giving it an unnatural appearance.
Step 3. Edit Your Photo
To ensure your photos fit perfectly within the 2x3 inch format, you may need to crop or zoom out to adjust the composition. For example, you may need to crop your photos to remove any unwanted elements and ensure the subject is prominently featured. If the photo is too large, zoom out to fit the 2x3 inch dimensions while maintaining the desired level of detail.
Additionally, fine-tuning the colors, contrast, and brightness can help you achieve the desired look and feel for your prints.
Also see: how to print a photo from iPhone directly
Suppose you're still editing in the PHOTOS app on your iPhone:
Crop photos to 2x3":
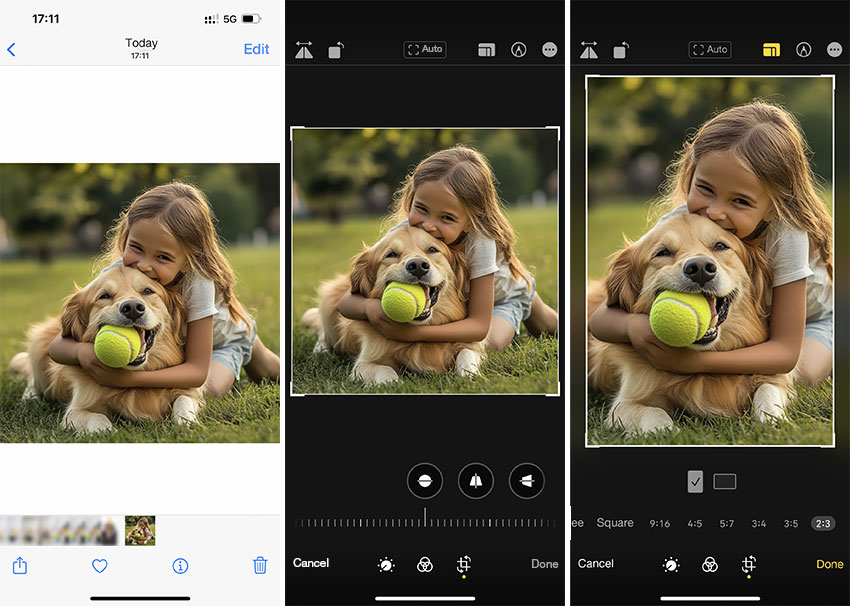
1. Open the Aiarty enhanced photo in Photos App. Tap on the "Edit" option at the top right corner.
2. Tap the "Crop" button, then do any of the following:
- Crop manually: Drag the rectangle corners to enclose the area you want to keep in the image, or pinch open or closed.
- Crop to a standard preset ratio: Tap the Aspect Ratio Freeform button, then choose an option such as Square, Wallpaper, 9:16, or 5:7.
- Rotate: Tap the Rotate button to rotate the image 90 degrees.
- Flip: Tap the Flip button to flip the image horizontally.
3. Tap "Done" to save your edits, or if you don’t like your changes, tap Cancel, then tap Discard Changes.
Adjust colors
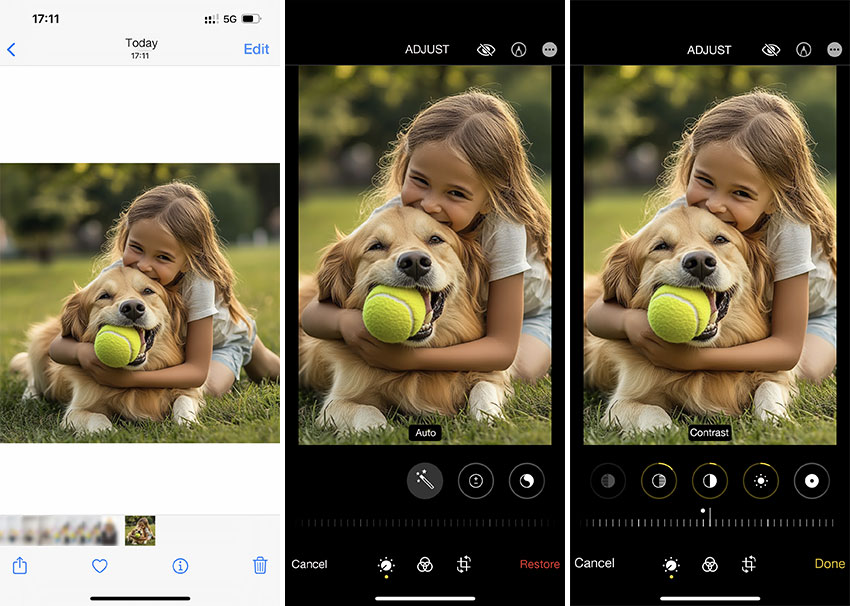
1. Open the photo in Photos App. Tap on the "Edit" option at the top right corner.
2. Swipe left under the photo to view the lighting adjustments you can make—for example, Exposure, Brilliance, Highlights, and Shadows.
3. Tap the lighting setting you want to adjust, then drag the slider to make precise adjustments.
4. Tap Done to save your edits, or if you don’t like your changes, tap Cancel, then tap Discard Changes.
Step 4. Set up Your Printer and Print Now
To achieve the highest quality prints for your 2x3 inch photos, proper printer setup is crucial. By following these steps, you can ensure that your printer is configured to deliver optimal results:
1. Connect Your Printer: At the very begining, you need to connect your iPhone to the printer. You have three ways:
- Wireless Connection: If your printer and iPhone are on the same Wi-Fi network, they should automatically connect.
- Bluetooth Connection: Pair your iPhone with the printer using Bluetooth settings.
- USB Connection: If your printer supports USB, connect it directly to your iPhone using a compatible cable.
2. Select Photo Paper
Choose the right photo paper for your prints. Look for high-quality options like glossy, matte, or pearl finishes, and make sure the paper is the correct size (2x3 inches) for your desired prints. >> How to print on photo paper
3. Adjust Printer Settings
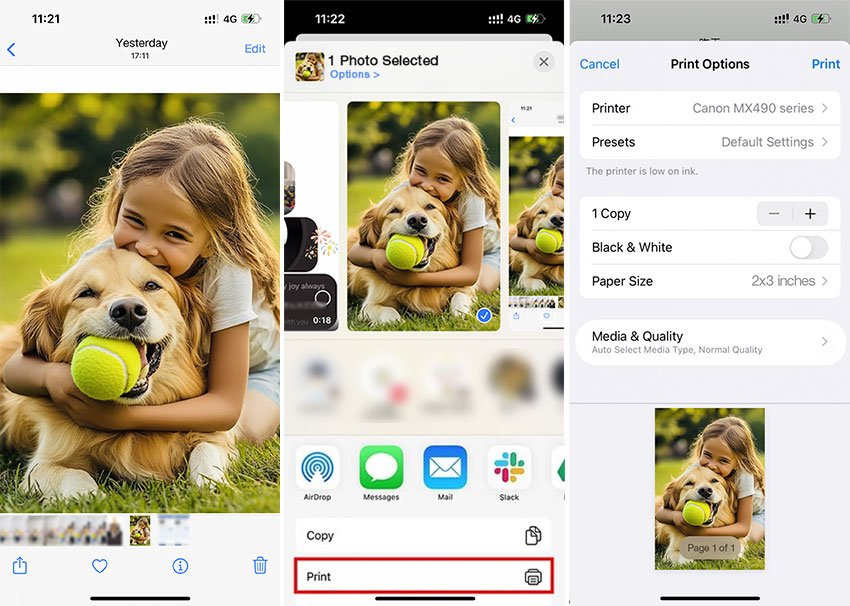
- Open the Photos app, select the image, and tap the "Share" icon at the left corner.
- Scroll down to find the "Print" option and select it.
- Select your connected printer. Decide how many copies you want to print. And set your paper size to 2x3 inches.
- Adjust the media type and print quality by selecting the "Media & Quality" option.
4. Print Now!
When you've done, tap the "Print" button to begin the printing process.
Conclusion
Printing 2x3 inch photos from your iPhone is a simple yet rewarding process that allows you to transform your digital memories into tangible keepsakes. By following the steps outlined in this guide, you can easily create high-quality prints that capture the essence of your cherished moments.
Remember to select photos with high resolution and good lighting. Enhance your images using AI tools like Aiarty Image Enhancer to optimize their quality. Carefully configure your printer settings, including paper type and print quality, to ensure optimal results. And finally, enjoy the satisfaction of holding your physical prints in your hands.
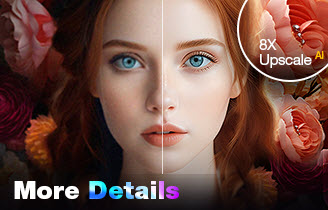
- 4-in-1 AI enhancer, denoiser, deblur, and upscaler for posters
- 3 AI models for any image type, incl. Midjourney & Stable Diffusion
- Generative AI enhancement up to 32K output with better details
- Intuitive UI with no artifacts, limitations, or quality loss
 FAQs for Printing Wallet Size Photos from iPhone
The standard size for wallet photos is 2x3 inches.
The quality of your wallet-sized photo prints depends on several factors, including:
- Image resolution: Higher resolution images generally produce better quality prints.
- Printer settings: Adjust settings like print quality, paper type, and color profile for optimal results.
- Paper quality: Use high-quality photo paper designed for printing images.
- Printer maintenance: Ensure your printer is clean and well-maintained for optimal performance.
Yes, you can edit your photos using your iPhone's built-in photo editing tools or third-party apps to adjust brightness, contrast, color, and other aspects before printing.
Check your printer settings, ensure you're using high-quality photo paper, and verify that your iPhone's photo resolution is sufficient. If not, try Aiarty Image Enhancer to upscale your image resolution. If the problem persists, try printing the photo on a different printer or at a photo lab.