How to Print on Photo Paper: A Step-by-Step Guide
Updated on
Printing on photo paper is an excellent way to bring your favorite images to life. Whether you’re creating a personal album, decorating your home, or preparing professional-quality visuals, the process can yield stunning results. This guide will walk you through enhancing your image and printing it on photo paper with ease.
Preparing Your Image: Enhance Image Quality
Before committing your digital memories to photo paper, take the time to optimize your images for the best possible results. One effective tool to consider is Aiarty Image Enhancer. This AI-powered software can significantly improve image quality by:
1. Upscale Your Image Resolution
The resolution of your image determines its clarity when printed. For crisp and sharp prints, aim for a resolution of 300 DPI (dots per inch) or higher. If your image has a lower resolution, you can upscale it using tools like Aiarty Image Enhancer. This tool uses AI technology to enlarge images without losing quality, making it ideal for photo printing.
Here's how to upscale image resolution using Aiarty Image Enhancer
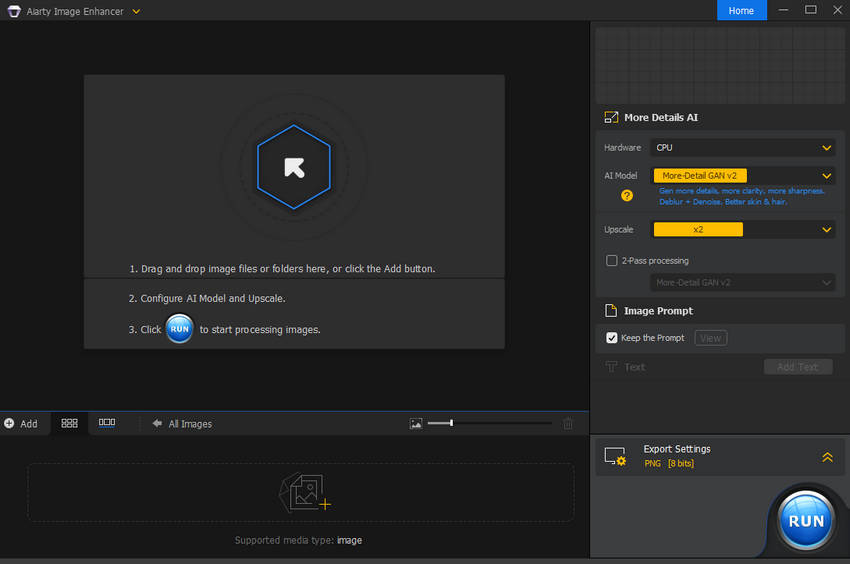
Step 1. Free download Aiarty Image Enhancer on your computer and follow the wizard to install it.
Step 2. Click the Add image button or directly drag and drop to import your photos. Aiarty supports bulk imports, so you can import multiple photos before printing at once.

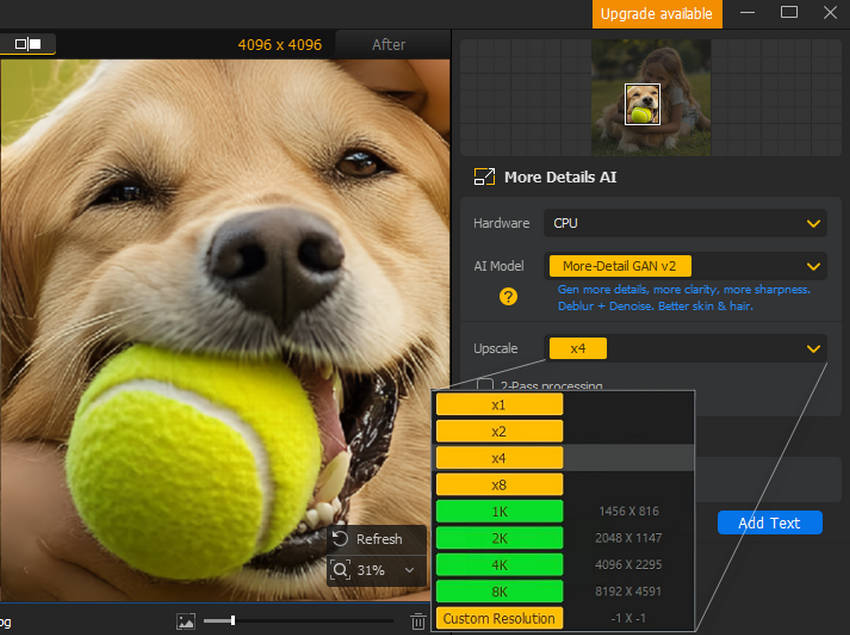
Step 3. Specify the AI Upscaling Model and Target Resolution.
AI Model: 3 models available, choose based on your image. More-Detail GAN v2 for generating more details, Smooth Diff v2 is perfect for the original image smooth and flawless, and Real-Photo v3 is specially designed for photo restoration.
Upscale: You can upscale the image by a certain multiple, namely 1x, 2x, 4x, 8x, or upscale the image to the certain resolution such as 1K, 2K, 4K, 8K, or custom resolution.

Step 4. Upscale your photos for print. Expand the Export Settings window and choose proper output format. Use PNG for high detail or JPEG with minimal compression for larger files. Then click RUN button to start enhancing your image quality.

2. Resize Your Image to Match the Photo Paper Dimensions
When preparing your image for printing, it's essential to resize it to fit the specific dimensions of the photo paper you plan to use. This ensures that the photo will print correctly without any parts of the image being cropped or distorted.
Photo paper comes in various standard sizes, such as:
- 4x6 inches (the most common size for prints, often used for personal albums and frames)
- 5x7 inches (slightly larger, commonly used for photo frames)
- 8x10 inches (ideal for portraits or larger prints)
- Other specialty sizes (e.g., 2x3 inches, 8.5x11 inches, 11x14 inches, or square prints like 8x8 inches)
Before resizing, ensure you know the exact size of the photo paper you're using. Check the packaging or printer settings to verify this. Also, ensure that your image's aspect ratio matches the photo paper dimensions to avoid distortion. For example, 4x6 inches has an aspect ratio of 2:3 and 5x7 inches has an aspect ratio of 5:7. If your image's aspect ratio differs from that of your photo paper, you can either crop the image or add borders to maintain the original proportions.
Print Photos on Photo Paper
Once your image is ready, you can proceed with printing. Follow these steps to ensure the best results when printing your photo:
1. Prepare the Required Materials
To print photos on photo paper, you need the following items:
- A printer that is capable of photo printing. Not all home printers are equipped to handle photo paper, so check that your printer supports high-quality prints on glossy or matte paper.
- Photo paper in the appropriate size. You can choose from various types of photo paper, including glossy, matte, or specialty finishes like lustre or satin. Printing on a glossy paper can enhance color vibrancy and sharpness, while matte paper has a more subdued finish and reduces glare.
- High-quality ink cartridges. Use ink designed for photo printing to ensure accurate color reproduction and longevity.
2. Set Up Your Printer
Load the photo paper into your printer, making sure to place it correctly (shiny side up for glossy paper). Be sure to load the paper according to the printer’s instructions to avoid paper jams.
Ensure that your printer settings are configured for photo printing. Most printers have specific settings for photo paper, which adjust the print quality and ink usage.
3. Configure Print Settings
When you’re ready to print, open the print dialog on your computer or device and adjust the following settings:
- Paper Type: Select photo paper or the equivalent option in your print settings. This tells the printer to use the appropriate settings for glossy or matte paper.
- Print Quality: Set the print quality to High or Best to ensure the finest details are captured in your print.
- Paper Size: Match the paper size to your image dimensions (e.g., 4x6 inches, 5x7 inches).
4. Print from Your Device
Once your image is prepared and your printer is set up, the next step is to send your image to the printer. You can print from various devices, including a computer or a smartphone. Each method offers a different level of control, so the choice depends on your preferences and the tools you have available. Let’s explore both options in detail:
How to Print Photos on Photo Paper from a Computer Using PhotoShop
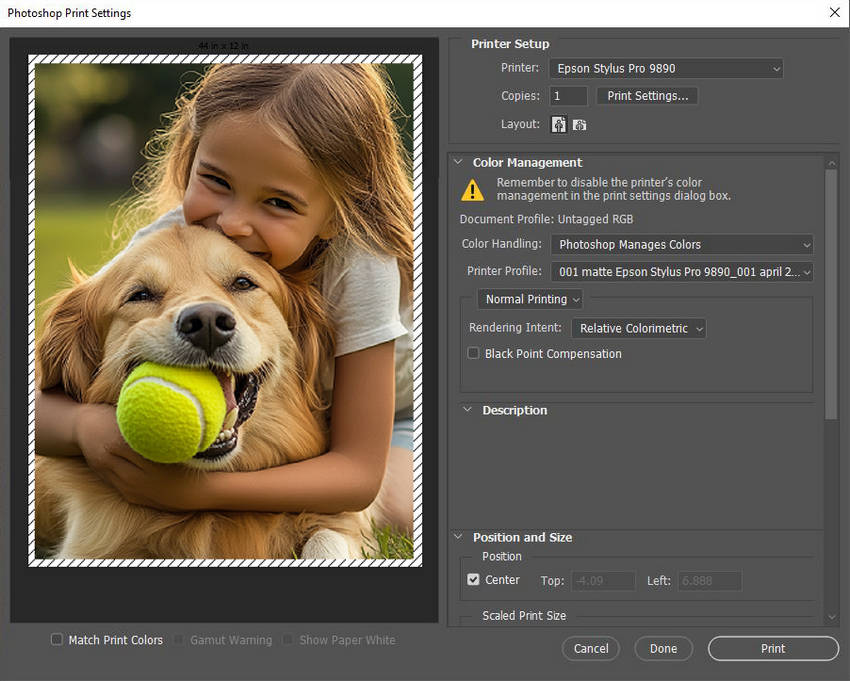
Printing from a computer gives you the most control over your print settings. Whether you’re using advanced photo editing software or a simple photo viewer, you can adjust nearly every aspect of the printing process to ensure the highest quality output. Now let's take Photoshop as an example, here is how it works:
Step 1. Launch the Adobe Photoshop and open the image file you wish to print.
Step 2. Go to File > Print to open the print dialog. Here, you can adjust important settings like print size, paper type, resolution, and print quality. You can also fine-tune color management and ensure that the colors in your print match what you see on your screen. Preview it to check whether there are any cropping issues or misalignments before you print.

Step 3. Choose your printer from the list of available printers. Ensure the correct paper size and type are selected (e.g., 4x6 inches, glossy paper). Set the Print Quality to High or Best for the sharpest results. You can also adjust color settings here if needed.
Step 4. Once you’ve verified everything, click the Print button to send the image to your printer. Be sure to check that the paper is properly loaded in your printer tray before printing.
How to Print Photos on Photo Paper from a Smartphone
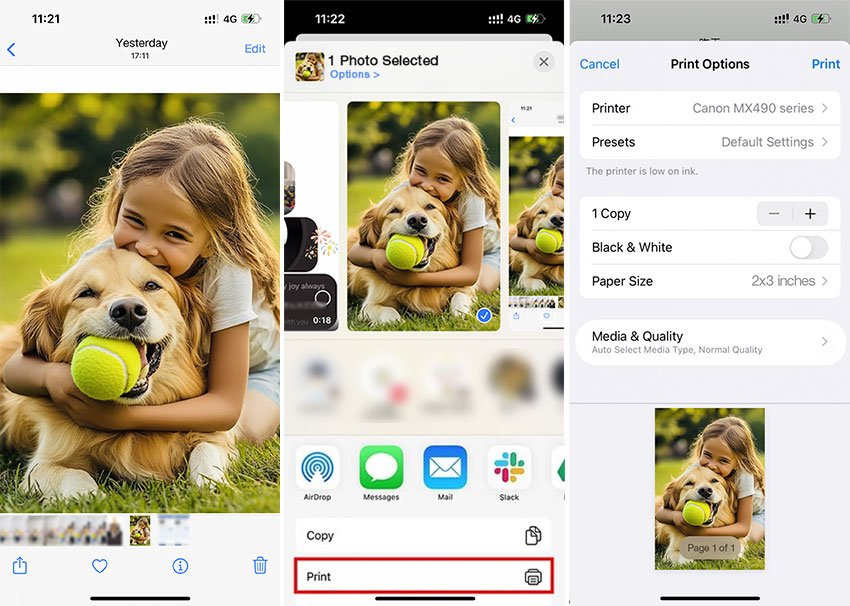
Printing photos from an iPhone or Andoird phone is convenient and allows you to wirelessly send photos to your printer. Most modern printers have apps that allow you to connect directly to your phone and print without needing a computer. Here’s how to print from a mobile device:
Step 1. Download the printer's app on your phone, such as Canon PRINT, Epson iPrint, HP Smart etc. from Google Play Store or Apple App Store.
Step 2. After installing the app, you’ll need to connect your smartphone to your printer. Most apps use Wi-Fi or Bluetooth for this process.
Step 3. Open the printer app and navigate to the Photos or Gallery section of the app to browse your images. Choose the image you want to print. Most apps will display a preview of the photo so you can ensure it’s the correct file.

Step 4. Adjust printer settings, like print quality, print type and size, orientation and borders.
Step 5. After selecting your settings, click the Print button in the app to send the image to the printer wirelessly. The app will communicate with the printer over the Wi-Fi network, and your photo will begin printing shortly.
It’s always a good idea to print a test image before committing to a full print. A test print lets you check for any issues with color, alignment, or cropping.If the colors appear off or the image looks blurry, revisit the editing or resolution adjustments. If there are alignment issues, ensure your photo paper is properly loaded and the print settings match the paper size.
Conclusion
Printing photos on photo paper is a great way to preserve memories and create personalized gifts. The key to achieving high-quality prints lies in enhancing your image before printing. Ensuring the right resolution, color balance, and sharpness will result in a vibrant, professional-looking photo. Tools like Aiarty Image Enhancercan help upscale images for better quality and details. By properly preparing your images, you can ensure stunning prints that capture your memories beautifully.

- 4-in-1 AI enhancer, denoiser, deblur, and upscaler for posters
- 3 AI models for any image type, incl. Midjourney & Stable Diffusion
- Generative AI enhancement up to 32K output with better details
- Intuitive UI with no artifacts, limitations, or quality loss
 FAQs for Printing on Photo Paper
The choice depends on your preference: glossy paper offers vibrant colors and shine, while matte paper reduces glare and fingerprints.
Yes, as long as your printer supports photo paper and high-resolution printing. However, specialized photo printers deliver superior results.
Monitors are often brighter than prints. Adjust brightness and gamma levels in your editing software to compensate.
Use acid-free albums or frames and avoid exposure to direct sunlight or high humidity for long-lasting prints.