Summary: Compressing images for the web helps speed up your site and improve SEO, but it often comes at a cost—blurry details, pixelation, and reduced clarity, which can hurt brand perception and conversions. If you've ever struggled with this, you can try an AI image enhancer to restore sharpness and clarity while keeping file sizes small.
If you run an online store, compressing images for the web is essential. Why? Because image size directly affects website speed, and website speed has a major impact on sales. According to Shopify, when page load time increases from 1 second to 3 seconds, bounce rates rise by 32%. If it exceeds 3 seconds, 53% of mobile users will abandon the page. Additionally, fast-loading websites have conversion rates 2.5 to 3 times higher than those that take 5 seconds to load.
Learning how to compress pictures for websites without losing quality is key to keeping your store fast, engaging, and profitable. In this guide, we’ll show you the best ways to do it. Let’s get started!
Compressing images helps speed up websites, but it often comes at a cost—blurry details, pixelation, and reduced clarity. This can be especially frustrating for e-commerce product photos, branding materials, and high-resolution visuals where quality matters.
![]() The Best Solution: Enhance Image Quality with AI-powered Aiarty Image Enhancer
The Best Solution: Enhance Image Quality with AI-powered Aiarty Image Enhancer
Aiarty Image Enhancer uses advanced AI technology to restore sharpness and fix compression artifacts without increasing much file size—and in some cases, even making it smaller by optimizing image data. Whether your images have lost clarity due to aggressive compression or you simply want them to look sharper and more professional, Aiarty provides a fast, effortless solution.

How to Compress Images for the Web?
When compressing images for a website, you have several methods to choose from, depending on how many images you’re working with and how much control you need over quality and file size. Let’s go through some of the most effective approaches.
Method 1: Use Online Tools (Best for a Few Images)
If you only need to compress a handful of images, online tools are the fastest and easiest option—no software installation needed. Some popular choices include TinyPNG, Squoosh, and CompressJPEG.
Personally, I use TinyPNG quite often because it’s free and simple and does a great job without messing up the image quality.
Don’t let the name fool you—TinyPNG isn’t just for PNG files. It also supports JPG, WEBP, AVIF, HEIF, HEIC, HEIX, HIF, and even DMG formats. You can upload and compress up to 20 images at once, though each file must be under 5MB.
Here’s how I use TinyPNG to compress JPG/PNG images for the web:
1. Go to TinyPNG.com – No signup, no hassle.

2. Upload your image – Just drag and drop your images. And then TinyPNG will compress your images automatically.
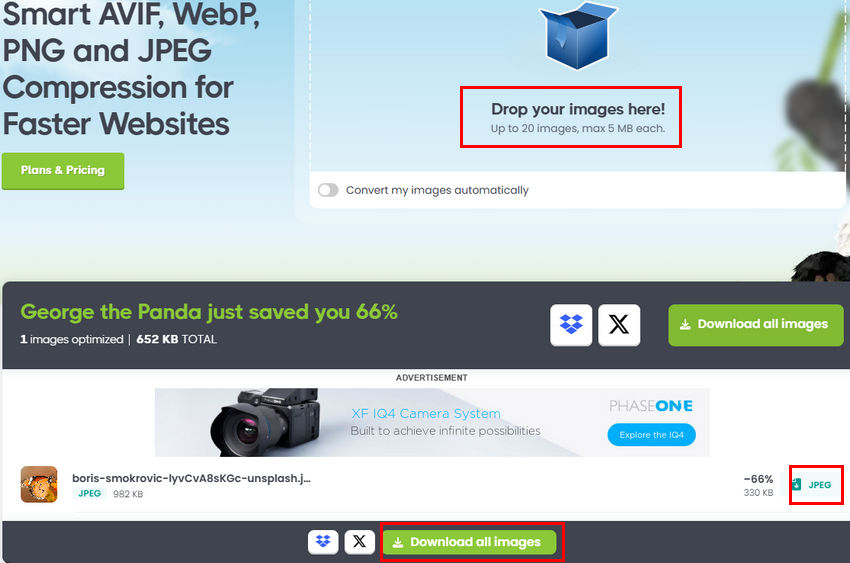
3. Download the compressed image – Once the compression is done, just click “↓JPEG” or “Download all images” to save them.
It’s that simple!
I tested a 982KB JPEG, and within seconds, TinyPNG compressed it down to 330KB, reducing the file size by 66%.
Common Issue: Why Do Images Lose Quality After Compression?
Compressing images often causes image quality loss. This happens because many compression tools, especially online ones, use lossy compression algorithms that remove visual data to achieve smaller file sizes. While this works well for simple graphics, it can be problematic for product images, high-resolution visuals, and brand assets where sharpness and detail matter.
At this point, many users think the best solution is to go back to the original image and re-compress it using different settings or tools. However, this often leads to frustration because no matter how carefully you adjust compression levels, there’s always a limit to how much you can reduce file size without compromising quality. Some tools don’t even allow manual quality adjustments—for example, TinyPNG automatically compresses images without letting users control the output quality.
Instead of spending time tweaking compression settings, a more effective approach is to restore lost details after compression using an AI-powered tool like Aiarty Image Enhancer. This advanced AI tool can recover sharpness and fix compression artifacts without significantly increasing file size, making it ideal for optimizing web images.
How to Restore Image Quality with Aiarty Image Enhancer
Step 1. Download and install Aiarty Image Enhancer on your computer.
Step 2. Select an AI model that suits your image, Then, click the drop-down menu of Upscale and select x1 if you don’t want to increase image resolution.
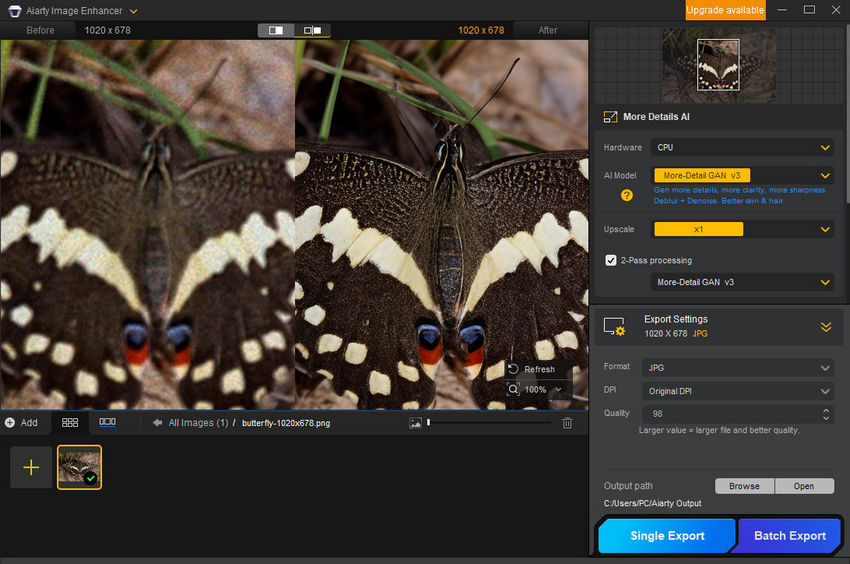
Step 3. Drag and drop your compressed image to Aiarty Image Enhancer. Then the AI will automatically start processing your image.
Step 4. Preview the result and click Single Export or Batch Export button to save the enhanced image.
From the screenshot above, you can see that the image sharpness and details have been significantly improved.
Now, let’s compare the file sizes. The original image was 995KB, while the enhanced image is only 401KB. Aiarty successfully enhances image quality without increasing file size, making it a perfect solution for those who need both clarity and performance.

Method 2: Use Desktop Software (When Online Tools Fall Short)
Online tools like TinyPNG and Squoosh are great for quick compression, but they come with limitations. Most have file size restrictions. For example, TinyPNG limits each file to 5MB. They also depend on internet speed, which can be frustrating if you're dealing with large files or a slow connection. Plus, batch processing is often limited or not supported, which gets tedious for large projects.
That’s where desktop software comes in. With tools like Photoshop, ImageOptim (Mac), and RIOT (Windows), you get faster compression, more control over quality, and the ability to process dozens (or even hundreds) of images at once—all without needing an internet connection.
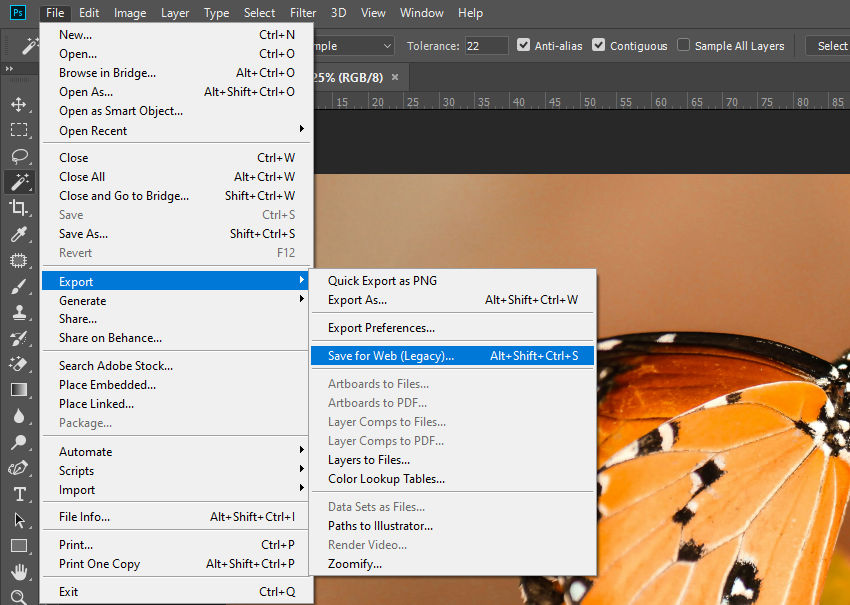
Photoshop’s "Save for Web" feature is particularly useful because it lets you manually tweak compression settings while previewing the quality in real time. Here’s how I do it:
1. Open your image in Photoshop and go to File > Export > Save for Web (Legacy).
2. Choose JPEG (or PNG-8 for images with fewer colors) as the format.
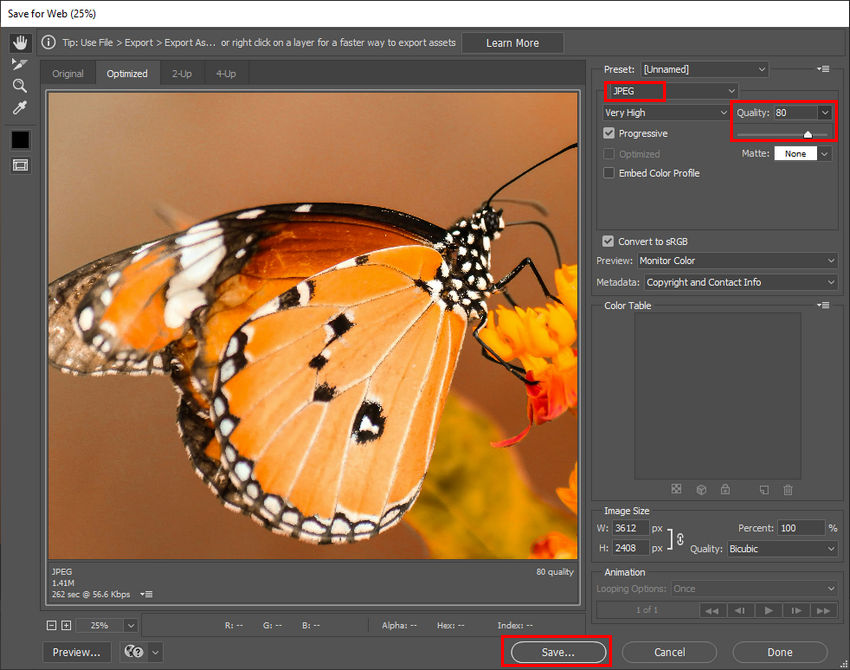
3. Adjust the Quality slider—I usually start at 80% for a good balance between size and clarity.
4. Check the preview and final file size to see how much you’re saving.
5. Click Save, and you’re done!
Common Issue: Why Is My Image Bigger After Compression?
Sometimes, after using Photoshop’s “Save for Web” feature, you might notice that your exported file is larger than the original. This happens for a few reasons:
- Your original image was already highly compressed – If you’re working with an image that’s already optimized (e.g., a JPEG downloaded from the web), saving it again at 80% quality might add more data instead of reducing it.
- Different compression algorithms – Photoshop’s JPEG encoder doesn’t always handle compression the same way as other tools, sometimes preserving more color details and metadata than necessary.
- Metadata wasn’t removed – If your exported image retains Exif data (like camera settings, GPS location, etc.), it can increase file size.
To fix this issue, you can try lowering the quality setting further (e.g., 60-70%), make sure “Optimize” is checked, and use a tool like ImageOptim or RIOT to strip unnecessary metadata.
Method 3: Use WordPress or Website Plugins (Best for Automation)
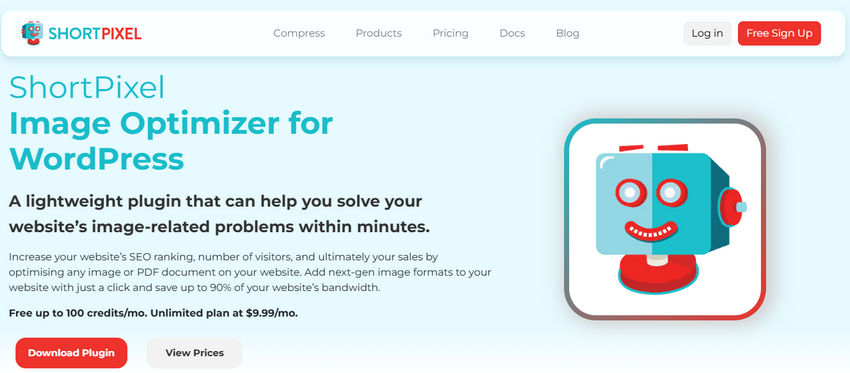
If you run a WordPress site, installing an image optimization plugin can save you a ton of time. Plugins like Smush, ShortPixel, and Imagify automatically compress images as you upload them.
I use ShortPixel because it supports multiple compression levels (lossy, glossy, lossless), and it even converts PNGs to JPEGs when needed. Once installed, it runs in the background, so I never have to think about compression again.
Method 4: Optimize Image Loading with HTML/CSS
Compression is just one part of the equation—how your images load on a webpage can be just as important for performance. Even well-compressed images can slow down a site if they’re not loaded efficiently. Thankfully, a few simple HTML and CSS tricks can make a big difference in speed and user experience.
For example, instead of serving the same large image to all users, you can optimize delivery based on their device and screen size:
- Use srcset and sizes to serve different image resolutions for different devices. This ensures mobile users load smaller, more efficient images while desktops get higher-quality versions.
- Enable lazy loading (loading="lazy") so images are only loaded when they’re about to be viewed. This prevents unnecessary requests and speeds up the initial page load.


Essential Considerations When Compressing Images for Website
When you compress photos for the web, there are a few important things to consider. The goal isn’t just to make the file smaller—it’s about striking the right balance between file size and image quality. A poorly compressed image can slow down your website, hurt SEO, or appear pixelated and unprofessional. Let’s go over the key points to keep in mind.
File Size vs. Image Quality—Find the Right Balance
When compressing images for web use, you need to decide how much quality you’re willing to trade for a smaller file size. High compression can significantly reduce image file size but may introduce artifacts, blurriness, or color loss. On the other hand, keeping images too large will slow down your website’s loading speed.
For web images, the ideal file size varies depending on the image type:
- Hero images (banners, backgrounds): Keep them under 200 KB if possible.
- Standard web images (product photos, blog images, thumbnails): Aim for 50-150 KB depending on dimensions.
- Icons and small graphics: Keep them below 50 KB.
2. Image Compression ≠ Image Resizing
Many people confuse compression with resizing. Resizing reduces the dimensions of an image (e.g., from 4000×3000 pixels to 1200×800 pixels), while compression reduces the file size without changing dimensions.
For web use, you often need both resizing and compression. Resizing ensures that images match their display size on your website, preventing unnecessary data from being loaded. Once resized, compression further reduces the file size without changing the dimensions, making images more efficient without sacrificing too much quality.
3. Choose the Right Image Format for the Web
Different image formats affect both file size and quality. Choosing the right one can make a big difference:
- JPEG (JPG) – Best for photographs and complex images. Supports lossy compression, so adjust quality settings carefully (around 70%-85% is ideal for web use).
- PNG – Best for images that require transparency. It supports lossless compression but results in larger file sizes.
- WebP – A modern format that offers better compression than JPEG and PNG while maintaining high quality. It is recommended for web performance. If your website supports WebP, use it—it can reduce image file size by up to 30% more than JPEG without noticeable quality loss.
- SVG – Best for logos and icons because it’s scalable without losing quality.
4. Don’t Over-Compress—Stick to a Reasonable Quality Level
A common mistake is over-compressing images to the point where they become blurry or pixelated. Here are some recommended compression settings:
- JPEG: Aim for 70%-85% quality to maintain a good balance.
- PNG: Use lossless compression to keep transparency and sharp edges.
- WebP: Choose 75%-85% quality for optimal results.
You can test different settings and compare results before finalizing your images.
5. Optimize Images Based on Web Use Case
Different web scenarios require different image optimizations:
- E-commerce websites: Product images should be sharp, with controlled file sizes to ensure fast loading without losing detail.
- Blogs and articles: Compress images efficiently to keep pages lightweight while maintaining visual appeal.
- Landing pages: Large background images should be compressed as much as possible without noticeable quality loss.
Conclusion
No single method works for every situation, so I tend to mix and match. If I’m working with just a few images, TinyPNG is my go-to. For bulk compression, Photoshop or ImageOptim works best. And if I’m running a website, I let ShortPixel handle everything in the background.
That said, compression is only half the equation. While it reduces file size, it often comes at the cost of sharpness and fine details—something that matters a lot for e-commerce product images, brand visuals, and high-resolution graphics. Instead of settling for blurry, washed-out images, you can use Aiarty Image Enhancer to refine and restore details, ensuring your images remain crisp and professional-looking.
Ultimately, the key is to find the right balance between image quality and performance to keep your site fast and visually appealing.
External resources: