Convert Image to High Resolution (Free, Online & AI Upscaler)
Looking to convert an image to high resolution? Whether you want to upscale a low-quality photo to HD, 4K, or even 8K, there are several ways to do it using AI upscalers, online tools, or professional software.
In this guide, we’ll show you the best methods to enlarge image resolution without losing quality, including tested tools like AI image upscalers, Photoshop, and free online converters.
How to Convert Image to High Resolution [Quick Answer]
You can convert a low-resolution image to high resolution using AI upscalers, online tools, or software. Here are the basic steps:
- Upload your image to an image upscaler
- Select the upscale level (2×, 4×, 8× or target resolution like 4K/8K)
- Apply AI enhancement to improve details and reduce noise
- Download the high-resolution image
While most tools follow the same steps, the final quality can vary depending on how well they handle noise, blur, and detail enhancement. For better results, especially when converting images to 4K, 8K, or higher—AI-powered upscalers are more effective than basic resizing, as they restore details instead of just stretching pixels.
Tools like Aiarty Image Enhancer help avoid common upscaling issues, such as enlarging images without improving details, lacking batch processing, or relying on low-quality online tools. With AI-based enhancement and noise reduction, they can deliver clearer and more natural high-resolution results.
Which Image Upscaler to Use for Increasing Image Resolution
There are multiple ways to convert an image to high resolution, including AI upscalers, online tools, and professional software. Based on our testing, each method differs in speed, output quality, and maximum resolution.
How we test:
- We tested all AI image upscalers with the same images and environment, upscaling to the highest resolution each tool supported to assess their performance.
- My PC’s specs: Windows 10, Intel (R) Core i7-13700K CPU, 32GB RAM, AMD Radeon RX 7600 Graphics.
- The test images: https://cdn.midjourney.com/74661ae2-7294-43ea-9778-b610334c966d/0_2.png
- We spent hours testing every tool listed here, the first 3 methods were cited by most editors. Find out more about how we choose the test objects.
Image Upscaler Comparison Results (AI vs Online Tools vs Photoshop)
| Image Upscaler | Max Resolution | Speed | Ease of Use | Best for | CTA |
|---|---|---|---|---|---|
| Aiarty Image Enhancer | 16K/32K | 3,000 images/hour | Easy | Ultra-high-res prints, batch processing | |
| Adobe Photoshop | 8K | 1 image / 10 seconds | Medium | Basic 4K–8K enhancement | |
| Topaz Photo AI | 8K | 100 images / 8 mins | Medium | Animal/Landscape details | |
| Upscale.media | 10K | 1 image / 30 seconds | Easy | Quick online enhancement | |
| VanceAI | 8K (Paid: 10K) | 1 image / 30 seconds | Easy | Online upscaling |
Best Way to Convert Image to High Resolution Without Losing Quality
Based on our testing, AI-powered tools deliver the best results when converting images to high resolution—especially for 4K, 8K, or higher outputs. Among them, Aiarty Image Enhancer stands out for its balance of image quality, speed, and batch processing capability.
- Max upscaling: 8× (up to 32K)
- Supported platforms: Windows, Mac
- G2 rating: 4.3/5
It uses AI models to upscale images while simultaneously reducing noise, fixing blur, and restoring fine details. Compared with basic resizing or some online tools, the output looks sharper and more natural, especially at higher resolutions.
Key advantages:
- Up to 8× Upscaling: Convert images to 4K, 8K, 16K, or even 32K resolution
- All-in-one Enhancement: Denoise, deblur, and enhance details automatically
- High Efficiency: Batch process large numbers of images quickly
Best for: Batch processing, ultra-high-resolution images, and users who want high-quality results without manual adjustments.
How to Convert Low Resolution Images to High Resolution with Aiarty Image Enhancer?
Step 1. Free download Aiarty Image Enhancer, install, and launch it.
- Make sure your computer has met the minimum system requirements to install Aiarty Image Enhancer.
- As the trial version comes with some limitations, upgrade to the full version to unlock all features.
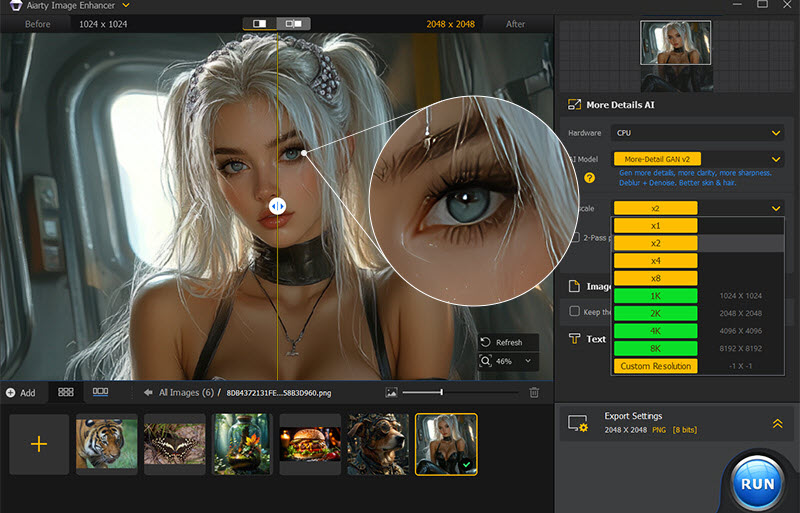
Step 2. Drag and drop one single image or multiple images to the 16K/32K photo converter.
Step 3. After analyzing, choose an AI model in the right panel, More-Detail GAN v3 for realistic high-fidelity details, AIGCSmooth v3 for improved clarity and smoother quality, and Real-Photo v3 for photorealistic details.
Step 4. Choose a resolution or an upscale scale.
- x1: fix low resolution photos without changing resolution (reduce noise, blur, and artifacts).
- x2 / x4 / x8: Upscale images up to 32K (Windows) or 16K (Mac).
- 1K / 2K / 4K / 8K: Directly output target resolutions.
- Custom: Manually set width or height.
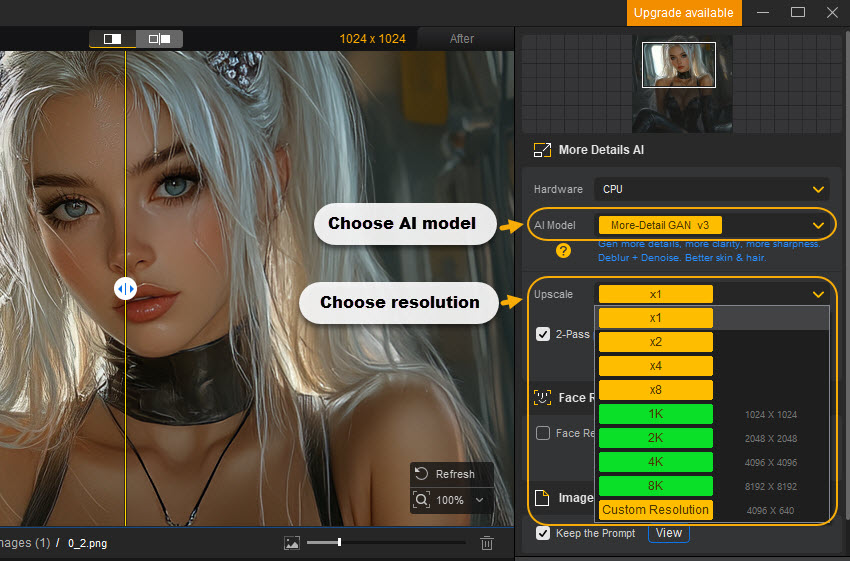
Step 5. Preview the upscaled photo at 100% zoom, then adjust the Strength slider for a more natural, high-fidelity result without the waxy AI look. If your image includes a face, toggle the Face Restoration option on or off to see which looks best.

Step 6. Set export settings and start processing.
- Choose an output format (PNG, JPEG, DNG, TIFF), DPI value and quality level. Usually, the default settings are recommended.
- Select a save folder by clicking the “Browse” button.
- Click Single Export or Batch Export to start generating high-resolution images.

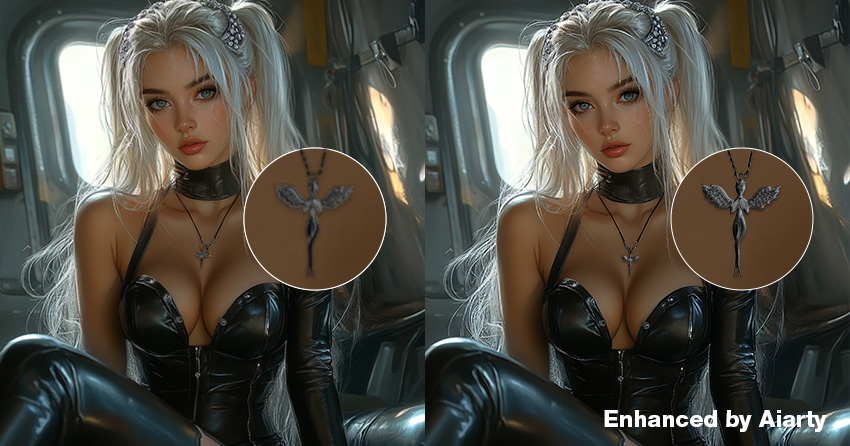
Before vs After: Real Image Upscaling Results
AI-Generated Image (Detail Reconstruction)
AI-generated images often benefit from upscaling, improving structure consistency and recovering missing details while maintaining natural appearance.
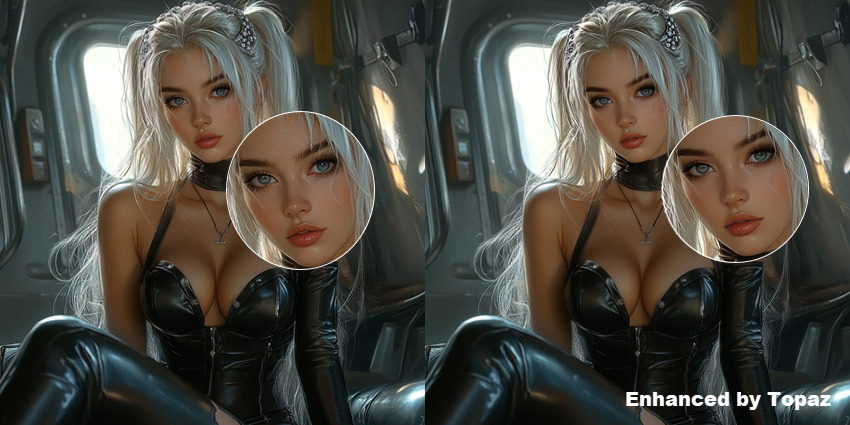
Portrait Photo (Face Details)
Aiarty's AI upscaling significantly improves facial details, enhancing skin texture, hair sharpness, and overall clarity.

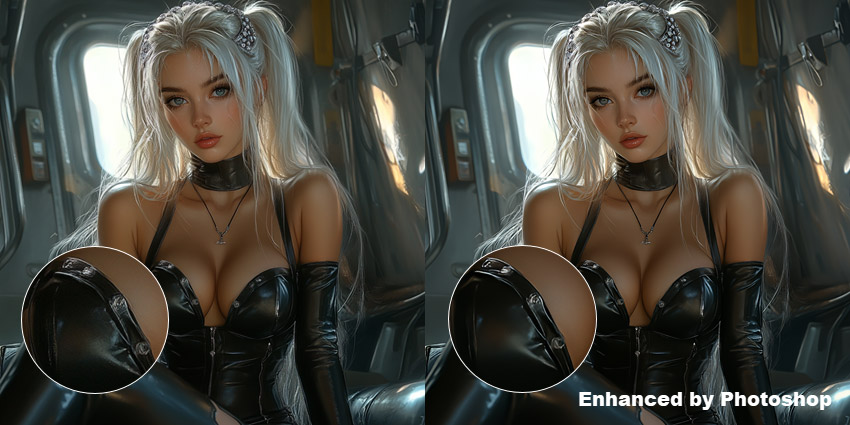
Product Image (Sharpness & Edges)
For product photos, AI upscaling enhances edge clarity and fine texture details, making images more suitable for e-commerce and large-format printing.

Observation: The upscaled image shows noticeably improved clarity with reduced noise. For overly soft images, it also adds subtle texture and restores a greater sense of detail. The portrait enhancement is particularly impressive in facial restoration, delivering sharper and more defined features. However, the transition between the enhanced subject and the surrounding areas could still be more seamless for a more natural overall result.
Other Ways to Increase Image Resolution (Compared)
Convert Images to High Resolution with Adobe Photoshop
- Max upscaling: 4X
- Supported platforms: Windows, Mac
- G2 rating: 4.6/5
Adobe Photoshop’s AI-powered Super Resolution feature doubles the linear resolution, quadrupling the pixel count of low-res images. Using AI and machine learning, it selects the best pixels to deliver sharp, detailed results ideal for high-quality prints. With one click, you can effortlessly enhance images and increase resolution to 4K or 8K in Photoshop.
How to increase image resolution with Photoshop’s Super Resolution?
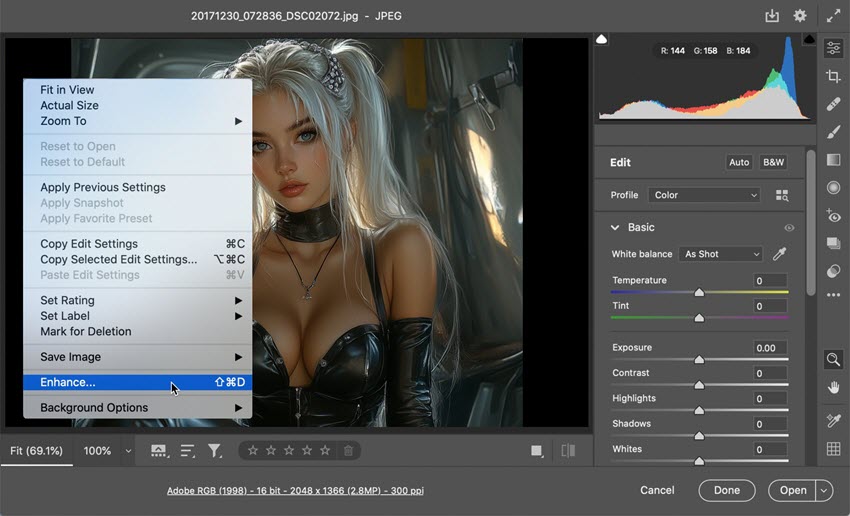
Step 1. Open a raw file first. The raw files would open up automatically in the Adobe Camera Raw tool.
Step 2. Right-click the shot & choose Enhance. An Enhanced Preview dialogue box will appear, with a few options for managing the procedure.
Step 3. Check the Super Resolution checkbox, and pan around the preview image to see the expected results. Then, click the magnifying glass icon to zoom out, and then click back on the patch you want to investigate.
Step 4. Click the Enhance option.
Step 5. After that, zoom in close enough to fine-tune aspects like sharpness, texture, and noise removal by using scales on the right. Check detailed steps to convert images to high resolutions in Photoshop >>
Notice: If you want to use Super Resolution with JPEG, HEIC, or TIFF files, first you need to set Photoshop to open those file formats in Adobe Camera Raw by default. You can do as follows:
- Browse the File Handling section and select Camera Raw Preferences from the menu.
- When a dialog box appears, select the File Handling area.
- Change the JPEG/HEIC option to "Automatically open all supported" images, then repeat the process for TIFF files if required.
My experience with Photoshop's Super Resolution and final image showcase:
Adobe Photoshop, while a professional tool, may not be ideal for beginners needing simple resolution upscaling. Its Super Resolution feature only upscales images by 4x, up to 8K or so, which may not be enough for very high-resolution needs. Zooming in on upscaled images may show less detail. After testing, Adobe Photoshop demonstrates improved performance with higher-resolution images; images with dimensions lower than 800x600 pixels may not produce satisfactory outcomes.
Increase Image Resolution with Topaz Photo AI
- Max upscaling: 6X
- Supported platforms: Windows, Mac
- G2 rating: 4.0/5
Topaz Photo AI is a cutting-edge image enhancer that uses advanced AI algorithms (Autopilot) to upscale, restore, and optimize images, delivering stunning results. It reduces noise, removes haze, sharpens details, adjusts lighting, corrects colors, recovers faces, and enhances text while preserving image quality. Capable of scaling images up to 600% for resolutions like 4K and 8K, it also adds details and eliminates imperfections. With over 1 billion images processed, Topaz Photo AI is a powerful tool for both amateur and professional photographers aiming to elevate their work.
How to convert images to high resolution with Topaz Photo AI?
Step 1. Go to Topaz official website, download the software and install it on your computer.
Step 2. Launch the software, drag and drop your image(s) to it.
Step 3. Once added, Topaz Photo AI will automatically process and enhance your image(s).
Step 4. To upscale image resolution, you can click on the "Upscale" icon and choose the scale option. 6x is the maximum option.
Step 5. Optionally, manually adjust the parameters to perfect your image(s).
Step 6. When everything is OK, hit the "Export image" to upscale and export the image(s).

My experience with Topaz Photo AI and final image showcase:
Topaz Photo AI demonstrated exceptional proficiency in processing images of animals, such as tigers, cats, and birds. The resulting images exhibited remarkable clarity and sharpness in the fur and other features. Also, it allowed me to export PNG, JPG, DNG, or TIFF format as well. However, it appeared that Topaz Photo AI struggles with face processing. A comparative analysis between Aiarty Image Enhancer and Topaz Photo AI also indicated that the facial images produced by Topaz were significantly blurrier than those generated by Aiarty.
Free 16K Photo Converter Online – Upscale.media
- Max upscaling: 8X
- Supported platforms: Online
- G2 rating: 4.8/5
Upscale.media is a free and user-friendly photo 8K converter online that uses advanced AI to upscale images by up to 8x, reaching a maximum output resolution of approximately 10K (e.g., 1,200px source image upscaled to 10,000px). While it doesn't offer true 16K/32K output, it's still a handy option if you're looking to convert image to high resolution alternatives or need ultra-high-resolution images for digital displays, large-format prints, or presentations. This online AI tool supports JPEG, PNG, WebP, and HEIC formats, making it ideal for users who want quick, installation-free image enhancement directly in their browser.
How to use Upscale.media as a 16K photo converter?
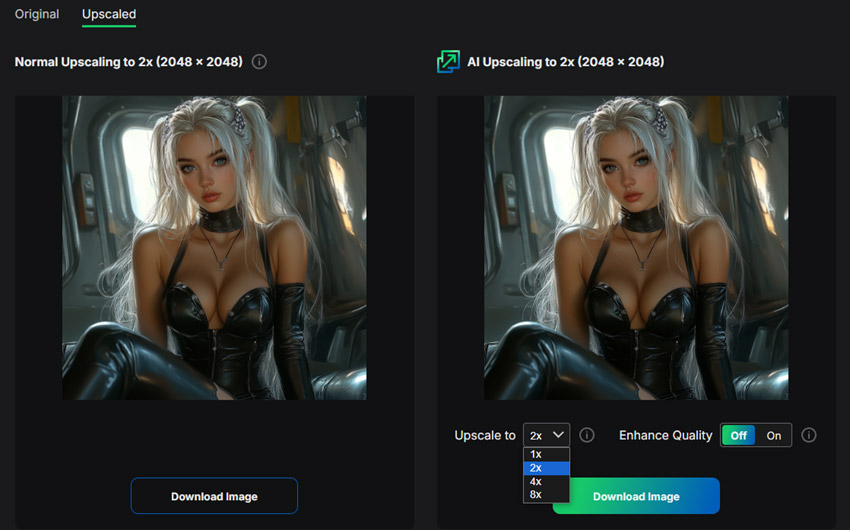
Step 1. Visit the official site: https://www.upscale.media/ and click "Upload Image" to upload your photo in JPEG, PNG, JPG, or WebP format.
Step 2. Choose between "Normal Upscaling" (2x) and "AI Upscaling" (up to 8x). To reach near-16K resolution, upload a high-quality source image and apply 8x scaling.
Step 3. Toggle "Enhance Quality" to boost sharpness and clarity.
Step 4. Click "Download Image" to save your enhanced, high-resolution photo. For large images, consider compressing afterward to meet file size limits (max output: 25MB).
Also see: Best photo enlargement software to increase resolutions
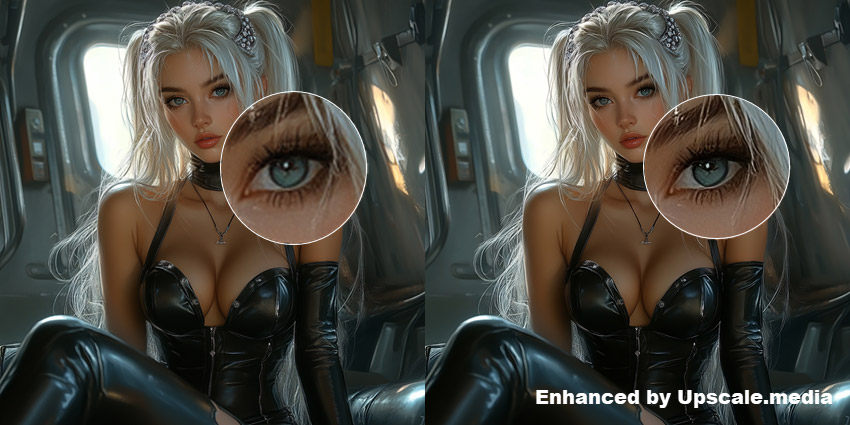
My experience with Upscale.media as a 16K converter:
While not a full 16K output tool, Upscale.media offers a free, online method to convert image to high resolution. I tested it with a 1024x1024px image, and the 8x upscaling brought it close to 8K–12K levels. However, the upload was slow, and the tool struggled with images exceeding 1500px input resolution. Final images were somewhat brighter but still lacked detail at extreme zoom. Overall, it’s a decent 16k photo converter online free solution for moderate use.
Convert Images to Higher Resolution Online with VanceAI
- Max upscaling: 8X (up to ~8K–10K resolution for subscribers)
- Supported platforms: Online
- G2 rating: 4.5/5
VanceAI is a fast, beginner-friendly photo 16K converter online free that uses AI and deep learning to upscale and enhance images. Although it doesn’t support full 16K resolution output, it enables paid users to generate images up to 34 megapixels—roughly equivalent to 8K–10K resolution. For free users, the output is limited to 2.8 megapixels, which is suitable for web use or previews. If you’re looking to convert image to 8K/16K resolution or get a higher-resolution version for printing, VanceAI offers an easy, cloud-based solution with quality enhancement features like denoising, sharpening, and upscaling.
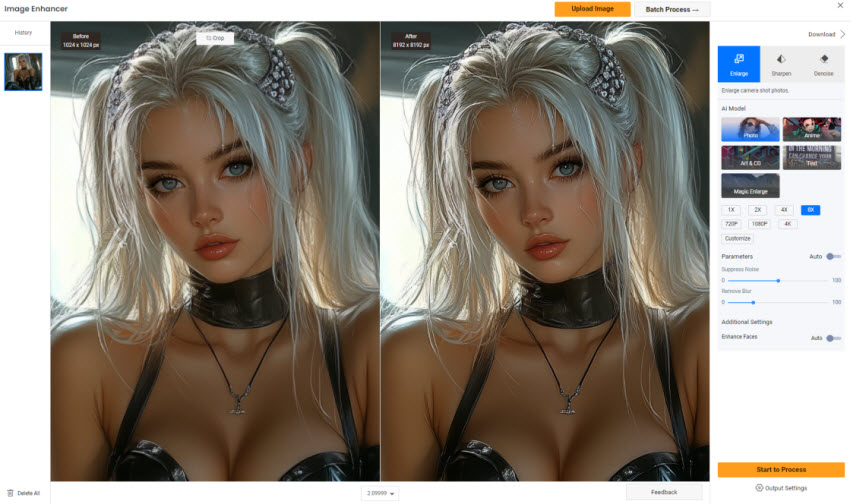
How to use VanceAI as a 16K photo converter alternative?
Step 1. Go to the official VanceAI website.
Step 2. Click "Start Now" and sign in to your account (registration required).
Step 3. Drag and drop your image onto the workspace.
Step 4. Select "AI Image Upscaler" mode and choose your desired AI model and scale (up to 8X).
Step 5. Optionally, tweak noise reduction, sharpening, or face enhancement options.
Step 6. Click "Start to Process" and download your enhanced image once finished.
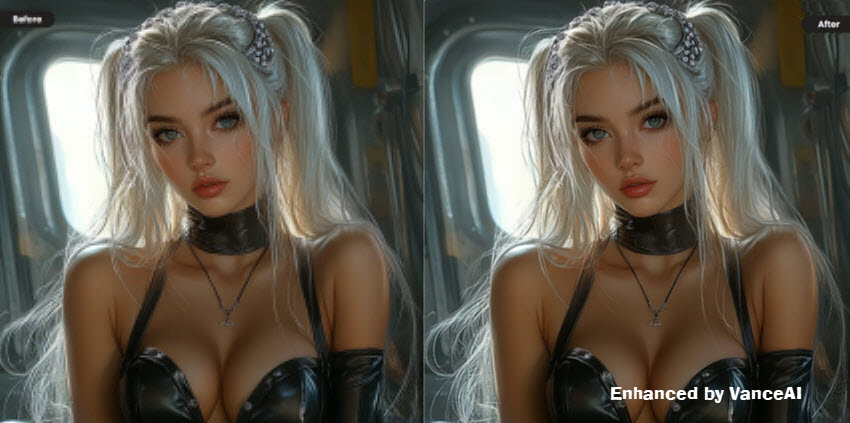
My experience using VanceAI as a photo 16K converter online free:
In free mode, VanceAI limited my output to around 2.8MP, which is enough for quick previews but not sufficient for ultra-high-resolution use. After upgrading, I was able to generate images up to 34MP, approaching 10K quality. Although it can’t fully convert images to 16K resolution, it remains one of the most accessible AI-powered tools for high-quality upscaling, especially for those looking for an online solution without installing software.
Test Results & Comparisons of the 5 Image Upscaling Ways
We've compiled a comparison of five image upscaling tools, highlighting key features like maximum resolution, processing speed, and output quality. This table serves as a quick reference to help you choose the best tool based on your needs, whether for high-quality upscaling, batch processing, or ease of use.
See the before-and-after images to assess the quality improvements achieved by each of the 5 image upscalers.

Conclusions for each tool:
- Aiarty Image Enhancer: Exceptional 8X upscaling (up to 32K) with sharp details, noise removal, and batch processing (3,000 images/hour). Ideal for high-quality prints and large projects. Produce smooth texture and minimal artifacts, even at extreme enlargements.
- Adobe Photoshop: Limited to 4x upscaling with decent clarity. Edges may appear slightly softened. Best for basic tasks but lacks higher resolution support and speed.
- Topaz Photo AI: Great for animal/landscape details but struggles with faces, since it might introduce subtle noise at high magnifications. Offers 6x upscaling with natural results.
- Upscale.media: Convenient for small tasks but limited to 25MB outputs. Results can appear blurry and visible tiling artifacts were introduced when zoomed in.
- VanceAI: Fast and user-friendly with 8x upscaling. Face might sometimes appear overly processed, reducing texture fidelity. Effective for noise reduction but limited by internet dependency.
This comparison and testing summary should help you choose the right tool based on your specific needs, whether you prioritize resolution, speed, or output quality. For the best overall performance, Aiarty Image Enhancer stands out as the top recommendation.
Free download Aiarty Image Enhancer and convert images to high resolution Now!
Which Tool Should You Use to Convert Images to High Resolution?
When choosing the best image resolution upscaler, key factors include:
- Resolution Increase: The tool should support upscaling to 4K, 8K, or higher, enhancing clarity and sharpness.
- Image Quality: It should restore details, denoise, deblur, and depixelate images, with noticeable improvements.
- Speed: The tool should process images quickly without sacrificing quality, even on moderate computers.
- Ease of Use: A user-friendly interface is essential, especially for non-tech users.
- Editor’s Review: We prioritize tools with ratings above 4.0 (out of 5), based on both professional and user feedback.
With the right tool, like Aiarty Image Enhancer, converting low-res images to high-res is easy. This AI-powered tool boosts resolution while preserving quality, adding rich details and sharp edges. So, unleash your creativity, upscale your images, and let them print-ready and shine!
 FAQs about Image Upscaling to 4K, 16K, and Beyond
1. How to convert an image to 4K?
You can convert an image to 4K (3840 × 2160 pixels) using either traditional software like Adobe Photoshop or AI-based tools. Photoshop allows you to manually resize to 4K, while AI tools like Aiarty Image Enhancer upscale automatically with improved sharpness, clarity, and detail generation.
2. How to convert a blurry picture to HD?
To enhance a blurry picture to HD, use an AI image upscaler that supports denoising and deblurring. Tools like Aiarty Image Enhancer or Topaz Photo AI not only increase resolution but also restore fine details, reduce noise, and correct motion blur automatically.
3. Can you increase the resolution of a JPEG?
Yes, you can increase the resolution of a JPEG using upscaling software. However, since JPEGs are often compressed, use AI-powered tools that can intelligently reconstruct missing details and reduce artifacts to avoid further quality loss.
4. How do I convert an image to 16K resolution?
To convert an image to 16K (15360 × 8640 pixels), choose an AI upscaler that supports high output resolution or custom dimensions. Aiarty Image Enhancer allows upscaling to 16K and even 32K. Simply upload your image, select x8 scaling or enter the target resolution, and process. Online tools like Upscale.media or VanceAI may reach close to 10K but not full 16K.
5. Can I upscale a low-resolution image (e.g., 480p) to 16K or 32K?
Technically yes, but the final quality depends heavily on the input. AI upscalers can generate lost details using deep learning, but the clearer the original image, the better the 16K or 32K output will be. Avoid using basic resizing tools, as they won’t improve detail or sharpness.
6. Can you upscale an image without losing quality?
Yes, you can upscale an image without noticeable quality loss by using AI-powered image upscalers. Unlike traditional resizing, AI tools analyze and reconstruct details, reducing blur and pixelation while preserving clarity. However, results still depend on the original image quality.
7. What is the best image upscaler for large prints?
The best image upscaler for large prints is one that supports high-resolution output (such as 16K or 32K) with strong detail reconstruction. Tools like Aiarty Image Enhancer are ideal for large-format printing, as they offer high upscaling limits, batch processing, and advanced sharpening and denoising capabilities.
External sources:
- "Image Interpolation". Science Direct
- "Upscale, Denoise, Deblur Photo and Restore Facial Details with New Aiarty Image Enhancer". PetaPixel
- "Testing Adobe's New Super Resolution on Heavily Cropped Images". Fstoppers
- "Topaz Photo AI Review". PCMag
- "What do people think of AI Image Upscaler by Upscale.media?". Product Hunt
- "VanceAI Image Upscaler Review: Enhance the Inner Capabilities of Your Image". LA Progressive
You May Also Like
This post was written by Brenda Peng who is a seasoned editor at Digiarty Software who loves turning ordinary photos into extraordinary works of art. With AI assistance for brainstorming and drafting, the post is reviewed for accuracy by our expert Abby Poole for her expertise in this field.