How to Use Super Resolution in Photoshop to Upscale Images?
Updated on
If you’ve ever tried to upscale images to larger sizes, you should know that upscaling images can easily result in loss of details and the introduction of artifacts. However, Adobe Super Resolution offers a promising solution. How to upscale an image in Photoshop without losing quality via Super Resolution? How effective is Adobe’s image upscaler compared to other deep neural network tools?
I tested Photoshop Super Resolution on various images and was impressed by its ability to enlarge images by a factor of four while preserving a significant amount of detail and clarity. In the following sections, I'll share my detailed findings and provide examples to demonstrate the effectiveness of Super Resolution.
What is Adobe Super Resolution?
Adobe’s Super Resolution, a powerful feature in Camera Raw and Photoshop, can effectively double the size of your photos. This means enhancing the image to twice its original width and height, resulting in four times the total pixel count. This is particularly useful for creating large-format and high-DPI printing.
To build Super Resolution feature, Adobe trained its Sensei AI technology on millions of photos, comparing originals with downscaled versions to learn how to effectively upscale images. It analyzes your image and generates new pixels that fill in the gaps, creating a higher-resolution version. The algorithm focuses on preserving essential details and minimizing artifacts, resulting in a more natural and visually appealing image. Therefore, important details and textures are retained even after upscaling.
The Adobe image upscaler works on both raw and conventional image formats (e.g., JPEG, PNG, HEIC).
KeyTakeaways
- Adobe Super Resolution can upcale your image by 2x only.
- To use Adobe Super Resolution, you should either have Adobe Photoshop Lightroom or Adobe Bridge, or you can't access the Super Resolution feature.
- The file size of the output DNG file can be up to 10 times larger than the original RAW file.
- While working with RGB files, Adobe's image upscaler gives best results with RAW files.
- To upscale images by 2x, 4x, and up to 8x, try third-party AI image upscaler - Aiarty Image Enhancer. It can upscale any image to up to 32K with crisp and natural details, while eliminating blur, noise, pixelated artifacts.
How to Use Super Resolution in Photoshop?
Step 1. Open Your Photo in Camera Raw
This Adobe Super Resolution feature is now built in Adobe photoshop lightroom. It’s also available in adobe Camera Raw (ACR) and Photoshop. To use Super Resolution on Photoshop, you need to open your image in Camera Raw (the plug-in, not the Photoshop filter) first.
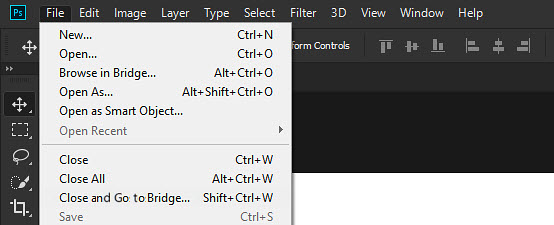
If your photos are raw files, it will automatically open the image in Adobe Camera Raw and simply proceed to the next step. If not, open Adobe Bridge from within Photoshop, go up to the File menu (in Photoshop) in the Menu Bar along the top of the screen and choose Browse in Bridge.
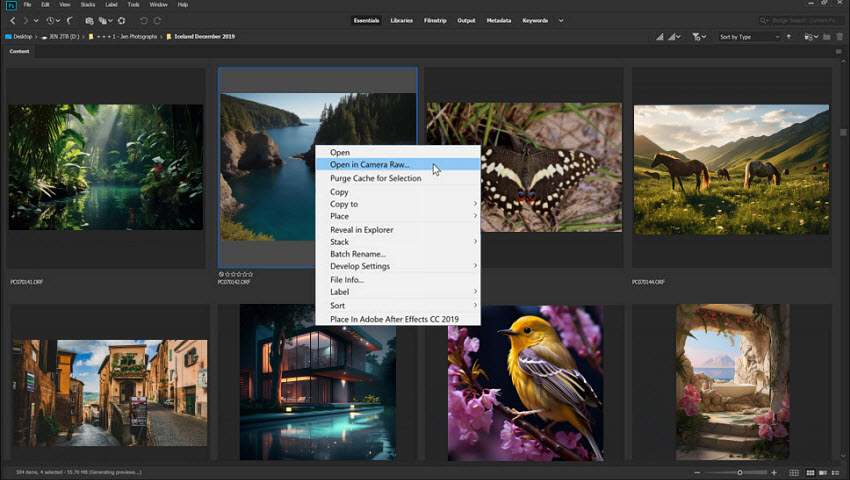
In the Adobe Bridge window, right-click on your image, and choose to "open in Camera Raw".
Just to be clear: Super Resolution is not available in the Camera Raw filter from within Photoshop. You need to open the file directly into the Camera Raw processor (the plugin). The Camera Raw filter in Photoshop is not the same thing.
Step 2. Enter into Super Resolution
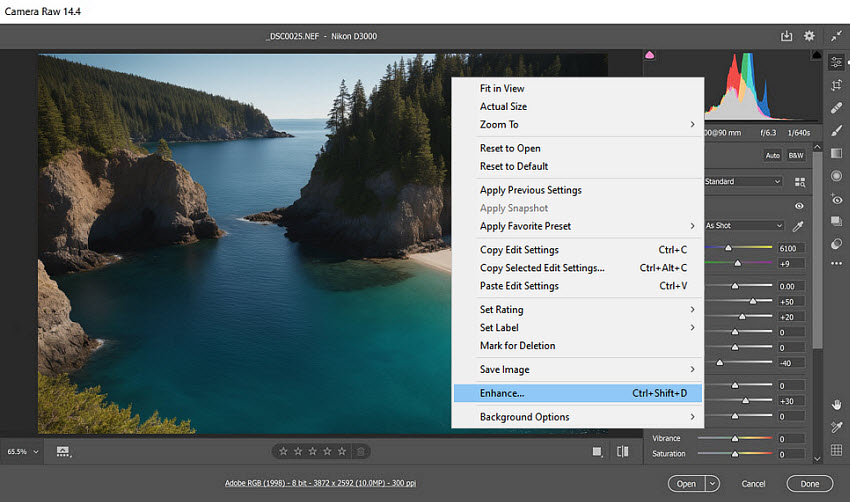
In Photoshop’s Camera Raw dialog, right-click on the image. Then click “enhance” or use this keyboard shortcut Ctrl + Shift + D. A dialog box will appear with Super Resolution options and a zoomed-in preview of your image.
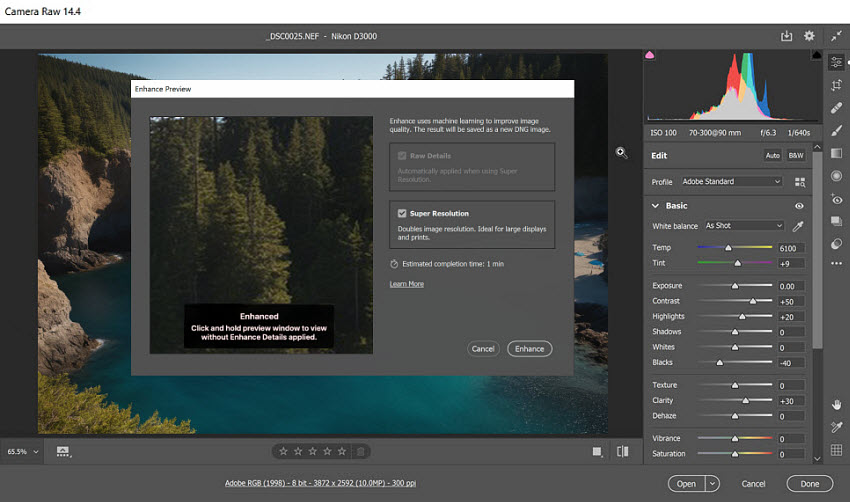
In the Enhance Preview window, the Raw Details option will be checked if you are using a RAW file, but this does not work on JPEG files.
Click and hold on the image to toggle between the original and enhanced versions for comparison. This dialog box will also give you an estimate of how long it will take to convert the image if you check the Super Resolution box.
Step 3. Enhance Your Image
Once you click "Enhance" it will go through the process of enhancing the image and a preview will show up in the bottom of the screen right next to the original. Super Resolution is a computationally intensive process, so it may take some time to complete, especially on older or less powerful computers.

Common Issues when Using Super Resolution in Photoshop
1. No Enhance option in Camera Raw
Some users report that when they right-click on the image in Camera Raw, there is no Enhance option to access the Super Resolution feature. When that happens, you can try to open the image directly in Camera Raw via Bridge instead of opening an image in Photoshop and Shift-Ctrl-A (or open a layer with the Camera Raw Filter). Go to your Bridge, select your image and choose “Open in Camera Raw”.
Many users confuse the Camera Raw filter with the Camera Raw processor. Therefore, when they open the Camera Raw filter window, they cannot find the Enhance option. It's important to note that Camera Raw can only be accessed from Bridge.
2. Super Resolution not showing for JPEG images
Sometimes, you may see Super resolution not showing up in camera raw for JPEGS. Camera Raw fully supports JPEG images. But by default, Adobe Bridge opens JPEGs not into Camera Raw but into Photoshop. Opening a JPEG file into Camera Raw is a bit less intuitive. You need to right-click on the JPEG file's thumbnail instead of double-clicking on it.
You can also go to Adobe Photoshop > Edit > Preferences > Camera Raw and in the File Handling tab, set JPEG or TIFF to Automatically open all supported JPEGs or TIFFs.
3. Super Resolution isnt working in Photoshop
This can be caused by different reasons. One reason is that ACR wouldn't fully recognize the GPU with all advanced functions. Then you can try to delete TempDisableGPU2 file in the ~/Library/Application Support/Adobe/CameraRaw/GPU path.
How Good is Adobe Super Resolution in Photoshop?
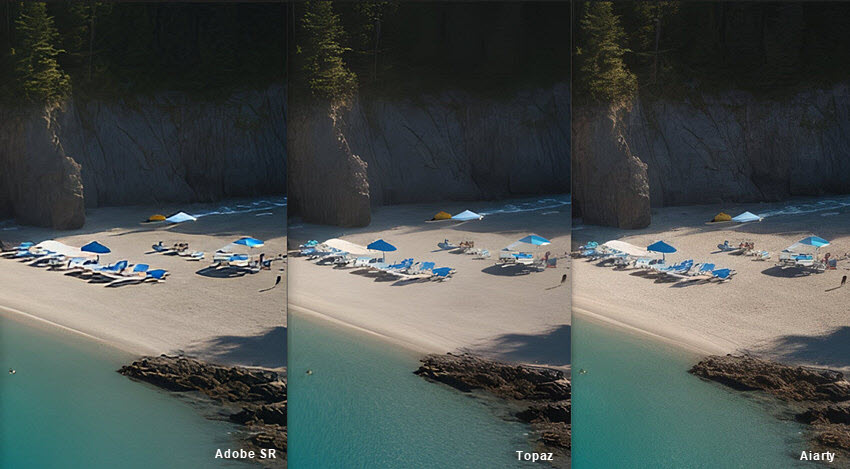
To demonstrate the capabilities of Photoshop Super Resolution, I've compared its results to Topaz Gigapixel AI and Aiarty Image Enhancer. Since Adobe image upscaler can only upscale images by 2x, for a fair comparison, all images were upscaled by 2x.
FYI, Aiarty Image Enhancer is an AI-powered tool is specifically designed to upscale and enhance images, including RAW photos, RGB files, AI images, high-resolution, old and low-quality images. It excels at removing image artifacts, such as noise, blur, pixelation, and reserving natural details after upscaling. You can download the AI image upscaler and compare the results by yourself.
Test 1.
Original: A .NEF Raw shot captured by my Nikon D3000, 3872 x 2592 (10.0 MP), ISO 200, 1/20, f/5.6

The original image is upscaled by 2x in Photoshop Super Resolution, Topaz Gigapixel AI, and Aiarty Image Enhancer.
File size of the enlarged image is from 8.4MB to 81.2MB enhanced DNG in Super Resolution, 2.86MB JPG in Topaz, and 3.25MB JPG in Aiarty.
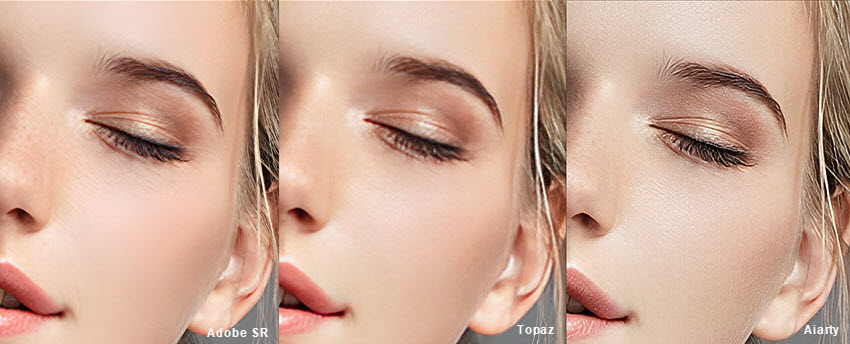
Test 2.
Original: an HD 1080P image in JPEG format, upscaled by 2x with three AI image upscalers.
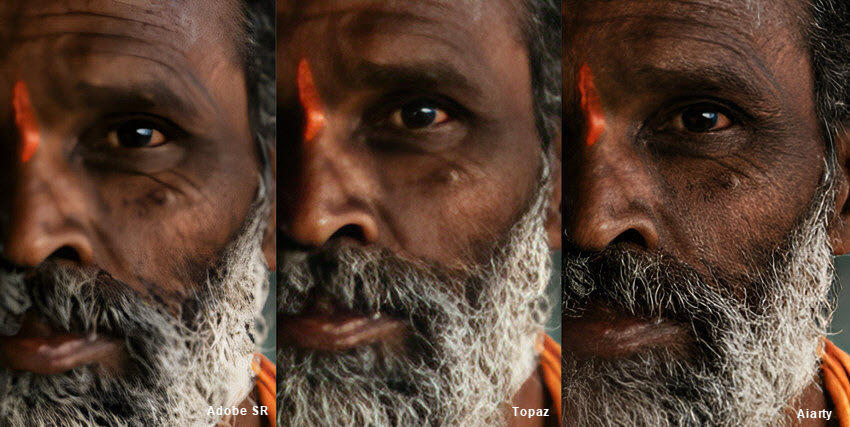
Test 3 (noisy image).
The original image is a 640x751 JPG image that contains noise, upscaled by 2x to 1280x1502 pixels
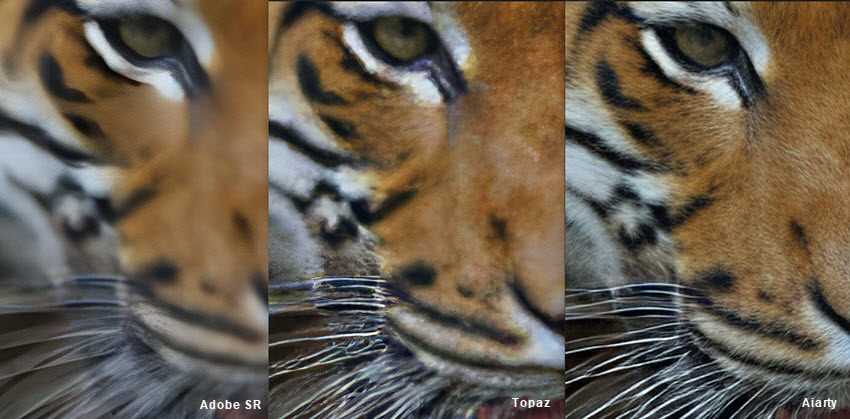
Test 4 (old image).
The original image is an old and low-quality JPG image at 512x512, upscaled by 2x to 1024x1024 pixels
To sum up:
- Adobe super resolution works better with higher-quality images, namely Raw files from cameras. If you want to restore and enlarge a low-quality photo with Super Resolution in Photoshop, such as images below 800x600 pixels, it may not yield satisfactory results due to the limited amount of detail available.
- Adobe Super Resolution may not work as efficient with JPEGs and PNGs with excessive compression. If the original images contain th excessive noise, Super Resolution can sometimes amplify existing noise in an image. You may need to use Photoshop's noise reduction tools before or after applying Super Resolution to minimize artifacts.
Tips for Upscaling with Super Resolution
Super Resolution offers a powerful way to increase image resolution, but there are ways to make the process even faster and more efficient. In this section, we'll explore tips to help you achieve the best possible results while minimizing processing time.
1. Use a powerful GPU
While Super Resolution can be used on less powerful systems, using a high-performance GPU will yield faster results and allow you to process larger images more efficiently. A GPU optimized for machine learning tasks, such as those in the Core ML, Windows ML, Apple M1, or NVIDIA RTX series, can significantly speed up image processing.
2. Upscale an image multiple times
Super Resolution can only be applied once to an image. If you can't upscale an image to the resolution you need via 2x upscaling, you can change the output DNG file format to another format, such as JPG, after upscaling, and then apply the feature once again.
3. Get engouh SSD storage
Super Resolution outputs a DNG file that can be up to 10 times larger than the original RAW file. Using a solid-state drive (SSD) instead of a traditional hard disk drive (HDD). This can also dramatically improve read and write speeds, leading to faster image processing times.
4. Work with RAW Files
RAW files offer more image data, allowing Super Resolution to achieve better results. While JPEGs, PNGs, and TIFFs are also supported, RAW files provide the most flexibility for image enhancement.
5. Fine-Tune Settings
As mentioned above, Adobe Super Resolution is not good at handling image artifacts. After you upscale with Super Resolution in Photoshop, you may need to adjust Sharpening, Noise Reduction, and Texture settings to achieve the desired balance between detail and artifact reduction.
Conclusion
By following these steps and considering the tips provided, you can effectively leverage Photoshop's Super Resolution feature to enlarge your images and achieve impressive results.
Adobe's image upscaler works best with high-quality RAW images from DSLRs and mirrorless cameras. If the original image contain artifacts or less data, third-party tools like Topaz Gigapixel AI and Aiarty Image Enhancer might work differently. Remember to experiment with different settings and compare the output to other upscaling tools to find the best solution for your specific needs.
 FAQ
FAQ
If you have a subscription to Adobe Creative Cloud, Super Resolution should be available within your Photoshop application. It's a free feature that don't require extra fee. But you need to pay for the subscription to Creative Cloud first.
There is no shortcut for Super Resolution in Photoshop. To turn Super Resolution for image upscaling, you need to access Adobe Bridge or LightRoom.
Yes, Adobe offers an image upscaler called Super Resolution. It's a powerful feature available in Adobe Photoshop and Adobe Lightroom Classic. Super Resolution uses advanced machine learning algorithms to enhance the quality of low-resolution images. It can significantly improve image clarity, detail, and overall sharpness by effectively upscaling the image. In addition, there is also a Preserve Details feature, which can be used to enhance image resolution while maintaining detail and reducing artifacts.
Photoshop Super Resolutiono is very helpful to upscale Raw files to poster or printing sizes. If your image is already of high quality and resolution, you can use Super Resolution to enlrage it to large sizes. On the contary, low-quality images with excessive noise or compression artifacts may have limited improvement.
The steps to use Super Resolution in Lightroom are similar:
- Open a raw image, JPEG, or TIFF in Loupe view.
- After the image is loaded in the Develop module, select Photo > Enhance in the top menu bar.
- You can also Control-click (Mac)/right-click (Windows) the image and select Enhance.
- In the Enhance dialog box, select Super Resolution. Click-and-hold the preview to see how the image looked before the enhancement. You can also click-and-drag the cursor across the preview to see other areas of the enhanced image.
You May Also Like
Brenda Peng is a seasoned editor at Digiarty Software who loves turning ordinary photos into extraordinary works of art. With years of experience behind the lens and in front of the computer, Brenda shares her passion for photography, image enhancement, and editing through easy-to-follow tutorials.