How to Convert Images to 4K Resolution [AI Powered]
Updated on
Summary: On this post, you will get two professional tools to help you upscale images into 4K resolution. They are the powerful and popular image editing software - Adobe Photoshop, and a specifically-designed-for-image-enhancing AI software - Aiarty Image Enhancer.
High-resolution, like 4K images are essential for various applications, including photography, videography, graphic design, and digital content creation. They allow for greater clarity, finer details, and improved color accuracy, making the visuals more captivating and engaging for the audience.
And to convert a low-resolution image to a 4K one, there are many software tools and applications available out there to make it, at least they said so. But the truth is most of them cannot make users happy about their results at all. Because what they are doing is simply enlarging the canva to 4K in size without producing more natural details or pixels to fill it up.
Luckily, on this post, we have tested and gathered three methods which can help you convert images to 4K resolution, increasing the resolution and adding the details at the same time. Check them now.
Method 1. How to Convert Images into 4K Resolution in Photoshop
Adobe Photoshop is a powerful software application widely used for image editing, graphic design, and digital art. Photoshop is part of the Adobe Creative Cloud suite and is used by professionals across various industries, including photography, web design, and advertising. And also, you can use it to upscale an image to 4K resolution easily. Here's a step-by-step guide on how to do it:
Step 1. Open the image you want to upscale in Photoshop. Photoshop supports many image file formats, even some unusual but popular ones, for example the EXR format.
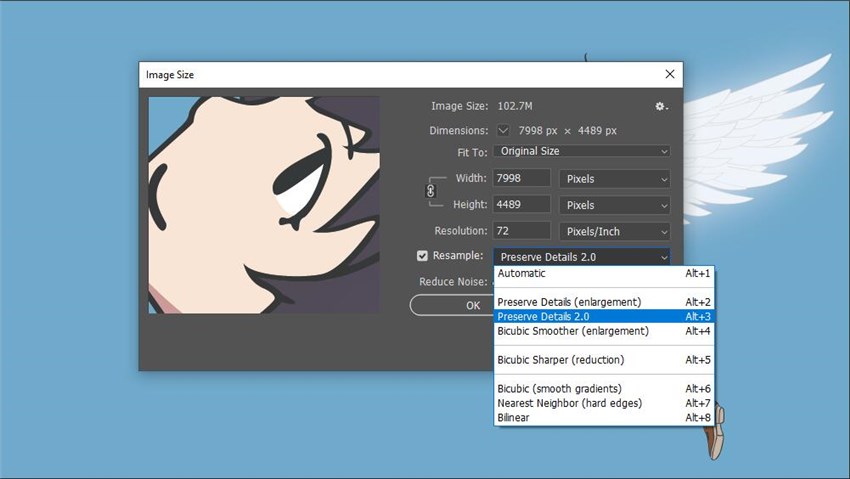
Step 2. Go to Image > Image Size in the menu bar.
Step 3. In the Image Size dialog box, you'll see the current size of your image. To upscale it, increase the Width and Height values to 4K resolution numbers. Then make sure the Resample box is checked.
Step 4. From the Resample dropdown menu, select Preserve Details 2.0. This option uses AI technology to maintain the quality of the image as it's enlarged. And this is my favorite algorithm in Photoshop to enlarge an image. If you want to learn more about it, keep reading the following words; While, if not, please directly jump to the fifth step for further operation.
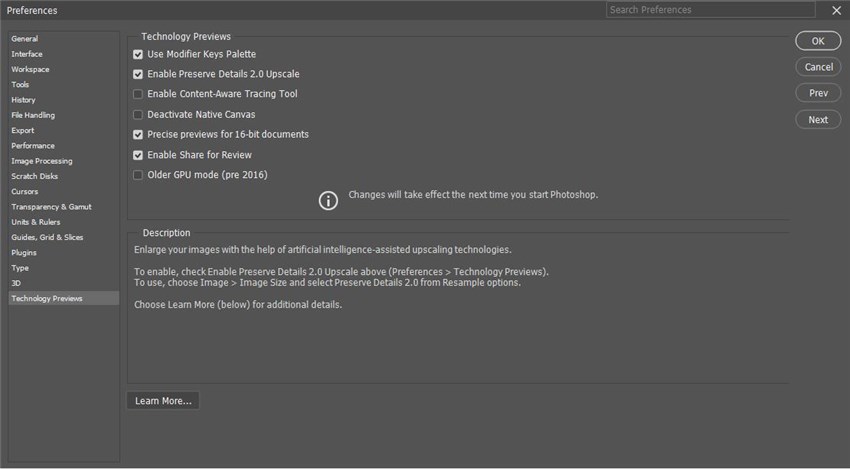
Note: If you cannot find Preserve Details 2.0 in the dropdown menu, please go to Photoshop > Edit > Preference > General . Go to Technology Preview and then Turn on the Preserve Details 2.0.
Preserve Details 2.0 in Adobe Photoshop uses an advanced image resizing algorithm designed to upscale images while maintaining the quality and detail of the original. The working logic behind this feature involves several key components:
- Detail Preservation: The algorithm is engineered to detect and preserve important details and textures within the image. This means that when the image is enlarged, the essential characteristics that define its sharpness and clarity are retained.
- Intelligent Upsampling: Preserve Details 2.0 uses machine learning to intelligently interpolate new pixels in areas where the image is being enlarged. Instead of simply duplicating pixels or averaging neighboring pixels, it predicts and inserts new pixels in a way that aligns with the original image's structure and detail.
- Edge Protection: The algorithm avoids over-sharpening of prominent edges, which can often lead to an unnatural look in upscaled images. It ensures that edges are kept smooth and natural-looking.
- Noise Reduction: A built-in noise reduction slider allows users to control the amount of noise reduction applied during the upscaling process. This helps to prevent the introduction of unwanted artifacts or graininess as the image size increases.
And also, like any technology, Preserve Details 2.0 has its limitations. Here are some of the key limitations that users have experienced:
- Technology Preview: Preserve Details 2.0 has been in the Technology Preview stage for a long time, which means it's still under development and may not always provide the most reliable results.
- Quality of Original Image: The success of upscaling with Preserve Details 2.0 heavily depends on the quality of the original image. If the original image is of low quality or resolution, the upscaled image may not show significant improvement.
- AI Model Limitations: The AI model used by Preserve Details 2.0 may not be trained to enhance certain types of details, such as text, which can lead to less than satisfactory results when upscaling images containing text.
Besides Preserve Details 2.0, does Photoshop also provide users with other algorithms to convert an image into 4K resolution?
Yes, it does. Besides Preserve Details 2.0, Photoshop offers several other algorithms for upscaling images, each with its own logic and limitations:
- Nearest-Neighbor Interpolation: This is one of the simplest methods where each pixel is replaced with the nearest pixel in the output. It's fast and preserves hard edges, making it suitable for pixel art or images with clear boundaries. However, it can introduce a jagged effect and is not recommended for continuous-tone images.
- Bilinear Interpolation: This method creates new pixels by averaging the color values of surrounding pixels. It's better for smooth gradients and cosntinuous-tone images but can result in a loss of detail and make the image appear softer.
- Bicubic Interpolation: A more advanced method that considers the closest 16 pixels (4x4 area) to create a new pixel. It generally produces smoother results than bilinear interpolation but can still lead to some blurring of details.
Each of these methods has its own strengths and weaknesses, and the choice of which to use depends on the specific requirements of the image and the desired outcome. For instance, while nearest-neighbor interpolation preserves sharp edges, it can create a pixelated look, which may not be desirable for photographs. Bilinear and bicubic interpolations offer smoother results but can blur fine details.
It's important to note that all upscaling methods involve some compromise. When an image is enlarged, new information has to be created from the existing pixels, and this can never perfectly replicate the detail that would be present in a naturally high-resolution image.
Therefore, while these algorithms can improve the appearance of an upscaled image, they cannot create detail that wasn't there in the original image. The effectiveness of upscaling also heavily depends on the quality of the original image; a low-resolution or heavily compressed image may not upscale as well as a high-quality one.
My personal advice for you to choose among them is testing. Select one algorithm and check how the outcome looks like, which Photoshop enables by the way. And finally choose the best one.
Step 5. You can adjust the Reduce Noise slider to minimize any noise that might result from upscaling.
Step 6. Once you're satisfied with the new size and settings, click OK to apply the changes and lastly export the image.
Method 2. How to Convert Image to 4K Resolution with Aiarty Image Enhancer
OK, for this second method, it is kind of an improved version of the first method. Because even though Preserve Details 2.0 in Adobe Photoshop is powerful, there are some limits for it. On some occasions, users cannot upscale their images to 4K with satisfied results. If you are one of them, too, now you can try Aiarty Image Enhancer to make the job done.
Similar to Photoshop's Preserve Details 2.0, Aiarty Image Enhancer is also an AI-powered software application, which means it uses AI algorithms to upscale images, including generating natural details and pixels and interpolating them into the canva.
But what it differs from Preserve Details 2.0 in is that it has no limit for your original image size and quality. No matter how small or blurry the original image is, it can generate enough data to make the 4K resolution result look natural, detailed, and sharp, owing to its models having been trained on a large database of image files.
By far, Aiarty Image Enhancer gives users three well-trained AI model options to upscale images to 4K resolution, even up to 32K resolution if you want. Each AI model was trained and for different type of image contents.
And honestly, for the results, I would say they are with much more details than Photoshop's Preserve Details 2.0 did.
Compared to Photoshop's Preserve Details 2.0, another big difference that Aiarty Image Enhancer can make is that it can help you convert images to 4K resolution in bulk. If you have dozens, or even hundred of images needed processed, this feature would be time saving and effort saving.
So now do you want to try this tool? Why not free download it now and then follow the steps below to check how it works?
Step 1. After you finish downloading and installing Aiarty Image Enhancer on your computer, run it.
Step 2. Drag and drop your image(s) into it.
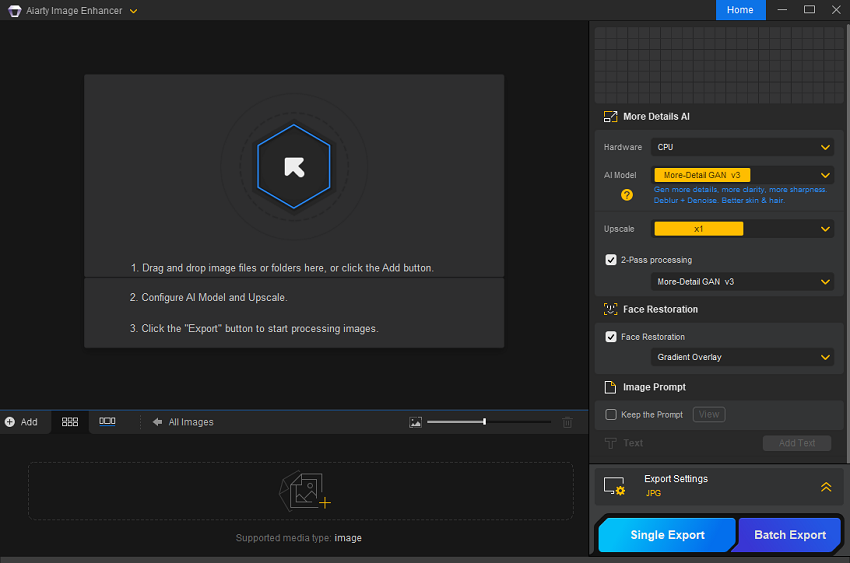
Step 3. Then head to the right side of this tool, where you can choose which hardware of your computer to process this work. GPU would be highly suggested. Then it's time to make a decision about AI models. Like we have mentioned above, there are three AI models available, i.e. More-details, Smooth, and Real-Photo. The differences among them?
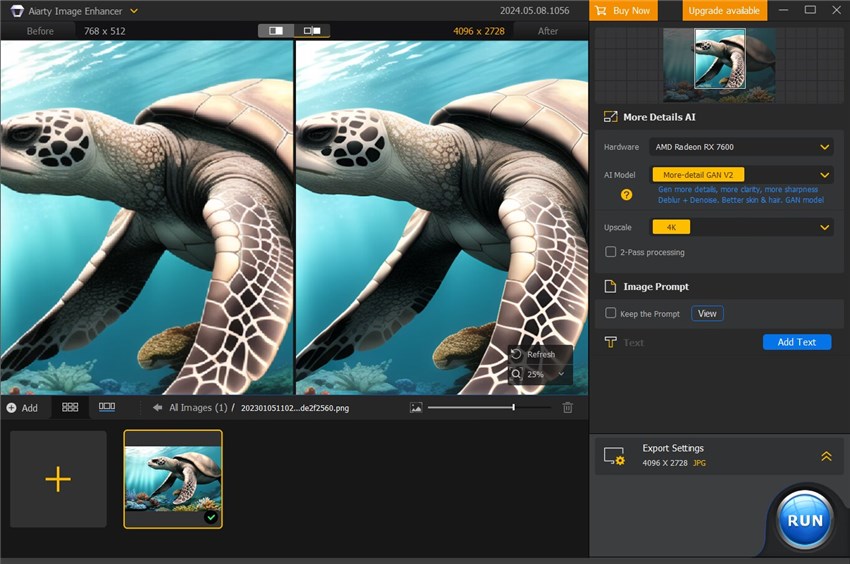
If you want your image upscaled to 4K resolution with more details, like the hairs, the eyelashes, wrinkles, etc. or deblurred, More-detailed is the perfect option to go.
If you want to upscale some anime images, Smooth would be suggested.
If your main job is to denoise images, like some night photos, you can try the Real-photo model.
If you still fell confused about which model to choose, simply, give each model a shot and get the one which bring your images the best outcome.
Next choose the 4K option under the Upscale feature.
Bonus Step: Fine-Tune the visuals with the Color panel (optional). After selecting your AI model and 4K upscale setting, you can click on the dedicated Color Panel (or "Adjustments" tab) to ensure your final high-resolution image has the perfect look. Adjust key parameters like:
- Saturation: Boost color richness to make landscapes and portraits truly vivid.
- Contrast: Enhance the depth and pop of your new 4K details.
- White Balance & Exposure: Ensure natural, accurate lighting and tone before exporting.
This step ensures that your newly detailed 4K image is not only crisp and large, but also visually stunning and ready for print or display.
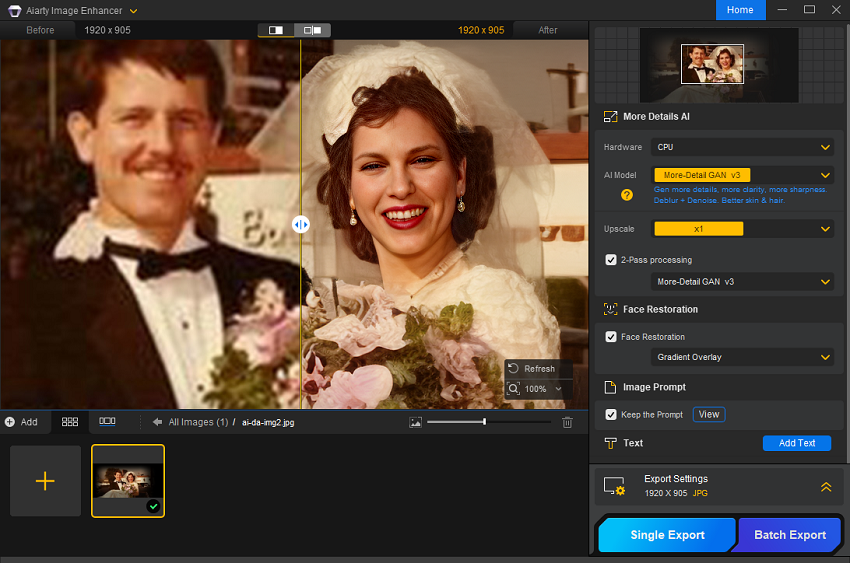
Step 4. Now you can click on the RUN button to process the image(s) and will get your 4K image in seconds.
Method 3. How to Convert Image to 4K Resolution Online and Free
If you are tired of doing this job on your computer, the online tools would be your savior. Online tools require no downloading and installing applications, and ensure you do this job on both computers and mobile devices, as long as your devices can access the internet.
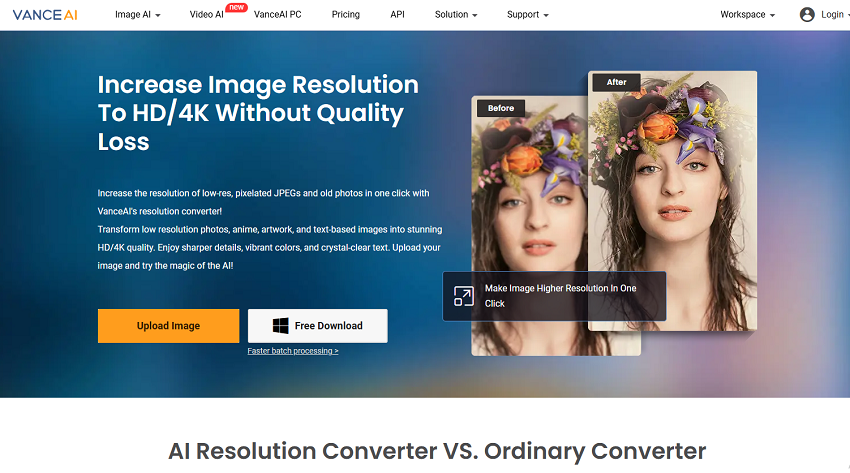
There are many online tools nowadays which can help you successfully convert images to 4K resolution. Here what we recommend is Vance AI. With it, you can upscale your images up to 8 times easily. Here is how,
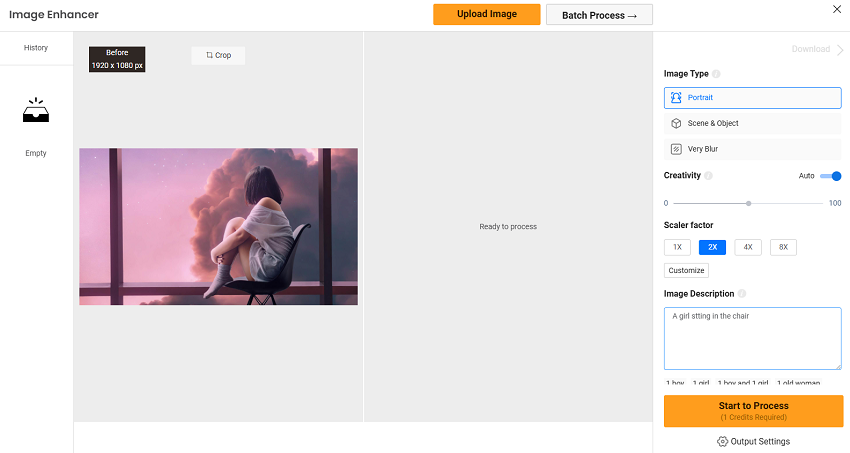
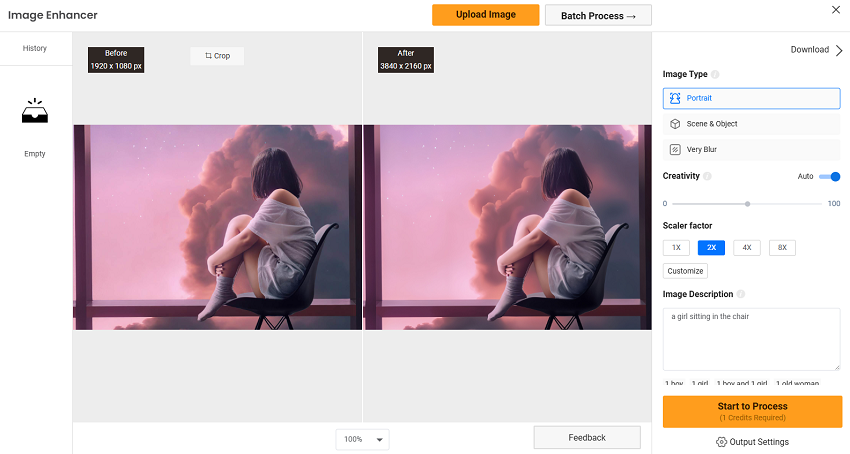
Step 1. Go to the Vance AI's Image Enhancer tool. And then click the Upload Image button to load your file.
Step 2. Now you must be on the new editing page. Head to its right panel. First select the Image Type. There are Portrait, Scene & Object, and Very Blur options. Choose one which suits your image contents. Then for the Creativity option, if you have no idea of what it is and how to set it, just toggle on the Auto option. Next, it is the most important setting, the Scale Factor. Under it, you can upscale your original image to 1X, 2X, 4X, and 8X. And you can also customize the upscaling resolution. And the last feature is the Image Description box. In it, you can write a description about what your original image is, which can help this AI tool get a better enhancing result.
Step 3. OK, after all the settings are done, it is time now to click the Start to Process button and wait for the AI tool finish the rest job. It won't be long. Based on my tests, it will take 10-20 seconds to process one image.
Comparison Among Three Tools
FAQs about Converting Image to 4K Resolution
Is it possible to increase the resolution of a photo to 4K?
Yes, it is possible to convert an image to a higher resolution, including 4K pixels), using image upscaling software. Unlike traditional methods that simply stretch pixels and result in a blurry or pixelated image, modern AI upscalers use machine learning to intelligently add new detail.
How do you convert an image to 4K resolution using Photoshop?
In newer versions of Photoshop, you can use the AI-powered Generative Upscale feature or the Super Resolution tool in Camera Raw. For more control, navigate to Image > Image Size, select "Resample," choose the "Preserve Details 2.0" interpolation method, and manually set the desired 4K dimensions.
Is it possible to upscale an image to 4K for free?
Yes, many online services and open-source software offer free AI-powered upscaling. Tools like PhotoGrid, Upscale.media, and Imgupscaler.ai offer free tiers that can enlarge images up to 4x, with some providing unlimited use.
Can I turn an old or low-resolution image into a high-quality 4K photo?
Yes, AI upscalers are particularly effective at enhancing low-resolution or old images by removing noise, blur, and JPEG artifacts. By using AI models to analyze the image and generate new pixels, these tools can add detail and increase clarity, transforming low-quality photos into much cleaner, higher-resolution versions.
Is upscaling a low-resolution image to 4K resolution a true quality enhancement?
No, upscaling does not create a true 4K image with the same detail as one originally captured at that resolution. While AI upscaling intelligently adds new pixels to make the image larger and appear clearer, it is essentially "guessing" and interpreting what those new pixels should look like. The original quality is limited by the data in the initial file, and upscaling cannot invent detail that was never there in the first place. Therefore, an upscaled 4K image will still have a lower quality than a native 4K image.
Conclusion
So to sum up, you can try Photoshop to convert images to 4K resolution with its Preserve Details 2.0 algorithm and get a satisfied outcome. While, if you are not happy about the results whatever you do with the software, you can take Aiarty Image Enhancer for a trial. And if you are looking for a much easier method, give Vance AI's Image Enhancer a try and you will be definitely satisfied with it.