How to Increase the Size of An Image without Losing Quality
Updated on
Image size is the dimension of an image, typically measured in pixels, representing its width and height. There are instances where you may encounter the need to increase image size to fulfill specific requirements for certain platforms, applications, for printing, or to enhance image quality.
It is crucial to understand that this process to increase size of image can potentially impact the image's quality. However, with careful consideration of the methods and the quality of the original image, you can minimize these effects and achieve desirable results. Here are various methods to increase image size without losing quality, compare their advantages and limitations.
Aiarty Image Enhancer - Increase image size without losing quality by offering more image details. Batch processing and AI-powered.
Define exact dimensions, document size, or resolution for tailored resizing with various resampling methods like Bicubic Smoother, which minimize quality loss during image size increase.
A free online image resizer that lets you increase image size with preset sizes for popular social media platforms and allows custom size input.
1. Increase Image Size without Losing Quality with Aiarty
Aiarty Image Enhancer goes beyond simply increasing the size of image. While boosting resolution, it also works its magic behind the scenes to deliver exceptional results and details. Aiarty automatically denoises, sharpens, and repairs compression artifacts, ensuring your upscaled images maintain crystal-clear clarity and impressive sharpness. Plus, it intelligently fills in missing details, bringing your photos to life with a richness they never had before.
Unlike other AI image size increaser that require you to tinker with settings or download models, the AI image upscaler makes the process a breeze. Its built-in AI algorithms analyze your original image, then intelligently upscale the resolution while reducing noise and blur. Missing details are meticulously filled in, resulting in a flawlessly sharp, high-resolution image bursting with vibrant details.
- Ease of use
- Add details while increasing image size
- Multiple AI models for specific image types
- Improved image clarity and sharpness
- Limited free trial
- No estimated output image size
How to Increase Image Size without Losing Quality
Step 1. Download Aiarty Image Enhancer (free trial available). Make sure your computer meets the requirements. Install and run it on your computer.
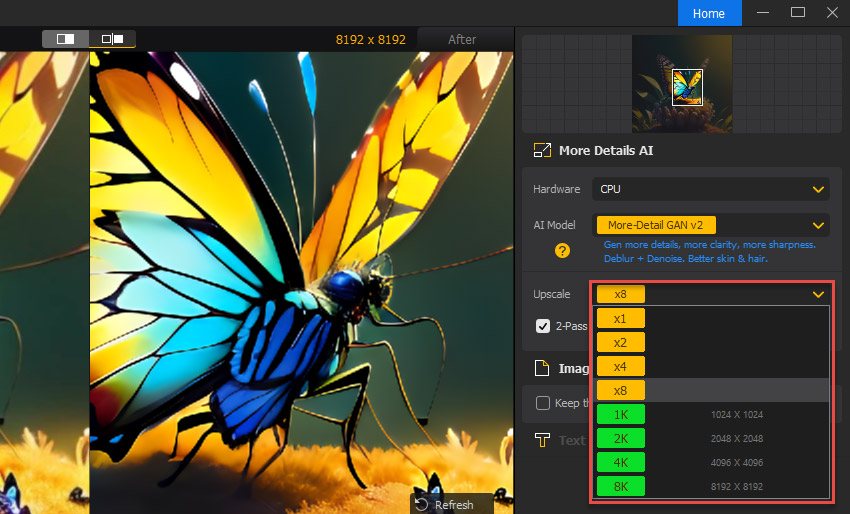
Step 2. Drag and drop photos you want to increase. Choose the ideal AI model and pick the upscaling mode. Then enable "2-Pass" for even richer details (may take longer).
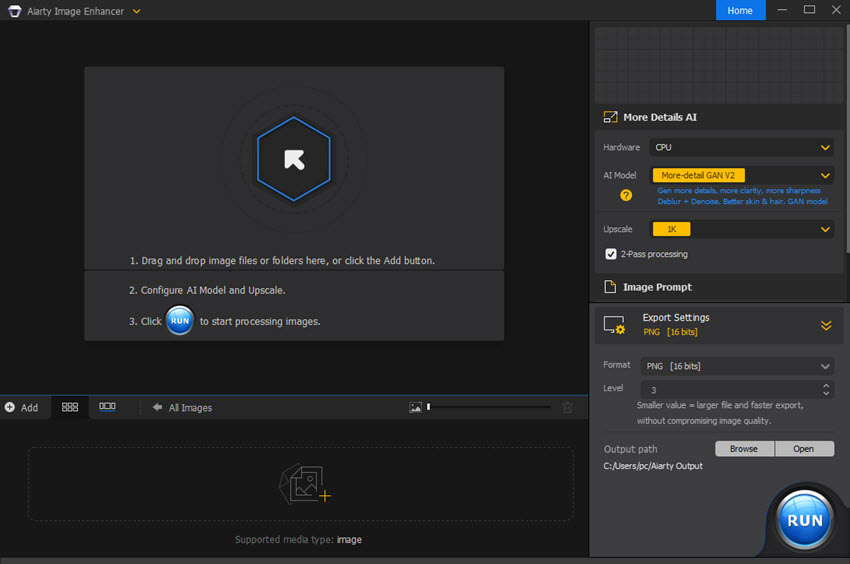
- More-detail GAN: Best for intricate details (fur, feathers) in high upscaling.
- Smooth Diff: Best for smoother textures (cartoons, logos).
- Real-Photo: Best for realistic photos and restoring old photos.
- X1: Improves image quality without increasing size.
- X2, X4, or X8: Increase size up to 32K (Windows) or 16K (Mac).
- 1K, 2K, 4K, or 8K: Specific resolution increase.
Step 3. Keep the default settings for output format and quality. Choose where you want to save the finished images by clicking "Browse" to pick a folder. Once everything looks good, hit "RUN" to start the process.
2. Increase Size of Image with Photoshop
Photoshop offers a high degree of control over the process to increase image size and to convert images to high resolution. You can specify new dimensions in pixels, document size with units, or adjust the resolution independently. The professional software provides various resampling methods, like Bicubic Smoother, which are specifically designed to minimize quality loss when enlarging images. These methods create new pixels in a way that preserves detail and reduces artifacts.
Its approach to increase size of image is non-destructive. The original image remains intact, and you can always revert to it if needed. This allows for experimentation and fine-tuning before committing to the final size. While enlarging, you can leverage other editing tools within Photoshop to address potential issues like noise or sharpen details for a more visually appealing output.
The image size increasing process itself is straightforward, but understanding the nuances of resampling methods and their impact on image quality might require some exploration. Photoshop is a paid software with a high price tag. There are free alternatives for basic image resizing. Even with the best resampling methods, enlarging an image can lead to some degree of detail loss and reduced sharpness, especially for significant enlargements.
- A high degree of control over the image resizing
- Resampling methods to minimize quality loss
- Non-destructive editing
- Deep learning curve
- Potential quality loss
- Expensive
How to Increase the Size of An Image In Photoshop
It’s a straightforward process to increase the size of an image in Photoshop is a. Here's how to do it in Photoshop.
Step 1. Launch Photoshop and go to File > Open. Select the image you want to increase the size and click Open.
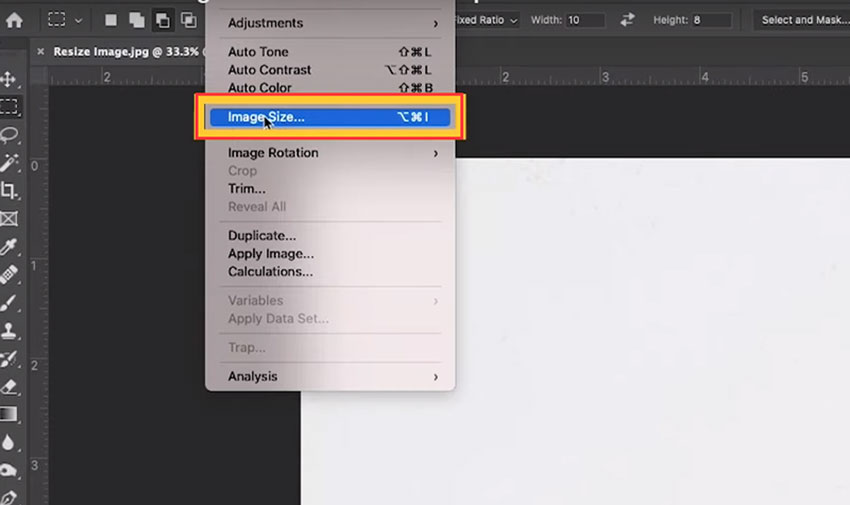
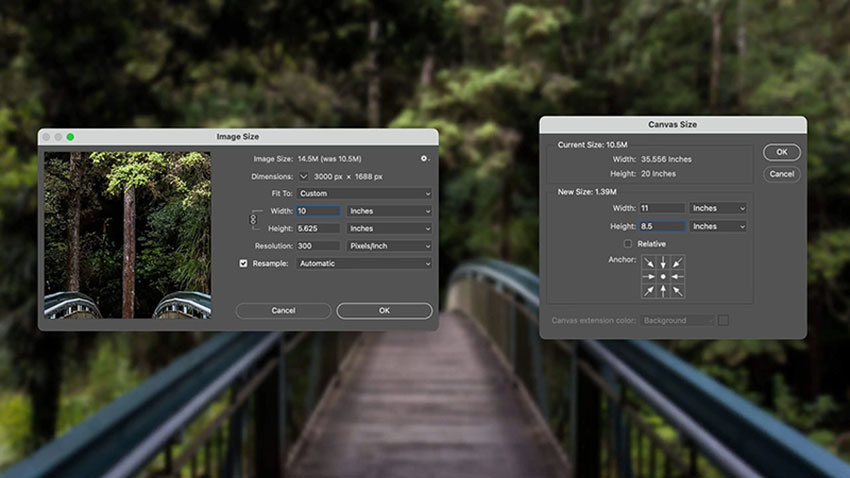
Step 2. Go to the top menu bar and select Image > Image Size. The "Image Size" dialog box will appear. In the "Image Size" dialog box, you can specify new dimensions for your image in three ways:
Pixel Dimensions: Enter the desired width and height values in pixels under the "Pixel Dimensions" section.
Document Size: Specify the new width and height using units like inches, centimeters, or millimeters in the "Document Size" section.
Resolution: Change the image resolution (PPI) in the "Resolution" section. Higher resolution typically results in a larger file size and more detail.
Maintain Aspect Ratio (Optional): The linked chain icon next to the "Width" and "Height" fields ensures the image proportions are maintained during resizing. Unlinking them allows independent adjustments to width and height, potentially distorting the image.
Choose Resampling Method (Important): When enlarging an image, Photoshop needs to create new pixels. The "Resampling" method determines how this is done.
Tips: Bicubic Smoother is recommended for enlargements). This feature is ideal for enlarging images as it creates smoother transitions and minimizes artifacts, especially in images with noise.
Step 3. Click OK to apply the new dimensions and resampling method. Your image will be resized according to your specifications.
3. Increase Image Size Online with Adobe Express
Adobe Express boasts a user-friendly interface that makes image size increase quick and effortless. Uploading your image, selecting a preset size, or entering custom dimensions requires minimal learning curve. The basic image resizing functionality is available within the free plan of Adobe Express. Presets for popular social media platforms like Instagram posts, Facebook covers, and YouTube thumbnails save time by offering pre-defined dimensions.
Adobe Express can increase image size in many ways, but it cannot increase the size of an image without reducing the quality. This is because enlarging an image requires creating new pixels, and there is no way to perfectly recreate the information that was not there in the original image. However, Adobe Express uses high-quality resampling methods to minimize the loss of quality as much as possible. The free version doesn't support batch processing, so you can only increase size of image one at a time. This can be time-consuming if you need to resize multiple images.
- Simple and user-friendly
- Free to use
- Preset size for popular social media platforms
- Limited control
- Quality loss
- Limited to JPEG, JPG, and PNG (max 40MB)
How to Increase Size of Image Online with Adobe Express
To increase size of image online, search for and go to Adobe Express free image resizer. Here’s a detailed guide.
Step 1. Open Adobe Express free image resizer page. Click "Upload" to choose the image from your device that you want to resize.
Step 2. Choose a preset size from the "Resize for" dropdown menu. The presets include common social media platform sizes (e.g., Instagram post, Facebook cover) or a custom size, so that you can increase image size for Instagram, Facebook, Snapchat, Pinterest, etc.
Select "Custom size" from the dropdown menu, then you can enter the desired width and height in pixels. You can also adjust the image scale using the slider to fine-tune the size.
Step 3. Once you're happy with the resized image, click "Download" to save it to your device.

Increase Image Size in KB/MB Online (Free Limited)
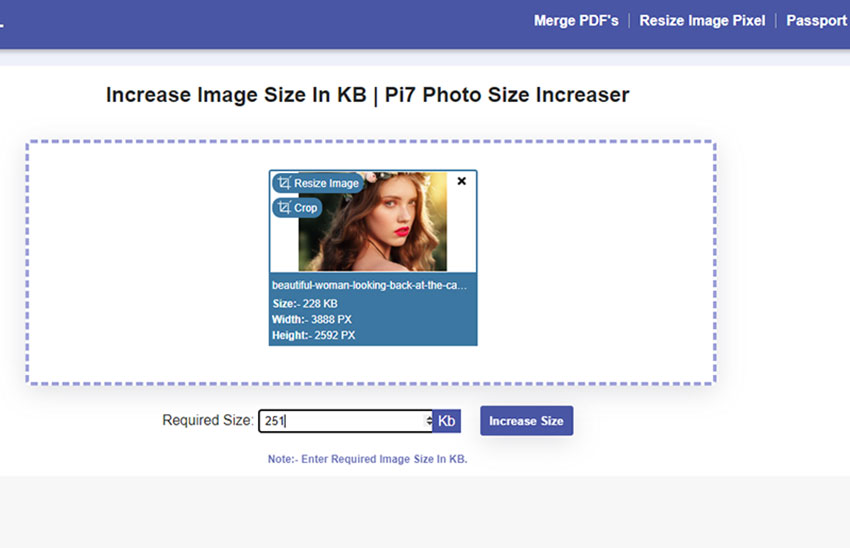
Pi7 Photo Size Increaser is a top rated tool to increase image size in KB online. The website boasts a straightforward interface with clear instructions, making it user-friendly for casual users. Uploading your image, specifying the target size, and initiating the process seem easy to follow. The tool specifically allows you to define the target size in kilobytes (KB) or megabytes (MB), which can be helpful for meeting specific file size requirements for online submissions. The tool claims to increase size without altering pixels or DPI (dots per inch), potentially maintaining image dimensions.
Beyond increasing image size, the tool offers no additional editing functionalities and image enhancement features. Enlarging images inherently leads to some loss of detail and sharpness. Without details about the resampling methods used, it's difficult to assess how well Pi7 Photo Size Increaser minimizes this quality loss, especially for significant enlargements.
- Easy to use
- Target size in KB or MB
- Quick and efficient image size increase
- No options to adjust or control the image quality
- Lack additional image editing features
How to Increase Image Size in KB to 100MB Online
Need to increase the size of an image file in KB or MB? Here's a quick guide that walks you through the process in just four easy steps.
Step 1. Open online Pi7 Photo Size Increaser, locate the "Upload Image" button or designated area on the website. Click on it to browse your device's files and select the image you want to enlarge.
Step 2. Look for the input box labeled "Target Size" or something similar. This is where you'll define the desired size of your image in kilobytes (KB) or megabytes (MB). Enter the size in the input box. You can increase image size in KB to 100KB, etc.
Step 3. Once you've specified the target size, click the "Download" button to save the image with increased size to your device.
5. Increase Image Size in MB Without Changing Pixels
For those who want to increase size of an image in MB online, Resize PNG is recommended. It preserves image quality and allows you to choose the format(JPG, PNG, or GIF). The tool is also free to use and doesn’t require any downloads. Resize PNG can increase imag size in MB without changing pixel dimensions with “upsampling of MB). Upsampling can be a quick and easy way to increase the resolution of an image. It can be useful for printing images at a larger size.
There are some drawbacks to consider, for example, increasing the size of an image too much can negatively impact quality. On the other side, Upsampling can introduce artifacts into the image, such as blurring or pixelation. In some cases, upsampling may not be necessary. If you are going to be viewing the image on a screen, a lower resolution image may be perfectly adequate. It does not actually add any new detail to the image.
- Increase image size and quality with unsampling
- JPG, PNG, and GIF output
- Upsampling can introduce artifacts into the image
- Doesn’t add any new detail to the image
How to Increase Image Size in MB Online with Resize PNG
Use the following steps to increase image size in MB online while preserving pixel quality.
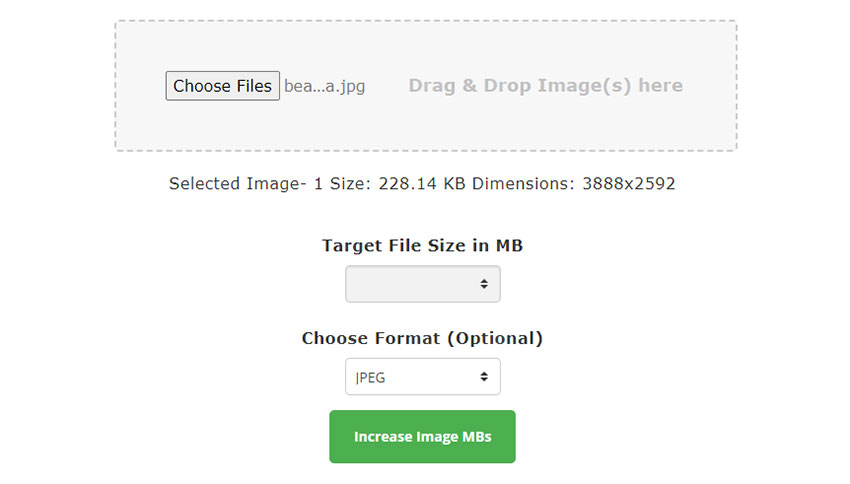
Step 1. Open Resize PNG and go to the image size increase page. Click the "Choose Files" button to browse your files.
Step 2. Specify your target MB size. Enter the desired size in MB. Make sure it's bigger than the original size for an actual increase.
Step 3. Choose format and increase size. The default format is JPEG, suitable for high-quality images. Click the "Increase Image MBs" button to initiate the process to increase image size in MB online.
 FAQ
FAQ
Yes. Currently, you can find free alternatives to Midjourney such as Stable Diffusion, Bing Image Creator, and Microsoft Designer.
There are two main options: online tools and software. Free online resizer tools like Pi7 let you upload your photo and choose a target size in MB. However, these might affect quality. To increase photo MB, use photo editing software like Photoshop or image enhancer Aiarty. Increasing a photo's MB size doesn't directly improve quality if a wrong tool is selected.
For precise control and advanced editing, image editing software is recommended. For quick and easy resizing, online tools are a convenient option for casual users. For upscaling low-resolution images, consider photo enhancer with AI image upscaling feature.
Yes if you pick the right tool. Simply enlarging an image inherently leads to some quality loss, some tools with image enhancement features might offer a partial yes. They can analyze the image and attempt to sharpen edges to compensate for some blurring during enlargement, reduce noise that might become more noticeable with larger sizes, and fill in small gaps between pixels using intelligent algorithms, potentially mitigating some loss of detail.