Create Product Photos with Midjourney AI: Forget Expensive Photo Shoots
Updated on
High-quality product photos are essential for capturing customer attention and driving sales—and their importance might be greater than you think. According to BusinessDasher statistics, high-quality product photos can boost conversion rates by as much as 94% over low-quality images. However, creating professional-looking product photos with the perfect background has traditionally been a time-consuming and expensive task, particularly for small businesses or individuals lacking access to high-end photography equipment.
Thankfully, the advent of AI has simplified this process significantly. With AI-powered tools like Midjourney, we can effortlessly create stunning, professional-quality product photos. Midjourney is a powerful AI image generator that allows users to create stunning visuals from simple text descriptions. We can use Midjourney for creating creative backgrounds and even entire scenes for product photography.
In this article, we'll show you how to create product photos with Midjourney AI.
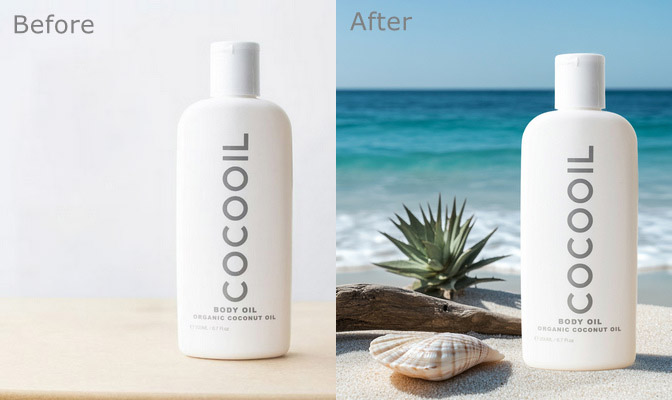
- How to Create Product Photos with AI
- Step 1: Prepare a Background-Free Product Photo
- Step 2: Import the Background-Free Product Photo into Midjourney
- Step 3: Generate a Custom Background for Your Product
- Step 4: Blend the Product with the Background
- Step 5: Replace the Midjourney-Generated Product with Your Actual Product
- Step 6: Enhance Product Photo
- Conclusion
- FAQs
How to Create Product Photos with AI
Step 1: Prepare a Background-Free Product Photo
If your product photo doesn't have a transparent background, you can use Aiarty Image Matting to easily remove it.
Using advanced AI frameworks and edge-refinement algorithms, Aiarty Image Matting automatically detects and separates your product from the background, delivering a clean, transparent image in just seconds. It can remove backgrounds for up to 3,000 images at once, significantly boosting efficiency.
In addition to removing background, Aiarty offers capabilities to replace backgrounds, upscale and enhance images, crop, rotate, and flip. For more details, you can check its product page. Here, we'll focus on explaining how to use Aiarty Image Matting to create a transparent product photo.
First of all, you need to download and install Aiarty Image Matting. It is compatible with both Windows and Mac. Just click the Get Free License button to get a setup file as well as a free license. This is a time-limited offer, so don’t miss your chance.
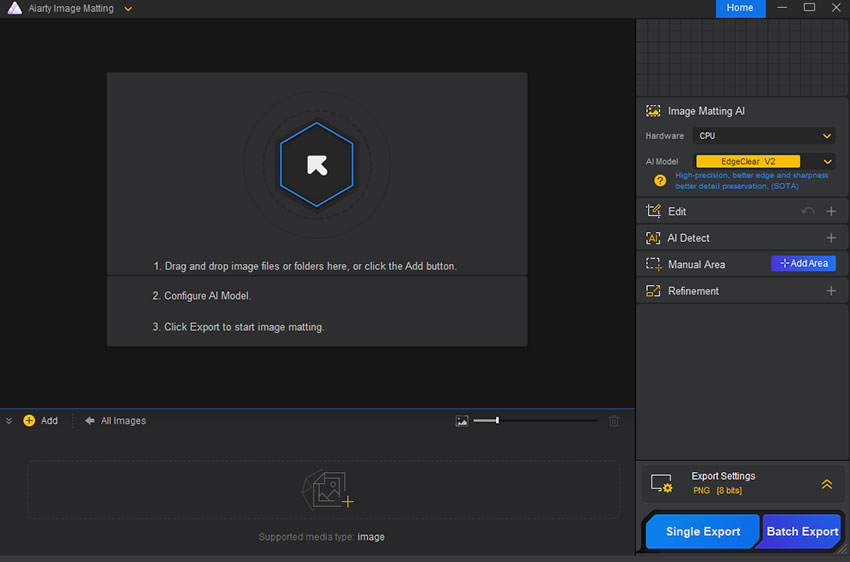
Secondly, import your product photos. You can add your product photos by dragging and dropping them into the software, or by clicking the + Add button to upload your images.
Thirdly, start removing background. Once your images are loaded, a small "Image Matting" dialog will appear on the right sidebar. To begin removing the background, simply click the "Start" button. Before proceeding, you can adjust settings such as switching the AI model, enhancing the image, and cropping photo to desired dimension.
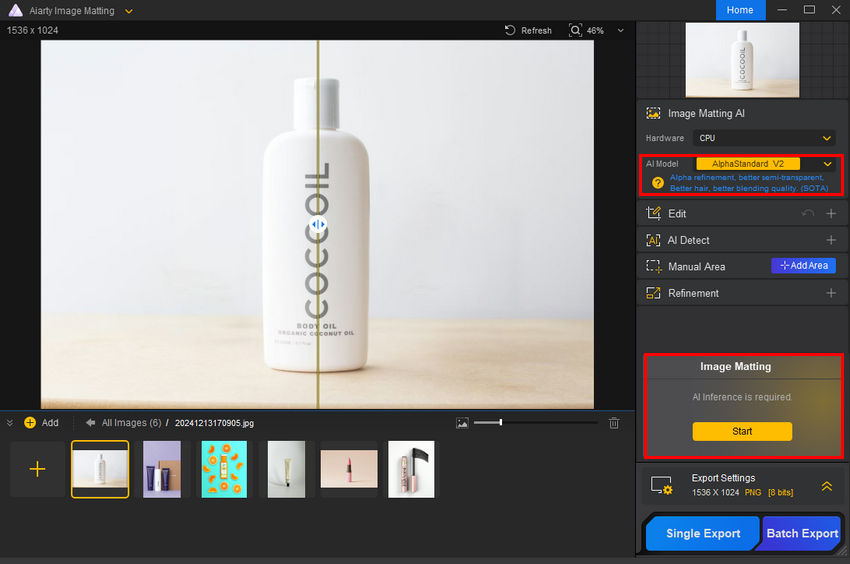
Once you click "Start", Aiarty will process the image using AI algorithms. Be patient as it analyzes the image.
Once the background is removed, you can preview the result. If necessary, use the drawing tools on the left side of the preview window to remove or restore specific area, or adjust transparency. You can also switch to another AI model if the first result doesn't meet your needs.
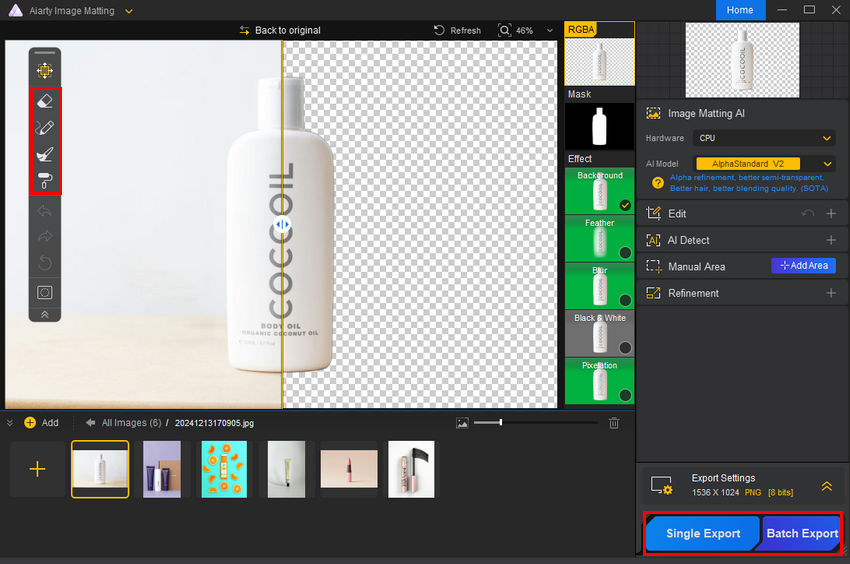
At last, export the background-free product photos. Once you’ve finalized your edits, click "Single Export" or "Batch Export" to export your transparent product photos.
Step 2: Import the Background-Free Product Photo into Midjourney
Open Midjourney, type /describe, and upload your background-free product photo to the Midjourney bot.
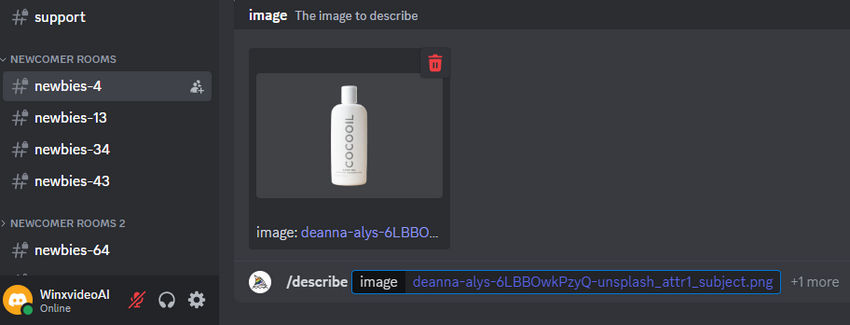
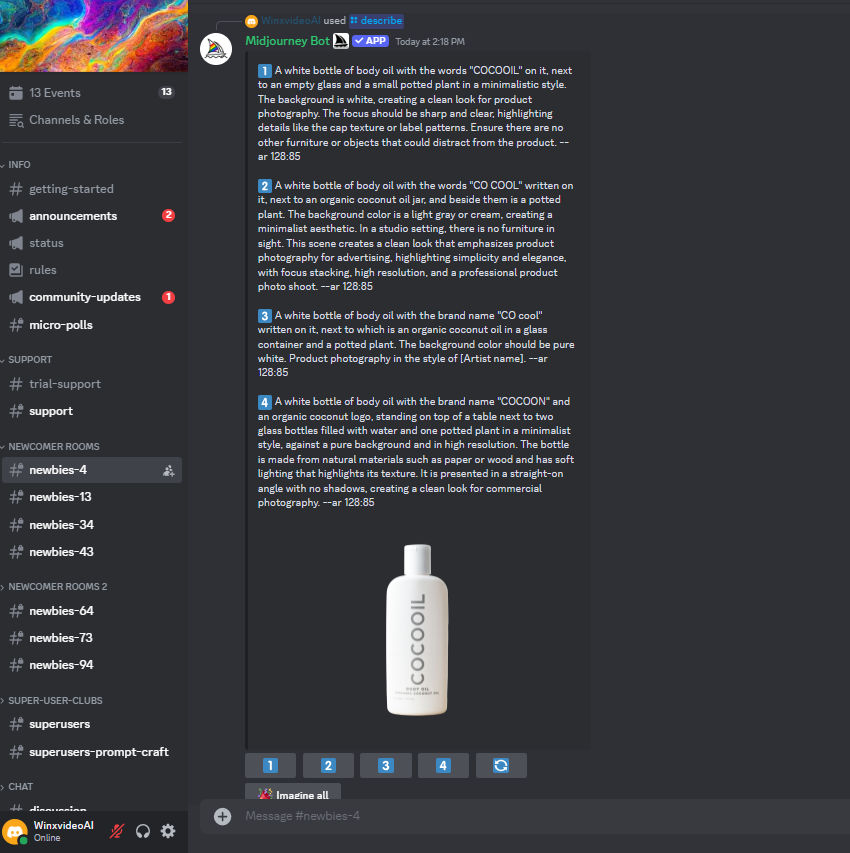
The bot will generate four prompt suggestions based on your photo. Choose one that suits your vision.
After making your selection, click the Submit button in the pop-up window. Midjourney will generate a set of images.
If one of the generated images has a suitable background, you can skip steps 3 and 4. Simply proceed to the step 5, where you’ll replace the product in the image with your actual product using Photoshop or another editing tool.
If the background doesn't meet your expectations, continue to the next step to create a custom background.
Step 3: Generate a Custom Background for Your Product
Type /imagine in Midjourney and describe the background you want in detail.
This is my example prompt:
"A white bottle of body oil on a sandy beach, next to a seashell and a piece of driftwood, with turquoise ocean waves and a clear blue sky in the background. Soft natural lighting enhances the freshness and vibrancy. --ar 16:9"
Step 4: Blend the Product with the Background
Combine the prompt for your product and the prompt for the background in Midjourney, along with the URLs of your product photo and the generated background. Use the following format:
Product photo description + background photo description --cref (product photo URL) + (background photo URL).
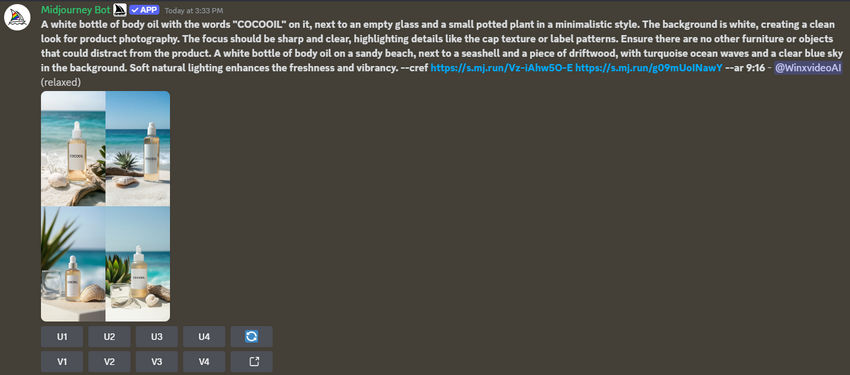
When Midjourney completes the blending, review the results and select an image where the product placement and scene look ideal.
Step 5: Replace the Midjourney AI-Generated Product with Your Actual Product
Use an image editing tool, such as Photoshop, to replace the product in the generated image with your actual product photo. There are plenty of online tutorials that explain how to replace one object with another in Photoshop if you need assistance.
Here’s a step-by-step guide on how I do it.
1. Start by opening the image I generated with Midjourney in Photoshop.
2. Use a selection tool to highlight the virtual product that Midjourney has created, which I want to replace with my actual product.
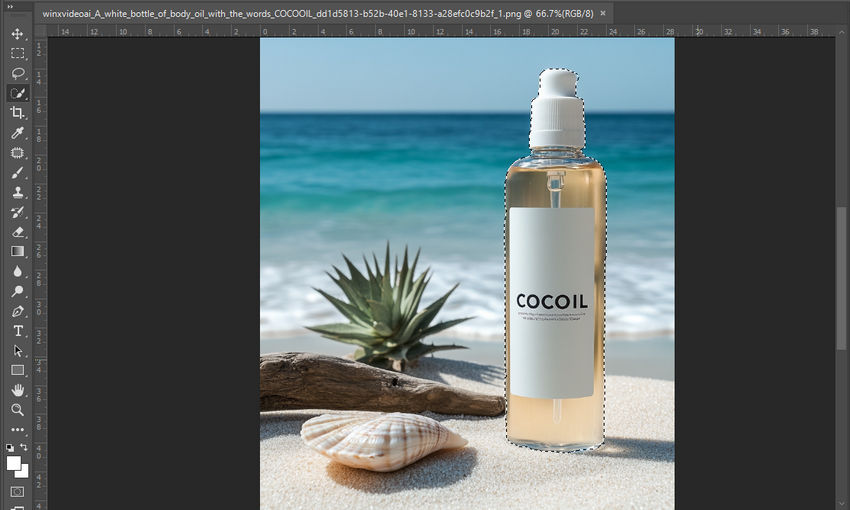
3. Right-click on the selected product and choose Fill. In the Fill dialog box, select Content-Aware to automatically remove the virtual product and fill the space with a matching background.
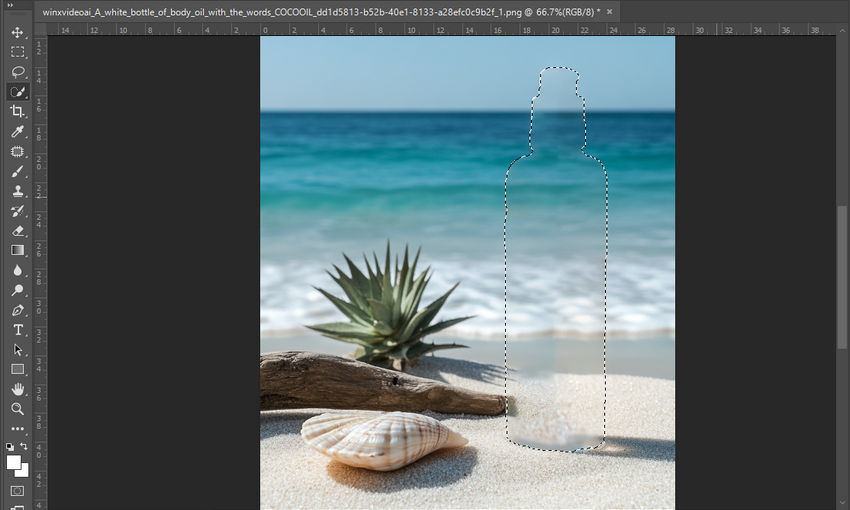
4. Click on File and select Place Embedded to insert my actual product image (ensure the product photo has a transparent background). Position the product where it fits best within the scene. Adjust the size as necessary, and tweak the lighting and shadows to make the product blend seamlessly with the background.
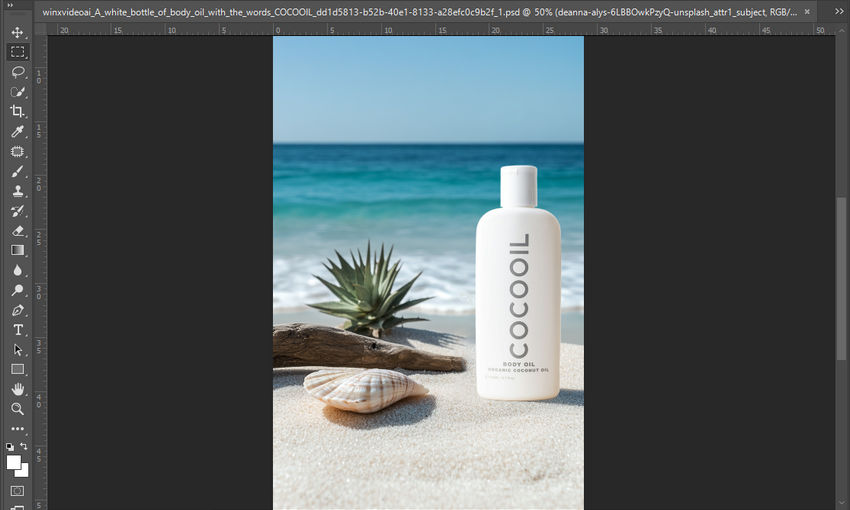
5. Once I'm happy with the placement and adjustments, I save and export the final image in my desired format.
Step 6: Enhance Product Photo
If you need to improve the resolution of your product photo or remove blur and noise, you can use an AI image enhancer like Aiarty Image Enhancer.
Aiarty Image Enhancer uses advanced AI technology to upscale images to 4K, 8K, 16K, or even 32K without losing quality, ensuring your product photos look sharp and professional.
To use Aiarty Image Enhancer to enhance product photos, follow these steps.
1. Download and install Aiarty Image Enhancer.
2. Drag and drop the product image into the enhancer. For example, let's use a soap product image.
3. Choose the desired upscaling resolution and preview the result. As shown below, the enhanced version of the product image is noticeably sharper and clearer.
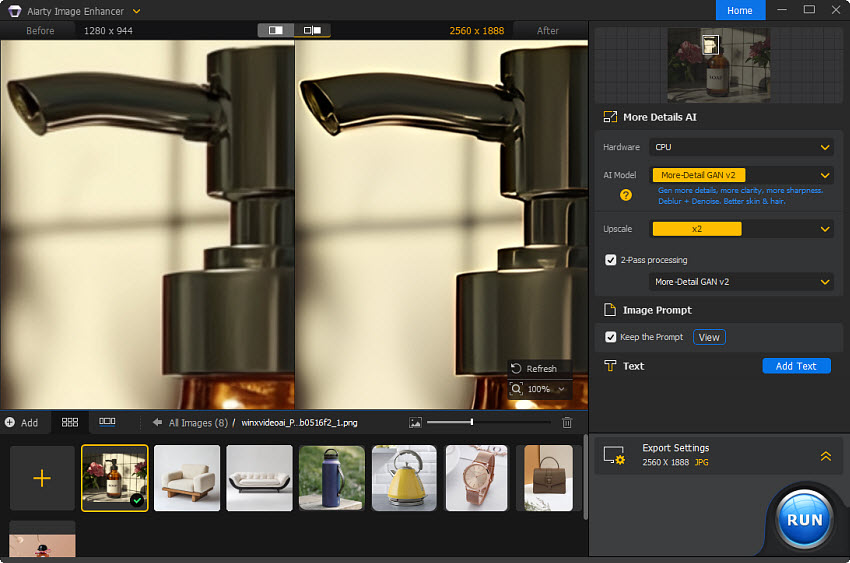
4. Click "RUN" to process the image. After processing, export the enhanced product photo.
Conclusion
With these steps, you can easily create high-quality product photos using Midjourney AI without the need for expensive photoshoots or professional photography equipment. AI has made the process faster, more affordable, and more accessible for businesses of all sizes. Whether you’re a small business owner or an individual looking to showcase your product in the best light, Midjourney can help you produce professional results with minimal effort.
However, to get the best results, you'll need creativity in descriptions—crafting detailed prompts for both your product and background is crucial. Additionally, strong image processing skills are necessary; familiarity with tools like Photoshop will help you seamlessly replace and blend your product into the generated backgrounds.
By leveraging AI tools like Midjourney, Aiarty Image Matting, and Aiarty Image Enhancer, you can create stunning product photos that meet professional standards, captivate customers, and drive higher sales and conversion rates.
 FAQs
FAQs
Some AI tools offer free plans or trials that allow you to create product photos at no cost. However, Midjourney AI does not offer a free option.
Yes, AI-generated product photos can be used for e-commerce. They offer benefits such as cost-effectiveness, customization, and consistent quality. However, you need to ensure they accurately represent your products and comply with platform guidelines.
Ethical concerns are minimal, but it’s important to ensure that AI-generated images represent the product accurately to avoid misleading customers.
Step 1: Go to reveals.app to get started.
Step 2: Upload a product photo — ideally with a transparent background. If your image doesn’t have a transparent background, consider using Aiarty Image Matting to remove it.
Step 3: If needed, click the Edit button to make adjustments to your product image before applying the animation.
Step 4: Choose a preset or create a custom one by describing the object, background, and animation. Then, click Generate Video to apply the animation to your product photo.
Step 5: Once the animation is generated, it will appear in the My AI Generations section. You can preview the animation here. To download your animation, click the three dots in the top-right corner of the thumbnail and select Download.
Step 1: Visit the 24AI app and create an account.
Step 2: Click Upload from computer button to select your photo or drag and drop it in the app.
Step 3: Generate a background. There are two ways to generate a background: choose from existing themes or write prompt to generate product photo background.
Step 4: Click the Generate button to let the AI create a custom background and combine it with your product photo.
Step 5: Hover over the generated image, and a few icons will appear. Click the Download icon to save the product photo to your device.

