Oops – Did That Photobomber Ruin Your Perfect Shot? Here’s How to Remove Unwanted Objects in Photoshop Like a Pro!"
We’ve all been there: you take what should be an amazing photo, only to spot an annoying distraction later—a random tourist in your sunset shot, a power line cutting through your landscape, or maybe just an outdated logo on a product image. While you can’t turn back time to retake the shot, Photoshop’s object removal tools can work magic. But here’s the catch:
- Basic cloning leaves obvious patches
- Complex backgrounds (like grass or crowds) are tricky to fix naturally
- One wrong brush stroke can make the edit scream "FAKE!"
Don’t worry—whether you’re cleaning up product photos for your online store, fixing real estate images, or just perfecting your travel pics, we’ll walk you through the smartest ways to erase objects in Photoshop without leaving a trace. Let’s turn your "almost perfect" photos into flawless keepers!
![]() Supercharge Your Object Removal Workflow with Aiarty Image Matting!
Supercharge Your Object Removal Workflow with Aiarty Image Matting!
While Photoshop offers powerful tools for removing objects, background removal—especially for complex subjects like hair, fur, or transparent objects—can still be time-consuming for beginners. Aiarty Image Matting comes in as your ultimate AI assistant!
- 1-Click Perfection – AI auto-detects subjects with zero manual selection needed.
- Flawless Edge Handling – Preserves fine details (flyaway hairs, lace, glass reflections) that trip up manual tools.
- Batch Superpowers – Process 3000+ images simultaneously (ideal for e-commerce/product photography).
- Seamless Photoshop Integration – Remove backgrounds in Aiarty, then polish in Photoshop with full layer control.
Download this Photoshop best AI mate to edit out both objects and background!
How To Delete an Object in Photoshop?
Removing unwanted objects from your photos is a common editing task, and Photoshop offers a variety of tools to achieve this. Depending on the complexity of the object and the surrounding background, different techniques may be more suitable. This guide will explore several methods for seamlessly deleting objects, from simple fixes with the Spot Healing Brush to more advanced techniques using Content-Aware Fill and Generative Fill.
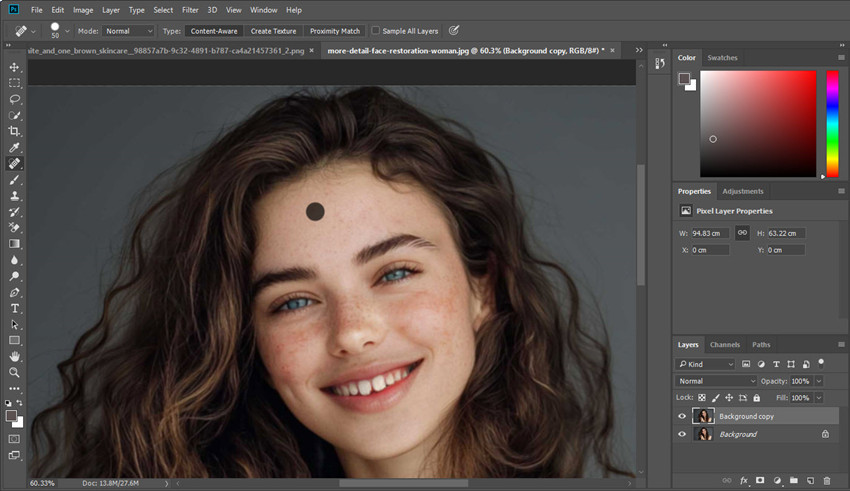
Method 1: Content-Aware Fill (Perfect for Large or Complex Objects)
Best for: Removing small objects like trash, wires, or blemishes from uniform backgrounds.
Content-Aware Fill is a powerhouse tool within Photoshop for removing unwanted objects from your photos magically. It analyzes the surrounding pixels and intelligently fills the selected area, creating a seamless blend with the background.
It can be very helpful to eliminate unwanted items in relatively simple backgrounds, making it ideal for scenarios like removing distracting elements from landscape shots, cleaning up product photos for e-commerce, or even repairing minor imperfections in cherished family portraits.
How to Erase an Object in Photoshop with Content-Aware Fill
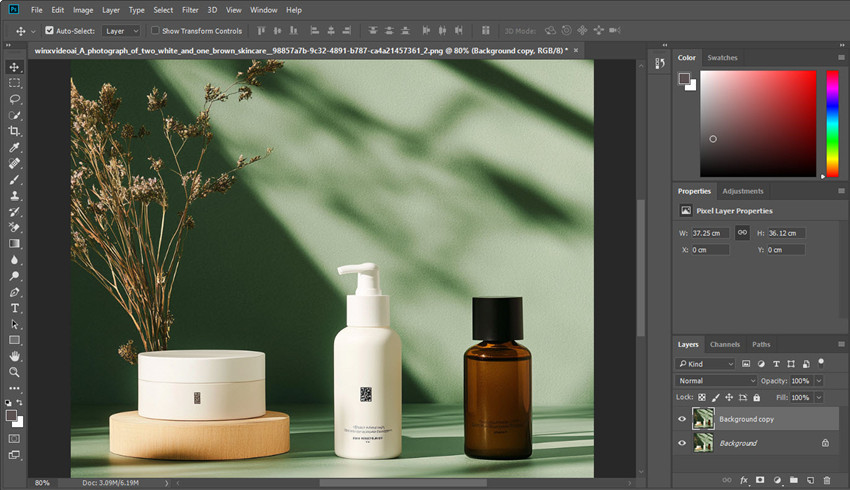
Step 1. Open your image in Photoshop and duplicate the layer (Right-click > Duplicate Layer) to work non-destructively.
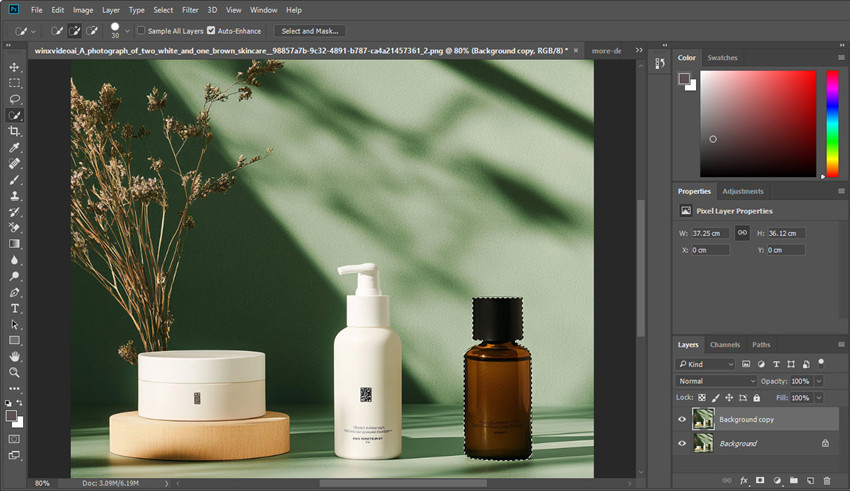
Step 2. Choose the Lasso Tool (L) or Object Selection Tool (W) to make a rough selection around the object you want to remove.
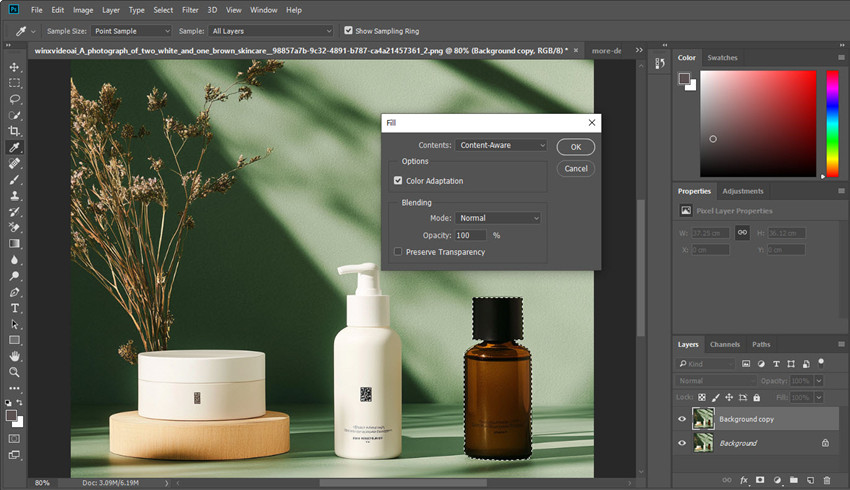
Step 3. Go to Edit > Content-Aware Fill. Photoshop will automatically analyze and show you a preview.
Step 4. Adjust the Sampling Area (Optional). In the Content-Aware Fill panel, use the green overlay to define where Photoshop pulls background data from. Use the brush to add or subtract areas if the preview looks off.

Step 5. Set Output to New Layer for flexibility. Then click OK. Your object will be removed in Photoshop, and the fill will blend into the background seamlessly.
Tips: If there are any leftover artifacts around the edges, you can use the Clone Stamp Tool or Healing Brush Tool to clean up.
Related reading: how to remove watermarks in Photoshop
Method 2: Healing Brush Tool (Best for Small, Simple Objects)
There are two Healing Brush Tools that can delete objects in Photoshop:
- Spot Healing Brush Tool: This tool automatically samples and blends pixels to repair imperfections with a single click. Ideal for small blemishes.
- Healing Brush Tool: Similar to the Clone Stamp Tool, but it blends the copied pixels with the surrounding area. Better for larger blemishes.
The Healing Brush Tool is a quick-fix solution for eliminating minor imperfections and unwanted small objects in Photoshop. Unlike the Clone Stamp or Healing Brush, it requires no manual sampling; Photoshop automatically analyzes the surrounding area and blends pixels seamlessly.
This makes it exceptionally efficient for tasks like removing blemishes from portraits, eliminating dust spots from scanned photos, or quickly cleaning up small distractions. Its simplicity and speed make it a go-to tool for rapid touch-ups, especially when dealing with images that require minimal, localized corrections. For users who prioritize speed and efficiency in their workflow, the Spot Healing Brush Tool is an invaluable asset.
How to Delete an Object in Photoshop with Healing Brush Tool?
Step 1. Open your image in Photoshop and duplicate the layer (Right-click > Duplicate Layer) to work non-destructively.
Step 2. Find the Spot Healing Brush Tool in the toolbar. Select the Spot Healing Brush Tool (J) from the toolbar.

Step 3. In the top options bar, set the mode to Content-Aware. This tells Photoshop to automatically analyze the surrounding pixels.
Step 4. Adjust the brush size to be slightly larger than the object you want to remove. You can use the [and ] keys to quickly change the brush size.

Step 5. Then click or paint over the object you want to remove. Photoshop will intelligently fill in the area using surrounding pixels. Use short strokes and zoom in for better precision when removing multiple small items (e.g., acne on a portrait).
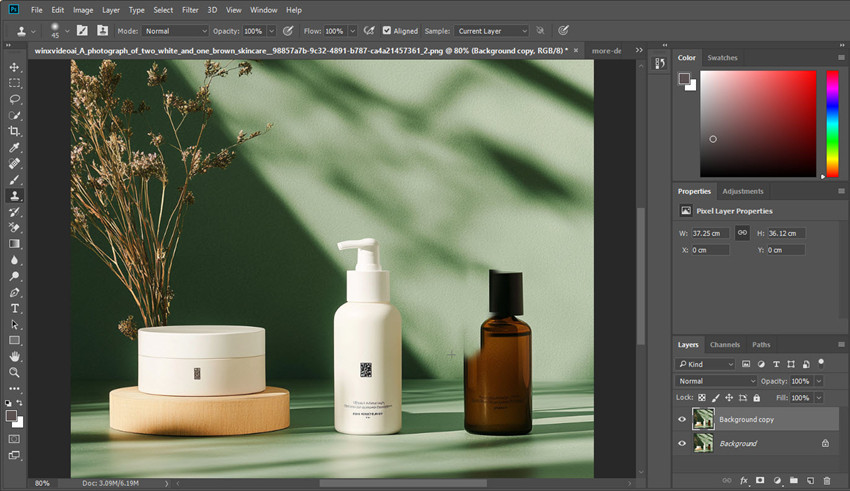
Method 3: Clone Stamp Tool (Great for Manual Precision)
Best for: Fixing detailed edges, repeating textures like fabric, bricks, grass.
The Clone Stamp Tool offers precise, manual control for removing objects from photos in Photoshop. Unlike automated tools, it allows you to directly sample pixels from one area and replicate them onto another. This makes it ideal for intricate tasks where accuracy is paramount, such as removing fine details like wires or small blemishes, duplicating patterns, or meticulously repairing damaged portions of an image.
It's particularly useful when dealing with complex textures or patterns that require careful matching to maintain a natural look. While it may require a bit more skill and patience, the Clone Stamp Tool's versatility and control make it an essential tool for achieving seamless Photoshop object removal and detailed image restoration.
How to Erase Items in Photoshop with Clone Stamp Tool?
Step 1. Open your image in Photoshop and duplicate the layer (Right-click > Duplicate Layer) to work non-destructively.
Step 2. Find the Clone Stamp Tool in the toolbar. Select the Clone Stamp Tool (S).

Step 3. Use the [and ] keys on the keyboard to quickly change the brush size. Then hold down the Alt key (Windows) or Option key (Mac) and click on an area of the image that has a similar texture and lighting to the area you want to repair. This sets the source point.
Step 4. Then carefully paint over the object you want to delete in Photoshop. It will replace the area with pixels from the sampled source.
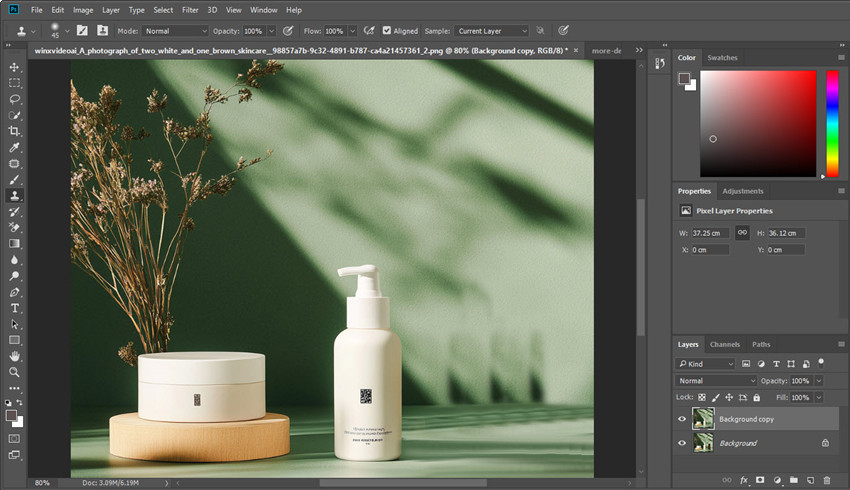
Step 5. Continue sampling different areas by holding Alt/Option again to ensure natural texture and blending. Use a soft brush edge and lower the brush opacity (20–50%) for better blending.
Also see: How to Remove Glare from Glasses in Photoshop
Method 4: Patch Tool (Ideal for Mid-Sized Objects in Clear Surroundings)
Best for: Removing logos from clothing or labels from packaging.
The Patch Tool offers a unique approach to object removal in Photoshop, allowing users to seamlessly replace unwanted areas with pixels from another part of the image. This tool excels when dealing with complex textures or patterns, making it ideal for tasks like repairing damaged skin in portraits, removing distracting items from textured backgrounds, or eliminating unwanted objects that blend somewhat with their surroundings.
It provides a level of control that's particularly useful when you need to maintain consistency in texture and lighting. Whether you're a photographer looking to clean up portrait shots or a designer aiming to refine product images, the Patch Tool offers a versatile solution for achieving flawless results.
How to Remove Things in Photoshop with Patch Tool?
Step 1. Open your image in Photoshop and duplicate the layer (Right-click > Duplicate Layer) to work non-destructively.
Step 2. Find the Patch Tool in the toolbar. It's often grouped with the Spot Healing Brush and Healing Brush Tool. You can also press J and then shift + J until you select the patch tool.

Step 3. Draw a selection around the object to select "Source" if you want to replace the selected area with pixels from another part of the image, or "Destination" if you want to replace another area with the selected area. "Source" is the most common use case for object removal in Photoshop.
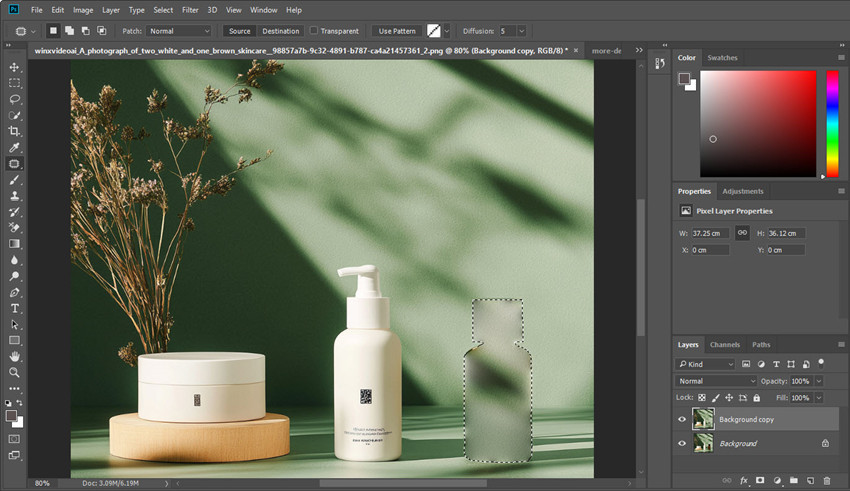
Step 4. Drag the selection of the object that you want to remove using the Lasso Tool, Selection Tool, or even the Patch Tool itself. Once you've made your selection, click and drag it to an area of the image that has a similar texture and lighting to the area you want to replace it with.
Photoshop will blend the texture from the sample area into your selection. If you see harsh lines, apply a slight feather (right-click > Feather) before using the Patch Tool.
Method 5: Generative Fill (AI Object Removal in Photoshop 2023+)
Best for: Removing large objects or filling complex gaps (e.g., missing parts of a building).
Generative Fill represents a significant leap in Photoshop's object removal capabilities. By leveraging advanced AI, this feature allows for the seamless removal of unwanted elements, with Photoshop intelligently generating realistic fill content to replace them. This tool is exceptionally powerful for complex scenarios where traditional methods fall short, such as removing large, disruptive objects from intricate backgrounds, or when needing to reconstruct missing portions of an image with natural-looking detail.
It's very well-suited for situations demanding quick, yet high-quality results, making it ideal for tasks like cleaning up busy urban landscapes, refining complex product photography, or even creatively altering image composition. For users seeking a blend of speed, efficiency, and realistic output, Generative Fill offers a cutting-edge solution.
How to Erase an Object in Photoshop with Generative Fill
Step 1. Open your image in Photoshop and duplicate the layer (Right-click > Duplicate Layer) to work non-destructively.
Step 2. Choose the Lasso Tool (L) or Object Selection Tool (W) to make a rough selection around the object you want to remove.
Step 3. Once you've made your selection, you'll see a contextual task bar appear below the selection. Click the "Generative Fill" button within this task bar. Alternatively, you can go to "Edit" > "Generative Fill."
Step 4. To let Photoshop remove the object and fill the area with content that matches the surrounding scene, leave the text prompt field blank. Generative fill will automatically analyze the surrounding pixels, and generate a fill based on that analysis.

Conclusion
Removing items in Photoshop doesn’t have to be complicated—once you know which tool to use and when. For quick fixes and small blemishes, the Spot Healing Brush works like magic. For larger or more complex objects, Content-Aware Fill or Generative Fill can save tons of time with surprisingly smart results. If you need more manual control, the Clone Stamp Tool and Patch Tool give you the freedom to fine-tune every pixel.
Whether you’re cleaning up a travel photo, polishing product shots, or retouching client work, mastering these object removal tools can take your edits from good to flawless. Start with the basics, experiment with each method, and don’t be afraid to combine tools for the cleanest, most natural results.
In addition, if you want to cut out an object from cluttered background, like edit out a product and replace the background with white color for Amazon or other platform, you can also use Aiarty Image Matting. It will precisely isolate your product, ensuring sharp edges and a professional finish, crucial for maximizing sales on online marketplaces.
You May Also Like
This post was written by Brenda Peng who is a seasoned editor at Digiarty Software who loves turning ordinary photos into extraordinary works of art. With AI assistance for brainstorming and drafting, the post is reviewed for accuracy by our expert Abby Poole for her expertise in this field.