Summary: High-quality product images are vital for e-commerce, but simply having photos isn't enough. Mediocre product photos fail to capture attention and improve purchase decisions. Don't worry! This guide reveals essential steps to edit product photos for maximum impact, including leveraging AI for precise background removal to enhance visual appeal and drive sales.
Struggling to retain e-commerce customers? Product images are key. BusinessDasher found that 75% of online shoppers rely on product photos, and high-quality images boost conversions by 94%. Eye-catching visuals grab attention instantly, building trust, and boosting sales. Great product photos minimize doubt, build confidence, and even reduce returns. Given that, let's discuss how to edit your product images.
![]() An Effective Way to Enhance Visuals Background Removal with Aiarty Image Matting
An Effective Way to Enhance Visuals Background Removal with Aiarty Image Matting
Aiarty Image Matting simplifies the crucial step of background removal for effective e-commerce photo editing. This fast, easy, and professional tool helps you achieve polished product listings for Etsy, Amazon, and TikTok shop, ultimately leading to impactful visuals that capture attention and drive sales.

1. Start with a Strong Foundation
Great Ecommerce photo editing begins with great photography. While AI and advanced editing tools can fix a lot, some mistakes are impossible to fully correct. That's why getting the basics right during the photo shoot will save you time and ensure your final images look professional.
Choose the Right Backdrop
If you prefer to set the scene for Ecommerce products with different background colors and textures, here is a list of best backdrops for photography. A consistent background across all product images maintains a cohesive look.
If you want to simplify background removal later, shoot against a white or neutral backdrop. For smaller items, a DIY lightbox works wonders. For larger products like furniture, position them against a plain wall or seamless paper.
Lighting Matters
I'll never forget the first time a customer returned a lamp because "the gold finish looked more mustard yellow online". Turns out, my kitchen's warm overhead lighting was the culprit.
Soft, diffused daylight near a window is excellent for natural-looking Ecommerce photos – we need to avoid direct sunlight to prevent harsh shadows. If natural light is not ideal at the time of shooting, use daylight-balanced bulbs (5000K–5500K). This prevents artificial yellow or blue tints that can alter the product's true colors.

Also, light diffusers such as a softbox or white umbrella help eliminate harsh shadows and create even lighting.
Angles and Details
Capture your product from multiple angles and include close-up shots to showcase important details. This gives customers a comprehensive view of what they're purchasing.

Sometimes, you may want the product photos to be at the same angle, such as ensuring that the composition is uniform across your catalog. You need to think in advance, and shoot accordingly to keep the consistency.
2. Remove and Swap Product Image Backgrounds with AI
The backdrop to your product photo is more crucial than you might think. Online marketplaces like Amazon often demand pristine white backgrounds, while platforms like Instagram thrive on visually rich, contextual scenes. The modern e-commerce landscape requires adaptability – backgrounds that can shift to suit the selling environment.
Fortunately, Aiarty Image Matting makes background removal and swapping incredibly easy. It can:
- AI cleanly cuts out your product, even tricky edges. Get crisp, pro cutouts.
- 1-Click to change the background to white, solid color, or lifestyle scene. Match any platform!
- Edit up to 3000 photos at once! Save hours & fix backgrounds for all products.
- Simple tools included: Crop for framing, rotate for perfect angles, all in one tool.


How to Remove & Change Backgrounds via Aiarty Image Matting
Step 1. Launch Aiarty Image Matting. Remove or swap the background for the product photos.
To remove the background, simply click Start. The AI will automatically isolate your product.

Once done, you can easily add a custom image or choose a solid color background to match your brand.

Step 2. (Optional). Fine-tune your mask
You can further refine the edge using extra tools like brushes and the mask curve. This ensures that even the most intricate details are preserved and the foreground subject blends seamlessly with the new background.

Step 3. Take a quick look at the final work. If you're happy, use the Single Export or Batch Export feature to quickly save your photos, ready for your e-commerce platform.

3. Basic Product Photo Editing
With your product backgrounds flawlessly handled, let's move on to another essential aspect of product photo editing: color correction. These color fixes can be achieved using many popular image editing software. For demonstration purposes in this guide, we will use Adobe Photoshop to show you how these common product photo editing techniques are applied. Let's see how it's done in Photoshop.
Adjust the White Balance
If your product photo looks too blue or too orange, it can misrepresent the actual colors and deter potential buyers. This is often due to the lighting conditions during the photoshoot. Adjusting the white balance will neutralize these color casts and ensure accurate color representation. Here's how to do it simply using the Camera Raw Filter. To do so:
Step 1. Open your product photo in Photoshop. Go to Filter > Camera Raw Filter... (If you shot in RAW format, the image might open in Camera Raw automatically).
Step 2. Click the White Balance tool. Carefully click on an area in your product photo that should be pure white or a true neutral gray. This tells Photoshop what a neutral color should look like, and it will adjust the overall color balance accordingly.
Step 3. If the color still doesn't look quite right, drag the Temperature and Tint sliders on the right side of the Camera Raw window. Once the colors in your product photo look accurate, click OK.

Correct Unwanted Color Casts
Sometimes, even after adjusting the white balance, your product might still have a subtle, unwanted color tint (a color cast). Here's a straightforward way to address this using a Color Balance Adjustment Layer:
Step 1. Open your product photo in Photoshop.
Step 2. Click on the Adjustment Layer icon at the bottom of the Layers panel.
Step 3. Click Color Balance. If you see a specific color cast (for example, a slight blue tint), move the corresponding slider in the Color Balance panel towards the opposite color (in this case, towards Yellow on the Yellow/Blue slider).
- To remove a blue cast, drag the Yellow/Blue slider towards Yellow.
- To remove a red cast, drag the Cyan/Red slider towards Cyan.
- To remove a green cast, drag the Magenta/Green slider towards Magenta.
Step 4. Make small, incremental adjustments and keep checking the neutral areas of your product until they appear truly neutral. You can close the Properties panel once you are satisfied.
Ensure Proper Exposure and Contrast
A well-exposed product photo isn't too dark or too bright, and it has a good range of tones from shadows to highlights. Adjusting the exposure and contrast can enhance the visibility and detail of your product. Here's an easy way to do it using a Levels Adjustment Layer:
Step 1. Open your product photo in Photoshop. In the Layers panel, click on the Adjustment Layer icon and choose Levels.
Step 2. In the Properties panel, you'll see a histogram (a graph showing the distribution of tones in your image) with three sliders below it. These are the input sliders.
- Black Input Slider (left): Drag this slider slightly to the right to make the darkest areas of your product appear truly black, adding depth to shadows.
- White Input Slider (right): Drag this slider slightly to the left to make the brightest areas of your product appear truly white, enhancing highlights.
- Gray Input Slider (middle): This slider adjusts the midtones, affecting the overall brightness. Drag it to the left to brighten the image or to the right to darken it.

Step 3. Make small adjustments to these sliders until your product is well-lit and has a good range of tones. The goal is to reveal details in both the shadows and the highlights without making the image look artificial. Close the Properties panel.
Avoid Over-Saturation for a Natural Look
While you want your product colors to be vibrant, over-saturating them can make your product look unrealistic and cheap. It's best to make subtle adjustments. Using the Vibrance adjustment is a great way to enhance colors naturally:
Step 1. Open your product photo in Photoshop. In the Layers panel, click on the Adjustment Layer icon and choose Vibrance.
Step 2. Gently drag the Vibrance slider to the right to increase the intensity of the more muted colors in your product. This usually results in a more natural-looking color boost.
Step 3. Use the Saturation slider sparingly, as it increases the intensity of all colors equally and can easily lead to an over-saturated look.

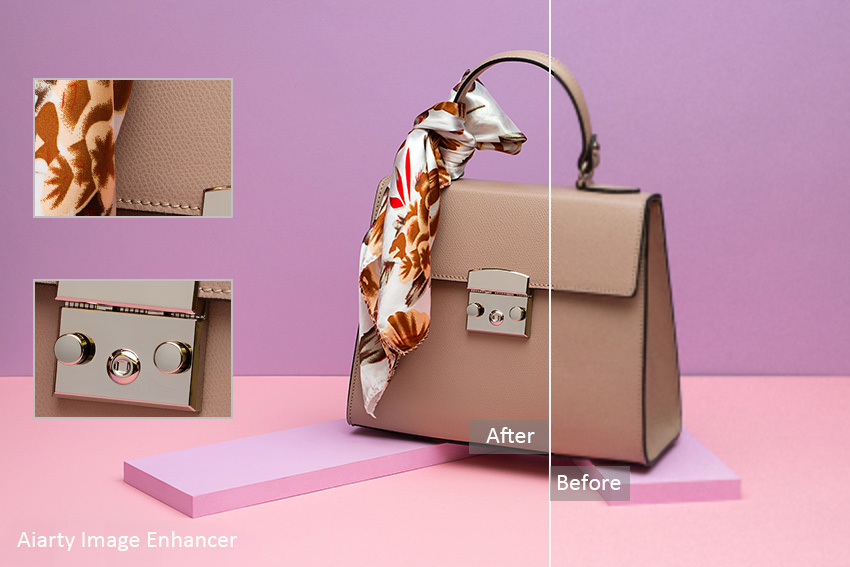
4. Enhance Product Photo Details and Sharpness
After perfecting your product photo colors in Photoshop or other general image editors, you might notice that some imperfections, like noise or slight blurriness, become more apparent. Furthermore, using general editing software might sometimes lead to image compression, potentially degrading the final image quality. To avoid these issues and truly make your photos look proffesional, enhancing image details and ensuring optimal quality is crucial.
For this, Aiarty Image Enhancer is an excellent tool. Let's see how to use this AI driven image enhancer to enhance your product photo details and even upscale the resolution for maximum impact.
Free download Aiarty Image Enhancer to improve your product photo quality now!
Step 1. Launch Aiarty Image Enhancer. Add your product photo by drag and drop.
Step 2. Select an AI model from the AI Model section. For product photos, More-Detail GAN v3 and Real Photo v3 are excellent choices to sharpen details and reduce any noise from earlier edits. Refer to the official guide for detailed information on each AI model.
Step 3. Go to the Resolution section. Here you have options:
- Choose 1x to enhance details without changing the original resolution.
- Select a larger scale ratio (such as 2x and 4x) or choose a larger resolution (such as 4K and 8K) to enhance details and upscale the photo to a higher resolution.
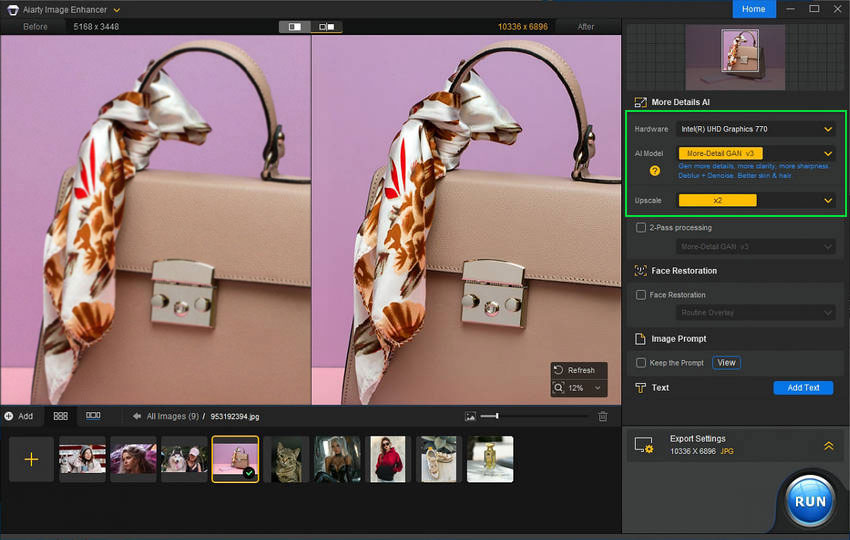
Step 4. Click Single Export or Batch Export to save the enhanced product photo.
5. Apply Subtle Branding and Creative Styling
Once your product photos are technically excellent – backgrounds clean, colors accurate, lighting balanced, and details sharp – you might consider adding subtle creative styling elements to further enhance your brand presence. Here are some guidelines for effective and subtle product photo styling for branding:
Know When to Brand (and When to Skip It): For marketplace listings like Amazon or eBay, generally, it's best to keep product photos clean and unbranded, focusing solely on the product against a white background.
Branding is more suitable for your own website, social media, marketing materials, and lifestyle shots where you want to build brand recognition.
Add Text for Branding
When considering adding text for branding, it's crucial to use it sparingly and strategically. If you choose to include text, ensure it is always minimal and serves a clear purpose. Good examples of strategic text usage include subtly highlighting promotional offers, like "Sale" or "Limited Time Offer," but always avoid text that is overly "sales-y" or creates a cluttered visual.
Another effective use of text is to discreetly add the product name, especially in cases where the name isn't immediately obvious from the image alone. For lifestyle shots, you might briefly indicate the product category or collection to provide context, but again, keep it concise and unobtrusive.
Add Brand Logo
For logo placement, the guiding principle is always to keep it discreet and non-intrusive. If you decide to add a logo, opt for a semi-transparent watermark style placed in a corner of the image, rather than a large, opaque logo that dominates the visual. Ensure your logo remains small and understated, acting as a subtle brand reminder rather than overpowering the product.
6. Optimize Product Photos for Web and Platforms
You've meticulously edited your product photos – backgrounds are perfect, colors are accurate, lighting is just right, and details are crisp. But your work isn't quite finished yet! The final crucial step is optimizing your images for the web. Large, unoptimized product photos can drastically slow down your website, leading to frustrated customers and lost sales. Optimizing for web speed and platform requirements is essential to ensure your stunning visuals actually contribute to your e-commerce success. Let's explore the key aspects of output optimization for your product photos.
Step 1. Research the recommended image sizes and aspect ratios for each e-commerce platform, website, or social media channel where you will display your product photos. Amazon, Shopify, Etsy, Instagram, and your own website may have different requirements.
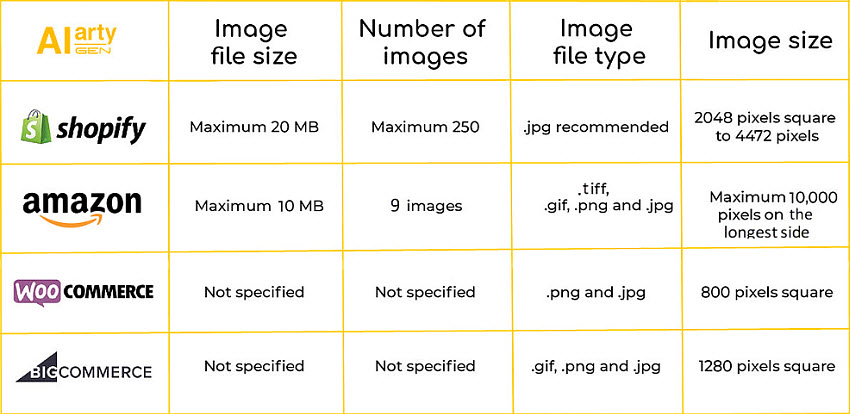
Step 2. Use image editing software (like Photoshop, or free online image resizers) to resize your product photos to the specific pixel dimensions needed for each platform. Batch resizing tools can be very helpful if you have many images.
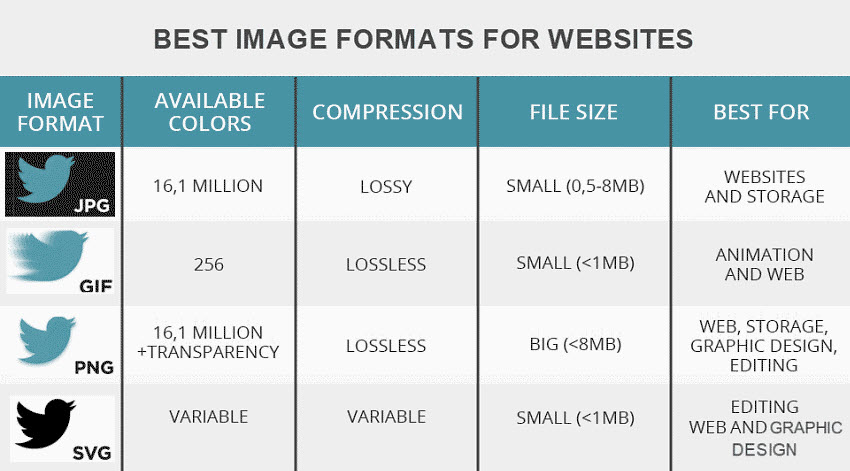
Step 3. Choose the optimal file format. For most product photos, JPEG is a good choice as it offers a good balance of image quality and small file size, suitable for web use. For images with transparency, PNG is necessary, but use it judiciously as PNG files are generally larger than JPEGs. Consider WebP format if your platform supports it, as it offers excellent compression and quality.
Step 4. Use image compression tools (many free online options are available) to reduce the file size of your product photos without significantly sacrificing visual quality. Aim for the smallest file size possible while maintaining acceptable image quality for web viewing.
Bonus Tips and Resources for Pro-Level Product Photos
Now that you've grasped the fundamental steps for editing your product photos, these bonus tips and resources will provide additional insights and tools to help you further refine your skills and achieve truly professional results.
Optimize Image Compositing
Sometimes a product image needs context to tell its story. Image compositing merges your product into a lifestyle scene, creating a narrative that resonates with your audience.

By placing your product in an environment—like a cozy living room for home decor or a sleek office for tech gadgets—you help customers envision its use in real life.
Insider Tips: If you don't have time to shoot on-site, you can use mockup generator tools to place the Ecommerce products in realistic scenes.
Maintain Brand Consistency
Establish a distinct and consistent visual style for your product photos, encompassing color, lighting, and overall presentation. This is crucial for building a memorable brand identity and creating a seamless shopping experience for your customers.
To inspire your color choices, start with your brand's core colors as seen in your logo and website. Then, look at successful brands in your industry and analyze their visual style. You can also create a mood board with colors and imagery that align with your brand's personality and target audience.
Pay Close Attention to Detail
Zoom in on your product photos during the editing process to identify and fix any small imperfections like dust, scratches, or unwanted reflections. These seemingly minor details can significantly impact the perceived quality and professionalism of your product.
Always Test Your Images
Before publishing your product photos, view them on various devices (desktops, smartphones, tablets) to ensure they look good across different screen sizes and resolutions. Colors and brightness can vary significantly between different screens, so this step is crucial for a positive customer experience.
Streamline Your Workflow
Efficiency in photo editing not only saves valuable time but also helps ensure a consistent visual style across your entire product catalog. Here are some strategies to streamline your workflow:
- Leverage Batch Processing: Use software features like Photoshop Actions to record a series of editing steps (such as resizing, sharpening, or adding a subtle watermark) and then apply these actions to multiple images at once (File > Automate > Batch in Photoshop).
- Utilize Lightroom Presets: If you use Adobe Lightroom, save your common color grading or exposure adjustments as Presets. This allows you to apply a consistent look to multiple images with a single click. Lightroom's ability to import all your photos, edit one, and then sync the settings to all other selected files is a powerful time-saver.
- Consider Cloud Tools: Platforms like Adobe Creative Cloud can help you sync your editing settings and assets across various devices. This allows for a more flexible workflow, enabling you to work on your product photos from different locations if needed.
Outsource E-commerce Photo Editing
If your workload becomes overwhelming or you require specialized editing skills, consider outsourcing your e-commerce photo editing. When selecting a service, look for portfolios that demonstrate strong experience with e-commerce product photography. Check reviews and testimonials on platforms like Upwork or specialized design service websites.

It's essential to communicate your vision clearly from the outset, whether through a detailed creative brief or a formal contract. Ensure the service provider understands your brand guidelines, deadlines, and the specific types of edits required (from basic background removal to more complex tasks like 360° spin edits). Remember that pricing will vary depending on the complexity and volume of the work.
You May Also Like
This post was written by Brenda Peng who is a seasoned editor at Digiarty Software who loves turning ordinary photos into extraordinary works of art. With AI assistance for brainstorming and drafting, the post is reviewed for accuracy by our expert Abby Poole for her expertise in this field.