Summary: This guide offers a complete step-by-step approach to taking DIY passport photos at home, including the benefits, essential requirements, setup tips, and editing techniques. Plus, we’ll share a bonus tip on how to elevate your passport photos with a professional touch by using our AI background remover to change the background.
Getting passport photos professionally taken can be costly and time-consuming. However, with the right tools and techniques, you can take high-quality passport photos from the comfort of your home. Whether preparing for a trip, applying for a new job, or renewing your passport, knowing how to capture the perfect shot can save your effort.
Most people report that the primary concern is the background when taking DIY passport photos at home. Statistics show that over 50% of rejected passport photos fail due to poor background or lighting. The good news? These common pitfalls are avoidable. When the photo's background is messy or the background color is not what you need, you can digitally replace it with a compliant solid-color backdrop using AI.
![]() The Best Solution: Change the Background with an AI Background Remover
The Best Solution: Change the Background with an AI Background Remover
Aiarty Image Matting makes it easy to remove messy backgrounds and replace them with any color or image with AI. It delivers precise background removal and seamless blending, handling fine details like hair and edges perfectly. Download for free and change your passport background now!
1. Benefits of DIY Passport Photos at Home
Taking passport photos at home offers a range of benefits:
- Cost Savings: Professional photo services can charge anywhere from $10 to $50 for a simple passport photo. By doing it yourself, you can save that money for your travels.
- Time Efficiency: No need to schedule an appointment or wait in line at a photo service. You can snap your photo whenever it’s convenient for you.
- Flexibility: You can take multiple shots until you find the perfect one, adjusting your setup as needed without the pressure of a ticking clock.
When the background of the passport photo is messy or the background color is not what you need, Aiarty Image Matting can help you remove messy bacground from your passport photos and replace it with another solid color background.
Download Aiarty Image Matting now and start replacing passport backgrounds!


2. Essential Requirements for Taking Passport Photos
Understanding official guidelines is crucial to ensure your passport photo is accepted. Requirements vary slightly by country, but the following are standard:
Common Passport Photo Standards
- Size: For the U.S., the photo must be 2 x 2 inches. Check your country’s specific size requirements.
- Head Position: The head should measure 1 to 1.4 inches from the bottom of the chin to the top of the head.
- Facial Expression: A neutral expression with eyes open and mouth closed is mandatory.
Background and Lighting Guidelines
Background: A plain, white, or light-colored background is required. Avoid textures or shadows.
Lighting: Use even lighting to eliminate shadows on your face and background.
Essential Equipment Checklist

- Smartphone or digital camera.
- A tripod or a stable surface to position the camera.
- Plain wall or backdrop.
- Measuring tape for accuracy.
3. Setting Up Your Space: Tips for a Professional Look
The setup is critical for achieving a photo that meets professional standards.
Choosing the Right Location
To achieve the best results, find a well-lit area with natural light to avoid harsh shadows, use a plain, light-colored wall as a background, and ensure the space is free of distractions or clutter.
Camera and Lighting Setup
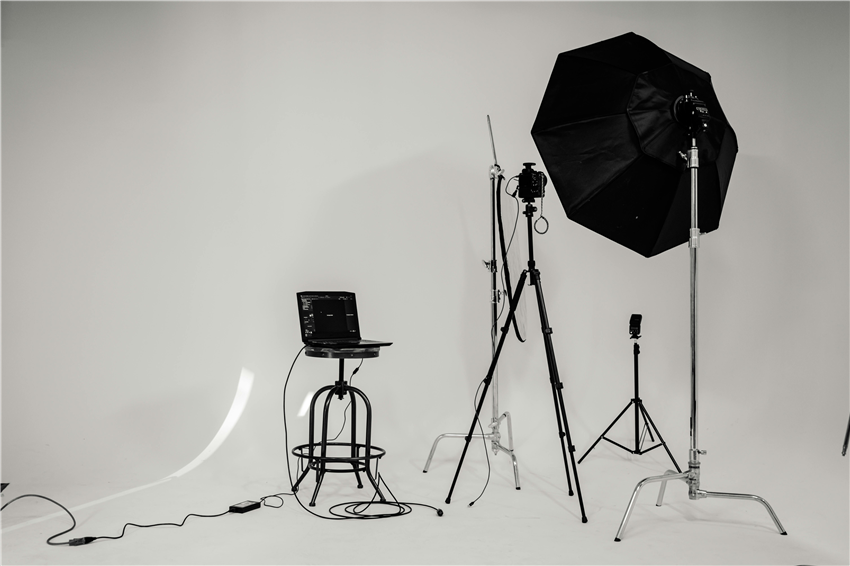
Position the camera at eye level, approximately 3-4 feet away from the subject. Use soft lighting or diffuse natural light by covering windows with sheer curtains, and avoid overhead lights that create shadows on the face.
Outfit Tips for Passport Photos
To ensure optimal results, wear solid-colored clothing that contrasts with the background, such as dark shirts against a white wall, and avoid uniforms, white clothing, or any attire that blends into the background.
Recommended Settings
Set your camera to the highest resolution available. Use the following settings to optimize your shot:
To capture high-quality images, ensure the camera is focused on the subject’s face, keep the ISO low (100-200) to reduce graininess, and use a wider aperture (like f/2.8 - f/4) to create a pleasing depth of field.
4. Step-by-Step Guide to Taking Passport Photos at Home
A neutral expression is crucial for passport photos. Encourage the subject to relax their face and maintain a straight posture, with their shoulders back and head straight. Follow these steps to take a high-quality passport photo:
- Prepare Your Area: Set up your camera, lighting, and background.
- Position the Subject: Have the subject stand or sit in front of the background.
- Adjust the Camera: Set the camera on the tripod, frame the shot, and ensure proper focus.
- Take Multiple Shots: Capture several photos to choose from later.
- Review the Photos: Check for proper exposure, focus, and background clarity.
- Retake if Necessary: If the photo doesn't meet requirements, adjust lighting or positioning and try again.

Tips for Avoiding Common Mistakes:
To prevent blurred images, use a tripod or stable surface for the camera. If wearing glasses, tilt your head slightly downward to reduce reflections, and adjust lighting angles to minimize unwanted shadows.
5. Editing Passport Photos: Remove and Replace Background
Editing is essential for finalizing your passport photo. This ensures compliance with government standards. Many online passport photo tools rely on basic editing. Aiarty Image Matting stands out with its precise alpha matting technology, perfect for high-quality results. Editing the background can be one of the trickiest parts of passport photo preparation.
Core features of Aiarty Image Matting to make your passport better:
- AI-Powered Matting: Use artificial intelligence to remove the background of passport photos precisely.
- Custom Backgrounds: Replace removed backgrounds with solid colors, gradients, or new images.
- Precision Matting: Achieve fine details like hair strands and refine edges for seamless blending into new backgrounds.
- High-Quality Output: Export images in high resolution, including transparent PNG formats, for easy secondary editing.
Aiarty Image Matting isn’t just for passport photos—it’s a versatile tool for all your photo matting needs, from professional headshots to creative projects. Download it today and explore its full potential!
Let's check the steps to change the background of your passport with Aiarty Image Matting!
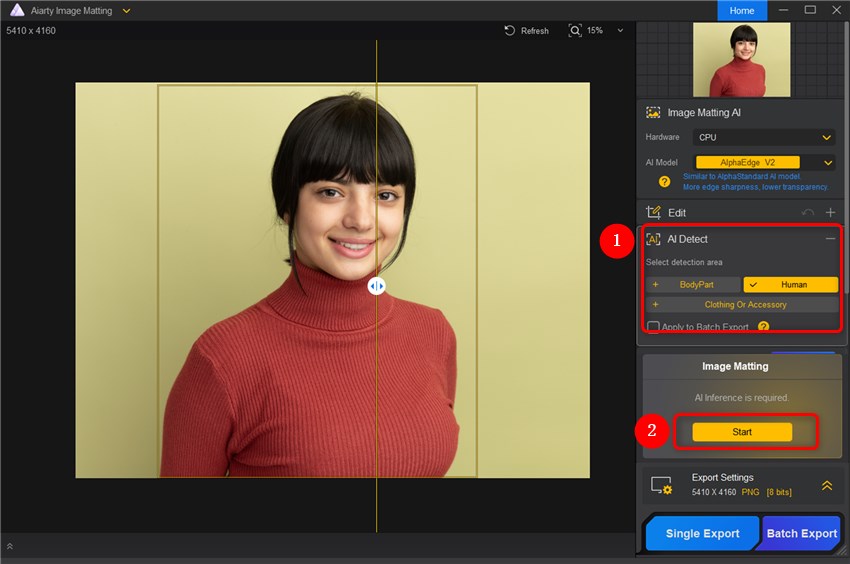
Step 1. Run Aiarty Image Matting and add your passport photos here. Click the AI Detect to recognize the human automatically. Click the Start button to remove the background of your photos.
Step 2. Click the Effect to change the background of your passport photos. You can upload images or choose a color for your photos.
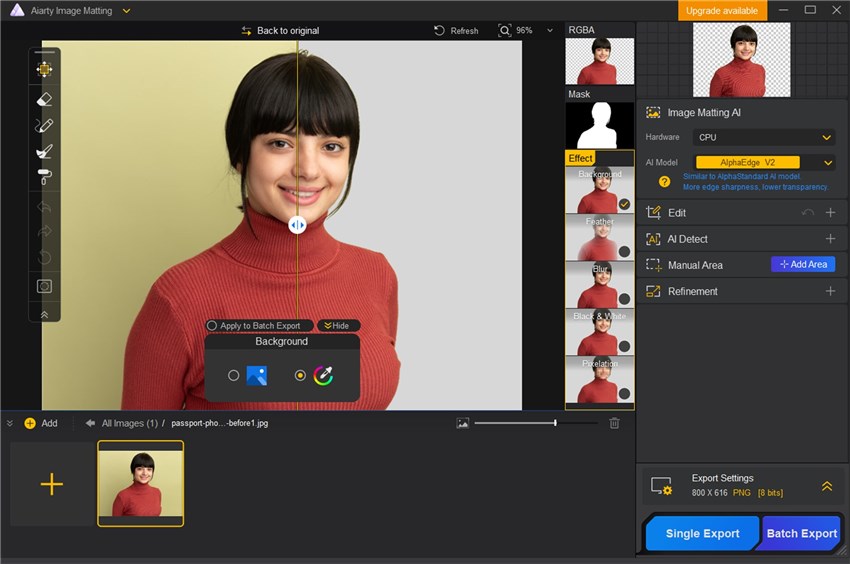
Step 3. Under the Edit panel, you can rotate, flip, and crop your passport photos. Single Export or Batch Export your photos once you're satisfied.
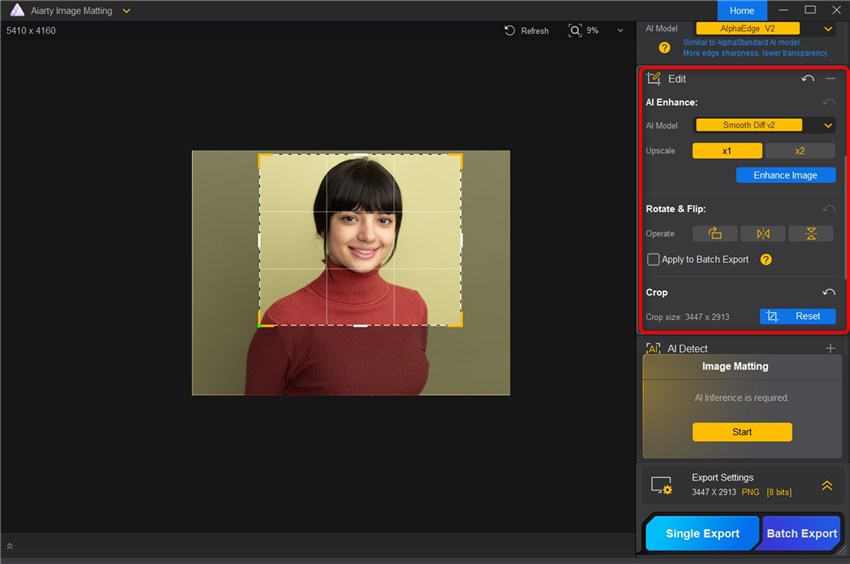
While you can manually edit your passport photos, using Aiarty Image Matting can save you time and ensure professional-level results. Its advanced AI technology makes background removal and replacement quick and effortless—perfect for busy individuals who want a polished photo without the hassle.
6. Printing and Finalizing Your Passport Photo
Once your photo is edited, it’s time to print and prepare it for submission.
Best Practices for Printing
Use glossy photo paper for professional results, set the resolution to 300 DPI or higher to meet quality standards, and ensure the dimensions match your country’s specifications.
Where to Print
For convenience, use a high-quality photo printer at home. Alternatively, local retailers like Walmart or CVS offer affordable and reliable photo printing services.
Double-Check Before Submission
Verify the dimensions, background, and overall quality of your photo, and confirm that it meets all government standards.
Conclusion
Unlike online tools, Aiarty Image Matting processes your photos locally on your device, ensuring your personal data stays private and secure. No need to upload sensitive photos to the cloud. By following this detailed guide, you can confidently create professional-grade passport photos at home. With tools like Aiarty Image Matting and a little preparation, your DIY passport photo will be flawless and government-approved. Download it now!