10 Best AI Image Enhancers to Improve Quality and Resolution
Updated on
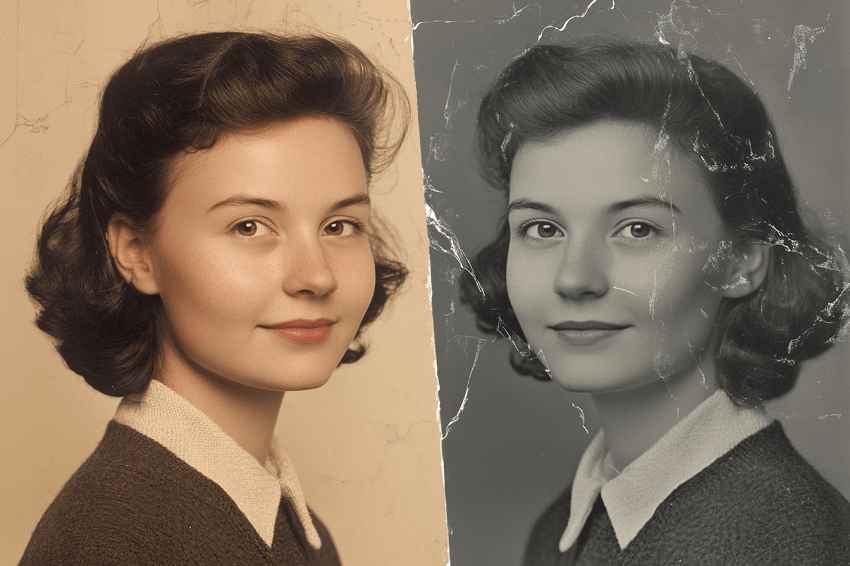
Let's face it: old photos are more than just pieces of paper or digital files—they're time capsules. They hold the laughter of a family reunion, the joy of a wedding day, or the innocence of a childhood moment. But over time, these precious memories can fade, tear, or get damaged. That's where photo restoration comes in:
Think about that one photo of your grandparents on their wedding day. It's not just a picture; it's a piece of your family's history. Restoring it ensures that future generations can see and feel the same connection you do.
Tears, stains, and fading are the enemies of old photos. A restoration can fix these issues, bringing the image back to life. For example, I once worked on a 1950s photo that had been torn in half. After restoration, it looked like the tear had never happened.
Physical photos don't last forever. By restoring and digitizing them, you're creating a backup that can be shared, printed, and cherished for decades. Plus, digital files are easier to organize and store.
So, whether it's a faded Polaroid or a scratched black-and-white print, restoring old photos is about more than just fixing an image—it's about preserving the stories and emotions behind them. And trust me, the effort is worth it.
Preparation Before Restoration: The Foundation of Photo Restoration
Before diving into the actual restoration process, a little prep work can go a long way. Think of it as laying the foundation for a successful project. Whether you're dealing with a dusty old album or a single cherished print, these steps will ensure your photos are ready for their makeover.
1. Clean Physical Photos
First things first: clean your photos. Years of storage can leave them covered in dust, mold, or even fingerprints. Here's how to handle it:
- Tools Needed: Grab a lint-free cloth and some isopropyl alcohol (89% works best).
- How to Clean: Gently wipe the surface of the photo to remove dust or debris. For tougher stains like mold, lightly dampen the cloth with alcohol and carefully clean the affected area. Pro tip: Always test a small corner first to ensure the alcohol won't damage the photo.
- What to Avoid: Steer clear of water or abrasive materials, as they can cause further damage.
For example, I once restored a 1970s wedding photo that had been stored in a damp basement. A quick wipe with isopropyl alcohol removed the mold without harming the image.
2. Digitize Your Photos
Once your photos are clean, it's time to digitize them. This step is crucial because it creates a digital copy that you can work with during restoration.
How to Digitize Like a Pro
Here's a breakdown of the best practices for digitizing your old photos:
- Choose the Right Equipment: Flatbed Scanner: 1. A flatbed scanner is ideal for most photos, especially delicate or fragile ones. 2. Smartphone Scanning Apps: While convenient, smartphone scanning apps often lack the quality and control of a dedicated scanner. 3. Professional Scanning Services: If you have a large collection or particularly valuable photos, consider using a professional scanning service.
- Scanning Resolution: Use a high scanning resolution to capture as much detail as possible. Minimum: 300 DPI (dots per inch) for general use. Recommended: 600 DPI for photos you plan to enlarge or heavily edit. For Maximum Detail: 1200 DPI or higher for very small or highly detailed photos
- File Format: TIFF: Recommended for archival purposes and photos you plan to edit, as it's a lossless format. JPEG: Acceptable for general use, but be aware that it's a lossy format, so you'll lose some quality with each save.
- Color Settings: Scan your photos in color, even if they appear to be black and white. This gives you more flexibility during the restoration process.
- Proper Handling: Be gentle! Handle old photos with care, and wear cotton gloves to avoid transferring oils from your skin.
- Calibrate Your Monitor: For the most accurate results, calibrate your monitor to ensure that colors are displayed correctly.
If you don't have a scanner, you can use your smartphone or camera. Place the photo on a flat surface with natural light, use a tripod to avoid blur, and make sure there's no glare on the photo.
By taking the time to clean and digitize your photos, you're setting yourself up for a smoother restoration process. Plus, you'll have a digital backup that can be shared and preserved for years to come.
Now let's head to the first restoration method.
Method 1: How to Restore Old Photos Using AI Software
1. Aiarty Image Enhancer
Alright, let's kick things off with a bang! Aiarty Image Enhancer. If you're looking for a truly powerful and easy-to-use AI solution, this might just be your new best friend. This software isn't just about quick fixes; it's about seriously elevating your image quality and achieving results you probably didn't think were possible.
It harnesses the power of advanced AI to denoise, deblur, upscale, and add intricate details to your photos. Think of it as giving your images a complete digital makeover!
What Makes Aiarty Stand Out?
Aiarty Image Enhancer is packed with features that make it a top contender in the world of photo restoration:
- AI-Powered Magic: Aiarty Image Enhancer is a state-of-the-art generative AI software that harnesses the power of advanced AI technology to denoise, deblur, upscale, colorize, and add intricate details to images, resulting in exceptional clarity and resolution. Aiarty Image Enhancer offers different AI models optimised for various photo types, like portraits, landscapes, detailed textures. Without having to adjust further settings, photographers can restore the finest details in feathers, fur, skin, lines, leaves, and intricate textures.
- AI Face Restoration Feature: Aiarty Image Enhancer V3.0 introduces a powerful new AI Face Restoration feature that elevates facial details with exceptional precision and natural realism. By leveraging advanced algorithms, it addresses common image flaws such as skin blemishes, inconsistent focus, and missing features like eyebrows or teeth, all while maintaining the face's natural appearance. The inclusion of Gradient Overlay and Routine Overlay ensures that key facial elements are enhanced with exceptional accuracy, producing a smooth, lifelike result. Whether enhancing low-resolution images, AI-generated faces, or group portraits, Aiarty's Face Restoration delivers sharper, clearer, and more vibrant images, transforming your photos into professional-quality visuals with a realistic, fresh touch. The artificially good results for the faces, even with a slight hint of color.
- AI Image Denoise: Say goodbye to grainy photos! Aiarty's noise reduction function can effectively reduce the noise while preserving fine details and texture, restoring clarity to the night photos. The tool adjusts exposure and brightness, making the image more vibrant without compromising the natural look. For instance, Aiarty can reduce the noise in the night sky while enhancing the visibility of stars and other celestial bodies.
- AI Image Deblur: Got a blurry shot? Aiarty's Deblur function intelligently restores sharpness to blurred images, correcting moderate blur and enhancing clarity without introducing unnatural artifacts, delivering sharper, clearer results.
- Details Generation: Enhance the details in elements such as skin, hair, textures, and lines, while preserving the original integrity of the image, adding realism and depth. More-Detail GAN v3 model in Aiarty excels in enhancing small details by sharpening textures and making intricate details more visible. Whether photographing the veins in a leaf, the wings of a butterfly, or the fine hairs on a flower's petals, Aiarty can enhance clarity and improve the depth of field, allowing viewers to appreciate the subtleties that might otherwise go unnoticed.
- Upscaling to Insane Resolutions: Capable of upscaling images up to an impressive 16K/32K, Aiarty effortlessly enhances AI-generated visuals, restores damaged photos, and improves low-quality JPEGs with just a few clicks. Imagine taking a tiny, pixelated old photo and blowing it up to a massive print without losing detail! That's the power of Aiarty. It can enlarge them up to 8x the original size. The maximum enlargement is 32K, meaning the long dimension becomes 32,000 pixels.
- Flexible DPI Output Settings: Aiarty Image Enhancer V3.0 now offers a range of customizable DPI output options, including 72DPI, 96DPI, 150DPI, 200DPI, 300DPI, 500DPI, and 1000DPI, giving users the flexibility to adjust image resolution according to their printing needs.
- Batch Processing: Supports processing up to 3,000 images at once, saving time on large image collections.
- Offline Processing: Allows secure image processing without an internet connection, offering enhanced privacy and reliability.
- Format Support: Compatible with a wide variety of image formats, making it adaptable for multiple use cases.
Step-by-Step: Restoring Your Memories with Aiarty Image Enhancer
Ready to give it a try? Here's how to use Aiarty Image Enhancer to breathe new life into your old photos:
Step 1. Download Aiarty Image Enhancer on your computer.
Step 2. Then run it after installation finishes. When you get its interface window, the first things that you need to do are heading to its left panel and check these things:
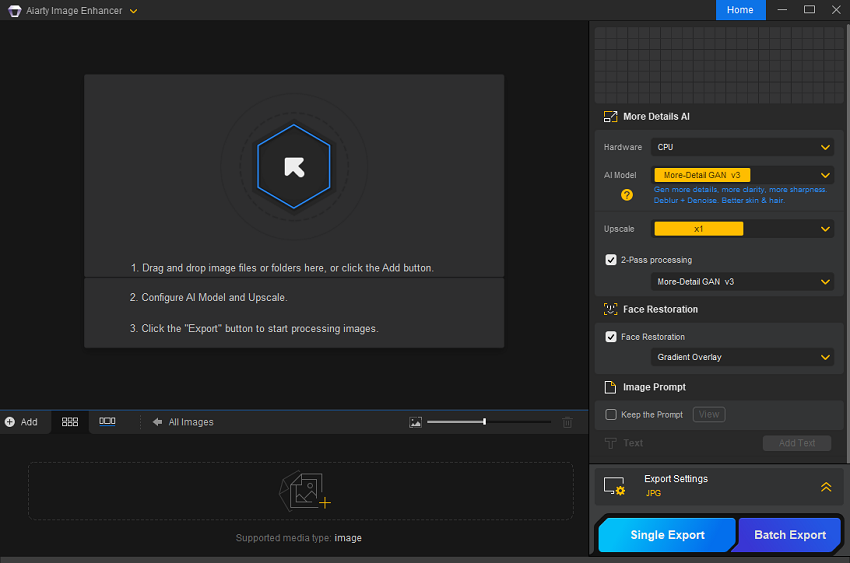
- Under Hardware, picking your GPU to do the whole job. If there is no GPU in your computer, no worries, Aiarty Image Enhancer can also utilize CPU to make the job done, just not as fast as that a GPU does.
- Under AI model, choosing the AI mode which you prefer. More-Detail GAN v3 is recommended for old photo restoration. You can try different models to choose the best result, on your demand.
- Under Upscale, selecting the time or exact resolution which you want your old photo to be upscaled into. If you have no such interest, just make it be x1 option.
- Then the big one, under Face Restoration, ticking it.
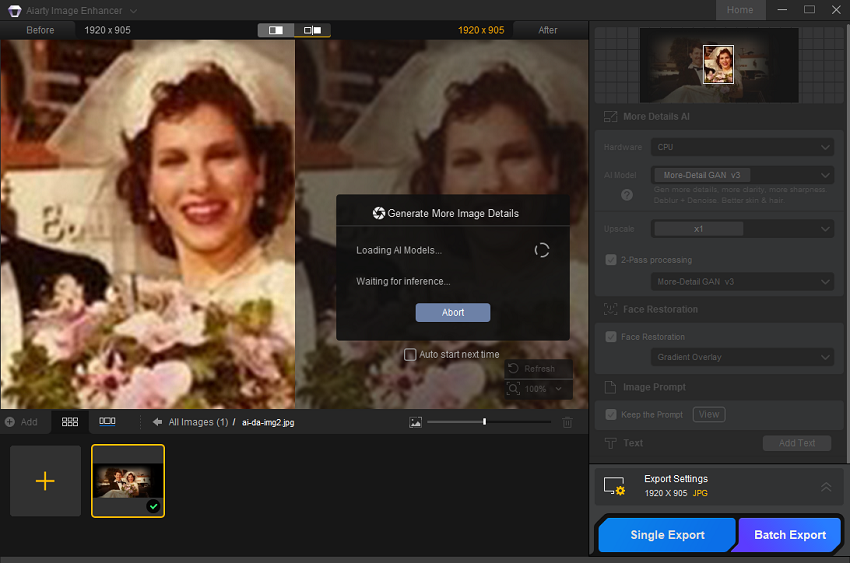
Step 3. Import your old photos. You can either click the adding area to make it, or just simply drag your photos into it. Then it will automatically load AI model, analyze your photos, and finish the restoration.
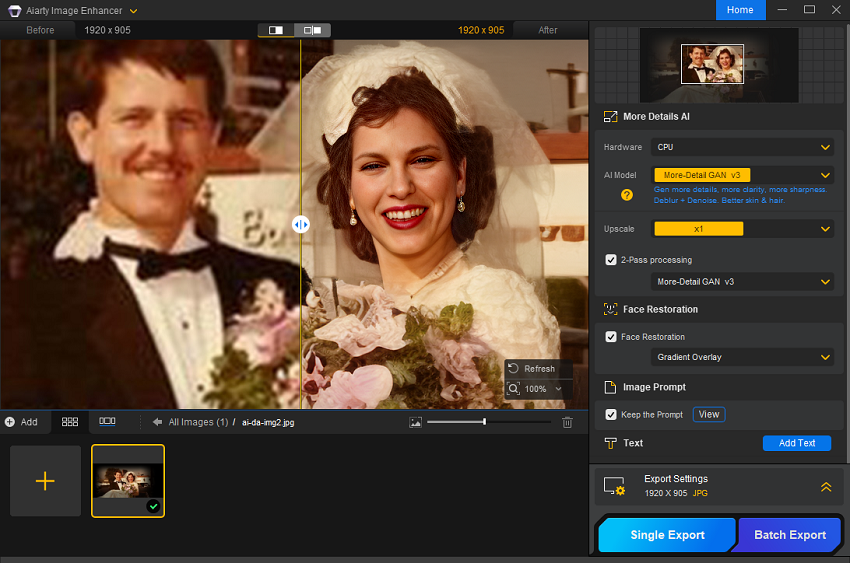
Step 4. Now you just need to click the Single Export button or Batch Export button to export your processed old photos.
2. PhotoGlory Software
As someone who values both simplicity and power, I'm excited to introduce PhotoGlory – a photo restoration software designed for Windows PCs that can revive old and damaged pictures. It's marketed as an easy-to-use tool that can heal your photos and help you preserve them for years to come. It is also great software for the restoration of old images. It comes equipped with a wide range of automatic tools that can fix your pictures with no effort at all. If you're looking for a straightforward, efficient way to bring your faded memories back to life, PhotoGlory might be just what you need.
What PhotoGlory Brings to the Table
PhotoGlory is packed with features aimed at making photo restoration accessible to everyone, from beginners to seasoned pros. Here's a glimpse of what it offers:
- Automatic Repair: With PhotoGlory, nasty imperfections can be effortlessly removed, restoring the original appearance of the image. All it takes is a click of the automatic restoration feature, which efficiently repairs all the imprints of time.
- Colorization: Colorize B&W photos in seconds. The software will analyze the objects on your photo automatically. Then, you can quickly colorize B&W photos with a click. If you're not satisfied with auto mode, you can use easy manual coloring to set custom accents. Or you can tweak the result to make your picture look more natural: paint over the little details with a special coloring brush.
- Manual Editing Tools: For precise defect removal in deteriorated pictures, this photos restoration software also provides content-aware tools like the Healing Brush, Clone Stamp, and Patch. You can control the size of the healing brush, the feather, and its opacity. All these features can assist your agency in addressing complex restoration tasks, such as repairing damaged photos and restoring pictures ripped in half, ensuring the quality of the restored images meets the highest standards.
- Color Correction: If your old picture is already in color but looks faded or has a nasty cast, PhotoGlory can help you fix it. For starters, there is one-click auto correction that can give your photo a quick enhancement. Then there are intuitive HSL sliders that you can use to fine-tune colors in your image. Next come the pro-level Curves that are a bit more complicated tool, but can help you bring back lost juiciness and get rid of color cast. Finally, there are smart 3D LUT presets that can boost colors and give your pictures a distinct look.
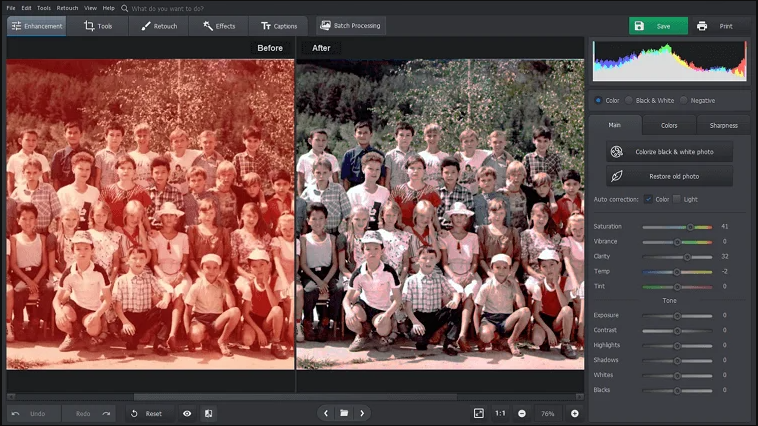
Worth Noting: A key point about PhotoGlory is that the Restore old photo function automatically reduce the image to less than 1MB.
Ready to try PhotoGlory? Here's a quick guide to get you started:
Step 1. Download and install this software on your computer.
Step 2. Run PhotoGlory and import your old photos.
Step 3. Under Enhancement tab, which is loacted in the left top corner, click the Restore old photo button and it will automatically start the restoration. This feature may not give your satisfied result, so we need to go further with some manual actions to make the result better.
Step 4. Switch to the Tool tab this time, choose the Crop feature to get rid of the damaged edges.
Step 5. Then head to the Retouch tab. There, we will mainly use three features, Healing Brush, Clone Stamp, and Patch. Which one will be chosen? It will highly depend on the size of area that you need to restore.
Step 6. After all adjustments finishes, you can export the processed old photos by clicking the Save button.
Method 2: How to Restore Old Photos Using PhotoDirector App
PhotoDirector also puts the power of AI-driven photo restoration right in your pocket, allowing you to breathe new life into old photos anytime, anywhere. It's like having a mini photo lab on your phone! And given that it's free to download for both iOS and Android users, it's an easy way to become a photo restoration pro in just moments.
Why PhotoDirector Stands Out
PhotoDirector isn't just another photo editing app; it's a comprehensive tool specifically designed for photo restoration. Here's what makes it special:
- AI-Powered Enhancement: PhotoDirector is a powerful AI-based photo editing software. The "AI Enhance" feature automatically upscales the image to improve its overall quality. This can make the subjects in the image look more crisp, enhance details, and even improve the lighting. This feature alone can work wonders on faded and blurry photos.
- Denoise and Deblur Tools: Got a grainy or blurry photo? PhotoDirector's denoise and deblur tools can help to clear things up. These tools are perfect for addressing common issues in old photos. With both tools, you can drag the slider to adjust the strength of the filter, then tap the checkmark when you're satisfied with the effect.
- AI Removal Tool: Creases, rips, scratches, dust, or discolored spots? No problem! With PhotoDirector's AI Removal tool, you can easily eliminate these flaws and blemishes. The AI will automatically remove the flaw and fill in the area, making the photo look completely flawless. Simply tap "Tools," select "AI Removal," then use the brush tool to select the area of the photo you want to remove.
- AI-Powered Retouching Features: PhotoDirector offers AI Face Reshape and AI Skin Tone features, which can virtually enhance and refine your facial details and instantly adjust and enhance skin tones in portraits.
- Easy to Use: PhotoDirector is an intuitive AI-powered photo editor that helps users create stunning images with hundreds of styles, effects, templates, and tools.
Ready to get started? Here's a step-by-step guide to restoring your old photos with PhotoDirector:
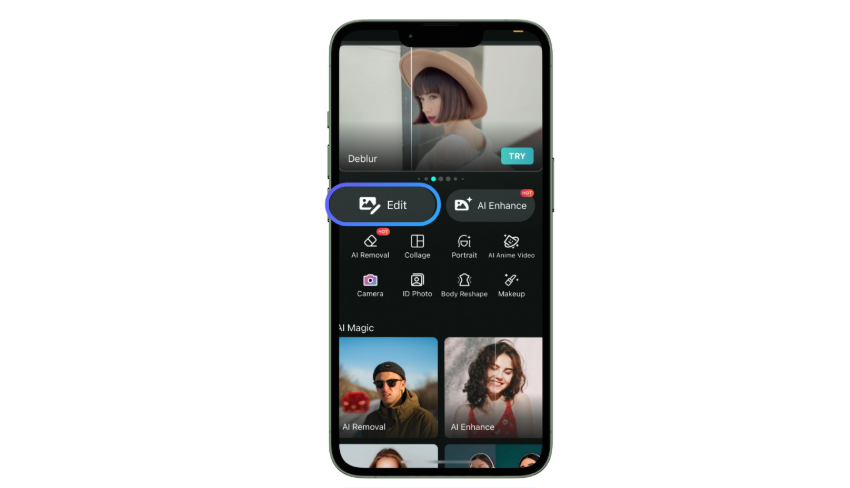
Step 1. Head to your phone's app marketplace and search for PhotoDirector. Download the app, then tap the PhotoDirector icon to start editing. The app is available on the App Store and the Google Play Store.
Step 2. On the main app screen, choose Edit. Then, search through your phone's gallery and choose the old photo you want to restore to open in PhotoDirector.
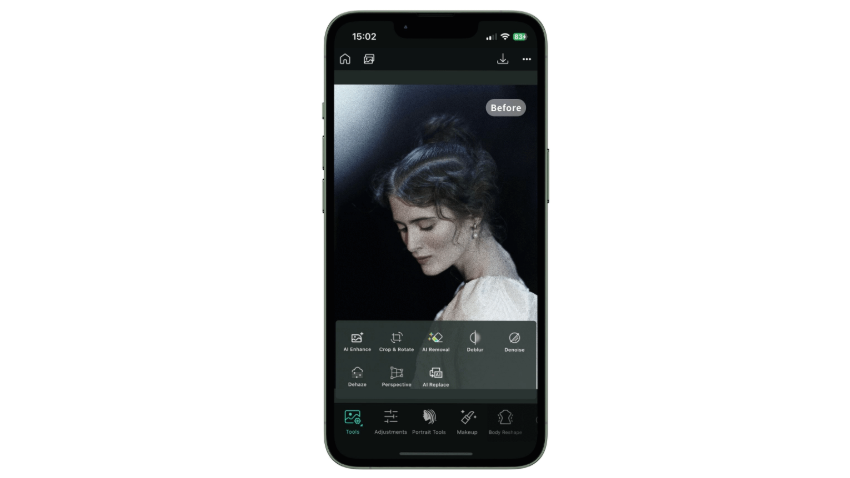
Step 3. From the PhotoDirector's home screen, tap "Tools." From there you can find several tools or features to restore your old photos, such as AI Enhance, Deblur, and Denoise. Try them one by one to see if the after-results meet your need.
Method 3: How to Restore Old Photos Online
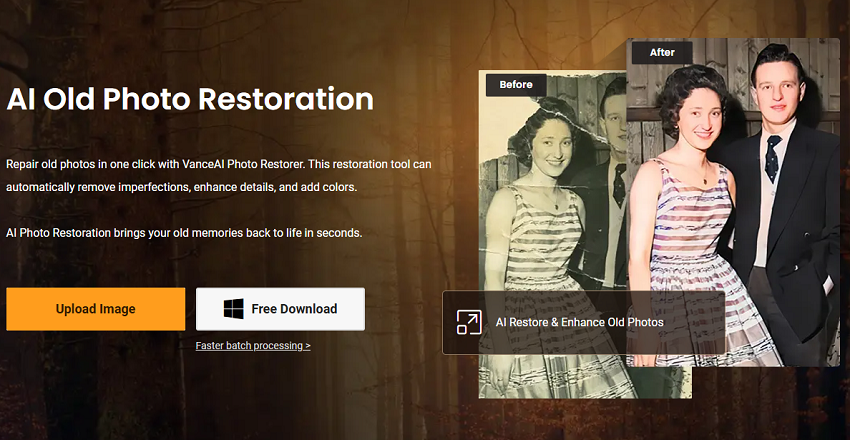
1. VanceAI AI Old Photo Restoration
As someone who's always looking for efficient online ways to get great results, I'm excited to introduce you to VanceAI AI Old Photo Restoration. If you're searching for a fully automated, AI-powered solution to breathe new life into your damaged old photos, this could be just the ticket. With just a few clicks, you can remove scratches, discoloration, and fading and help preserve the original photo's colors and details. It's designed to be user-friendly, even if you don't have any prior experience in image editing.
What Makes VanceAI AI Old Photo Restoration
- AI-Powered Restoration: This tool uses AI and Deep Learning to analyze your photos and automatically remove imperfections, enhance details, and restore colors.
- Automatic Scratch Removal: VanceAI Photo Restorer can automatically remove scratches, spots, and tears from damaged old photos.
- Face Enhancement: It can also detect and enhance human faces in damaged photos with AI Face Enhancement. Vance AI Photo restorer can auto repair images, as well as enhance faces and old photos.
- Ease of Use: Just drag and drop a photo and let the AI work its magic!
Here's how to restore your old photos with VanceAI AI Old Photo Restoration:
Step 1. Upload Your Image: The first step is go to VanceAI AI Old Photo Restoration website page. And once you're there, click on Upload Image.
Step 2. Start the Process: By default, VanceAI AI Old Photo Restoration will set two options: Fix Scratches/Creases/Spots and Improve Quality, into the auto mode. You can leave them as they are, and simply hit 'Start to Process' to let AI automatically remove scratches, tears and spots from old pictures as well as restore colors, and enhance face details.
You can also tick the manual modes to do it as you like.
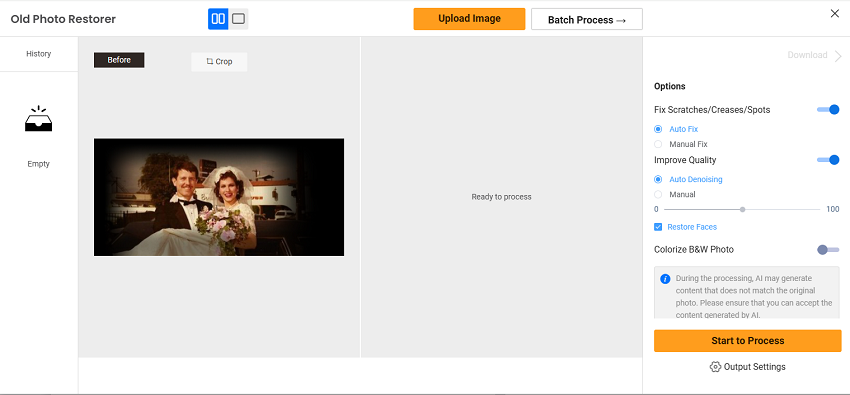
Step 3. Preview and Download: Preview the repaired old pictures and click 'Edit' for a better picture restoration. After that, click 'Download' to save the restored pictures for printing.
Tips and Considerations: Use manual adjustments for complex tasks: I've been working with its AI tools for three months and this photo restorer is definitely another handy tool that I can use to remove scratches from old photos. I look forward to uploading more photos to repair for my customers.
2. Picsart's AI Image Enhancer
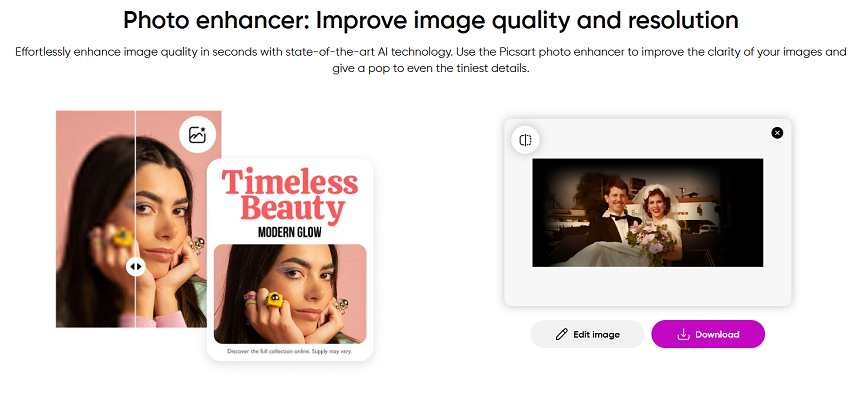
As someone who appreciates a blend of creativity and convenience, I am excited to explore Picsart's AI Image Enhancer Tool, an advanced both online and mobile solution using AI to repair old images within seconds. The advanced AI tools in Picsart can easily transform blurred and pixelated images into high-resolution photos, restoring the tiniest details to older photos.
With Picsart, you can relive precious memories and special moments, all while saving your family history in digital form. It also offers an advanced online solution using AI to repair old images within seconds. With Picsart's AI photo restore tool, you can convert old photos to new photos in just a few seconds to cherish your favorite memories.
What Picsart's AI Image Enhancer Tool Offers:
Picsart's AI-powered tool is designed to bring your old photos back to life with ease. Here's a closer look at its capabilities:
- AI Enhance: Easily increase your photo resolution for a sharper, higher-quality image. It uses a generative AI model to add pixels, remove or blur pixelated effects, and sharpen and restore faces in any image.
- AI-Powered Restoration: Save precious memories and heritage with the AI Photo Restorer. You can also use AI face generator to effortlessly generate faces with the help of AI.
- Image Upscale Tool: For an instant quality upgrade, you can also use the image upscale tool to bump up your pixel count for crisp image quality.
- Object Removal Tool: Need to remove unwanted spots from older pictures? Use the remove object tool to clean up your pictures for a fresh new look.
- Unblur Image: Quickly unblur photos for crisper, sharper images. It makes blurry pictures clearer, upload your photos to the AI Enhance tool for higher image resolution, improved clarity, and increased sharpness.
Here's a step-by-step guide to get you started (on the web):
Step 1. Open AI Image Enhance in your browser, and then, upload an old photo from your library to restore.
Step 2. In the photo editor interface, simply click the AI Enhance button to bring your old photos back to life.
Step 3. Preview your results. Check out your newly restored photo.
Step 4. Click the Export button and choose Download to save your new photo.
Method 4: How to Restore Old Photos Manually (Hands-On Approach)
Restoring old photos manually is a labor of love. It's perfect for those who enjoy a hands-on approach or have antique photos that require delicate handling. This method combines physical repair techniques with digital touch-ups, offering a comprehensive way to bring your photos back to life. Here's a detailed guide to help you through the process.
Step 1. Physical Repair Tools and Techniques
Before you can digitize and enhance your photo, you'll need to address any physical damage. Here's how to do it:
1. Using Archival Tape for Tears: Carefully align the torn edges of the photo on a flat surface. Place the acid-free archival tape (available at most craft stores) on the back of the photo to hold the tear together. Avoid using tape on the front, as it can leave a shiny residue. For larger tears, use multiple small pieces of tape instead of one long strip. This provides better support and flexibility.
2. Appyling Retouching Inks for Fading: Use a fine brush to carefully apply the retouching ink (available in art supply stores) to faded areas. Match the original colors as closely as possible. Start with light layers and build up gradually to avoid over-saturating the photo. Please practice first on a scrap piece of paper or a less important photo to get a feel for the ink and brush.
3. Cleaning the Surface: Gently wipe the photo to remove dust, mold, or fingerprints using a lint-free cloth and isopropyl alcohol (89%). For stubborn stains, lightly dampen the cloth with alcohol and carefully clean the affected area. Always test a small corner first to ensure the alcohol won't damage the photo.
Step 2. Digitizing the Photo
Once the physical repairs are complete, it's time to digitize the photo for further enhancements.
If you have read this post from the beginning, you must remember that we have covered this in the first part. If you still do no know how to do this digitizing job, you can go there for more details.
Method 5: How to Restore Old Photos by Hiring a Professional Service
Let's be honest: not every photo restoration project is a DIY job. Sometimes, the damage is too severe, or the photo is too precious to risk experimenting with. That's where professional restoration services come in. These experts have the skills, tools, and experience to handle even the most challenging projects, ensuring your photos are restored to their former glory.
There are certain situations where hiring a pro is the best (and sometimes only) option:
- Severe Damage: Think water damage, fire damage, or photos that are almost completely faded.
- Complex Colorization: Turning a black-and-white photo into a vibrant color image requires a keen eye for detail and historical accuracy.
- Priceless Heirlooms: If the photo holds significant sentimental or historical value, it's worth investing in professional care.
Here are some of the best professional photo restoration services available:
- Legacybox: Known for its affordable pricing ($25–$50 per photo) and high-quality results. They handle everything from minor touch-ups to complex restorations.
- ScanMyPhotos: Offers both restoration and digitization services, making it a one-stop shop for preserving your memories.
Conclusion
Restoring old photos isn't just about technical skills; it's an act of preserving your history. By reviving these images, you're safeguarding them for future generations and reconnecting with the stories that shape you.
So, what's your next step? Experiment, learn, and most importantly, enjoy the process. Dust off those albums, fire up your chosen tools, and start bringing your past to life. I'm excited to see the incredible memories you'll unearth.
You May Also Like
Brenda Peng is a seasoned editor at Digiarty Software who loves turning ordinary photos into extraordinary works of art. With years of experience behind the lens and in front of the computer, Brenda shares her passion for photography, image enhancement, and editing through easy-to-follow tutorials.
*This post draws inspirations from DeepSeek AI, and is reviewed for accuracy by our expert Abby Poole ![]()