Have you ever wanted to make your text stand out in an image? Whether you're designing a logo, creating a poster, or working on social media graphics, adding an outline to text in Photoshop is a great way to enhance visibility and style. But what if you struggle to get that perfect outline effect? You're not alone—many Photoshop users find it tricky to outline text correctly.
In this guide, we'll walk you through how to outline text in Photoshop using different methods. We'll also discuss some of Photoshop’s limitations and introduce an easier tool – an AI image enhancer from Aiarty that can outline text with or without fill easily and enhance the text images with better quality.
Do You Know These Photoshop’s Limitations in Outlining Text?
- Complicated Steps: Requires multiple layers and effects to achieve a clean outline.
- Limited Flexibility: Once rasterized, the text is no longer editable.
Frustrated with These Limitations? Let’s Explore a 1-Click Way
If you’re tired of Photoshop’s complex layers, Aiarty Image Enhancer can outline text with or without fill much more easily. Just add your image, turn on outline function, and get a perfect result within seconds. Also, it can upscale your images up to 32K without pixelation after zooming in.
How to Put an Outline on Text in Photoshop (3 Ways)
Below, I will show you three ways to outline text in Photoshop. I’m using Photoshop CC 2018, but these methods are compatible with the latest versions of Photoshop, and any slight differences in the interface should be perfectly fine.
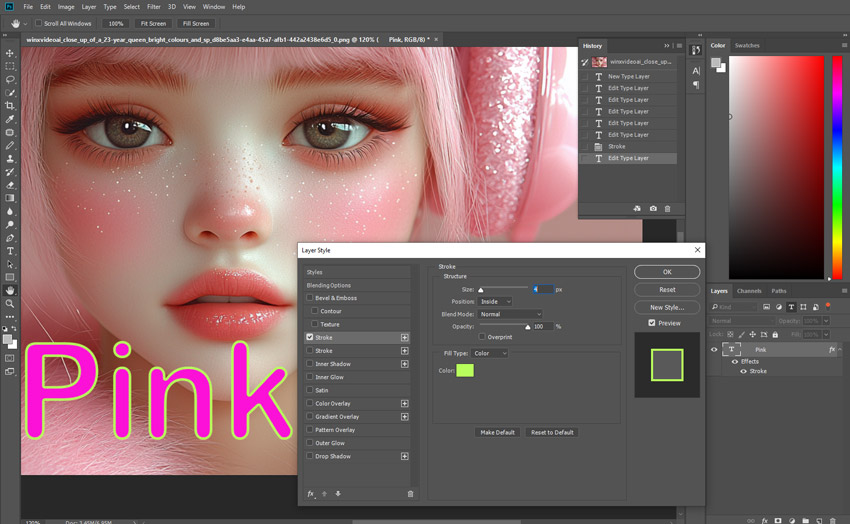
Way 1. Outline Text in Photoshop Using Stroke Layer Style
Best for: quick and editable outlines.
The Stroke Layer Style in Photoshop is a non-destructive, fully customizable way to convert text to outline, making it ideal for logos, social media graphics, web design, and print materials. It scales with text, supports multiple strokes for creative effects, and allows adjustments to color, opacity, and position without losing quality. This technique can create bold outlines, double-stroke typography, gradient effects, or even hollow text, enhancing visibility and design impact effortlessly.
Step 1. Open Photoshop and add your image or create a new document.
Step 2. Select the Text Tool (T) and type your desired text.
Step 3. Adjust the text size, style, color, shape, etc.
Step 4. In the Layers Panel, right-click on the text layer and select Blending Options.
Step 5. Click on Stroke and adjust the settings:
- Size: Defines the thickness of the outline.
- Position: Set to "Outside" for a clear effect.
- Color: Pick any color you prefer.
Step 6. If you want your text have an outline with no fill, in the same Blending Options window, set Fill Opacity to 0% under the "Advanced Blending" section.
Step 7. Click OK to apply.
- Fully editable text.
- Quick and easy.
- No need to rasterize.
- Struggles with complex edges.
- No batch processing.
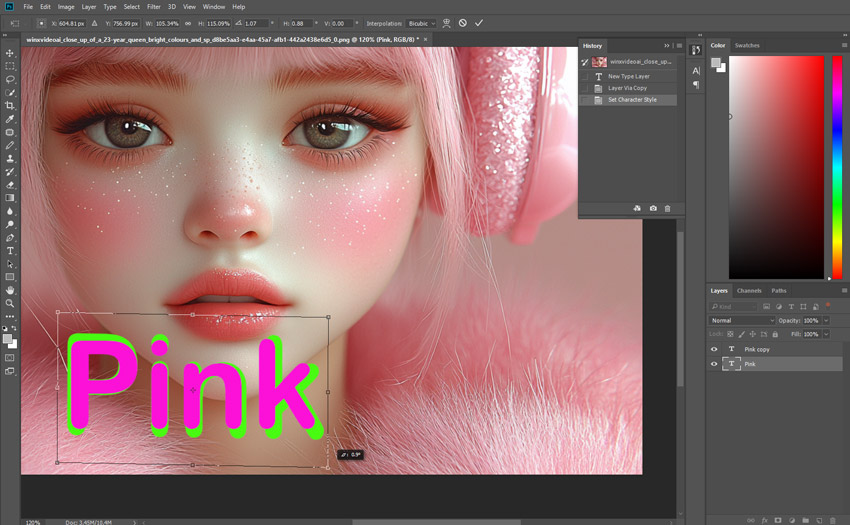
Way 2. Add an Outline to Text in Photoshop Using Multiple Text Layers
Best for: multi-colored outlines.
Adding an outline to text using multiple text layers in Photoshop provides greater flexibility and control than the Stroke Layer Style. This method allows for multi-layered typography, perfect for bold titles, neon effects, 3D depth, and retro designs. Each outline can have different colors, opacities, gradients, or offsets, enabling creative effects like double strokes, glowing text, and extruded shadows for eye-catching visuals.
Step 1. Open Photoshop and add your image or create a new document.
Step 2. Select the Text Tool (T) and type your desired text.
Step 3. Duplicate your text layer (Ctrl+J / Cmd+J).
Step 4. Change the color of the bottom layer to your desired outline color.
Step 5. Use Ctrl+T (Cmd+T) and slightly increase the size of the bottom text.
Step 6. Repeat this process for multiple layers if you want a stacked outline effect.
- Customizable multi-layered outlines.
- No rasterization required.
- More manual adjustments needed.
- Can be tedious for complex designs.
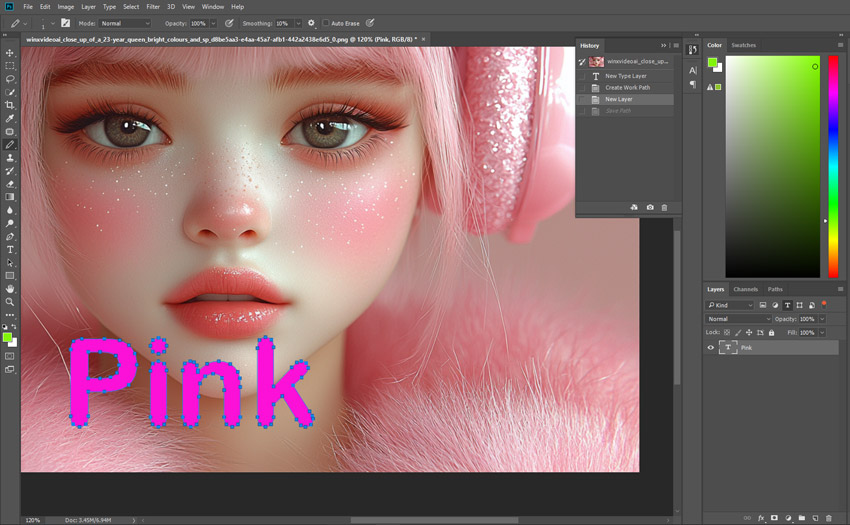
Way 3. Make a Text Outline in Photoshop Using the Path and Stroke Method
Best for: precise vector outlines.
The Path and Stroke method in Photoshop creates precise, scalable, and fully customizable text outlines by converting text into a vector path. Ideal for logos, print design, and artistic typography, this technique ensures sharp edges at any size and allows for custom brush strokes, hand-drawn effects, and fine-tuned letter adjustments, making it perfect for decorative and high-resolution designs.
Step 1. Open Photoshop and add your image or create a new document.
Step 2. Create a new text layer and type your text.
Step 3. Right-click the text layer and select Create Work Path.
Step 4. Select the Brush Tool (B) and adjust its size.
Step 5. Choose a color and create a new blank layer.
Step 6. Go to Paths Panel, right-click on "Work Path", and choose Stroke Path.
Step 7. Select "Brush" as the tool and click OK, and then Photoshop will convert text to outline for you.
- Smooth, precise outlines.
- Works well with vector designs.
- Requires more steps.
- Steep learning curve and not beginner-friendly.
Outlining text in Photoshop can be done in multiple ways, but each method has its pros and cons. If you want quick and editable outlines, the Stroke Layer Style is your best bet. For multi-layered outlines, duplicating text layers works well. If vector precision is your priority, the Path and Stroke method is ideal.
However, all the Photoshop outline text ways are quite complicated to a newbie. If you are tired of Photoshop’s complicated steps, you can try an easier way – Aiarty Image Enhancer.
Aiarty - 1-Click Text Outline & Advanced Image Enhancement
Aiarty Image Enhancer lets you convert text to outline with just one click—no layers, no effects, just instant, professional results. But that’s not all! As a powerful AI-driven image enhancer, Aiarty can increase image resolution, enhance quality, and restore fine details effortlessly. Whether your text image is blurry or noisy, Aiarty’s advanced sharpening, deblurring, and denoising technology ensure sharp text edges and crystal-clear images.
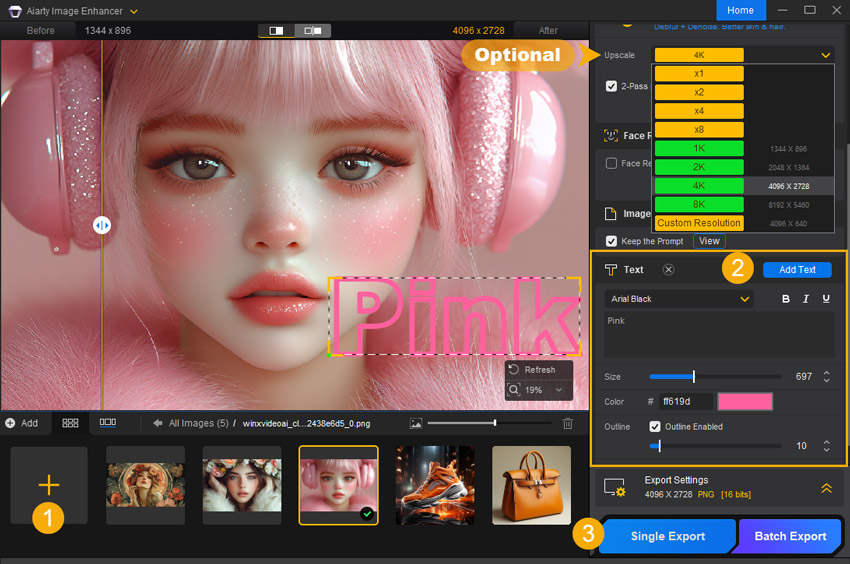
How to outline texts in Aiarty Image Enhancer:
Step 1. Download Aiarty Image Enhancer, install and launch it.
Step 2. Drag and drop your image(s) into the working panel, and wait for inference.
Step 3. Optionally, you can upscale your image to a higher resolution to get a better quality.
Step 4. Click on "Add Text", type your texts, adjust the size and choose a color. Then, tick the "Outline Enabled" box to outline your texts without fill.
Step 5. When everything is OK, hit the "Export" button.
Try Aiarty Image Enhancer today to convert text to outline and skip the Photoshop hassle!
To sum up, outlining text in Photoshop offers various methods to suit different needs. The Stroke Layer Style is the fastest for clean outlines, while multiple text layers allow for multi-stroke, neon, or 3D effects. The Path and Stroke method provides sharp, scalable outlines, ideal for logos and artistic typography. For an even easier option, Aiarty Image Enhancer's 1-click text outline feature lets you quickly apply professional text outlines with just one click, saving time while achieving high-quality results.
You May Also Like
This post was written by Brenda Peng who is a seasoned editor at Digiarty Software who loves turning ordinary photos into extraordinary works of art. With AI assistance for brainstorming and drafting, the post is reviewed for accuracy by our expert Abby Poole for her expertise in this field.