Summary: Editing car photos is crucial for creating stunning visuals that grab attention and drive engagement. However, many struggle with complex tools and time-consuming processes, especially when removing or replacing backgrounds. With Aiarty Image Matting, an advanced AI background remover, you can effortlessly cut out cars and swap backgrounds, transforming ordinary photos into masterpieces.
Picture this: You snap a photo of your car under golden-hour sunlight, only to realize later the background is cluttered with trash bins and the paint looks dull. Sound familiar? You're not alone. According to AutoTrader, high-quality car photos boost buyer engagement by 70%, whether you're selling a car, building a portfolio, or just flexing on Instagram. But turning a mediocre snapshot into a showroom-worthy image doesn't require magic.
A stunning car photo can make all the difference. But how do you go from a decent snapshot to a jaw-dropping masterpiece? That's where car photo editing comes in. With the right tools and techniques, you can transform dull, lifeless images into vibrant, professional-grade photos. Let's dive in!
What If You're Not Satisfied with the Car Photos' Background?
 The Best Solution: Use Aiarty Image Matting for Background Removal
Aiarty Image Matting is the ultimate solution for removing backgrounds from car photos and replace with another background. Its AI-powered technology automatically detects and cuts out cars with precision, making it perfect for creating clean, professional images for sales, portfolios, or social media. Say goodbye to tedious manual edits and hello to stunning results in seconds!
Below we will show you the before and after effects of using Aiarty Image Matting to replace the background of a car photo. In addition to replacing the background, Aiarty Image Matting was used to crop and adjust the position of the subject. You can drag the slider left and right to see the difference.
Step-by-Step Car Photo Editing Tutorial
Shooting Tips for Easier Edits
- Shoot in RAW: Unlike JPEGs, RAW files retain tons of detail for exposure adjustments.
- Use a Neutral Background: A plain wall or empty parking lot minimizes post-processing headaches.
- Avoid Harsh Shadows: Cloudy days = soft, even lighting. No fancy equipment is needed!
Now that you've got your tools ready and your photos prepped, it's time to dive into the editing process. Whether you're a beginner or a seasoned pro, these step-by-step instructions will help you transform your car photos into stunning visuals. Let's get started!
Step 1: Adjust Lighting & Exposure
Fix Over/Underexposed Areas
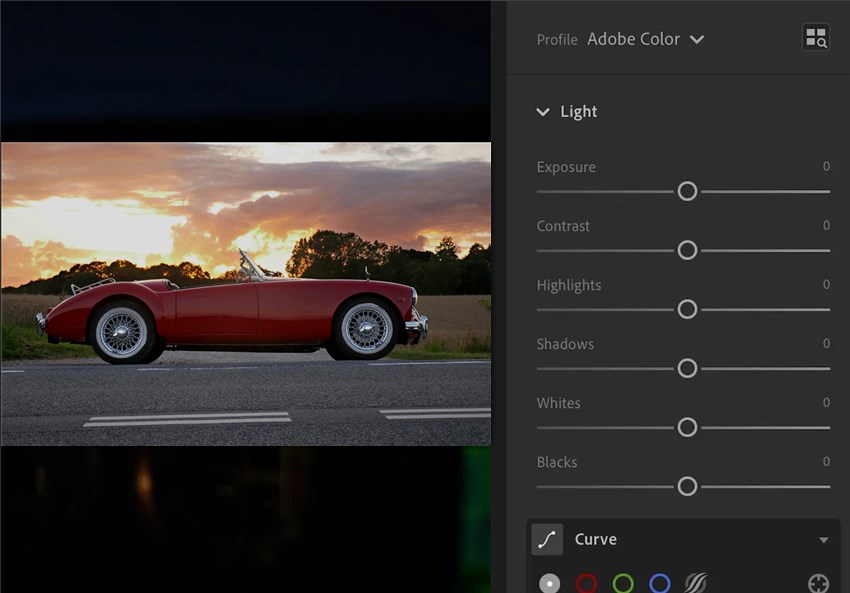
The first step to a great car photo is getting the lighting right. If your image is too dark or too bright, you'll lose important details. Open your photo in Lightroom and use the histogram to balance shadows and highlights. For example, if the wheel arches are too dark, slide the Shadows slider to the right to reveal hidden details. If the headlights are blown out, pull back the Highlights slider to recover some of that lost information.
Enhance Natural Highlights
Once the exposure is balanced, it's time to make the car's curves and contours pop. In Photoshop, use the Dodge & Burn tools to selectively brighten (dodge) and darken (burn) areas. For instance, gently dodge the hood's reflection to make it shine, and burn the edges to add depth.
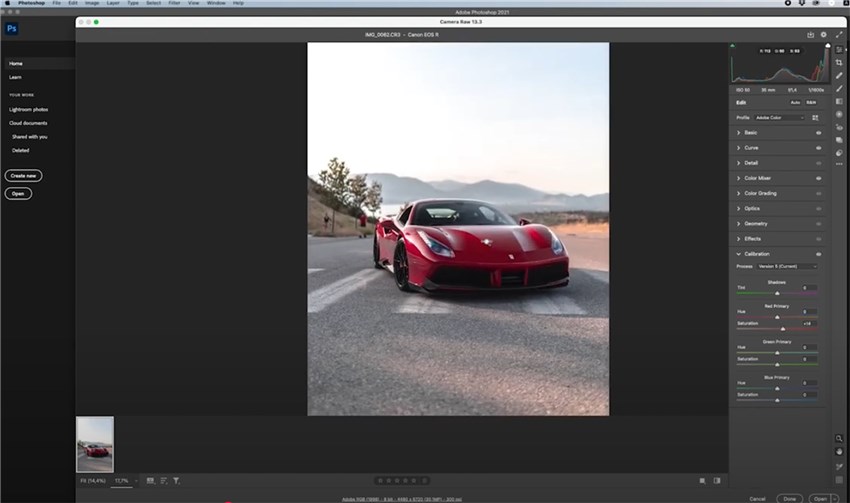
Step 2: Color Correction & Grading
Neutralize Unwanted Tones
Reflections can introduce unwanted color casts—like green from grass or blue from the sky. In Lightroom, use the White Balance tool to neutralize these tones. Then, head to the HSL sliders to fine-tune the colors. For metallic paint, adjust the Luminance slider to make the finish sparkle.
Make Colors Pop
Now it's time to make the car's paint stand out. Apply automotive-specific Lightroom presets to give your photo a polished look. Boost the Vibrancy slider slightly to enhance the colors, but be careful not to overdo it—especially with reds, which can quickly look unnatural.

Step 3: Enhance Car Details
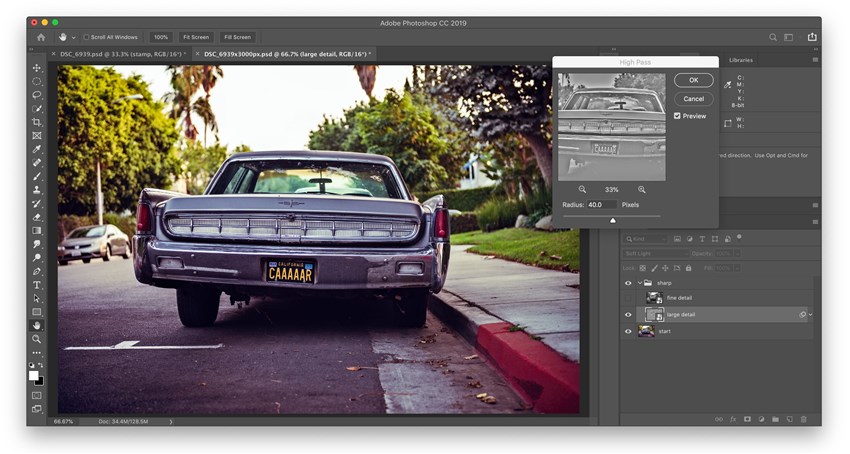
Sharpen Wheels & Grilles
The devil is in the details, and nothing says “pro edit” like sharp, well-defined features. In Photoshop, use the Smart Sharpen tool to bring out the texture in tire treads and the shine in chrome accents. Be subtle—over-sharpening can make the image look artificial.
Step 1. Zoom the document window to 100% to get an accurate view of the sharpening. Choose Filter > Sharpen > Smart Sharpen. Set the controls in the Sharpen tabs:
Step 2. Remove Sets the sharpening algorithm used to sharpen the image.
- Gaussian Blur is the method used by the Unsharp Mask filter.
- Lens Blur detects the edges and detail in an image, and provides finer sharpening of detail and reduced sharpening halos.
- Motion Blur attempts to reduce the effects of blur due to camera or subject movement. Set the Angle control if you choose Motion Blur.
Step 3. Adjust sharpening of dark and light areas using in the Shadow and Highlight tabs. (Click the Advanced button to display the tabs). Click OK.
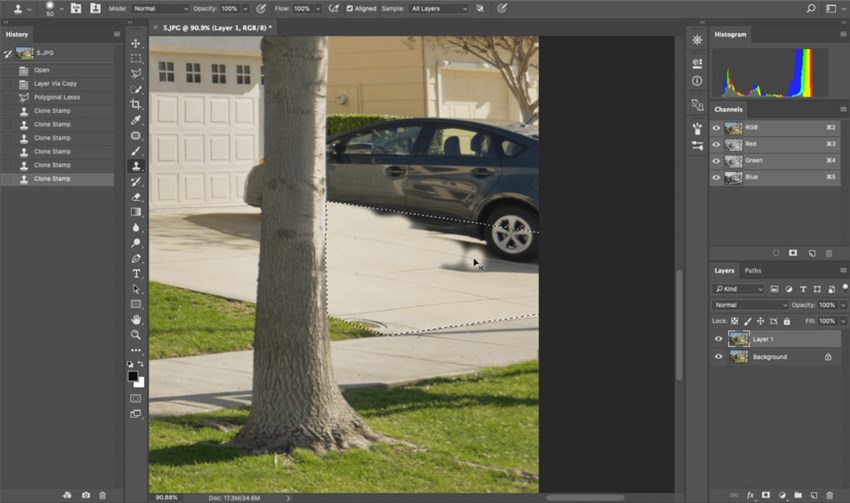
Clean Up Interiors
If you're shooting the car's interior, dust and smudges can ruin the shot. Use the Clone Stamp tool to remove these imperfections. For example, clean up the dashboard by cloning a clean area over the dusty spots.
- Select the Clone Stamp tool. Use the Options bar to customize tool settings, like Size, Hardness, and Blending mode, to get the effect you need.
- Press the Alt key (Windows) or the Option key (macOS) and click the area of the image that you want to copy. This sets a starting point from which the tool will begin copying.
- Release the Alt or Option key and drag over the new area where you want to place your copied content.
- The Clone Stamp tool will copy content from the source and paint it into the new area.
Step 4: Remove Unwanted Elements
Remove Reflections: Reflections can be distracting, especially if they show you or your camera in the shot. Use Photoshop's Clone Stamp or Healing Brush to remove these reflections. For example, if there's a glare on the windshield, clone a clean section of glass over it.
1. Select the Healing Brush tool from the toolbar. In the tool options bar, click the brush sample and set the brush options in the pop‑up panel — Mode, Source, Aligned, Sample, and Diffusion.
2. To set the source sampling area, position the pointer over an area in your image and Alt-click (Win) or Option-click (Mac).
3. In the Clone Source panel, click a clone source button to select the sampled source you want. Drag anywhere in the image. The sampled pixels are blended with the existing pixels each time you release the mouse button.
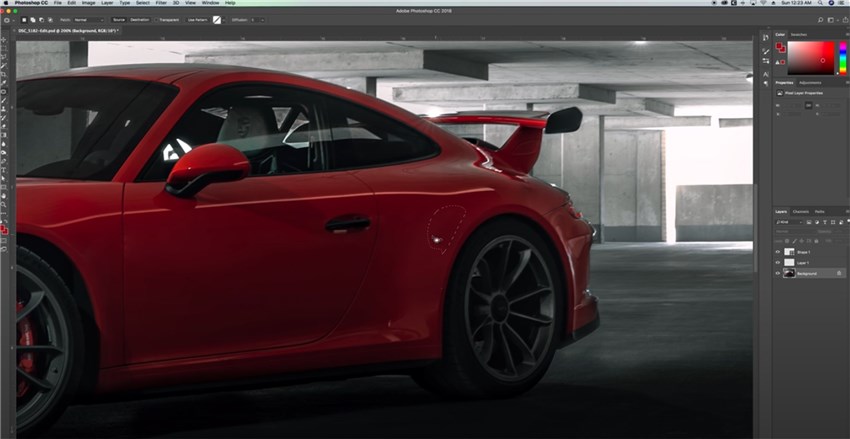
Clean Up the Background: A cluttered background can take attention away from the car. Use the Healing Brush tool to remove debris, power lines, or other distractions.
Tutorial: Here's how to use the Healing Brush effectively: Select the tool, adjust the brush size, and click on the area you want to fix. Photoshop will blend the surrounding pixels seamlessly.
Step 5: Replace the Background with Aiarty Image Matting
Sometimes, the original background just doesn't work. That's where
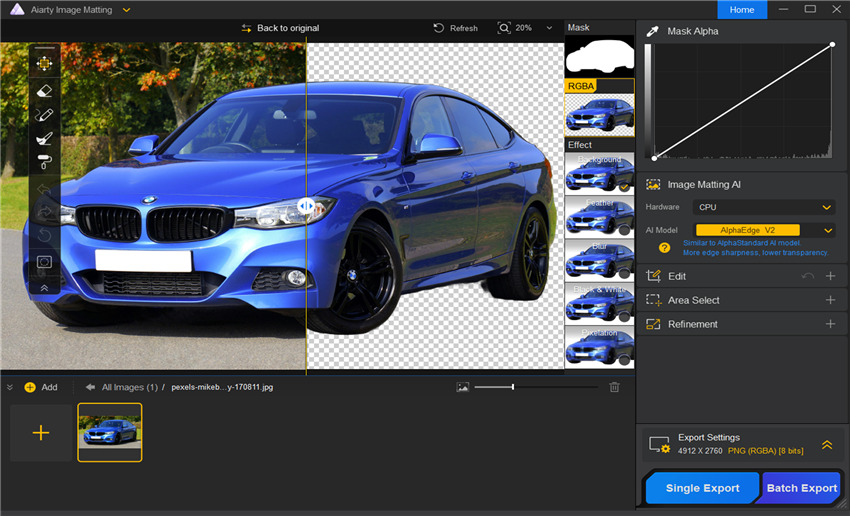
Aiarty Image Matting comes in. Aiarty's AI-powered engine will automatically detect the car's edges, making it easy to cut out the vehicle. No need for tedious manual selections!
Aiarty uses advanced AI algorithms to accurately detect and separate your subject from the background, even with complex edges like hair, fur, or intricate details. It handles challenging scenarios, such as translucent objects or fine edges, with exceptional accuracy.
With just a single click, you can remove the existing background, leaving your subject perfectly isolated. This feature is ideal for beginners and professionals alike, as it eliminates the need for manual masking or tedious selections.
Replace the background with a solid color, gradient, or any image of your choice. Aiarty offers a library of pre-designed backgrounds, or you can upload your own for complete creative control.
Step 1. Download and install Aiarty Image Matting. Drag and drop car photos, up to 3000+ images simultaneously. Choose an AI model based on your source images.
Step 2. Select the subject (if needed), and click "Start." Use an Eraser, Brush, Dodge, and Burn for further refinements.
Step 3. Tick on the “Background” under the Effects. You have the option to select a solid color, create a gradient, or import a custom background image to seamlessly integrate with your car image.
Step 4. Once happy with the results, click "Single Export" or "Batch Export" to export the car photos.
Step 6: Enhance Car Details
Go back to Photoshop and use the Dodge & Burn tools to add depth and dimension. Highlight the wheels, headlights, and other key areas to make them stand out.
Finally, sharpen the car's logos, grilles, and other details to give the image a crisp, professional finish.
Remove Noise for a Cleaner Look: If your photo has grain or noise—especially in low-light shots—use an AI denoising tool like Aiarty Image Enhancer to clean up the image. This ensures a smoother, more polished final result.
Step 7: Export for Different Platforms
For Instagram, export your image at 1080px width with an sRGB color profile. This ensures your photo looks vibrant on mobile screens.
Print and High-Resolution Needs
If you're printing your photo or need a higher resolution, consider using an AI image upscaler like Aiarty's Image Enhancer. This tool can increase your image's DPI to 300 or higher, making it perfect for large-format prints or professional presentations. Upscaling also enhances details, ensuring your car photos look sharp and polished, even at larger sizes.
Final Thoughts
Editing car photos doesn't have to be intimidating. With the right tools and techniques, you can create stunning images that turn heads. Whether you're a beginner or a pro, tools like Aiarty Image Matting can save you time and effort. So, what are you waiting for? Grab your photos, fire up your editing software, and start transforming your car images today. And don't forget to share your before-and-after results—we'd love to see what you create!
This post was written by Brenda Peng who is a seasoned editor at Digiarty Software who loves turning ordinary photos into extraordinary works of art. With AI assistance for brainstorming and drafting, the post is reviewed for accuracy by our expert Abby Poole for her expertise in this field.