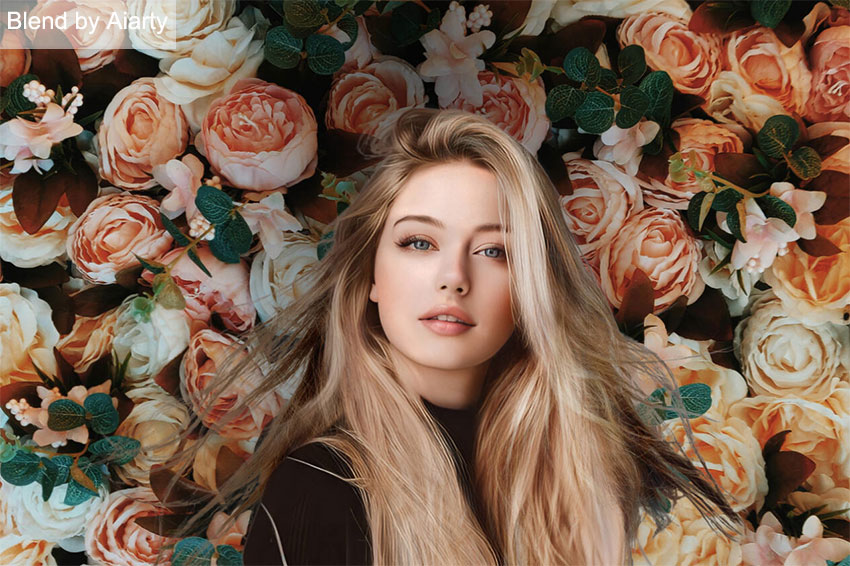
How to Blend Two Images Together Naturally: 3 Easy Ways for Perfect Blends
Want to create eye-catching visuals that truly stand out? One of the most powerful and versatile techniques in image editing is blending two images together. Imagine seamlessly merging a portrait into a stunning landscape, creating surreal double exposure effects, or crafting unique social media graphics by combining different elements into a cohesive scene. Image blending opens up a world of creative possibilities, allowing you to make your visuals more dynamic, artistic, and impactful.
But image blending can sometimes seem tricky, especially for beginners. You might worry about creating unnatural-looking transitions, jagged edges where images meet, or colors that just don't quite match up. Achieving that seamless, professional blended look can feel like a challenge.
The good news is: that blending images beautifully doesn't have to be complicated! With the right methods and tools, anyone can master the art of image blending and create stunning visual effects. This guide will walk you through 3 easy-to-follow methods to blend two images together naturally. But, before diving into these simple methods, let's identify some of the common frustrations people experience when trying to combine two pictures together.
Tricky Challenges When Blending Pictures – Do Any of These Sound Familiar?
- Difficult to blend selectively parts of two images together.
- Struggle with harsh lines and jagged edges where your images are supposed to blend.
- Have an obvious "Pasted-On" look with no seamless transition.
- Get an unrealistic and artificial-looking composite where the different parts don't quite belong together.
Forget these blending headaches! Blending background with foreground naturally is now easier than you think.
Aiarty Image Matting offers a surprisingly intuitive and powerful way to blend images through its unique AI-powered background removal and replacement features. It simplifies the process of creating seamless composites and artistic image blends, even for beginners.
Get Aiarty Image Matting and blend images with seamless precision:
How to Blend Two Images Together in 3 Methods
Creating stunning blended images demands creativity and the right techniques. A key element of impactful visual design is the seamless and artistic merging of different photos. Whether you aim to create dreamy double exposures, realistic composites, or eye-catching graphics, mastering image blending is essential. For achieving perfect image blends, you need methods that offer both ease of use and creative control. Below, we'll walk you through 3 methods to help you achieve beautiful and professional image blends.
Method 1. Blend Two Images Together with Aiarty Image Matting
While renowned for its background removal prowess, Aiarty Image Matting also excels at effortless image blending, thanks to its AI-powered precision and background replacement features. Its intelligent algorithms accurately isolate various elements – backgrounds, foreground subjects, human faces, entire human figures, clothing, or accessories. Beyond automated detection, you can also manually select specific areas or fine-tune AI-generated selections. This precision ensures you can selectively blend two images exactly as envisioned.
Furthermore, with its support for alpha channels and alpha mask adjustment features, Aiarty enables seamless image blending, eliminating any "pasted-on" appearance. Best of all, Aiarty achieves impressive blended images in mere seconds, often with just a single click, saving you countless hours of tedious manual adjustments and delivering professional-looking results with effortless ease.
Key Features for Effortless Image Blending:
- Accurately isolates foreground subjects for clean and seamless blending.
- Achieves smooth and believable transitions between blended images.
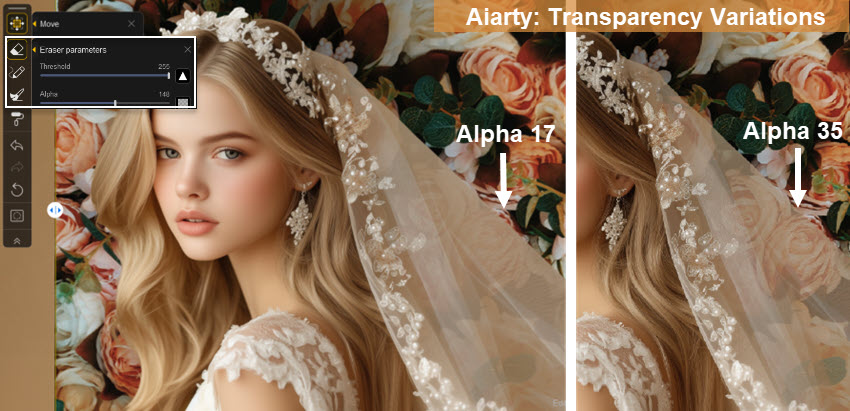
- Precise control over transparency levels, ideal for layered compositions.
- Keep complex features in lace, tulle, glass, window, and other semi-transparent objects.
- 4K quality enhancement with optimization in sharpness, contrast, and color balance.
Download Aiarty Image Matting to create effortless image blends with AI precision!
How to Blend Two Images Together with Aiarty Image Matting
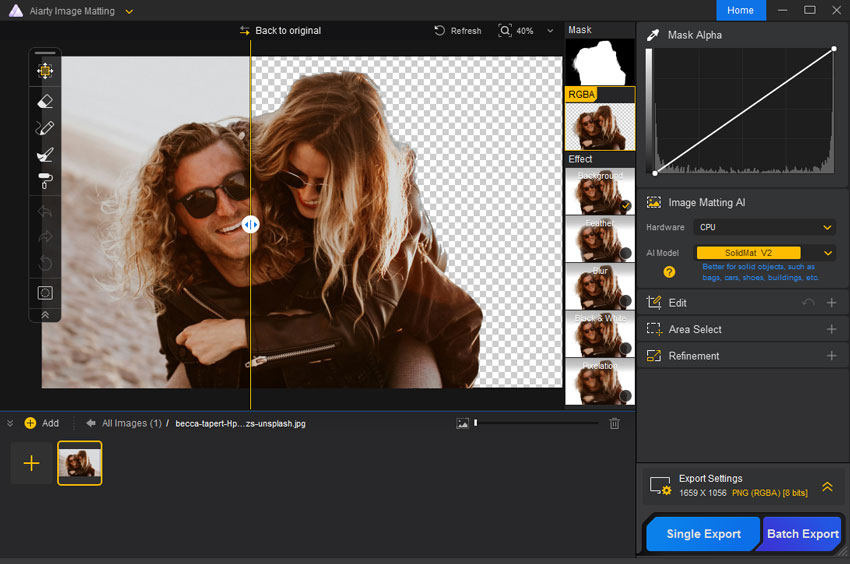
Step 1. Import Your Image
Launch Aiarty Image Matting on your computer. Click the + Add button and select your foreground image file. Batch processing is supported for multiple images.
Step 2. Choose the AI Model
- AlphaStandard V2: Ideal for semi-transparent and transparent elements like glass, sheer fabrics, or wedding dresses; also excels with hair and fur.
- AlphaEdge V2: Choose for sharper edges and less transparency, particularly well-suited for silhouette images, anime, and tattoos.
- EdgeClear V2: Best for images with solid, non-transparent objects with intricate details, for example, vehicles, furniture, and birds.
- SolidMat V2: Great for pictures of buildings, gadgets like phones, clothing items, and books – anything where you want super clean, defined edges.
Click Start and Aiarty Image Matting's intelligent AI will then automatically analyze your image and precisely remove the background, leaving your foreground subject ready for blending.
Tips:
Aiarty Image Matting offers flexible selection options to ensure perfect subject isolation. While the AI automatically detects and selects the background, you have additional control:
- Manual Selection: For intricate selections or specific areas, you can manually select the precise regions you want to extract from your image.
- Auto Detect: Utilize the Auto Detect feature to have Aiarty intelligently identify and isolate objects within your image, further refining your selection beyond just the background.
These options provide flexibility and control over the selection process, allowing you to tailor the isolation to your specific blending needs.
Step 3. Change Background to Blend Images Together
Go to the Effects section, tick Background, select Image Background, and click + to import your second image as the new background. Aiarty Image Matting will seamlessly blend the images.
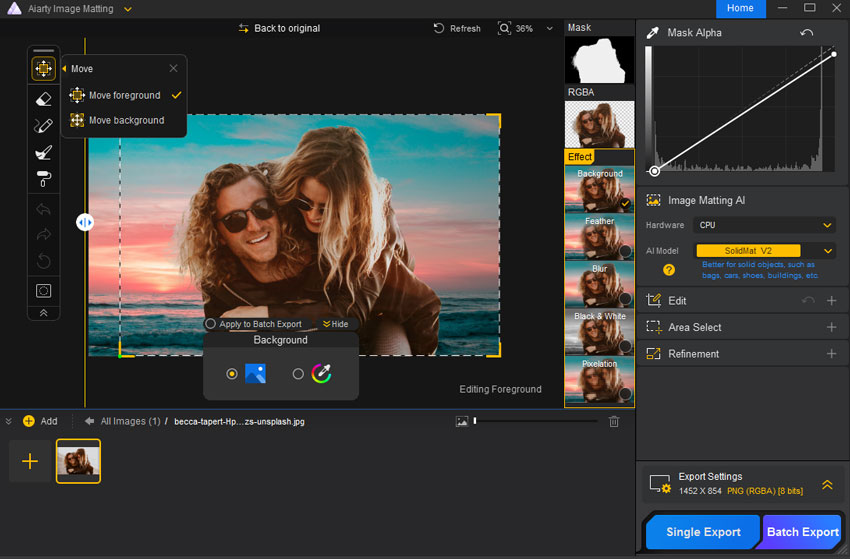
Step 4. (Optional) Refine Blend for a Better Look
You have many tools to make the blended image look better. For example,
- To enhance the overall cohesion of your image, try using the Feather effect to create a smoother transition between the foreground and background.
- Fine tune the alpha curve to precisely control the transparency and blending between the foreground and background images. This helps achieve a truly harmonious visual integration.
Step 5. Export Your Blended Image
Expand the Export Settings section to configure output format, quality, and folder path. Click Single Export or Batch Export to save your blended image.
Method 2. Blend Two Pictures with Adobe Photoshop
For users undertaking highly complex creative image design, involving intricate combinations of text, multiple images, diverse shapes, and advanced adjustments, Adobe Photoshop remains an indispensable tool and the industry standard. When your image blending project extends beyond simple two-image merges and requires sophisticated layering, typography, vector graphics integration, and granular control over every design element, Photoshop's wide range of image editing features set becomes essential.
How to Blend Two Pictures with Adobe Photoshop
Step 1. Before blending images with Photoshop, purchase an Adobe Photoshop subscription and launch the software. Once Photoshop is open, import your two images into the same document as separate layers.
Step 2. Go to File > Open to open your first image, and then go to File > Place Embedded to import your second image as a new layer on top of the first. This layering is fundamental to Photoshop blending.
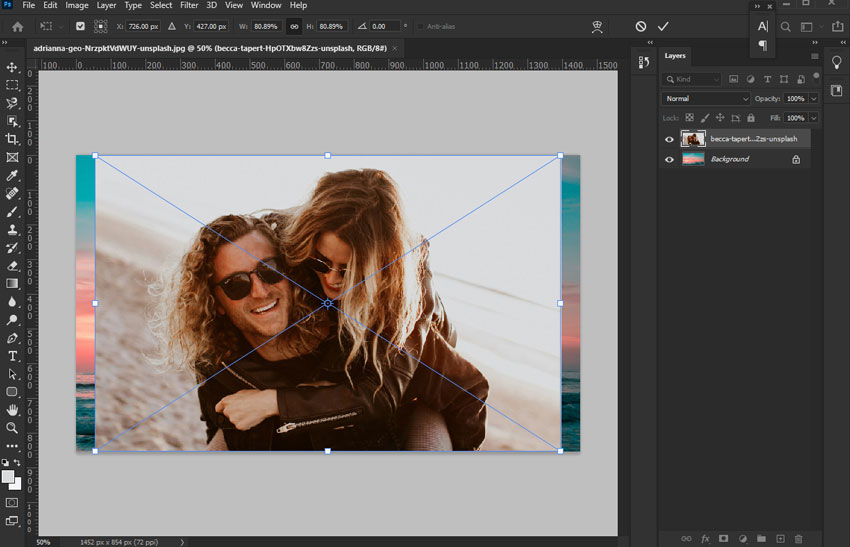
Step 3. Drag the image around in the preview to adjust its position. You can also drag the corners to adjust their scale to match with the other image.
Step 4. In the Layers panel, select the top image layer. Click the Add Layer Mask icon at the bottom of the Layers panel. This adds a white layer mask to your top image layer.
Step 5. Select the Gradient Tool from the toolbar. Choose a proper preset gradient fill. Click and drag across the area where you want to blend the two images together. Dragging the gradient tool across the layer mask will create a smooth transition area, making the top image gradually fade into the image below.
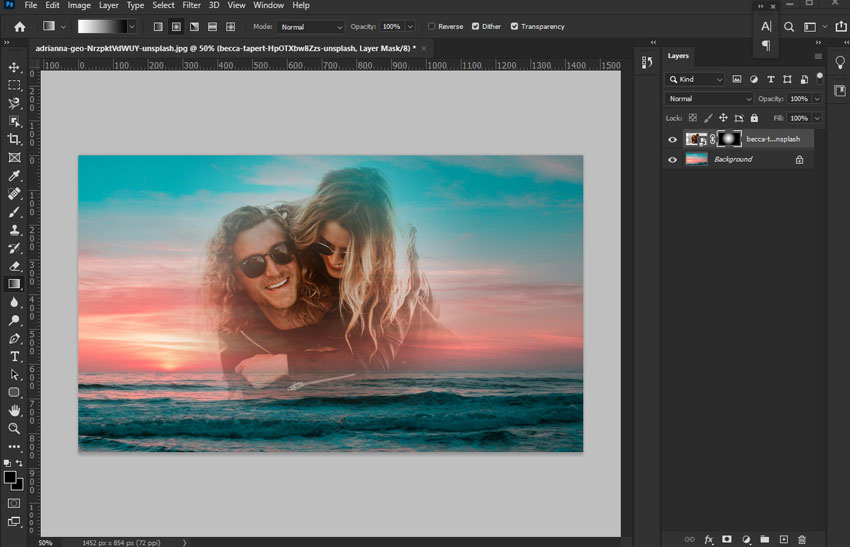
In my case, I choose Radial Gradient, so I can make the shades from the starting point to the ending point in a circular pattern, you can experiment with different gradient lengths and directions for varied blending effects.
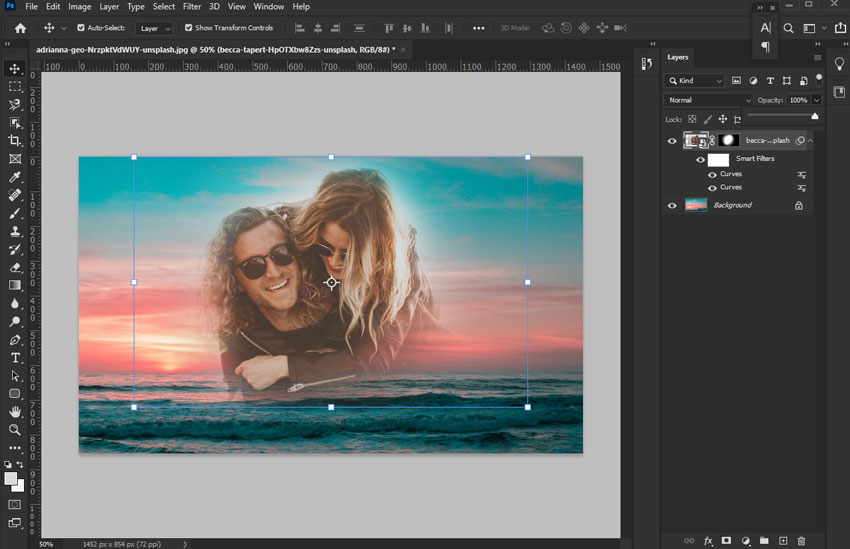
Step 6. If needed, you can add the blend mode. In the Layers panel, with the top layer still selected, look for the Blend Mode dropdown menu. Click the dropdown and experiment with different blend modes like Multiply and Darken. Each blend mode interacts differently with the layers below, creating a wide range of blending styles and color effects.
Step 7. For more precise control over the blended area, use the Brush Tool on the layer mask. Paint with black on the layer mask to hide more of the top image and paint with white to reveal more of the top image. Use a soft brush for gradual, feathered edges in your blend.
Step 8. For a more subtle blend, you can adjust the opacity of the top layer. In the Layers panel, with the top layer selected, adjust the Opacity slider to reduce the top layer's opacity, allowing the bottom layer to show through more transparently.
Step 9. To create a more harmonious and realistic blend, use Adjustment Layers to match the colors and tones of the two images. Click the Create new fill or adjustment layer icon at the bottom of the Layers panel and choose adjustment layers like Curves, Levels, Color Balance, or Hue/Saturation.
Step 10. Go to File > Export > Export As... Choose your desired file format (JPEG, PNG, TIFF, etc.) and adjust export settings as needed. Click Export to save your final Photoshop-blended image.
Method 3. Blend Two Pictures Togeather Online with Canva
For users seeking a simple online solution to blend two images without complex software or technical expertise, Canva provides a Blend Image feature. While convenient, Canva's blending capabilities are somewhat basic and might not fully achieve your desired results.
Specifically, the Blend Image mode has limitations; for instance, it doesn't allow for image repositioning or fundamental edits like cropping and color correction within the blending interface itself. Therefore, if you are not satisfied with the initial blend, making further refinements directly within the Blend Image tool is not possible.
How to Blend Two Pictures Online with Canva
Step 1. Open your web browser and navigate to the Canva website (www.canva.com). Log in to your Canva account or sign up for free if you don't have one.
Step 2. Once logged in, click the Create a design button on the Canva homepage. Choose a design size that suits your needs – the size isn't critical for basic image blending, but choose something relevant to your intended use.
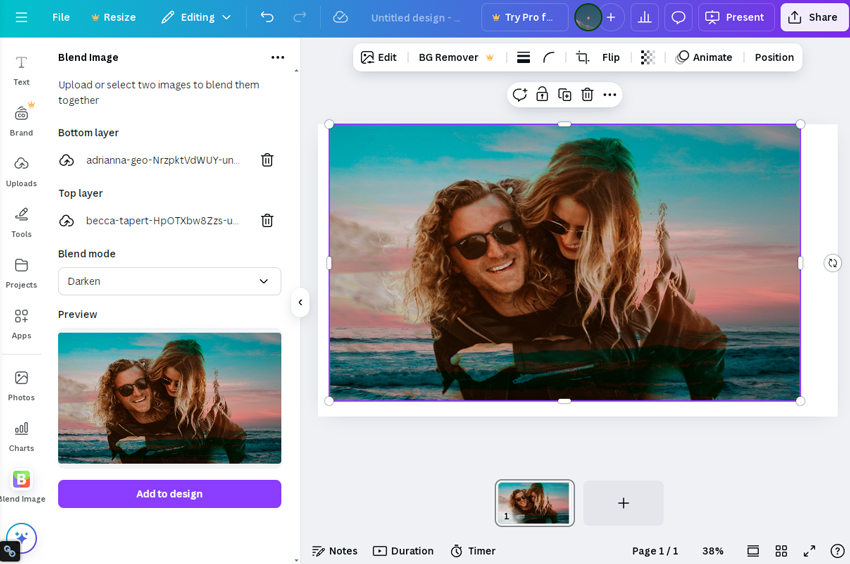
Step 3. Select Blend Image from the left toolbar. Then, for both the Bottom and Top layers, click Choose file and select your original image to use as both the base and top layers.

Step 4. Go to the Blend mode section and try different blend modes. When you're satisfied, click Add to Design to preview the outcome in a large window.
Step 5. Click the Share button and then hit the Download button. Choose your desired file format (PNG, JPG, etc.) from the File type dropdown menu. Click Download again to save your blended image from Canva to your computer.
What Is the Best Way to Blend Two Pictures Together
After exploring the three methods for putting two images togeather, it becomes clear which approach suits your needs best:
- Aiarty Image Matting: For effortless, natural image blends, especially foreground/background swaps, Aiarty Image Matting is perfect – often one-click. It's flexible for creative blends with tools like Mask Curve, ensuring natural results beyond simple swaps. Plus, it preserves image quality and efficiently handles batch processing.
- Adobe Photoshop: It remains the go-to for professionals needing ultimate creative control, yet its complexity can be overkill for simple image blending. Achieving natural blends demands significant time and expertise, presenting a steep learning curve for beginners. If you're seeking quick, natural image blends, Photoshop might not be the most efficient choice.
- Canva: It offers a convenient solution for fast, basic image blending, ideal for social media and everyday use. It's user-friendly and requires no specialized software, but its image combining capabilities are basic, relying on simple transparency adjustments and blend modes, potentially resulting in less refined and unnatural effects.
Download and install Aiarty Image Matting now and effortlessly blend your foreground with a new background!
You May Also Like
This post was written by Brenda Peng who is a seasoned editor at Digiarty Software who loves turning ordinary photos into extraordinary works of art. With AI assistance for brainstorming and drafting, the post is reviewed for accuracy by our expert Abby Poole for her expertise in this field.