If you're working on images that need to be printed, adjusting the DPI (dots per inch) can make a big difference in the quality of the final print. Knowing how to change DPI in Photoshop is an essential skill for photographers, designers, and anyone working with images that will be printed or displayed in high resolution.
Whether you’re preparing a photo for a brochure or adjusting the resolution for a poster, changing the DPI correctly can help you achieve a crisp, professional result. In this guide, we’ll walk you through the steps of setting/increasing DPI in Photoshop.
However, while Photoshop is a powerful tool, adjusting DPI can be tricky, especially for beginners or when dealing with multiple images.
💡 Troubles with Editing DPI in Photoshop:
- Changing DPI in Photoshop often results in quality loss or pixelation, especially when resizing images.
- Batch changing DPI in Photoshop isn't straightforward, requiring extra steps or scripts.
- Photoshop can be costly, and navigating through complex settings might be overwhelming for those unfamiliar with the software's advanced features.
Looking for a Faster, Easier, and More Affordable Way to Change DPI?
Aiarty Image Enhancer offers an effortless way to change DPI, covering the most commonly needed settings. It also supports batch DPI changes. In addition to changing DPI, Aiarty allows you to upscale and enhance images using AI technology, ensuring sharp, clear results.
Download Aiarty Image Enhancer now to streamline DPI changes and image upscaling in batches:

How to Change DPI in Photoshop
Changing the DPI (dots per inch) of an image in Photoshop involves adjusting the PPI (pixels per inch) setting, which is essentially the same as DPI for most practical purposes. The term "DPI" is commonly used in the context of printing, while "PPI" is more relevant for digital images. However, when preparing an image for print, Photoshop allows you to adjust the PPI, and it’s often referred to as DPI in this context.
Here’s how you can change or increase the PPI/DPI in Photoshop to make sure your image is optimized for printing:
Step 1. Open Your Image
Start by opening the image you want to modify in Photoshop. Go to File > Open and select the image file from your computer.

Step 2. Access the Image Size Settings
To change the PPI (DPI), navigate to Image > Image Size in the top menu.

This will open the Image Size dialog box, where you can see your image's current resolution and dimensions.
Step 3. Adjust the Resolution (PPI/DPI)
In the Resolution field, you can adjust the PPI, which corresponds to the DPI when printing.
- 72–96 DPI: Suitable for digital screens but not ideal for printing. Images at this resolution will appear pixelated in print.
- 150 DPI: Acceptable for basic prints like flyers or draft documents but lacks sharpness for professional printing.
- 300 DPI: The industry standard for high-quality prints, commonly used for brochures, magazines, and professional photography.
- 600+ DPI: Used for fine art prints, detailed illustrations, or extremely high-resolution outputs requiring precision.
Tips:
- When increasing DPI, make sure the image has enough pixel information to avoid quality loss. If the resolution is too low, consider using an AI-based upscaling tool to enhance the image before printing.
- When changing the DPI for printing, always keep in mind that higher DPI values are better for detailed prints, but they can increase file sizes. Ensuring the right balance of image quality and file size is key to achieving the best results.

Step 4. Resample or Not
When adjusting the DPI in Photoshop, whether or not you select the Resample box is important for controlling how your image changes:
If you want to change the DPI without altering the pixel dimensions (the actual number of pixels in the image), make sure to deselect the Resample box. This ensures that Photoshop adjusts only the resolution (PPI/DPI) while keeping the pixel count the same, which is ideal for maintaining image quality.
If you check the Resample box, Photoshop will adjust the pixel dimensions automatically to match the new resolution. This process adds or removes pixels from the image, which can potentially degrade its quality.
Step 5. Output the Image
Once you’ve made your adjustments, click OK to apply the changes.
To finalize the process, save your image by going to File > Export > Export As. Ensure you're saving it in the appropriate format for print, such as PNG, which can maintain the high resolution.
Once your image is exported, you can easily check the DPI.
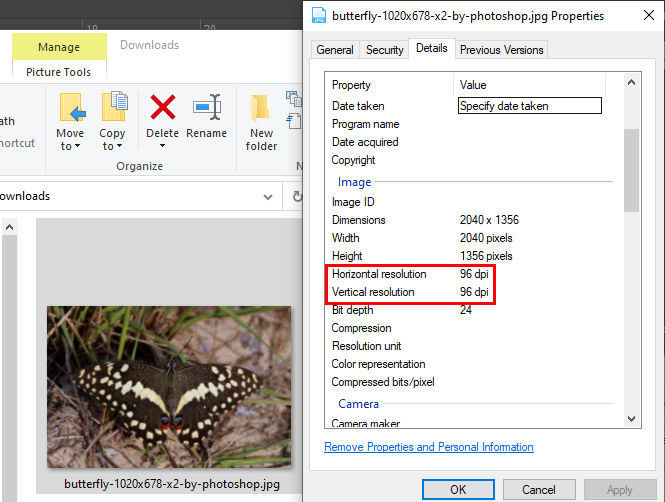
How to Check DPI on Windows
- Right-click the image file and select Properties.
- Go to the Details tab.
- Scroll down to find the Image section, where you will see the DPI listed as "Horizontal resolution" and "Vertical resolution."
How to Check DPI on macOS
- Open the image in Preview.
- From the top menu, select Tools, then choose Show Inspector.
- In the Inspector window, click the i tab, which will show the DPI in the Resolution section.
How to Change/Increase DPI of an Image Without Photoshop
If you don't have access to Photoshop but need to change the DPI of your image for printing or other purposes, Aiarty Image Enhancer provides a seamless solution that doesn’t require advanced photo editing skills.
Aiarty Image Enhancer allows you to set the DPI to 72, 96, 150, 200, 300, or even 1000 DPI, depending on your needs. For the width and height pixels, you can either preserve the original pixel dimensions or choose to upscale your image to 4k, 8k, 16k, 32k, or any custom resolution. Unlike traditional upscaling methods, Aiarty uses AI to enhance the image quality while keeping the details sharp and natural-looking.
How to Change/Increase DPI in Aiarty Image Enhancer
Follow these simple steps to change the DPI of your image in Aiarty Image Enhancer
Step 1: Download and install Aiarty Image Enhancer on your device.
Step 2: Upload Your Image
Click the +Add button or simply drag and drop your image into Aiarty. You can import multiple images at once for batch processing.
Step 3: Choose an AI Model
Aiarty offers 5 AI models tailored to different types of images, such as photography photos, AI arts, anime images, and more. Just choose the one that best suits your image type.

Step 4: Select the Upscaling Option
From the Upscale dropdown menu, you can select from options like 1k, 2k, 4k, 8k, or scale by 1x, 2x, 4x, 8x, or set a specific dimension by choosing Custom Resolution.
To change the DPI without altering the pixel dimensions, select the 1x option. This keeps the original pixel dimensions while increasing the DPI for higher resolution prints.

Step 5: Set the Desired DPI
Expand the Export Settings section. Click on the DPI dropdown menu and select the desired DPI value, such as 300 DPI for printing high-quality images.

Step 6: Export the Image
Click Single Export or Batch Export to output your image with the new DPI settings.
By following these steps, you can efficiently change the DPI of your image without Photoshop and enjoy high-quality prints with enhanced resolution.
 FAQs about Changing DPI
1. Why does changing the DPI not visually change the image?
Changing the DPI will not affect the visual quality of the image unless you also alter its pixel dimensions. DPI (dots per inch) is primarily for printing, influencing how the image appears on paper, not on-screen.
2. Does changing the DPI affect the file size?
Changing the DPI alone does not significantly alter the file size. However, increasing the image's pixel dimensions (e.g., by upscaling) while adjusting DPI will increase the file size.
3. How to avoid blurriness when enlarging a low-DPI image?
To avoid blurriness when enlarging a low-DPI image, use AI-powered tools like Aiarty Image Enhancer. These tools can upscale the image while enhancing quality, avoiding pixelation and blurriness.
4. What’s the difference between DPI and PPI?
DPI (Dots Per Inch) is a print resolution measurement that refers to how many dots the printer places on paper per inch. PPI (Pixels Per Inch) measures the pixel density on a screen, showing how many pixels fit into one inch of display space.
5. How to batch change DPI in Photoshop?
To batch change DPI in Photoshop, you can use the "Actions" feature to record the DPI adjustment process and then apply it to multiple images using the "Batch" function. Follow these steps:
- Create a new action in Photoshop by going to Window > Actions, then click the New Action button.
- Record the steps to change the DPI by opening an image, going to Image > Image Size, and setting the desired DPI.
- Stop recording the action.
- Go to File > Automate > Batch.
- In the Batch dialog, choose the folder containing the images you want to process and select the action you just recorded.
- Click OK, and Photoshop will apply the DPI change to all the images in the selected folder.
External source:
- DPI Meaning | What is DPI & How to Check/Change it | Adobe
- What is PPI Resolution? | Adobe
- PPI vs. DPI: what’s the difference? | 99designs
- Standard DPI & Image Resolution for Quality Printing | Printing for Less
- What is Resampling | Adobe
You May Also Like
This post was written by Brenda Peng who is a seasoned editor at Digiarty Software who loves turning ordinary photos into extraordinary works of art. With AI assistance for brainstorming and drafting, the post is reviewed for accuracy by our expert Abby Poole for her expertise in this field.