How to Increase the DPI of an Image with More Details for Sharper and High-Quality Prints?
Updated on
Summary: This post is not only about changing or increasing the DPI of an image, but also enhancing resolution and increasing actual pixel density for quality prints or other purposes. Dive into real tutorials on how to increase the DPI of an image with added details and higher resolution.
Is it possible to increase DPI on an image? I'm trying to create a canvas print but the vendor recommends an image of at least 300 DPI. I found a few websites that convert images to high DPI but I'm not sure how reliable/if it's actually possible.Thank you for any advice! – Reddit user
Don’t be fooled! Printing posters, illustrations, or brochures might seem simple, but achieving satisfactory quality hinges on things like DPI. Lower DPI settings may result in pixelated and blurry prints, even for high-resolution images. If you are a photographer or designer looking to produce stunning prints of your work or create eye-catching illustrations, increasing DPI can up pixel density and therefore improve image clarity. Let’s ere how to increase the DPI of an image for quality prints.
Part 1. What Is DPI and Why It Matters for Print Quality?
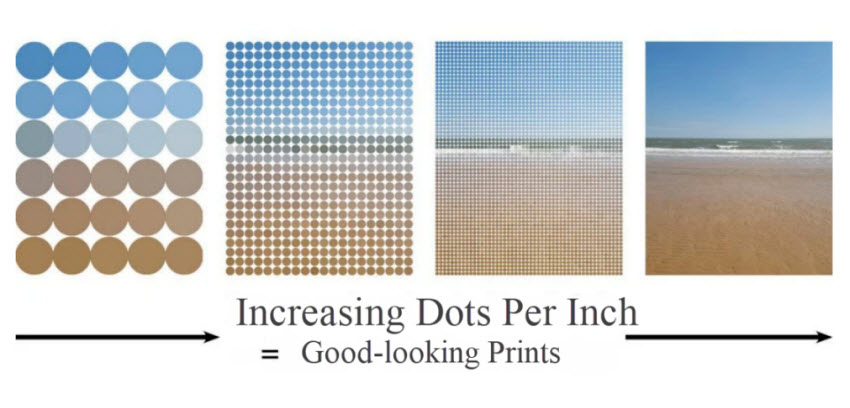
DPI(Dots Per Inch)refers to the number of individual ink dots that can be placed in a line within the span of one inch. It acts as a bridge between digital imagery and physical prints, directly impacting how sharp or blurred the image appears once printed.
The DPI value plays a key role in print quality. Higher DPI settings result in a denser distribution of dots, leading to sharper prints. It is essential for accurately reproducing digital images on paper, measuring print quality, and optimizing printing materials. Therefore, increasing image DPI is crucial for achieving high-quality prints.
Understanding How Other Factors Influence the Final Print Result
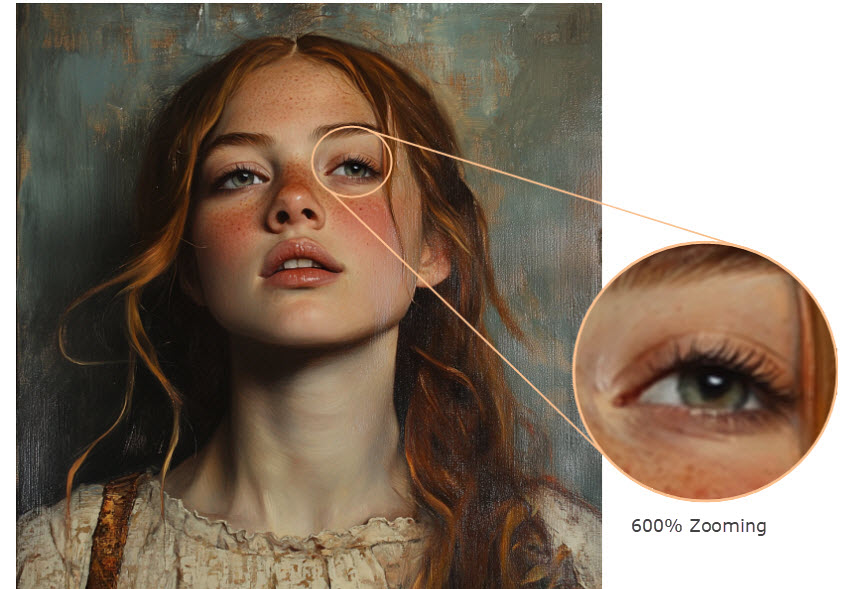
However, DPI is just one aspect of print quality. It's important to note that increasing DPI alone only affects how that detail is displayed on a screen. It does not actually upscale image resolution, generate image details or increase the quality of the image. For example, even if you set an image’s DPI to 300, a low-resolution image will appear blurry when zoomed in.
Here is an example of a low-res image that is zoomed in to 600%. The result will still lack clarity and detail, regardless of the DPI setting.
When considering print quality, the connection between image resolution, print size, and DPI is paramount. The formula that governs this relationship is:
Print Quality (in dpi) = Image Pixels / Print Size (in inches)
For instance, consider an image file with 1000x800 resolution intended for a 10x8 inch photo. Regardless how you increase the DPI setting to 150, 200, 300 or even higher, the actual pixel density remains 100 pixels per inch. You can get an increased 167 DPI for a smaller 6x4 inch image with the same file. If you don’t want to compromise on size, the only way is to both increase image resolution to 3000x2400 pixels and set the image's DPI at 300. This ensures that your prints are sharp, detailed, and ideal for various print sizes, from standard posters to fine art prints.
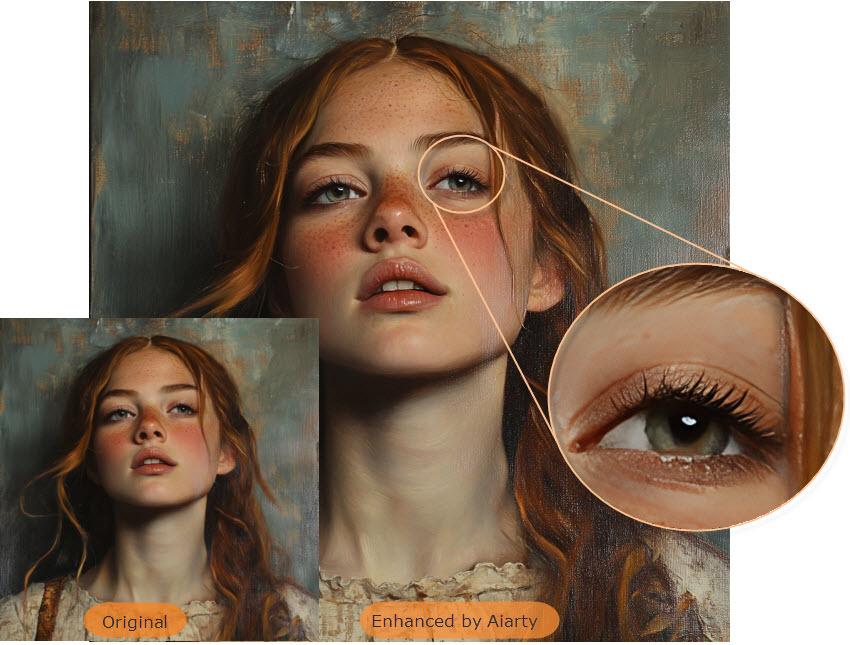
Part 2. Increase both Image DPI & Resolution for Crisp Prints with Aiarty
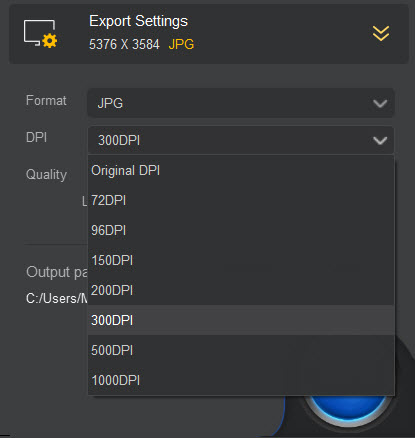
Now Aiarty Image Enhancer comes to the rescue. Unlike traditional tools that just upscale images without increasing the DPI of Image, or image editors that simply replicate the existing pixels while boosting DPI, Aiarty Image Enhancer allows you to select the ideal print DPI, ranging from 72 to 1000. On top of that, it upscales images by 2x/4x/8x or directly convert image to 4K/8K, generating more detailed and accurate results that closely match the original.
Whether you're preparing for standard prints or high-quality professional output, you can adjust the DPI to ensure your images are sharp, detailed, and perfectly suited for printing at any size. This flexibility guarantees that your prints will have the clarity and quality needed for everything from posters to fine art prints.
Here are the detailed steps to enhance image resolution using Aiarty. Prior to the steps, download and install Aiarty Image Enhancer on your computer.
Step 1. Once you open the program, drag and drop the image you are going to print to the windows. It supports a wide range of formats, from jpg, webp, png, tiff, to raw format.
Step 2. Choose a preferred AI model. In order to ready your image for quality print, it’s advised to choose More-Detail Gan v2, which will help to enhance image with intricate details. Then you can choose the scale preset like x2, x4, x8, or directly upscale the image to specific resolution like 2k/4k/8k as per your needs.
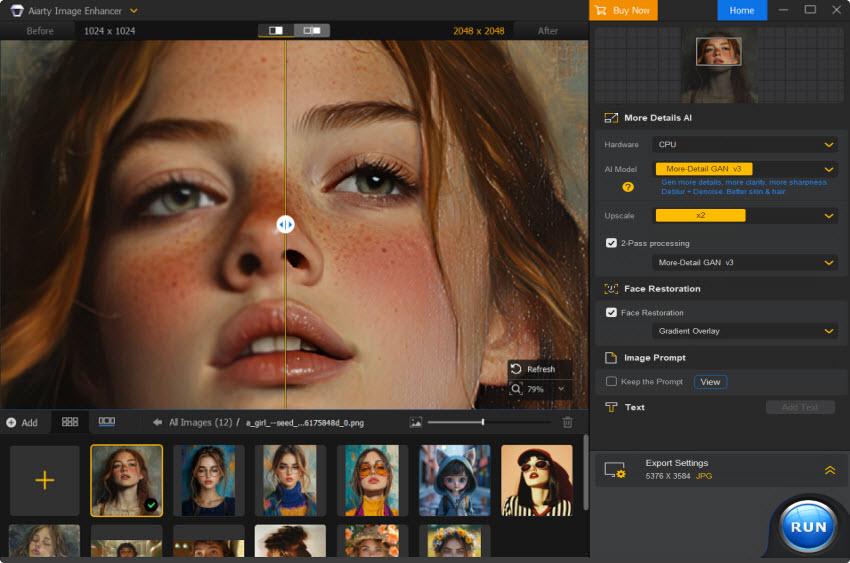
Step 3. Go to the Export Settings at the right lower side of the interface, and choose a preferred DPI value. Aiarty offers up to 8 DPI options here.
Step 4. When everything is OK, hit RUN to button increasing image resolution.
Then you can enjoy the crisp image after upscaling and increasing the image DPI. Then feel free to print image with high sharpness.
Part 3. How to Check the DPI of Image in Metadata?
Almost all file managers or photo editors allow to view image properties and check the DPI.
On windows
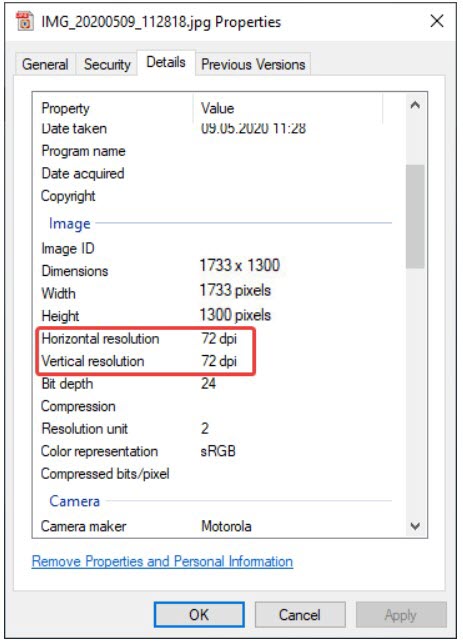
On windows, open File Explorer and navigate to your image. Right click on the image file > select Properties > Details. Scroll down to find image Dimensions and the DPI Resolution.
Or open the image file in Photo app, right click the Information, where you can see the DPI value next to the resolution.
On Mac
On Mac, open the image in Finder > Preview > select Tools > Show Inspector. Select General Info from the dialog box. View the image information to find the resolution or click More Info in the second tab at the top to find the DPI.

Part 4. How to Increase the DPI of an Image in Metadata: 3 Ways
If you just need to adjust the Image DPI but don’t want to enhance the image quaity (for example, for websites that require a minimum DPI/PPI), you can adjust the metadata DPI with the following options.
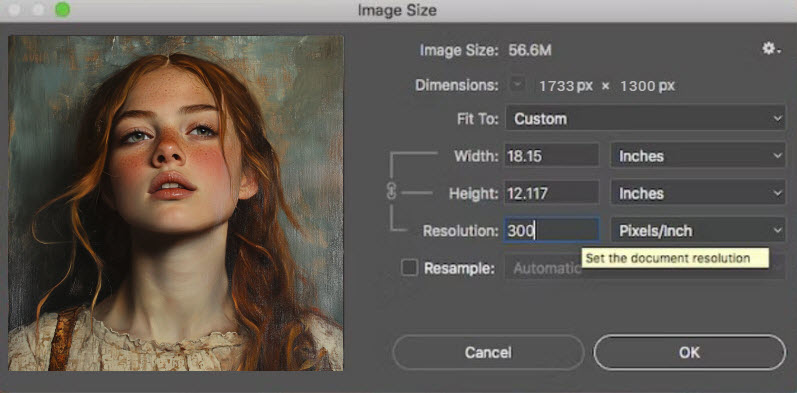
Way 1. Photoshop
Photoshop is recognized as one good way to change image DPI on Windows or Mac. Here are the steps:
- Open your file in Photoshop.
- Go to Image > Image Size.
- Uncheck Resample Image.
- Type in preferred resolution such as 300, and set as Pixels/Inch next to Resolution.
- Click OK.
- Click FILE > SAVE.
- Your image will be increased to desired DPI like 300, the best resolution for printing.
Note: Simply increasing DPI, e.g. from 72 to 300 without altering pixel dimensions just instructs printer to use more dots per inch during printing, it doesn’t introduce new information or sharpness. You can use the resampling feature to fill in gaps between pixels by taking advantages of Photoshop’s algorithmic interpolation to increase pixel dimensions. But this method just creates new pixels by replicating the existing ones, which potentially leads to quality loss and blurry, pixelated image. You are recommended to rely on third-party image enhancer to improve image quality with higher resolution and more details.
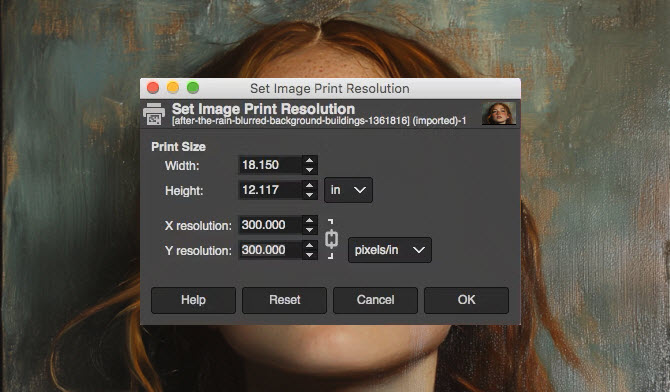
Way 2. GIMP
GIMP is a free and open-source image editor that can change and increase the DPI of image on your PC and Mac with ease. Here is the tutorial.
- Open GIM > Go to Image > Print Size.
- Enter the DPI you prefer next to X Resolution > set in pixels/in. The Y Resolution will change automatically.
Way 3. Online DPI Converter
If you are unfamiliar with the above programs, and want to easily increase the DPI of an image for printing without blurry results, online DPI converter like Convert Town is ready for help.
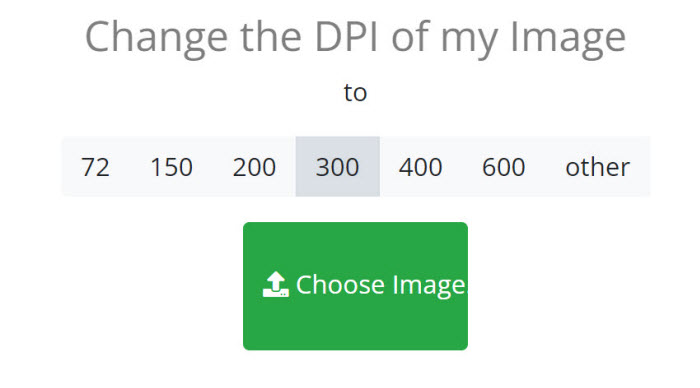
- Head over to the DPI converter.
- Set a DPI value for your image such as 300.
- Load an image by clicking on Choose Image.
- Your new image with increased DPI will instantly download to your device.
Note: Remember DPI only measures the print resolution. Increasing the DPI of an image doesn’t actually add new detail to an existing image. For the best clarity and detail, it’s crucial to start with high-resolution images, or upscale and enhance your low-res image to higher one with professional image upscaler.
Part 5. What to Consider When Choosing the DPI for Printing
DPI (dots per inch) plays a pivotal role in print quality, impacting how sharp and detailed your printed image will be. The optimal DPI setting depends on multiple factors, including print size, intended viewing distance, and the medium (e.g., photo prints, posters, or billboards). Understanding these considerations ensures your prints meet your quality expectations.
Recommended DPI, Resolution and Print Size for Different User Cases
Since different printing project requires different print size and resolution. Here are the recommeded DPI, print size, and resolution for different user cases.
| Printing Purpose | Recommended Print Size | Recommended DPI | Recommended Image Resolution |
|---|---|---|---|
| Wallpaper | Various (Customizable) | 150-300 DPI | 4500 x 3000 pixels (minimum) |
| T-shirt | 11 x 8 inches (standard) | 300 DPI | 3300 x 2400 pixels (standard) |
| Poster | 18 x 24 inches (standard) | 200-300 DPI | 3600 x 4800 pixels (standard) |
| Flyers | 8.5 x 11 inches (standard) | 300 DPI | 2550 x 3300 pixels (standard) |
| Movie Poster | 27 x 40 inches (standard) | 300 DPI | 8100 x 12000 pixels (standard) |
| Business Cards | 3.5 x 2 inches (standard) | 300 DPI | 1050 x 600 pixels (standard) |
| Photo | Various (Customizable) | 300 DPI | Depends on print size. |
| Brochures | 8.5 x 11 inches (standard) | 300 DPI | 2550 x 3300 pixels (standard) |
| Book Covers | Various (Customizable) | 300 DPI | Depends on book size |
| Banner | Customizable | 150-200 DPI | 4500 x 3000 pixels (minimum) |
DPI and Viewing Distance
The viewing distance significantly influences the DPI you should use. The closer an image is to the viewer, the higher the DPI required to maintain sharpness and avoid pixelation. This is because the human eye can discern more detail when it’s closer to the image, demanding higher pixel density for clarity. Here’s how DPI and viewing distance correlate:
- < 1 foot: 300+ DPI. For small prints like photos held in hand or viewed up close, use 300 DPI for sharpness.
- 3 feet: 200-300 DPI. This is suitable for images displayed at a medium distance, like framed prints on walls or posters. Around 200 DPI is sufficient for good clarity, though 300 DPI offers the highest quality.
- 6 feet: 90 DPI. For larger prints like posters or ads viewed from 6 feet away, 150 DPI is sufficient for clear visuals.
- 10+ feet: 72-100 DPI. Large prints, such as billboards or wall posters viewed from a distance, can use a lower DPI, as viewers are not seeing the image in fine detail from such a distance. 72 DPI is standard for such large formats.
 Part 6. FAQ about Image DPI
Yes, it is 100% secure to buy product via videoproc.com. It has enabled HTTPs and uses SSL encryption to protect your security on the site. In addition, we utilize world-leading e-platform to process all payment which is PCI Level 1 certified and ISAE 3402 / SSAE 18 compliant with BBB A+ accreditation.
- 72 DPI: 72 DPI is generally used for web or online platforms like FB or Instagram rather than printing. Printed images with the resolution will result in noticeable pixilation.
- 150-200 DPI: It is deal for draft printing, larger-sized printing when viewing distances are farther like billboards, banners or posters. If you does not value high-quality print and focus on speed and resource efficiency, it is a good option.
- 300 DPI: It is considered the optimal print resolution in the print industry. It is suitable for any print job where clarity is paramount, such as wallpaper, flyers, T-shirt, graphic design, or poster printing.
- 600 DPI: Increasing the DPI of an image to 600 will ensure higher clarity and depth. It is best for fine art prints, professional photography, etc.
DPI refers to dots per inch used in printing, which measures print quality. Higher DPI means more ink dots and sharper prints. But it doesn’t affect how images look on screen. PPI means pixels per inch used for digital resolution, which measures detail in digital images. Higher PPI means more pixels and sharper visuals.
You May Also Like
Brenda Peng is a seasoned editor at Digiarty Software who loves turning ordinary photos into extraordinary works of art. With years of experience behind the lens and in front of the computer, Brenda shares her passion for photography, image enhancement, and editing through easy-to-follow tutorials.