5 Ways to Remove Green Screen Background from Images (AI-Powered, 100% Clean)
Updated on
Summary: This post shares how to remove a green screen from images using Photoshop, AI-powered image background remover software, and various online tools. Along with detailed step-by-step instructions for each method, I also highlight the pros and cons to help you choose the best option for your needs.
Removing green screen backgrounds from images has become an essential skill in today's digital content creation world. Originally used in professional film and television production, green screen technology allows subjects to be photographed against a solid green backdrop, which can then be digitally removed and replaced with any desired background or setting. Whether you're a content creator looking to enhance your social media posts, a business owner needing professional marketing materials, or simply someone wanting to create compelling visual content, knowing how to effectively remove green screen backgrounds can transform your ordinary photos into polished, professional-looking images without the need for expensive location shoots or complicated setups. In this post, let's take a look 5 of the best ways to remove green screen background from images.
5 Methods to Remove Green Screen Background from Image
1. Use Aiarty Image Matting
Looking for a one-click solution to remove green screen backgrounds from a large batch of images? Aiarty Image Matting might be just what you need. This AI-powered tool automatically separates and removes green screen backgrounds while preserving fine details like hair, fur, and even translucent objects. Especially for complex images, Aiarty delivers faster, higher-quality results compared to traditional methods. Its state-of-the-art AI models and alpha matting techniques ensure precision, even in the trickiest scenarios.
- Delivers high-quality background removal, even for challenging details.
- AI-powered enhancement improves image clarity.
- Supports bulk processing, making it perfect for product photography.
- Runs smoothly on most consumer-grade computers.
- Can be slow when working with extremely high-resolution images.
How to Remove Green Screen Background from Images with AI
Step 1. Download, install, and launch Aiarty Image Matting. Simply drag and drop your source image into the program to import it.
Step 2. Choose the optimal AI model for removing the checkered background. Refer to the on-screen instructions for guidance on selecting the best model for your specific use case.
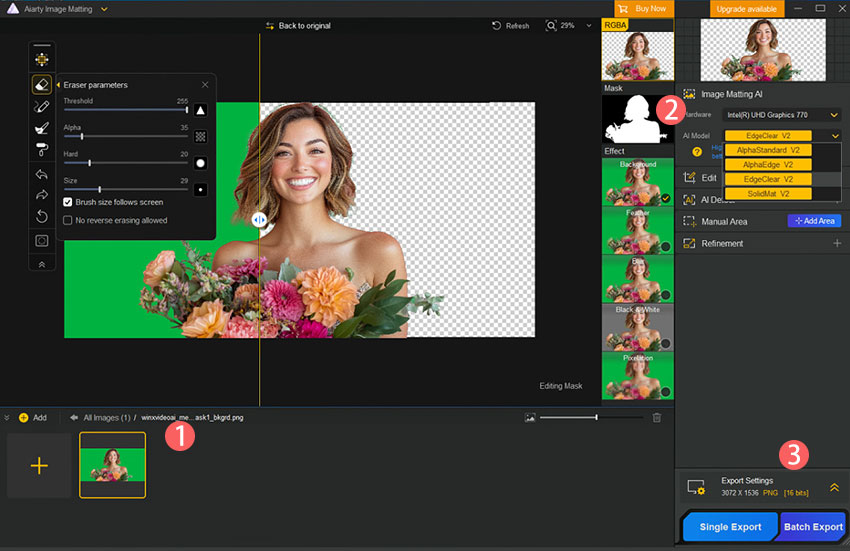
Step 3. Click Start to start removing the green screen background from your image. Once complete, click Single Export to save the outcome to your computer. If you're removing green screen from multiple images, you can click Batch Export to export them at once.
2. Use Remove.bg
Remove.bg is an AI-powered tool that automatically removes image backgrounds with just a few clicks, making it popular among photographers and businesses worldwide. Beyond its simple web interface, Remove.bg offers API integration that lets users build the service into their own apps and systems. One of its standout features is batch processing, allowing users to edit multiple images at once - a real time-saver for professional work. Just give a caution, while Remove.bg excels in handling most image types, it's worth noting that it can still struggle with fine details like hair and color blending, so results may not be perfect 100% of the time.
- Straightforward to use.
- The pricing pan looks confusing.
- Supports bulk processing, making it perfect for product photography.
- Runs smoothly on most consumer-grade computers.
- Free accounts are limited to preview the result in low-resolution.
- Some customers feedback that the customer service is poor.
- Sometimes they cutout images incorrectly and edge wasn't good.
How to Remove Green Screen Background from Image via Remove.bg
Step 1. Open the official website of the online green background remover. Sign up for an account, then log in.
Step 2. Click Upload Image and select your original image. Remove.bg will begin uploading the image and then analyze and remove the green screen background. Depending on your network conditions and the file size, this may take several minutes.
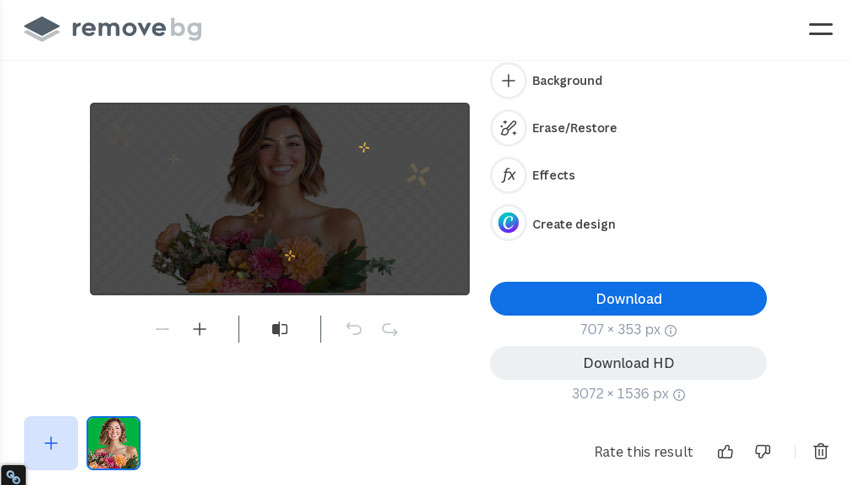
Step 3. You can preview the result and refine details using the brush and restore tools. However, with a free account, you can only preview the result in low resolution, which makes it difficult to see any details.

Step 4. Free account users can only click Download to save the low-resolution version (up to 0.25 megapixels), which appears to be of very low quality.
Note: To download the image in high quality, click the Download HD icon and follow the on-screen instructions to purchase credits. Each image costs 1 credit, which is priced at 1.99 USD.
3. Use Fotor
Fotor offers a comprehensive suite of photo editing tools, ranging from basic functions like cropping and text overlay to advanced AI-powered features such as text-to-image generation and photo restoration. As part of its toolkit, Fotor includes a capable AI background remover. It's automatic subject identification feature makes the green screen background removal process remarkably simple, while the brush tool allows for precise refinement of selections. Fotor is particularly adept at handling challenging details like hair, animal fur, and complex edges, delivering impressive results in most cases. Even better, it comes with an AI background feature that allows you to replace the green screen with AI generated backgrounds tailored to the content and style of your image.
- AI background.
- AI tools work well.
- Strong layout features.
- Disjointed interface.
- Limited image format support: JPG, JPEG, PNG, WebP.
- No photo organization.
How to Remove Green Screen Background from Image via Fotor
Step 1. Visit the Background Remover page on Fotor and click Upload Image to choose the original image for processing.
Step 2. Fotor will automatically detect and remove the green screen background from the image. Once completed, use the brush tool to make any necessary adjustments.
Step 3. You can also click Change Background to replace the green screen with images you prefer or click Blurry Background to make the background blurry.
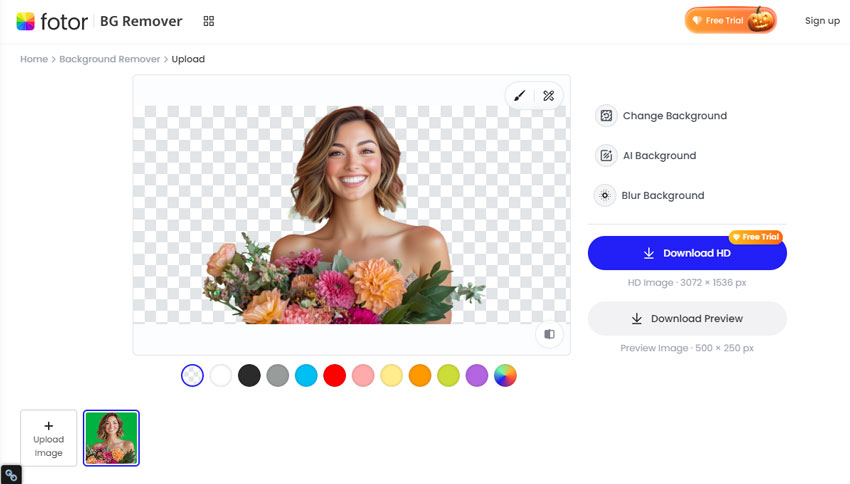
Step 4. Premium users can then click Download HD to save the outcome. As a free account user, you can only click Download Preview to save the lower-resolution version of the outcome.
4. Use BGBye
BGBye, as its name suggests, is an easy-to-use online tool that enables users to remove backgrounds from images effortlessly. Utilizing 10 cutting-edge AI models, it can handle various types of images, including graphics and portraits. When it comes to removing green screen backgrounds, BGBye brings excellent results for images with smooth edges and minimal gradients, such as product photos and graphics design. However, just like most green screen remover tool in the market, BGBye may struggle with more complex images, especially when the subject and background share similar colors or tones, or when the subject's edges are soft, blurry, or blend into the background. In these challenging cases, the tool often leaves behind traces of green edges. Another slight drawback is the lack of fine-tuning tools, such as a brush feature, to refine selections. Nevertheless, BGBye remains the go-to option as it's completely free of charge, and its results rival many premium green screen background removers.
- Free to use.
- 10 AI models to choose from.
- No learning curve.
- Not support for batch processing.
How to Remove Green Screen Background from Image via BGBye
Step 1. Open BGBye on your browser. Click SELECT MODELS to choose one or more model that you want to work with. If you don't mind a longer waiting time, you can keep all of these models selected.
Step 2. Click the name of the model listed in the right side to preview the green screen background removal outcome made by that model.

4. Use Adobe Photoshop
If you already pay for Photoshop, it's a great tool for removing green screen backgrounds, especially if your image has a clear difference between the subject and the green screen. It works well for things like graphics and car photos where the edges are easy to see. For more challenging subjects like hair, fur, or subjects with soft edges, Photoshop offers precise selection tools like the Magic Wand and Quick Selection to help you achieve clean results. The best part? You can use Photoshop's Edge features and comprehensive color grading tools to remove the green reflections on the image. Just keep in mind that the process can be complex and requires patience to achieve the acceptable results.
- Boast advanced, industry-standard photo editing tools.
- Turn text prompt to image with Generative AI.
- Support unlimited number of image layers.
- High price tag: 19.99USD/month.
- Difficult for green hands to start with.
- Can't isolate the background accurately.
How to Remove Green Screen Background from Image via Photoshop
Step 1. Go to Adobe official page for subscribe to Photoshop. Download and install the latest version for Photoshop on your Windows or Mac computer.
Step 2. Launch Photoshop. Drag the source image with green screen background into the program.
Step 3. Click Windows located in the top menu bar. Select Properties to open the Properties windows. Choose Remove Background under Quick Access. Photoshop starts to remove the green screen background.
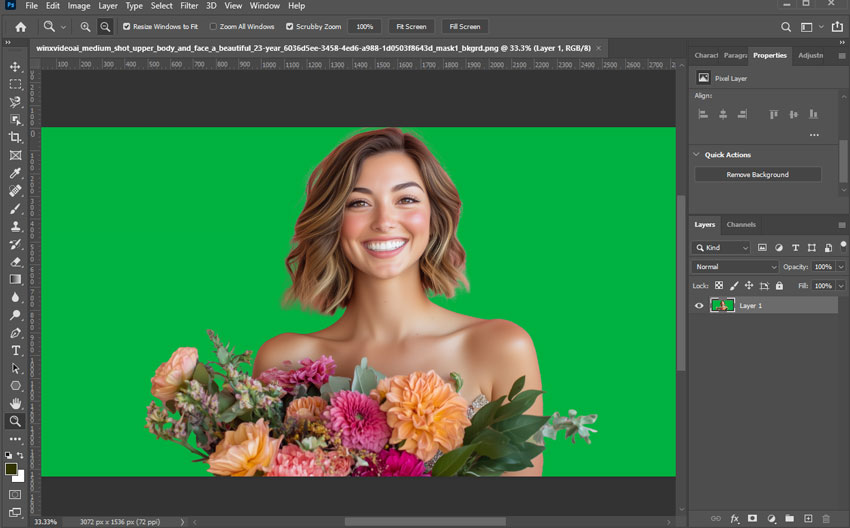
Step 4. Press Alt while clicking the mask. Refine the mask layer by using brush and selection tools. This can help eliminate the remaining green color and restore any content that was mistakenly masked. This detailed process requires careful manual adjustments and may take several hours to complete.
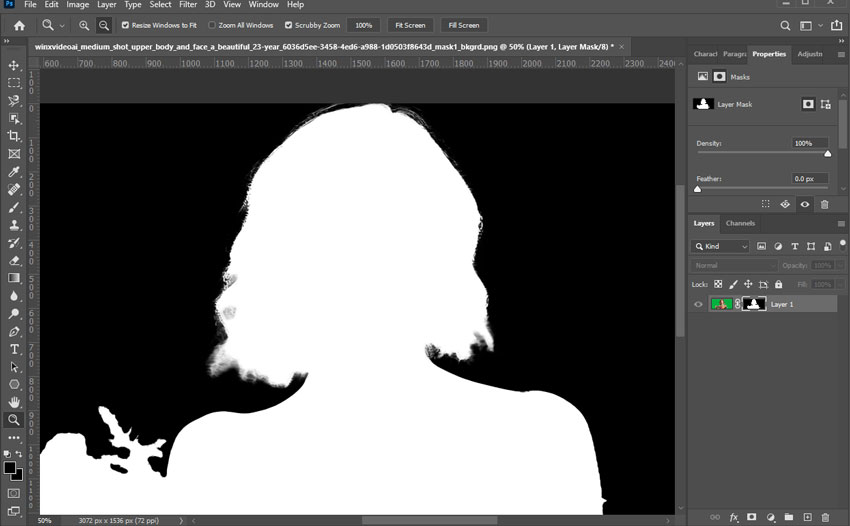
Step 5. Once you're satisfied with the outcome, click on File > Export As, and follow the on-screen instructions to save the image without a background on your computer.
What Are Green Screens and Why Are They Used in Photography
Green screen backgrounds, also known as chroma key backgrounds, serve as a versatile tool in photography and video production by providing a solid, uniform color that can be easily removed and replaced with different backgrounds or visual elements in post-production. This technique allows creators to transport subjects to any desired setting, create dynamic visual effects, or integrate computer-generated imagery without the need for expensive location shoots or elaborate sets. The bright green color is specifically chosen because it's distinctly different from human skin tones and most commonly used wardrobe colors, making it easier for editing software to isolate and remove while maintaining the quality and detail of the foreground subject.
Traditional vs. AI Methods for Green Screen Removal
The removal of green screen backgrounds from images has evolved significantly, moving from traditional methods relying heavily on manual skill to AI-powered approaches that automate much of the process.
Traditional Methods
Traditional methods primarily rely on color keying techniques within image editing software like Adobe Photoshop or After Effects. This involves selecting a range of green colors to be removed, often fine-tuning with tools like masks, feathering, and color correction. More advanced techniques might involve using multiple keying methods and combining them for improved results. A significant portion of the process is manual. Editors meticulously mask areas to protect the subject and refine the edges to eliminate any remaining green or artifacts. This is time-consuming and requires a high level of skill.
AI-Powered Methods
AI-based tools leverage machine learning algorithms to automatically identify and remove the green screen background. These tools analyze the image to understand the difference between the subject and background, which often bring more accurate results, especially in complex scenarios with fine details or challenging lighting conditions, surpassing the capabilities of a human editor in some cases. Users don't need to know any previous knowledge, within only a simple click and they can get rid of the unwanted green screen background.
Does All AI Green Screen Removal Work the Same
While AI-powered green screen removal tools generally use deep learning to separate subjects from backgrounds, their accuracy can vary. For example, the left image from Aiarty looks clean and high-quality, whereas the right image from Photoshop still has visible green colors and some parts we want to keep have been removed.
This difference is because each AI tool has its own unique "brain" for the job. The way these "brains" are built (using different types of neural networks) and how much they've learned from diverse examples (training data) greatly affect their performance. Based on my tests, Aiarty Image Enhancer is the best. It excels in handling images with fine details like hair, translucent objects, and low-light conditions. It not only cleanly processes the edges but also smooths out blurry or unclear boundaries, making it easier to blend the subject into a new background.

