Make Background White: 3 Tested Methods for Perfect Results
Summary: This guide explores 3 tested methods for making background white in your photos, such as product and ID photos. Each method is reviewed for its effectiveness, ease of use, and best use cases, helping you find the perfect solution for creating clean, professional images. Take a brief look and select the tool that best suits your needs.
- Aiarty Image Matting: The best AI tool to make background white in bulk with pixel-perfect precision.
- Photoshop: The traditional choice for background editing. Complex and time-consuming.
- Photoroom: The fast and easy online solution, but lacks precision and batch processing.
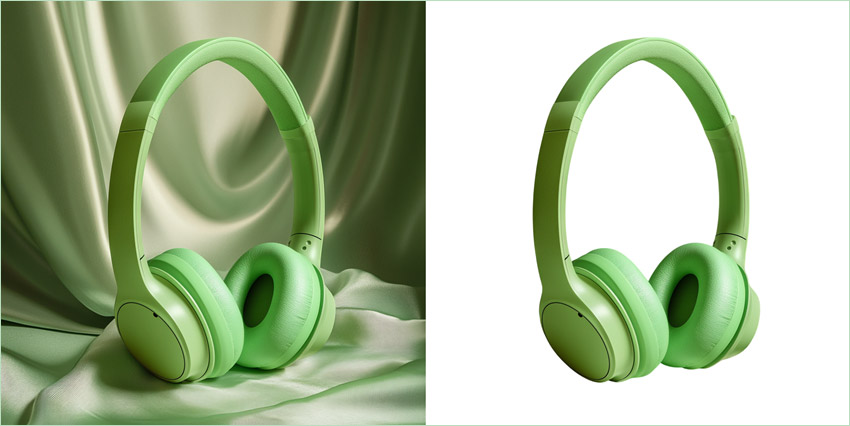
After hours of photographing handmade jewelry, the messy background dulls its elegance. Or perhaps your LinkedIn headshot looks sloppy against a cluttered office wall. If this sounds familiar, it’s time to make background white. A crisp white background not only enhances the subject, but also improves click-through rates and conversion rates for e-commerce and professional use.
"White background has won the hearts of e-commerce businesses. This is clearly visible from the statistics presented by retouching companies, as around 75% [1]of all product images end up with white background. Customers vote with their choices based on visual information, and these choices are all pointing to white." – from Orbitvu [2]
In this article, we’ll walk you through 3 tested methods to change image background to white — using an AI tool, a traditional editing software, and an online solution. Let’s dive in!
![]() Pro Tips Most Users Miss: Avoid These 4 Mistakes When Whitening Background
Pro Tips Most Users Miss: Avoid These 4 Mistakes When Whitening Background
- Ignore edge precision: Low-quality white background makers will leave jagged edges, halo effects, and messy backgrounds.
- Spend too much time: Complex manual selection of traditional tools will waste 5-10 mins per image.
- No batch processing: Both online and traditional tools lack batch processing.
- Output low-quality images: Low-resolution outputs get rejected by platforms like Shopify and customers.
💡 Say Goodbye to These Challenges, Here is a Fast Fix for Tough Problems:
Making photo background white isn’t just about removing clutter—it’s about precision, efficiency, and professionalism. The good news is the modern AI tool - Aiarty Image Matting lets you add a white background to photos with near-human precision, with no uneven edges for hair, fur, or glass. Its bulk processing ability (3,000 images/one-time) will save hours and help improve 50%+ productivity, especially for e-commerce sellers managing large inventories.
Download Aiarty Image Matting to make background white with high quality effortlessly!
3 Proven Ways to Make Photo Background White
Whether you're an e-commerce seller, a graphic designer, or someone looking to polish up a personal photo, the white background maker you choose can make all the difference. To help you remove the cluttered background and add a white background to images, we have tested 3 methods for creating clean and professional white background images.
How we test:
- Test tools: Aiarty Image Matting (AI tool), Photoshop (traditional software), and Photoroom (online tool).
- Test images: 10 images (7 product shots, 2 portraits, 1 graphic design).
- Test environment: Windows 10, Intel (R) Core i7-13700K CPU, 32GB RAM, AMD Radeon RX 7600 Graphics.
- Test criteria: We test each method to see edge accuracy, speed, ease of use, batch processing, and output quality. Find out more about how we choose the test objects.
Method 1. Use Aiarty Image Matting: AI Perfection in 8 Seconds
- Supported platforms: Windows, macOS
- Rating: 4.6/5 on TheWindowsClub
- Best for bulk and precise background whitening for e-commerce sellers, photographers, designers.
Meet your new photo sidekick! Aiarty’s background removal magic can change image backgrounds to white (CMYK/Web-safe white #FFFFFF), other colors, or custom images, giving your photos an instant studio glow-up. Picture this: your handmade jewelry floating on a crisp white canvas, so clean it’d make Amazon product shots blush. No more wrestling with wonky edges, ghostly halos, coffee-stain gradients, or messy residues – this tool’s been trained on 7 million images, slicing around frizzy hair and puppy fur smoother than a hot knife through butter.
Also, Aiarty treats your photos like VIPs. Its offline mode ensures data privacy, making it a reliable choice for professionals handling sensitive visual content.
Why Aiarty Image Matting wins:
- 1-click background removal and whitening.
- AI power for precise edge detection: no jagged/uneven edges for hair, fur, glass, etc.
- Replace background with white, color, or image background.
- Batch-processing up to 3,000 images/one-time. 50+ productivity improved.
- 10K upscaling & precise cropping for better visual appeal.
Free download Aiarty Image Matting to make product background white to boost conversions!
How to make background white with Aiarty Image Matting:
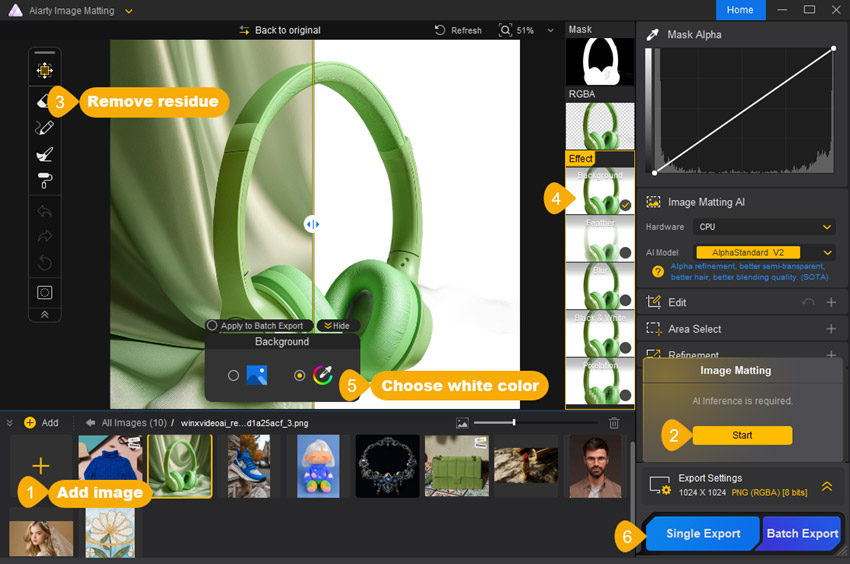
Step 1. Download and install Aiarty Image Matting. It’s available for Windows and Mac.
Step 2. Drag and drop your image(s) to the workspace, and wait for inference.
Step 3. Click on the "Start" button. Aiarty will automatically detect and extract the subject.
Step 4. Optionally, check details and use the Eraser tool to remove any unwanted background residue.
Step 5. Now, navigate to the "Effect" section and tick "Background".
Step 6. Click "Change background color", choose white color (RGB:255), and click "Done".
Step 7. Click the "Single Export" button to export one image or "Batch Export" button to export multiple images at once.
My experience with Aiarty Image Matting:
I processed the 10 images less than 2 minutes - previously an over 1 hour Photoshop task. It achieved 98% accuracy on lace and hair, and zero background residue on subjects with smooth edges. I could also use the upscale function for ID photos and it could fix uneven lighting. Aiarty indeed saved me hours of work.
Method 2. Use Adobe Photoshop: Precision Editing for Advanced Users
- Supported platforms: Windows, macOS, iPad
- Rating: 4.6/5 on G2
- Best for: Designers needing pixel-level control.
Here is the OG of photo editing - Photoshop's been the trusty Swiss Army knife for designers since forever. Photoshop's "white background magic" is like having a studio photographer on call. Need crisp product shots for your Etsy shop? The "Select Subject" tool snips away messy backgrounds cleaner than a paper guillotine, leaving pure #FFFFFF white – the kind that makes jewelry sparkle and sneakers look straight off the assembly line. Even fussy edges (e.g. lace wedding dresses) get the VIP treatment.
However, Photoshop has a steep learning curve, requires several manual adjustments for image background removal and replacement, and lacks efficient batch processing capabilities, making it less suitable for beginners or high-volume editing tasks.
- Industry-standard quality.
- Pixel-level precision and unmatched control over edits.
- Works well with detailed, complex, and high-resolution images.
- Non-destructive editing with layer-based adjustments.
- Advanced masking and edge refinement tools.
- Steep learning curve for beginners.
- No auto batch-processing.
- Expensive ($59.99/month subscription).
How to add white background to photos with Photoshop:
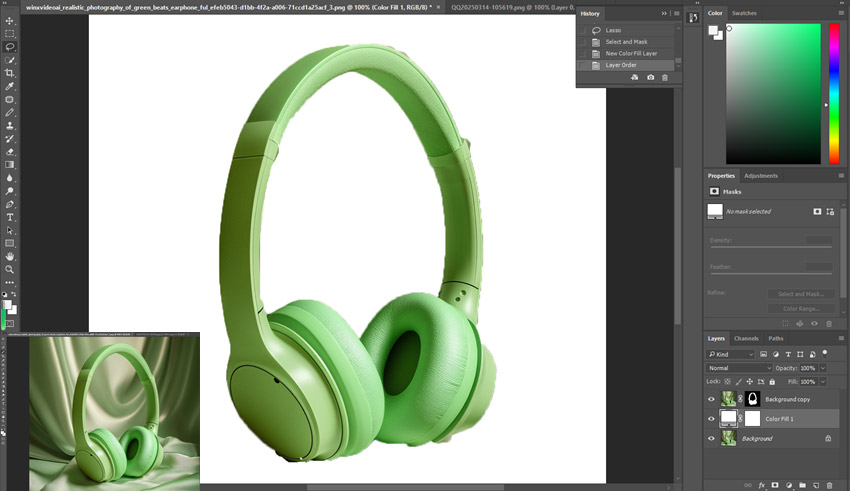
Step 1. Launch Photoshop and open the image to which you want to add a white background.
Step 2. In the Layers panel, right-click on the background layer and select "Duplicate Layer". This preserves the original image.
Step 3. Use the "Select Subject" feature by navigating to Select > Subject. Photoshop will automatically attempt to select the main subject of the image.
Alternatively, for more complex images, use the "Quick Selection Tool" or "Pen Tool" to manually select the subject.
Step 4. After making the initial selection, click on Select > Select and Mask. In the Select and Mask workspace, use tools like the "Refine Edge Brush" to improve the selection, especially around areas like hair or fur.
Step 5. With the refined selection active, click the "Add Layer Mask" button at the bottom of the Layers panel. This will mask out the background, leaving only the subject visible.
Step 6. Go to Layer > New Fill Layer > Solid Color. Then, choose white (#FFFFFF) as the color and click "OK".
Step 7. In the Layers panel, drag the new white fill layer below the layer containing your subject. This places the subject over the white background.
Step 8. If any unwanted background areas are still visible or if parts of the subject are missing, select the layer mask thumbnail of the subject layer. Use the "Brush Tool" with a soft-edged brush to paint with black (to hide) or white (to reveal) on the mask, refining the edges as needed.
Step 9. Once satisfied with the result, save your image in the desired format.
My experience with Photoshop:
Photoshop delivered excellent results with precise edge accuracy, achieving clean cutouts, but it took me around 15 minutes per image. Complex details, like lace, could extend this to over an hour. Despite its steep learning curve, Photoshop remains unparalleled for magazine work. However, I've encountered issues with batch editing, including crashes during attempts to process multiple images simultaneously.
Method 3. Use Photoroom: The Best Online Tool
- Supported platforms: Web, iOS, Android
- Rating: 4.3/5 on G2
- Best for: Casual users editing single images quickly.
Now, let me tell you about this magical photo editor called Photoroom! Remember how annoying it is to deal with messy backgrounds when shooting product photos? With Photoroom, just upload your image and tap twice – boom! You'll get a crisp white background instantly. It's like having a professional photography studio in your phone!
The smart background removal even handles tricky details like hair strands. No more awkward jagged edges on your ID photos. Hot tip for online sellers: Swapping to clean and white backgrounds boosted my product click-through rates by 30%! Whether you're building a side hustle or just want to level up your social media game, this app turns you into an editing pro.
- Fast and easy to use.
- Browser-based (no installation required).
- Works well for basic product shots and profile photos.
- Instant background remover.
- Pre-set white background templates.
- Watermarks on free tier.
- Struggles with complex textures/edges, and semi-transparency.
- 50-image/month limit ($9.99 for 500).
- Limited export resolution in free version.
How to make image background white online with Photoroom:
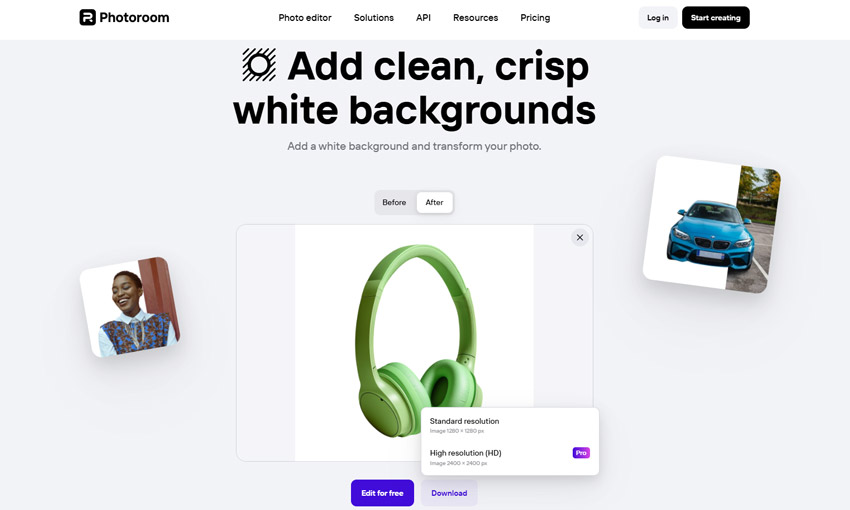
Step 1. Open Photoroom white background webpage: https://www.photoroom.com/tools/white-background.
Step 2. Upload the image you want to make the background white. You can only upload one image each time.
Step 3. The tool will auto-detect and extract the subject, and then add a white background to your image.
Step 4. Download your image. Only the paid version can download an image up to 2400x2400px.
My experience with Photoroom:
Photoroom processed 10 images in under 5 minutes, but it could only upload 1 image each time. The AI was fast but sometimes struggled with complex details like hair, cluttered backgrounds, and semi-transparency, achieving about 75% ~ 90% accuracy. Even I’m a pro user, I can only output a 2400 x 2400px image.
Side-by-Side Comparison of the 3 White Background Makers
After testing all three methods, here’s a quick comparison. Take a quick look and pick the one you like best.
- Aiarty Image Matting (speed & quality balance): Ideal for businesses needing bulk edits and pixel-perfect precision.
- Photoshop (precise but slow): Only worth it for designers with advanced needs. Steep learning curve and time-consuming.
- Photoroom (Easy but struggle with semi-transparency): Decent for single social media posts but unreliable for pros. Struggles with semi-transparent details.
How We Choose the 3 Methods to Make Background White
When choosing a tool to whiten an image background, edge accuracy, speed, output quality, ease of use, and user ratings matter. So, we choose the 3 methods based on these standards:
Pixels-perfect precision: The tool can perfectly detect the complex edges and fine details (e.g., hair, glass), including semi-transparent details like lace.
Fast speed: For those working with a ton of images, like in e-commerce or photography, quick background removal and replacement can boost productivity. That's why the tool needs to have this capability.
High output quality: A clean white background is crucial, as are the image quality and intricate details.
Ease of Use: The tool has an evaluated interface and learning curve
Rating: The tool should have positive user reviews and a high score from trustworthy sites. So, we prioritize tools with ratings above 4.0 (out of 5).
In short, Aiarty Image Matting combines AI precision and bulk processing; Photoshop is the industry benchmark for manual control, though the manual editing in Photoshop feels like rocket science, and Photoroom is the most Googled online photo editor to change background color to white with ease.
Final Word
For 95% of users, Aiarty Image Matting is the quickest and most budget-friendly option for making the backgrounds white. Its AI technology expertly manages those tricky edges that Photoshop and Photoroom often overlook, and the bulk processing feature can save you hours of work. With its blend of speed, precision, and user-friendliness, it's perfect for e-commerce and social media creators. Give Aiarty a shot today and take your visuals to the next level!
External sources:
- "What 7 Million Edited Images Can Teach You". Pixelz
- "The best solutions for white background product photography". Orbitvu
You May Also Like
This post was written by Brenda Peng who is a seasoned editor at Digiarty Software who loves turning ordinary photos into extraordinary works of art. With AI assistance for brainstorming and drafting, the post is reviewed for accuracy by our expert Abby Poole for her expertise in this field.