Summary: This article tells how to blur the background of a photo on iPhone using built-in tools or advanced editing. For effortless, studio-quality results—even on older devices or non-Portrait Mode photos—explore AI-powered tool that automate precision background blurring and adjustments.
You just took a stunning photo of your friend with iPhone, but the cluttered background ruins the shot. Sound familiar? Blurring the background instantly draws attention to your subject, making photos look professional. While iPhones have tools like Portrait Mode, they don’t always work perfectly—especially with complex scenes or older devices.
Good news: Whether you’re editing live photos, retro shots, or tricky angles, this guide covers reliable methods to blur backgrounds of photos on iPhone. Let’s dive in!
In the market, over 92% of all photos are captured using smartphones, and 6.95% of the users use portrait mode every time they take a blurry background photo. Also, e-commerce product photo shoots and social media content creation prefer blurred backgrounds to enhance professionalism and aesthetics. So, how can you efficiently and precisely achieve background blur, making your images more visually striking?
![]() The Secret Weapon: Use Aiarty Image Matting to Blur Any Photo Background
The Secret Weapon: Use Aiarty Image Matting to Blur Any Photo Background
For maximum flexibility, use AI-powered tools to blur any photo including iPhone photos, even ones taken years ago. Aiarty Image Matting is the ideal tool to detect subjects and blur backgrounds with strength variations—no fancy hardware or photography skills needed.
Blur Photo Background on iPhone with Built-in Tools
iPhone offers 3 built-in tools to blur background on iPhone photos, including Portrait Mode and two lesser-known built-in tricks. Let’s explore these hidden gems!
1. Use iPhone’s Portrait Mode
Perfect for: Quick, real-time background blurring when shooting new photos.
Pros:
- Quick, built-in, and free.
- Adjust blur strength after taking the photo.
Cons:
- Only works on iPhone X or newer models.
- Struggles with complex edges and fine details (e.g., hair, glasses).
- Requires specific lighting and distances to blur background.
- Non-portrait mode photos can’t be blurred later.
- Importing pictures to editors (e.g., Photoshop) may not recognize iPhone’s depth data, resulting in lost background blur.
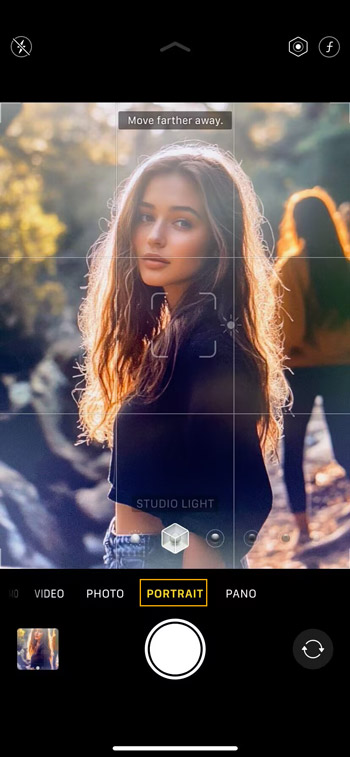
How to use Portrait Mode to blur iPhone photo background:
Step 1. Open the Camera app and swipe to Portrait Mode.
Step 2. Frame your subject within 2–8 feet. Pro tip: Tap the subject to lock focus.
Step 3. Ensure "Natural Light" or "Studio Light" is selected for best results.
Step 4. Capture the photo and you will get a photo with a blurry background.
Tip: For non-human subjects (e.g., food), you can also enable Portrait Mode and tap the object to force focus.
2. Use Photos App’s Depth Control
Perfect for: Tweaking blur intensity on photos already taken in Portrait Mode.
Pros:
- No app download required.
- Adjust blur strength post-capture.
Cons:
- Only works if the original photo was shot in Portrait Mode.
How to blur the background of a picture on iPhone with Depth Control:
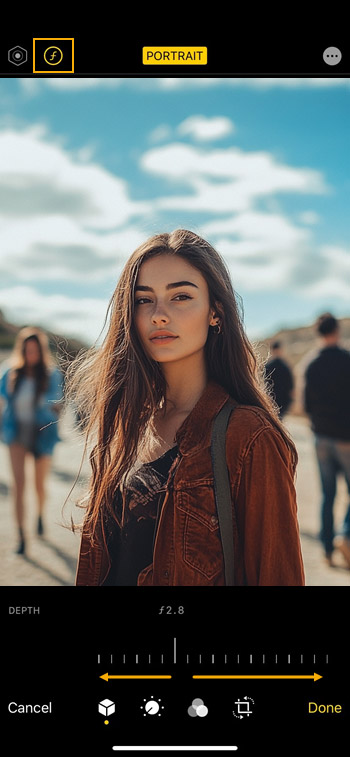
Step 1. Open the Photos app and select a photo taken in Portrait Mode.
Step 2. Tap Edit > adjust the f-stop slider (labeled "Depth").
Step 3. Slide left to reduce blur or right to intensify it.
Step 4. Tap Done to save.
3. Use Long Exposure Effect for Live Photos
Perfect for: Blurring moving backgrounds (e.g., waterfalls, crowds).
Pros:
- Adds artistic motion blur.
- Works on any iPhone model supporting Live Photos (iPhone 6s or newer).
Cons:
- Only blurs moving elements (static backgrounds stay sharp).
- Long Exposure is marketed as a creative effect, not a blur tool.
How to blur background of photo on iPhone using Long Exposure effect:
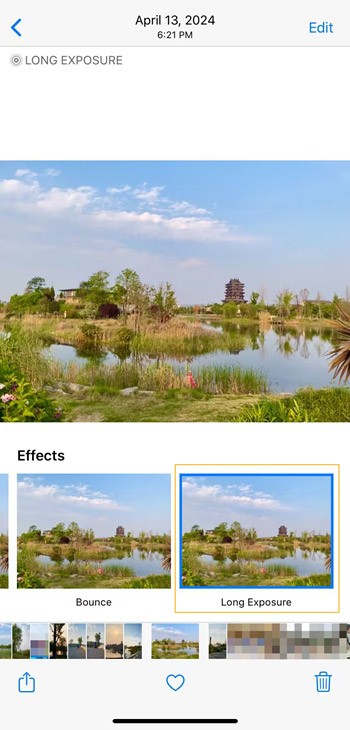
Step 1. Take a Live Photo of a scene with motion (e.g., a busy street).
Step 2. Open the photo, swipe up, and select Effects.
Step 3. Choose Long Exposure.
Step 5. The background motion will blur automatically.
While iPhone offers built-in tools like Portrait Mode, Depth Control, and Long Exposure to create background blur, they come with notable limitations. Portrait Mode struggles with fine details like hair and glasses, requires specific lighting and distances, and only works on newer iPhone models. Depth Control is limited to photos already taken in Portrait Mode, offering no flexibility for standard images. Long Exposure is more of a creative effect than a true blur tool, as it only affects moving elements while keeping static backgrounds sharp.
Frustrated by the built-in tools for blurring photo backgrounds on iPhone? You need a smart alternative.
For universal photo background blurring, you may need another tool that works on any photo, handles complex edges precisely, and offers full control over blur intensity. And AI-powered Aiarty Image Matting is your go-to option.
Alternative Way: Blur Any Photo with Aiarty Image Matting
Perfect for: Blurring any type of photos, complex backgrounds, non-Portrait or non-Live iPhone shots.
Aiarty Image Matting stands out as an advanced AI-powered image background removal and change tool, with its "Blur Background" feature being a game-changer. Whether you're a photographer looking to enhance portraits with DSLR-like blur, an e-commerce seller aiming to highlight products by removing distractions, a graphic designer in need of seamless cutouts for high-quality visuals, or a social media influencer striving to create eye-catching content, Aiarty makes achieving stunning background blur effects effortless, ensuring your subject stands out with a professional touch.
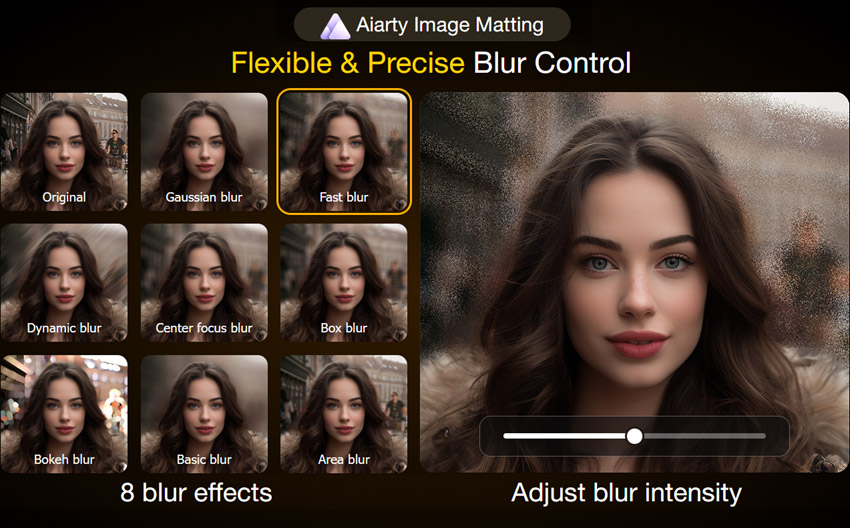
Key Features:
- One-Click Background Blur: Achieve professional blur effects instantly.
- 8 Blur Effects & Multiple Blur Levels: Customize the blur intensity to match your style.
- AI Precision: Detects edges and fine details better than manual tools.
- Fast & Efficient: Process 3,000 images/one time.
- Ease UI: User-friendly interface for beginners and professionals alike.
How to blur photo background with Aiarty Image Matting:
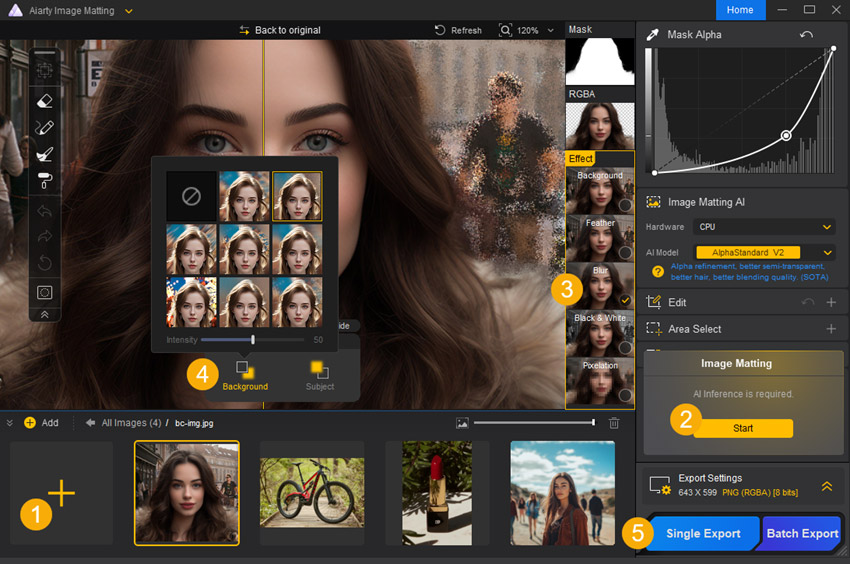
Step 1. Download Aiarty Image Matting, install and launch it.
Step 2. Drag and drop your image(s) to it, click the orange "Start" button, and wait for inference.
Step 3. Navigate to Effect section and tick Blur effect only. Also, there are other effects for changing your photo backrgound.
Step 4. Now, you can choose to blur the image background by clicking on the Background. Then, choose a blur effect and adjust the intensity.
Step 5. When everything is OK, click on the "Export" button to export your image(s) with a blurred background.
While iPhone’s native ways offer a quick way to blur image backgrounds, it often struggles with complex edges like hair and fine details, and it’s limited to certain conditions. Aiarty Image Matting, on the other hand, uses advanced AI technology to deliver professional-quality blur effects with precision and ease. It handles intricate details effortlessly, making it ideal for photographers, designers, and content creators who need a polished, natural look. Whether you're enhancing portraits, product shots, or social media content, Aiarty provides a seamless and refined finish every time.
You May Also Like
This post was written by Brenda Peng who is a seasoned editor at Digiarty Software who loves turning ordinary photos into extraordinary works of art. With AI assistance for brainstorming and drafting, the post is reviewed for accuracy by our expert Abby Poole for her expertise in this field.