How to Fix Pixelated Images with Awesome Quality
Updated on
How to make a picture less pixelate? Pixelation is an annoying issue that can occur in digital photos, making them appear blurry, grainy, or distorted. This happens when an image is enlarged or resized beyond its original resolution, making individual pixels visible. Pixelated images can cause problems in a variety of uses, including social media, e-commerce, graphic design, and photography.
Pixelation can be frustrating when it affects the quality of your images. Fortunately, various programs are available to repair pixelation and restore clarity. In this post, we'll look at four easy and effective approaches for using popular products like Aiarty, Adobe Photoshop, Fotor, and Depixelate Image Online. Whether you're a professional photographer or an amateur enthusiast, these methods will allow you to improve the quality of your pixelated images without any effort.

Method 1: Fix Pixelated Images Using Aiarty Image Enhancer
Aiarty Image Enhancer employs advanced algorithms to enhance and upscale photographs up to 32K. Whether you want to improve image quality with more details, increase image resolution, reduce blur and noise, or restore compressed JPEGs, Aiarty Image Enhancer can help you achieve super duper quality up to 32K on Windows or 16K on Mac.
Aiarty Image Enhancer can process photos using both the CPU and GPU. It can do enhancement and enlargement even on lower-end PCs. A computer with a higher configuration is preferred so that Aiarty can execute compute-intensive operations more quickly while processing huge image files.
Step to Fix Pixelated Images with Aiarty Image EnhancerNow let's download and install Aiarty Image Enhancer to our computer and follow the simple steps to make a picture less pixelate. You can remove the limitations by upgrading to the full version. Furthermore, the full version will regularly upgrade to the most recent version for free and offer technical support.
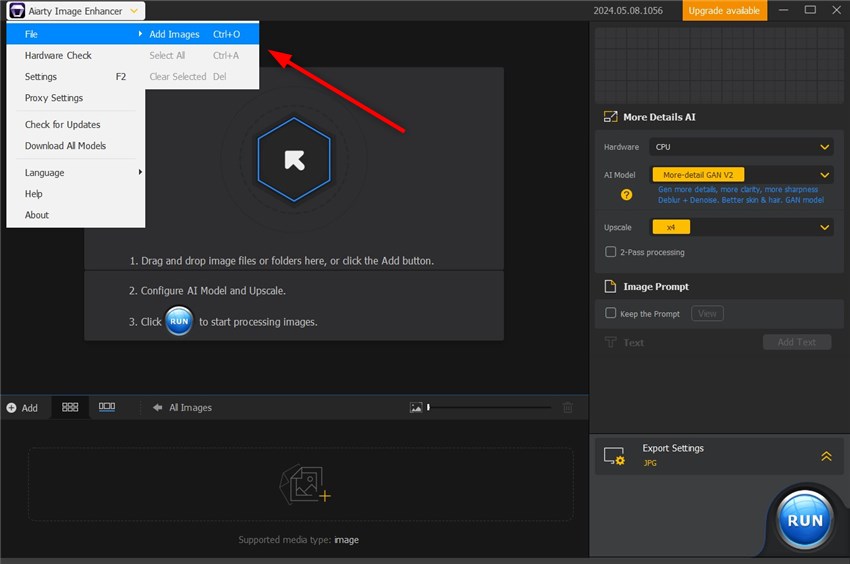
Step 1. Add your images to Aiarty Image Enhancer.
Click Aiarty Image Enhancer - File - Add Images at the left top corner to add images. You can also drag and drop your image files here directly.
Step 2: Preview your images.
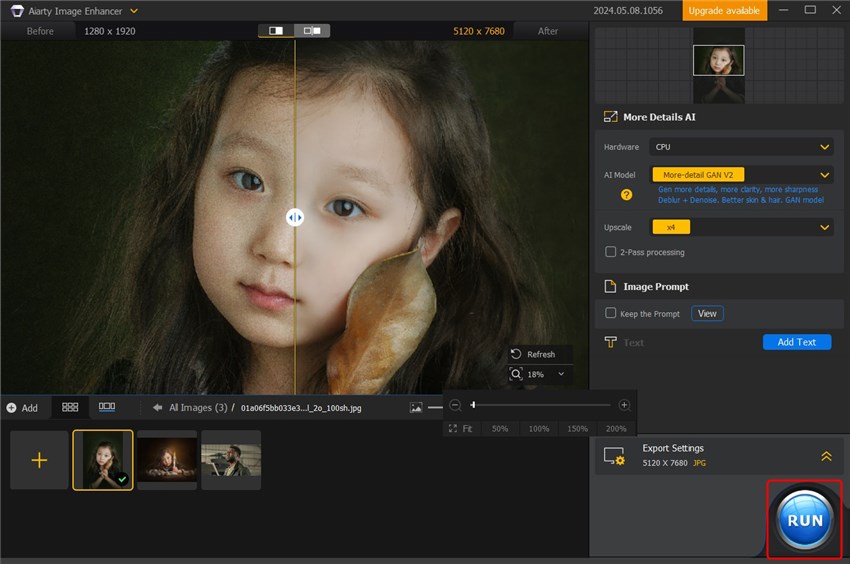
The original image is displayed in the left window, and the enhanced image will be previewed on the right. You can click the switch button to choose a preview mode. You'll see all your imported images here.
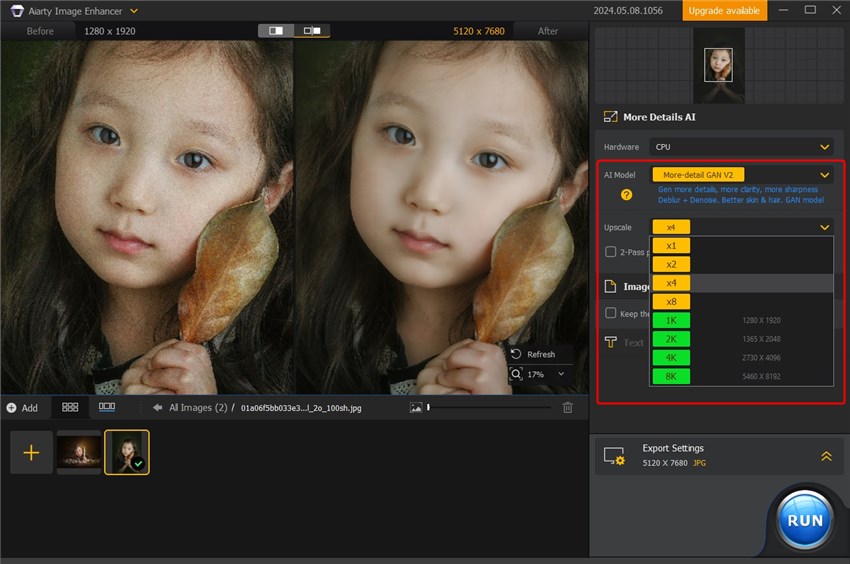
Step 3: Choose an AI Model or Upscale scale to fix pixelated images.
More-detail GAN V2: This AI model will generate more details, more clarity, and more sharpness. It will also help deblur and denoise your bad-quality images.
Smooth Diff V2: This AI model will make the image smoother, clearer, and brighter. It will also help deblur and denoise your bad-quality images; and restore the original.
Upscale: To enhance your images, you can choose x1, x2, x4, or x8, or you can double, quadruple, or octuple the resolution. Alternatively, you can convert the images to specified resolutions, such as 1K (1408 x 1408), 2K (2408 x 2408), 4K (4096 x 4096), or 8K (8192 x 8192).
Further Reading: How to Unblur Wildlife Photos >>
Method 2: Fix Pixelated Images Using Adobe Photoshop
When it comes to image processing, Adobe Photoshop is the industry standard, known for its outstanding versatility and extensive set of features. Thanks to its range of strong tools and advanced techniques, Photoshop makes it simple to fix pixelated images and make a picture less pixelate.
Users may modify the size of their images while reducing pixelation by going to the "Image" menu and selecting "Image Size." Furthermore, Photoshop has many sharpening filters, such as "Unsharp Mask" and "Smart Sharpen," that may be used to improve image clarity and eliminate pixelation, ensuring that your photos seem crisp and professional.
Whether you're working with high-resolution photos or web graphics, Photoshop allows you to get the best image quality without losing performance. With its user-friendly interface and technical functions, Adobe Photoshop is a powerful tool for fixing pixelation and improving the quality of your images. Here's a closer look at how Photoshop's features can help you rescue your pixelated images:
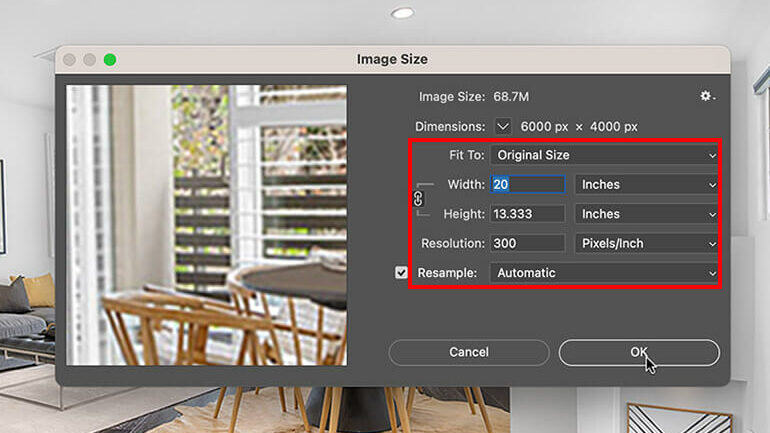
- Resizing and Resampling: With Photoshop's resampling features, you can resize images while retaining image quality. By going to the "Image" menu and selecting "Image Size," you can change the dimensions of your image while also picking a pixel-reducing resampling method. Increase the width and height slightly, letting Photoshop use AI to intelligently add pixel information and increase the resolution. And in the Resample dropdown, consider options like Bicubic Smoother for smoother transitions.
- Sharpening Filters: When dealing with pixelated photos, sharpening filters may greatly enhance image clarity. Photoshop has several sharpening effects, including "Unsharp Mask" and "Smart Sharpen," which help sharpen edges and small details, thereby fixing the pixelated images. Also, experiment with the Amount, Radius, and Threshold sliders to achieve the desired sharpness without overdoing it.
- Noise Reduction: Use noise reduction filters, such as Filter > Noise > Despeckle, or Filter > Noise > Reduce Noise, to minimize pixelation caused by noise or compression artifacts.
- Camera RAW (for RAW files): Open RAW files in Camera RAW and utilize the Super Resolution feature for a dramatic quality enhancement.
- Adjusting Resolution and DPI: Correcting pixelation often involves adjusting image resolution and DPI (dots per inch) settings. Photoshop allows you to fine-tune these parameters to match your specific needs, ensuring optimal image quality without sacrificing performance.
- Additional Tips and Tricks: Beyond these fundamental techniques, Photoshop offers a wealth of advanced features and techniques for tackling pixelation. From advanced retouching tools to layer-based editing, Photoshop provides endless possibilities for refining and restoring pixelated images with precision and finesse.
Method 3: Fix Pixelated Images Using Fotor
Fotor is an easy-to-use online image editor with strong AI-driven solutions for fixing pixelation issues. Fotor's user-friendly interface and AI-powered features make it a simple and effective option for pixelation removal, even for individuals with limited picture editing expertise. When you upload your pixelated image to Fotor, you'll get an array of user-friendly features aimed at improving image quality.
Also, Fotor provides full control over brightness, contrast, and saturation levels, allowing you to improve image quality while minimizing the effects of pixelation. By achieving the ideal balance of these aspects, you can take your pixelated pictures to new heights, transforming them from poor snapshots into polished works of art. Fotor's simple saving and sharing options allow you to download your modified images or publish them directly to your favorite social networking platforms like Pinterest, Twitter, Instagram, and more.
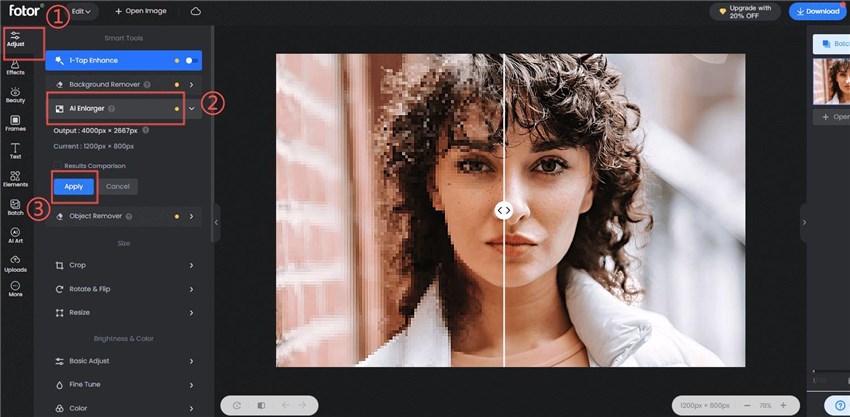
Step 1. Go to the Fotor website and click Open Image to upload your pixelated image. You can import pixelated images from a computer, phone, cloud, and Dropbox.
Step 2. Click "Adjust" and find the "AI Enlarger" tool.
Step 3. Finally, don't forget to click "Apply" and save your photo.
Method 4: Fix Pixelated Images Using Pixelied
Pixelied's Depixelate Image feature emerges as a versatile and user-friendly solution for fixing pixelated images with ease. With its intuitive interface and advanced AI algorithms, Pixelied empowers users to restore clarity and detail to their pixelated images effortlessly.
One of the standout features of Pixelied's Depixelate Image tool is its comprehensive range of adjustment options, allowing users to fine-tune their images to achieve optimal results. From sharpening filters and noise reduction to color correction and detail enhancement, Pixelied offers various tools to enhance image quality and minimize pixelation. With its simplicity and effectiveness, Pixelied's Depixelate Image feature stands as a go-to solution for anyone seeking to fix pixelated images.
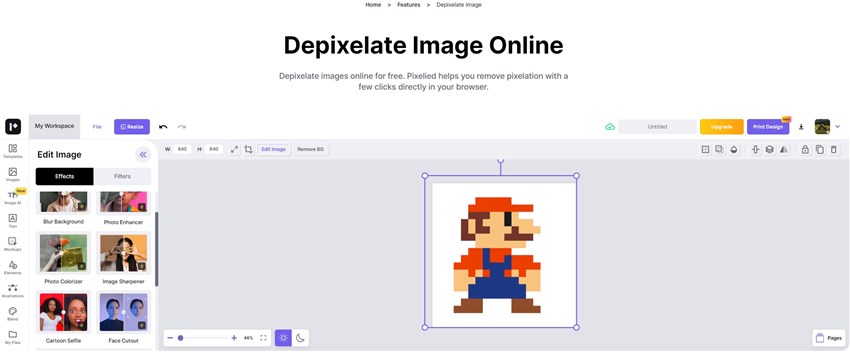
Step 1. Visit the Depixelate Image Online website and click Unpixelated Image Now.
Step 2. Upload your pixelated image by clicking the "Upload Image" button.
Step 3. Choose Image Sharpener in AI Image Tools. Wait for the tool to process your image and remove the pixelation.
Bonus Tip: How to Prevent Pixelation in the First Place
While the previous methods can effectively address existing pixelation issues, it's also important to understand how to prevent pixelation from occurring in the first place.
- Use a High-Quality Camera: Invest in a camera with a high resolution and sensor quality to capture images with ample detail, reducing the risk of pixelation.
- Adjust Camera Settings: Configure your camera settings to optimize image quality, such as using a low ISO setting, slower shutter speed, and longer exposure time.
- Minimize Image Resizing and Compression: Avoid excessive resizing and compression of images, as these processes can lead to pixelation. When resizing, maintain the aspect ratio to prevent distortion.
- Prepare Images for Various Purposes: Tailor the preparation of images based on their intended use. For web applications, optimize images for the web by balancing quality and file size, while for print, prioritize higher resolutions.
By following these simple yet effective tips, you can capture and prepare high-quality images that are less prone to pixelation, ensuring your visuals retain their clarity and appeal across different platforms and applications.
Conclusion
Pixelation doesn't have to ruin your images anymore. With these four easy methods, you can quickly fix pixelation and make your pictures look fantastic. Whether you prefer using Adobe Photoshop for precise editing or a simple online tool like Fotor, there's a solution for everyone. Explore these four easy ways to fix and prevent pixelated images, and unlock the full potential of your digital content.