40+ Stable Diffusion Perspective Prompts with Image Cases
Updated on
Perspective refers to how things are perceived from a specific viewpoint. This viewpoint can be a tangible physical location - an angle, or it may stem from an individual's experiences, knowledge, and beliefs, which collectively influence their feelings about a particular matter.
For example, when generating an image with Stable Diffusion, a basic prompt might be:
"A cat’s eye"
With a perspective prompt, you could make it:
"A cat’s eye, close-up shot"
So, mastering perspective prompts for Stable Diffusion will help generate images from different narrative points of view with Stable Diffusion easily. Waste no time, let’s explore these perspective prompts.
Generate Images with Stable Diffusion Perspective Prompts
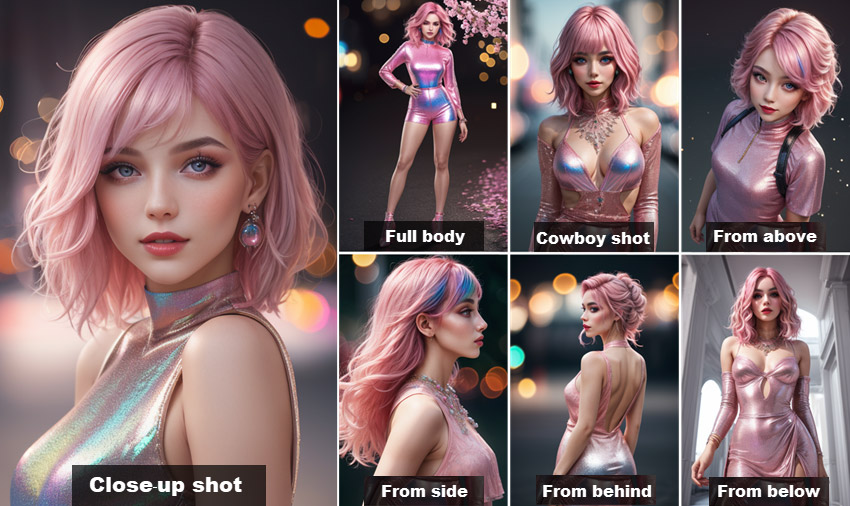
Now, activate your Stable Diffusion, and let’s generate images with different angles and points of view step by step. I choose 7 angles to show you the differences, including close-up, full body, cowboy shot, from above, from the side, from below, and from behind.
My basic prompt: "A vibrant girl, pink hair, detailed face, perfect skin, iridescent outfit, 8k resolution, high-fashion, colorful bokeh"
Step 1. Choose a Proper AI Model for Stable Diffusion.
In the top left corner of the Stable Diffusion user interface, choose an AI model. I wanted a photorealistic image with sci-fi and fantastical-style visuals, so I chose DreamShaper – a comprehensive AI model that can generate different images in different styles and perspectives. If needed, you can go to the Civitai website to choose a dedicated perspective model and download it. Then, place the checkpoint model file in the folder: stable-diffusion-webui/models/Stable-diffusion/.
Step 2. Input Stable Diffusion Perspective Prompts and Adjust Parameters.
First, I keep all the images I generate with the same parameters:
SD VAE: Automatic; Sampling steps: 20; Sampling method: DPM++ 2M; Schedule type: Karras; Width: 768; Height: 512; CFG: 7; Seed: -1; Clip skip:2; Version: v1.9.3; LoRA: <lora:add_detail:1>
Then, in the "text2img" section, I input the perspective prompts for Stable Diffusion. For example:
Prompt: "A vibrant girl,pink hair,detailed face,perfect skin,iridescent outfit,8k resolution,high-fashion,colorful bokeh, close-up (or full body, cowboy shot, from above, from the side, from below, from behind)"
Negative prompt: "cartoon,anime,blurry,bad quality"
Then, hit the "Generate" button to generate images based on the provided prompts.

Step 3. Check Details of the Generated Images.
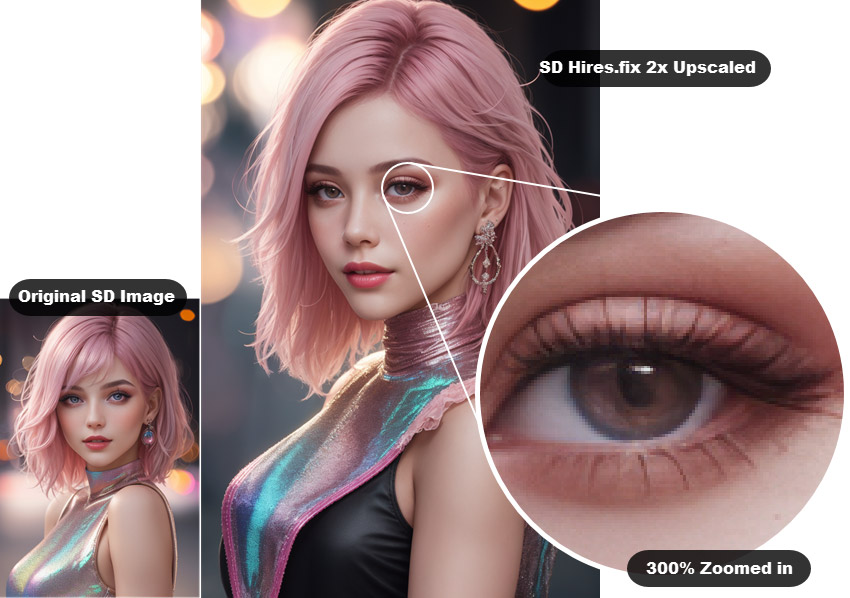
After image generation, you are suggested to check these images. For example, if there is any bad anatomy of my girl, I will add "bad anatomy, bad hands, bad arms, missing legs, or missing arms" negative prompt to adjust the image. Or if the image is blurry when zoomed in, I will use Stable Diffusion Hires.fix to upscale the image resolution to 2048px.

Step 4. Upscale & Enhance Stable Diffusion Perspective Images to Next Level.
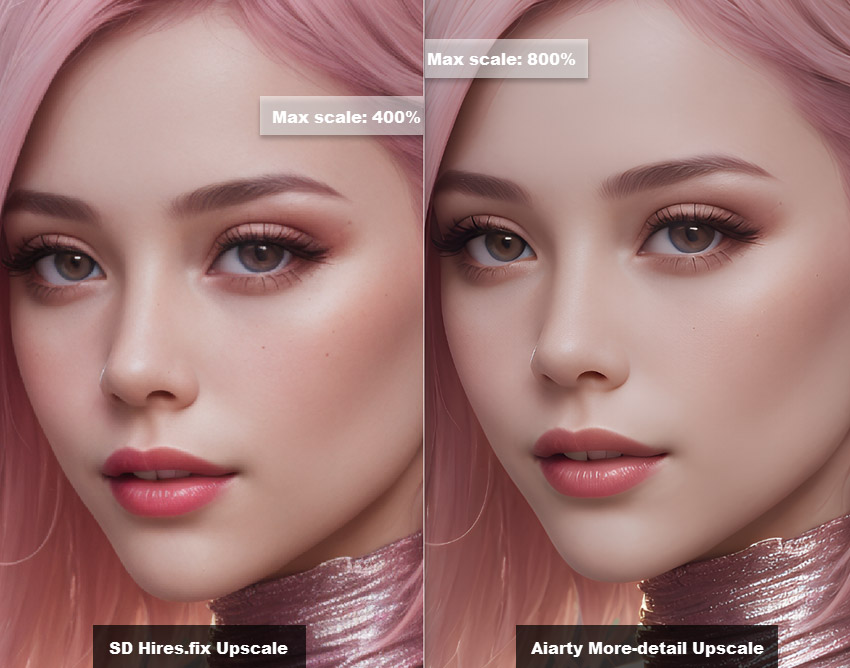
The default output resolution of Stable Diffusion images is 512x512 pixels, rendering them inadequate for display or printing. When upscaled by Stable Diffusion Hires.fix, the image clarity is improved a lot, but it seems that Hires.fix modifies the original image and introduces certain changes. Worse still, upon zooming in on the image that was upscaled using Hires.fix in Stable Diffusion, I observed that the image remained blurry.
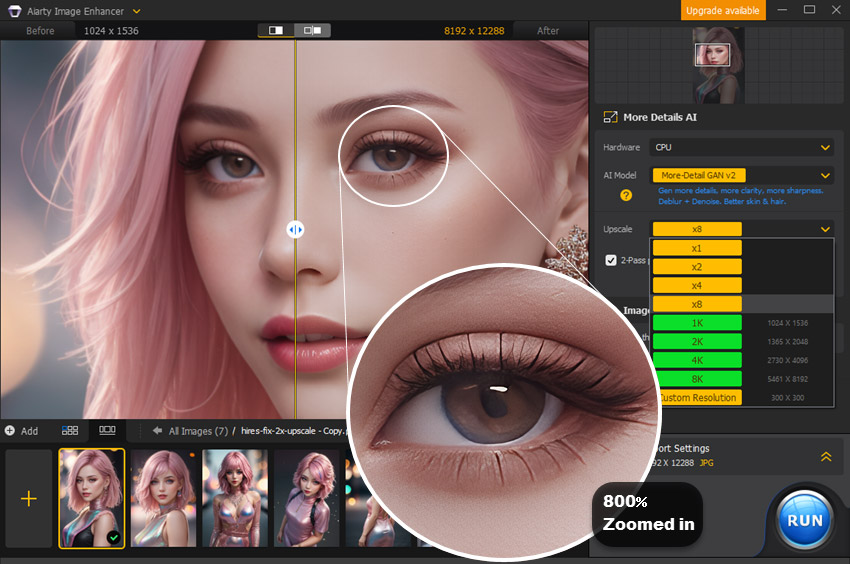
So, I use Aiarty Image Enhancer, an AI-powered image enhancer to upscale my image when it is generated for the first time and I’m very satisfied with it. Aiarty Image Enhancer is an AI-driven tool designed to upscale Stable Diffusion images by factors of x1, x2, x4, or x8, and it can elevate image resolution to 4K, 8K, 16K, or 32K, ensuring exceptional clarity and intricate details.
*** Better Way to Upscale & Enhance Your SD Perspective Images ***
Aiarty Image Enhancer will automatically deblur, denoise, upscale, and add details during the image enhancement process. With only a few clicks, your images will be upscaled without artifacts or blur.

How to Upscale & Enhance Images with Aiarty Image Enhancer?
Step 1. Download Aiarty Image Enhancer, install, and launch it.
Step 2. Drag and drop your anime image to it.
Step 3. After analyzing, choose an AI model in the right panel. The "More-Detail GAN" model is always suggested.
Step 4. Choose a resolution (1K, 2K, 4K, or 8K) or a scaling option (x2, x4, or x8).
Step 5. Specify the exporting settings and click on the "RUN" button to start upscaling your Stable Diffusion image with Aiarty Image Enhancer.

Stable Diffusion Perspective Prompt List with Cases
I have given some perspective prompt examples for Stable Diffusion and tell you how to generate images with Stable Diffusion. Now, you can collect more perspective prompts for different purposes. For your convenience, below is a collection of Stable Diffusion perspective prompts with example images.
Stable Diffusion Perspective Prompts: Camera Angle & Lens

Bird's eye view: "A bird’s eye photograph of a cityscape" |
Aerial shot: "Aerial shot of a coastal city, vibrant colors, clear blue sky, cinematic lighting" |
Worm's eye view: "Worm's-eye view of a towering tree, looking up at the branches" |

High angle: "High-angle perspective of a concert crowd, people dancing" |
Low angle: "Low angle shot of a superhero, dramatic pose, city skyline, cinematic lighting" |
Ground-shot angle: "Ground-level perspective of a meadow" |

Close-up shot: "Close-up of pink roses in bloom" |
Extreme close-up shot: "Extreme close-up shot of a tiger's eye,detailed iris" |
Long-angle shot: "Distant perspective of a mountain range, snow-capped peaks" |

Wide-angle shot: "Wide-angle shot of a beach, expansive shoreline" |
Panoramic shot: "Panoramic perspective of a city skyline at night, lights on" |
Dutch/Tilted angle: "Tilted camera, mysterious figure, shadows, suspenseful" |

Macro lens: "Macro lens of a bee,detailed" |
Pinhole lens: "Pinhole lens, old town, cobblestone streets, soft focus, sepia tone" |
Fisheye lens: "Barrel distortion, underwater scene, fish-eye view, vibrant colors" |

Soft-focus lens: "Soft focus flower,gentle bokeh,pastel colors" |
Telephoto lens: "Telephoto lens,lion in savanna,golden hour,detailed,high quality" |
Eye-level angle: "A boy reading a book,focused,happy,eye-level perspective" |
Stable Diffusion Perspective Prompts: POV & Mental Perspective
From above |
From below |
From side |
From behind |
Full-body |
Half-body |
Cowboy shot |
Close to viewer |
Looking at viewer |
Looking to the side |
Looking away |
Over the shoulder |
Dramatic angle |
Dynamic angle |
Expressions |
Cenertered |
Three-quarters |
Front view |
First person |
Second person |
Third person |
Three-point perspective |
Panning perspective |
Interior perspective |
Interior perspective |
Forced perspective |
Underwater perspective |
Street-level perspective |
Reflection perspective |
Backlit perspective |
With perspective prompts for Stable Diffusion, you’re not just describing what you want, but also providing vital context for the AI to render a tailored scene. By providing specific details, you can enhance the AI's ability to generate highly detailed, coherent, and visually compelling images that align with your creative vision, allowing you to craft intricate visual narratives and achieve greater control over the final output.