Summary: Ready to create stunning Google Slides? This guide shows you how to make a background transparent in Google Slides using Google's native tools and a professional background remover. Use transparency to focus attention, layer images, and add a professional touch. Try Aiarty for easy image background removal and transform your presentations today!
Transparent backgrounds in Google Slides are more than just a design trick—they're a powerful tool for creating polished, professional presentations. Whether you're working on a business pitch, a school project, or a creative portfolio, transparent backgrounds can take your slides from meh to wow.
By removing unnecessary distractions, they help focus your audience's attention on what truly matters: your content. Plus, they allow you to layer images and text seamlessly, adding depth and sophistication to your design. Think of it as decluttering your slide's visual space while giving it a 3D effect.
From logos to infographics and custom graphics, transparent backgrounds have endless use cases. For example, imagine presenting a company report—instead of a logo with a white box awkwardly placed on your slide, a transparent version makes it look like it belongs there. These small details can make a big difference in how your presentation is perceived.
Before we go for the details of using this native tools, you may need to first learn about its limitations. If you are not happy about it, you can directly jump to the second method and save your time.
💡 Limitations of Using Google Slides' Native Tool:
While Google Slides' native tools are great for shapes and text boxes, they have one major limitation: you can't directly make image backgrounds transparent. If you're working with a logo, graphic, or photo, you'll need to use a third-party tool to remove the background first. Don't worry—we'll cover that in the second method with more advanced needs!
Method 1: How to Make a Background Transparent in Google Slides Using the Native Tools
While Google Slides' native tools are great for shapes and text boxes, they have one major limitation: you can't directly make image backgrounds transparent. If you're working with a logo, graphic, or photo, you'll need to use a third-party tool to remove the background first. Don't worry—we'll cover that in the second method with more advanced needs!
Google Slides may not have the most advanced editing features, but its native tools are surprisingly handy for basic transparency needs—especially when working with shapes or text boxes. If you're looking to add a semi-transparent overlay or a subtle design element, this method is quick, easy, and doesn't require any third-party software.
Here's how to do it.
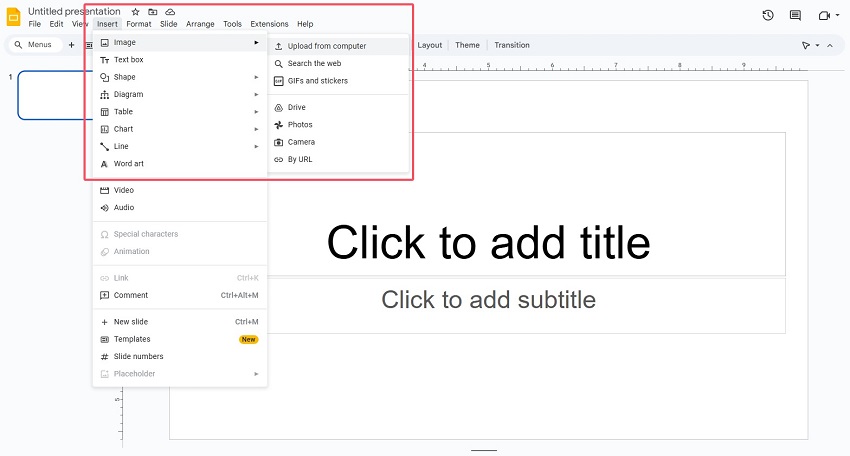
Step 1. Open Google Slides and then insert the image which you want to remove its background following Insert > Image > Upload from computer or somewhere else.
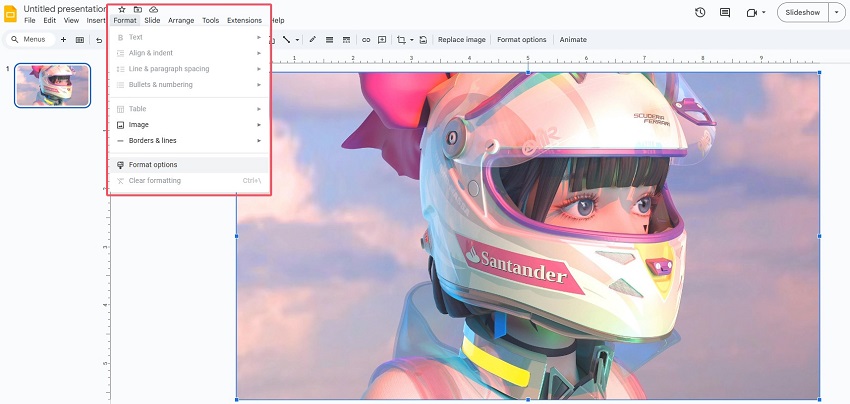
Step 2. Then click on the inserted image. Go to the tool bar and find Format tab. Under it, choose the Format options menu.
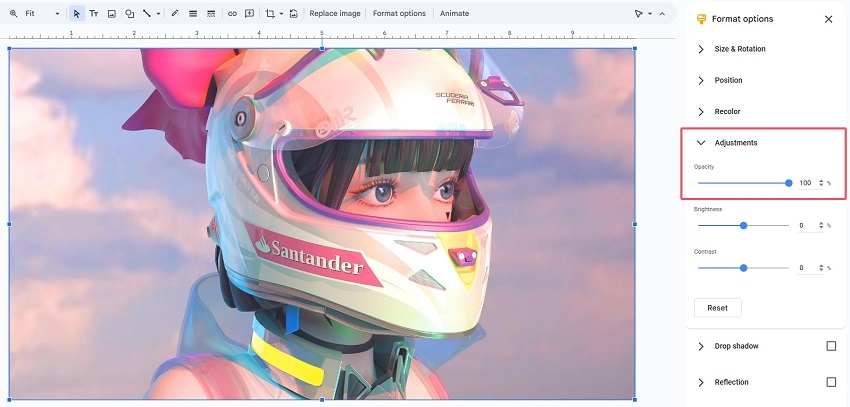
Step 3. Click the Adjustments tab from the drop-down menu, then move the Opacity slider to the left to change the image's transparency, until you're satisfied with the transparency level.
Method 2: How to Make a Background Transparent in Google Slides Using Aiarty Image Matting
When it comes to making image backgrounds transparent in Google Slides, Google's native tools fall short. That's where Aiarty Image Matting comes in.
Let's say you have a company logo with a white background. Instead of inserting it as-is and dealing with that awkward white box, you can use Aiarty Image Matting to remove the background entirely. The result? A clean, professional logo that integrates perfectly with your slide's design.
This AI-powered tool is a game-changer for anyone looking to remove backgrounds quickly and precisely. Whether you're working with logos, product photos, or custom graphics, Aiarty makes the process effortless.
Why Choose Aiarty Image Matting?
Aiarty Image Matting stands out for its simplicity and accuracy. Unlike manual editing tools that require hours of work, Aiarty uses advanced AI to detect and remove backgrounds in seconds. The interface is intuitive, making it perfect for beginners, while the refining tool offers advanced users the ability to clean up tricky edges (think hair or fur).
Plus, it exports your image as a transparent PNG, which is ideal for Google Slides.
Step 2. Run Aiarty Image Matting and import your image(s) into it.
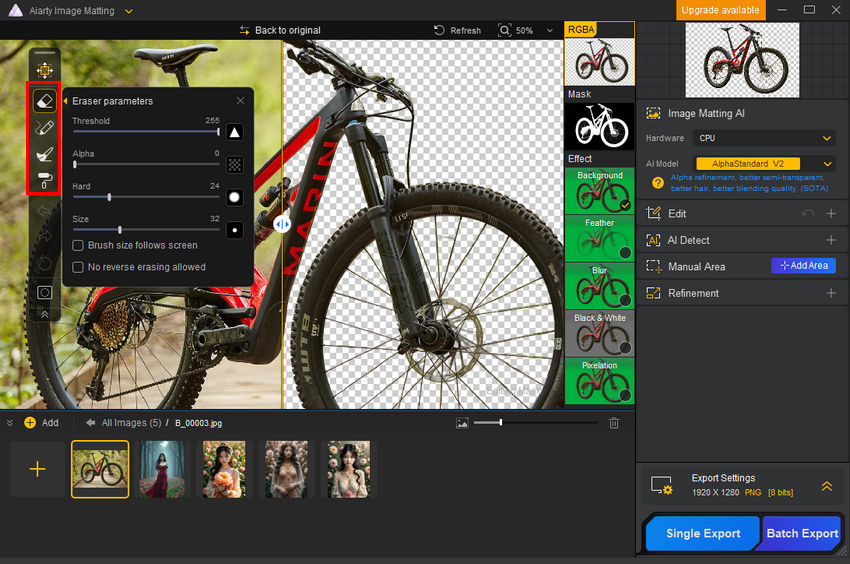
Step 3. Then choose the AI model which you prefer. After that, click the Start button and Aiarty Image Matting will automatically analyze and remove the background from your image.
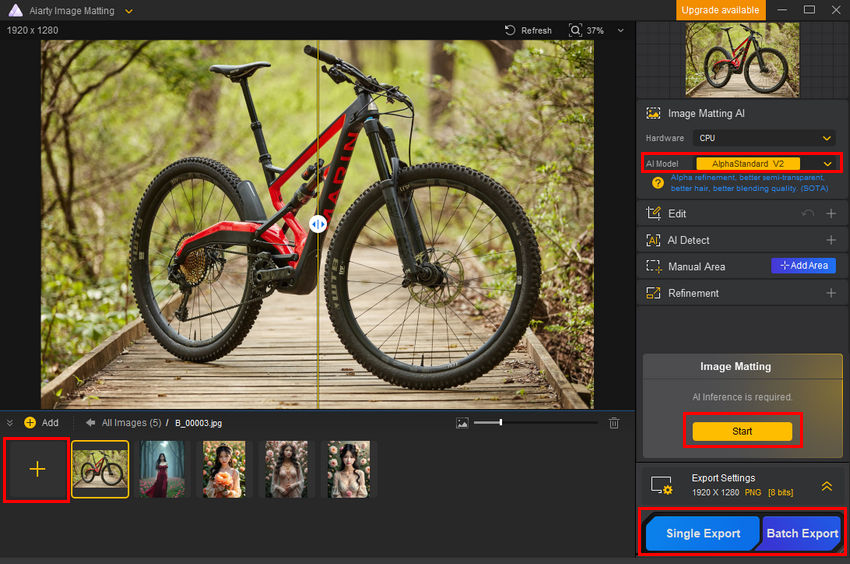
You can check the result here.

Step 4. If the result is not make you satisfied, for example, the left-object is not really what you want, please use the manual drawing options on the left to further refine the result.
Step 5. Lastly, when all are settled, just click the export button to save your results.
Brenda's Tips for Best Results
- Use High-Resolution Images: Low-res images can look pixelated when resized, so always start with the highest quality file you have.
- Refine Complex Edges: For images with intricate details (like hair or fur), take advantage of Aiarty's refining tool to clean up the edges manually.
- Organize Your Files: Save your transparent PNGs in a dedicated folder for easy access. Trust me, it'll save you time in the long run!
Troubleshooting Common Issues
Even with the best tools and techniques, you might run into a few hiccups when working with transparent backgrounds in Google Slides. Don't worry—most issues have simple fixes. Here's a rundown of common problems and how to solve them.
Transparency Lost After Uploading
You've created a beautiful transparent image, but when you upload it to Google Slides, the transparency disappears. What gives?
Fix 1: Make sure your image is saved as a PNG file. JPEGs don't support transparency, so they'll add a white background by default.
Fix 2: If you're using Aiarty Image Matting, double-check that you downloaded the image in PNG format. If not, re-export it and try again.
Rough Edges on Transparent Images
Sometimes, the edges of your transparent image might look jagged or uneven, especially with complex subjects like hair or fur.
Fix: Use Aiarty Image Matting's refining tool to smooth out the edges. Zoom in and carefully adjust the selection for a cleaner result.
Transparency Not Showing in Slides
You've inserted a transparent image, but it's not showing up as expected.
Fix: Check if the image is placed behind other elements on the slide. Right-click the image, select Order, and choose Bring to Front if needed.
Pixelation or Blurry Images
Your transparent image looks great in the editor but appears blurry or pixelated in Google Slides.
Fix: Start with a high-resolution image to avoid quality loss when resizing. If you're using Aiarty Image Matting, ensure you're uploading the original, high-quality file. If your original file is blurry, you can also go for the Aiarty Image Ehancer to help you make it with much better quality first.
Incorrect Background Removal
The AI might not always get it right, especially with images that have similar foreground and background colors.
Fix: Use Aiarty's Manual Area tool to manually adjust the selection. For tricky areas, zoom in and take your time to get it just right.
By keeping these troubleshooting tips in mind, you'll be able to tackle any transparency-related issues with confidence. Remember, practice makes perfect—so don't be afraid to experiment and refine your process!
Conclusion
Making backgrounds transparent in Google Slides doesn't have to be complicated—whether you're using native tools for shapes and text boxes or leveraging the power of Aiarty Image Matting for images. With these methods, you can create clean, professional slides that truly stand out.
Here's a quick recap:
- Use Google Slides' Fill Color tool for simple transparency adjustments to shapes and text boxes.
- For images, turn to Aiarty Image Matting to remove backgrounds quickly and precisely.
- Always test your slides in Present mode to ensure transparency looks perfect before sharing.
As a seasoned editor, I can't recommend Aiarty enough—it's fast, accurate, and makes background removal a breeze. So, whether you're designing a presentation for work, school, or a personal project, give these techniques a try. Your slides will look polished, professional, and ready to impress.
You May Also Like
This post was written by Brenda Peng who is a seasoned editor at Digiarty Software who loves turning ordinary photos into extraordinary works of art. With AI assistance for brainstorming and drafting, the post is reviewed for accuracy by our expert Abby Poole for her expertise in this field.