
How to Remove Background from an Image or Picture in Microsoft Word (2010–365)
Updated on
Adding a picture to a Word document often comes with an annoying issue—the white background stays, making the image look unprofessional. This is especially frustrating when dealing with logos, signatures, or any image that needs a clean, transparent look. While most people jump to third-party background removers like Aiarty Image Matting, Word itself has a built-in tool for background removal. It's not perfect, but for simple tasks, it does the job.
This article shows how to use Word’s background remover step by step. And when Word fails—like with blurry edges, low contrast, or complex objects—there’s an AI-powered alternative that handles the hard part for you.
How to Remove Background from Picture in Word (2010–365)
The steps for removing a picture’s background aren’t exactly the same across all versions of Microsoft Word. Newer versions like Word 2019, 2021, and Microsoft 365 offer a more intuitive interface and slightly different menu labels compared to older editions. If you're using Word 2010, 2013, or 2016, some of the commands appear in different places, and a few features may behave differently. Below is a breakdown for each version to make sure you’re clicking the right tools no matter which one you have.
How to Remove Background in Word 2019/2021/365
The following steps are suitable for removing background from the picture in Word 2019, Word 2021, and Microsoft 365 on Windows & macOS.
Step 1. Copy your picture to Word.
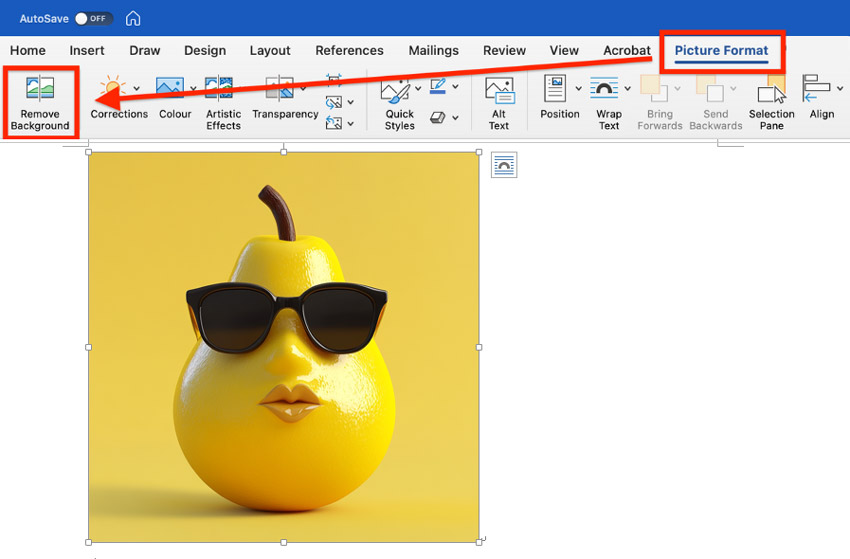
Step 2. Use your mouse to select the picture. This step is very IMPORTANT, otherwise you won’t see the "Remove Background" function.
Step 3. On the toolbar, select Picture Format > Remove Background, or Format > Remove Background.
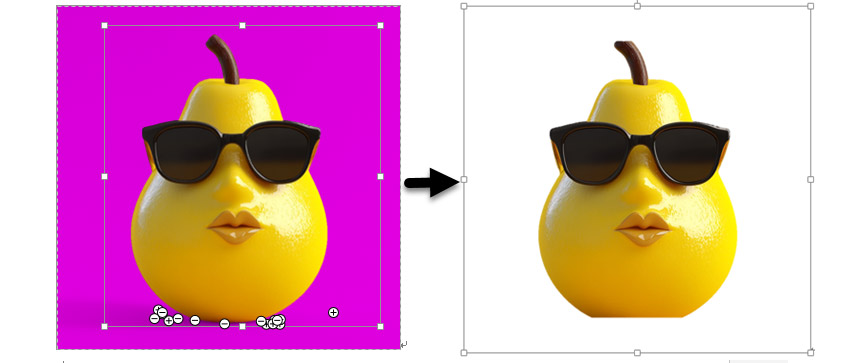
Step 4. The default background area will be colored magenta to mark it for removal, while the foreground will retain its natural coloring. Drag the bar to control the area that you want to remove.
Step 5. If the default area isn’t what you need, you can go to Background Removal > Picture Tools to manually select specific area.
- Select Mark Areas to Keep and use the free-form drawing pencil to mark the areas on the picture that you want to keep.
- Select Mark Areas to Remove and use the drawing pencil to mark those areas that you want to remove.

Step 6. When you’re done, select Keep Changes. Then, right-click the picture and select "Save as Picture" to save the image in PNG format to keep its transparent background.
How to Remove Background in Word 2010–2016
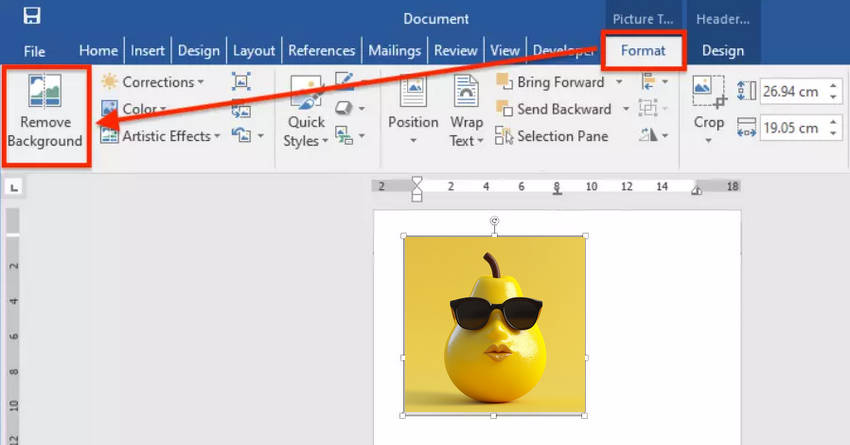
In Word 2010, Word 2013, and Word 2016, there is a slight difference to remove a background of a picture in Word.
After selecting your picture in Word, you should find the Remove Background option under Picture Tools on the Format tab in the Adjust group. Then, use the above steps to make a picture transparent in Word.
When Word Fails: The Limitations of Built-in Background Removal
Microsoft Word can remove backgrounds from simple images, but its capabilities are limited. It works best when:
- The image has clear, sharp edges
- The subject is small and separated from the background
- Examples include logos, cartoons, and basic line drawings
Even with simple images, Word often fails to fully detect the subject. You may need to manually adjust the selection using “Mark Areas to Keep” and “Mark Areas to Remove,” which can be time-consuming.
Word struggles especially with:
- Photos with soft or blurry edges
- Detailed subjects with shadows or mixed colors
- Semi-transparent elements like glass or hair
- Vector images such as SVG files (not supported at all)
Since Word isn't designed for advanced background removal, it may not give clean results in most real-world cases. For better precision, try Aiarty Image Matting—an AI-powered tool that accurately extracts subjects and blends them with new backgrounds. Here's how it works.
Can't Remove Background in Word? Try Aiarty Image Matting
Microsoft Word’s background removal tool often fails when dealing with complex images—especially those involving hair, soft edges, shadows, or semi-transparent elements like glass or fabric. It also doesn't support advanced cutouts or accurate transparency, making it unsuitable for high-quality visual content.
This is where Aiarty Image Matting becomes essential. Designed for AIPC, PC, and Mac, it uses deep-learning models to extract fine details with pixel-level accuracy. Whether you're working with portraits, animals, blurry edges, or translucent textures, Aiarty can isolate the subject cleanly—far beyond what Word can achieve.
The AI background remover not only removes the background with precision but also lets you:
- Export images in PNG format with transparent backgrounds
- Replace the background with a new image of your choice
- Refine edges manually for perfect cutouts
If Word gives you jagged edges, missing parts, or a messy selection, Aiarty provides a fast and professional alternative for clean, ready-to-use results.
How to remove background from picture in Aiarty Image Matting?
Step 1. Download Aiarty Image Matting, install and launch it.
Step 2. Drag and drop the image you want to remove background to Aiarty.
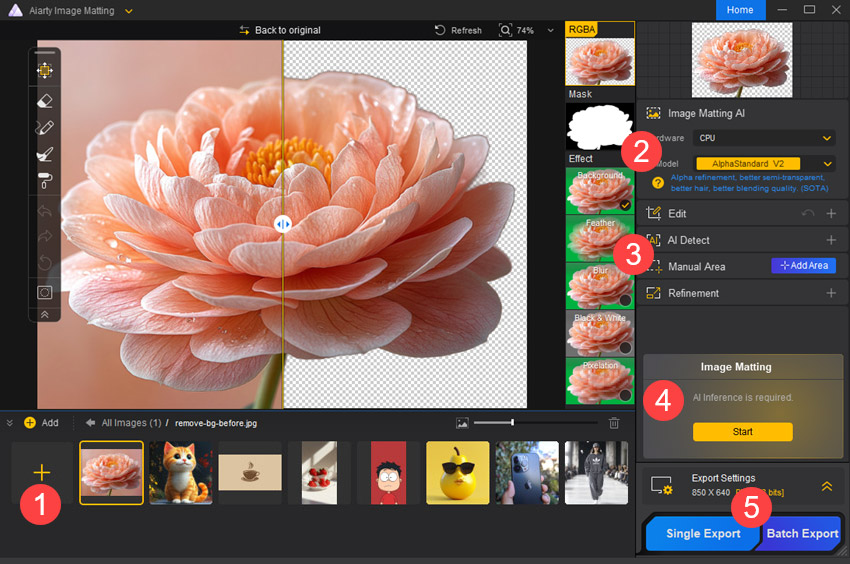
Step 3. Choose CPU or GPU to process your image. Select an AI model for your image.
- AlphaStandard V2: A CNN-based model that refines the Alpha channel, preserves translucency, and optimizes edge details. Ideal for processing semi-transparent objects like wedding dresses, glass, hair, and pets, ensuring smooth transitions and natural blending with backgrounds.
- AlphaEdge V2: Built on a CNN architecture, AlphaEdge V2 enhances edge sharpness and reduces transparency compared to AlphaStandard. It delivers crisp, well-defined outlines, making it ideal for product images, cartoons, icons, and high-contrast black-and-white photos.
- EdgeClear V2: Using a Swin Transformer variant, this model improves matting accuracy and detail preservation. Ideal for birds, bicycles, cars, bags, jewelry, furniture, and other objects.
- SolidMat V2: Based on a Swin Transformer variant, this model offers higher edge sharpness for solid objects like bags, shoes, cars, and buildings. Ideal for architecture, industrial products, abstract art, and macro photography, it ensures clear, distinct edges and sharp contrast for solid subjects.
Step 4. Optionally, expand Edit to enhance image, rotate or flip, or crop your image before matting. Also, you can use AI Detect to detect the subject automatically or use Manual Area to manually select the areas you want to extract.
Step 5. Hit the orange Start button under Image Matting to start analyzing and matting your image.
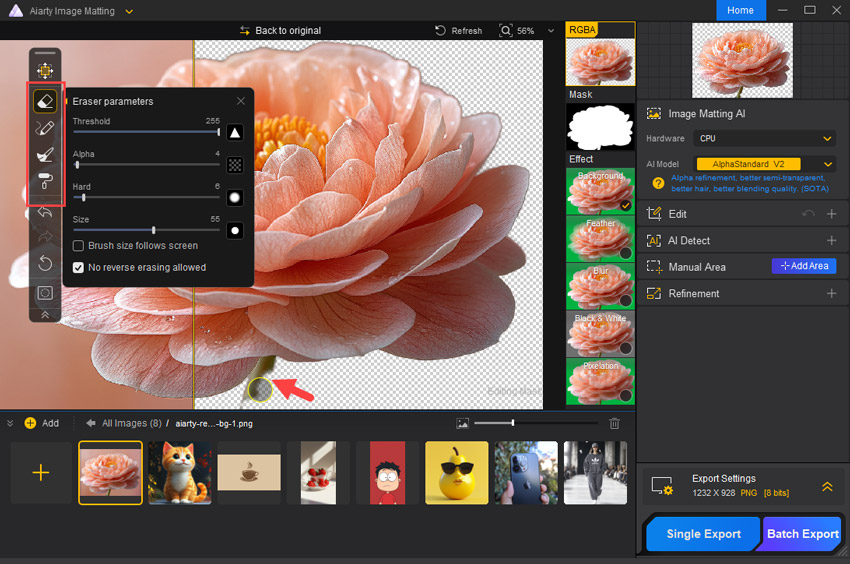
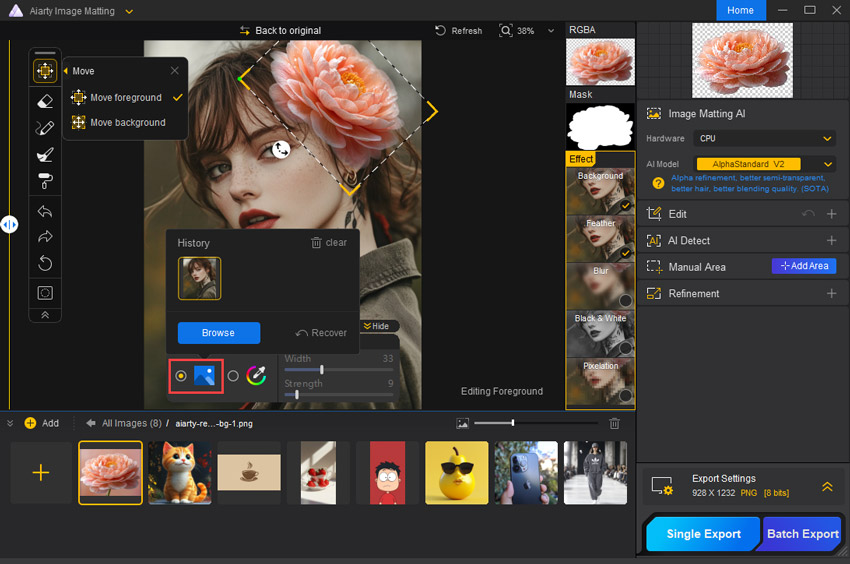
Step 6. After that, Aiarty Image Matting will make your image background transparent. If there are some flaws, you can use the drawing tools to have some manual operations. For example, I don’t want the flower scape, I will use Eraser tool to remove it.
- Eraser: It allows users to selectively erase parts of an image, making them transparent based on the configured settings.It is suggested to set the Threshold value to 230 and Alpha value to 0.
- Brush: You can use the Brush tool to recover the part you just removed using Eraser tool. You can adjust the Alpha value to control the image opacity.
- Dodge: The dodge tool is used to lower the transparency of the areas it affects. It can be used as a erasing tool. It is suggested to set the Threshold value to 230 and Alpha value to 50.
- Burn: The burn tool is used to increase the transparency of the areas it affects. It can be used as a brush tool. It is suggested to set the Threshold value to 20 and Alpha value to 50.
Step 7. If you just need to remove background of a picture, now you can hit Single Export button to export the picture with transparent background.
Step 8. As I want to blend this image with a new background, I switch to Effect section to have further adjustments. For example, I can use Feather, Blur, Black & White, or Pixelation effect.

Step 9. Now, I choose a new image as the new background. Adjust the foreground and background. Then, hit the Single Export button to export the image.
Aiarty Image Matting software uses advanced algorithms to separate foreground subjects from backgrounds with high accuracy, enhancing photo editing by allowing seamless background changes, refinements, or transparency. This tool is ideal for professional photographers, e-commerce, and graphic designers, delivering precise cutouts and saving time on complex manual editing. If you encounter challenges in removing the background from an image in Word, you may utilize Aiarty Image Matting for assistance.
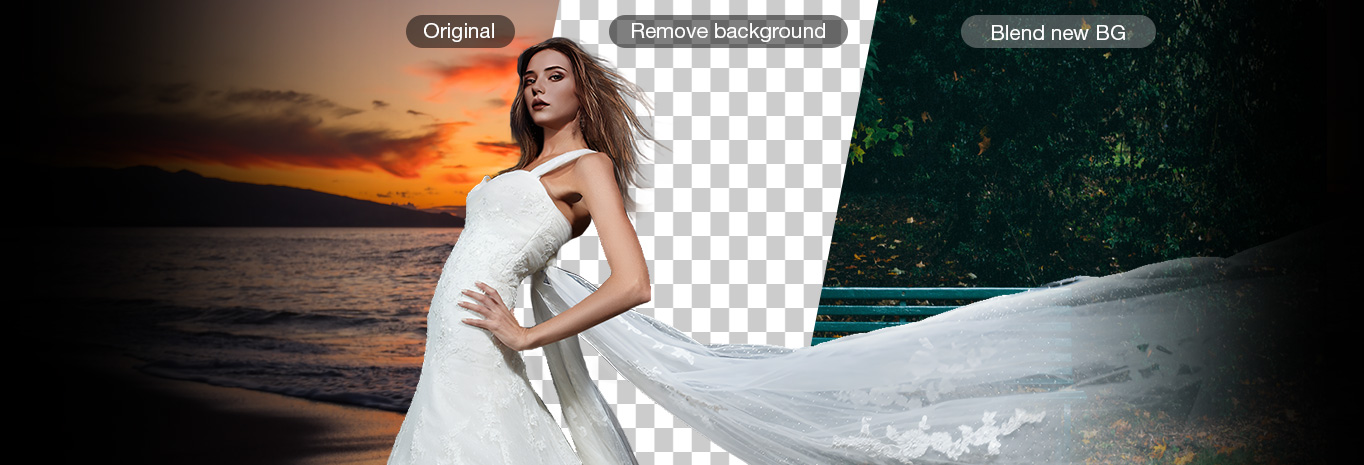
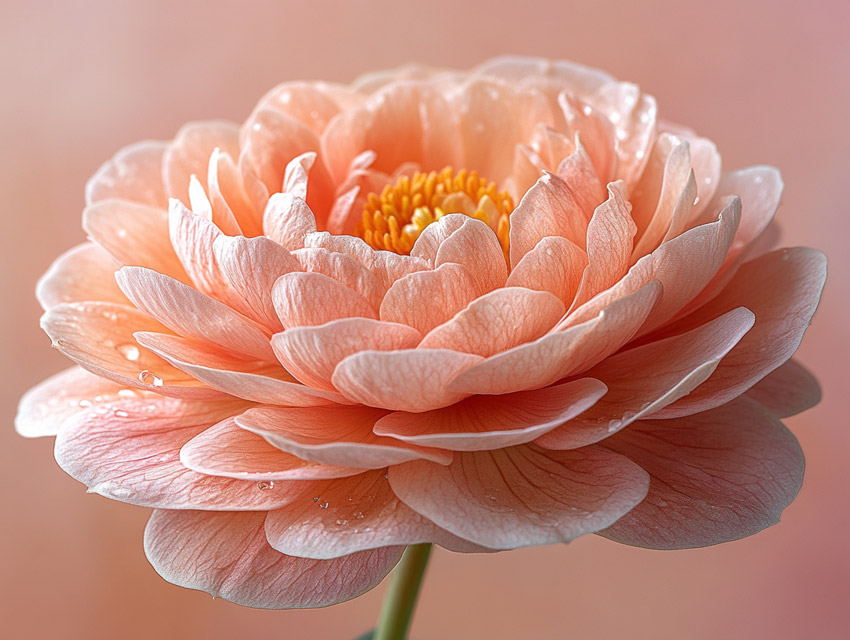
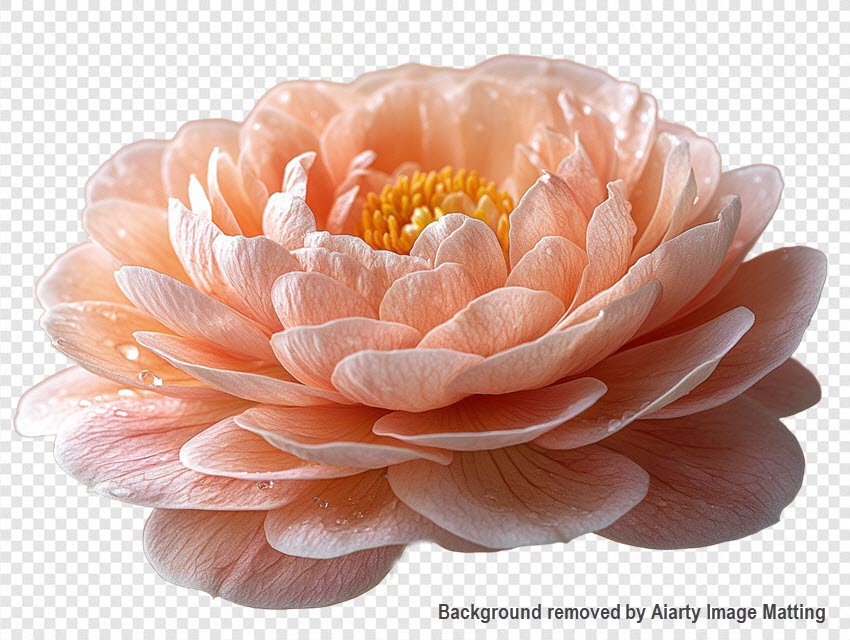
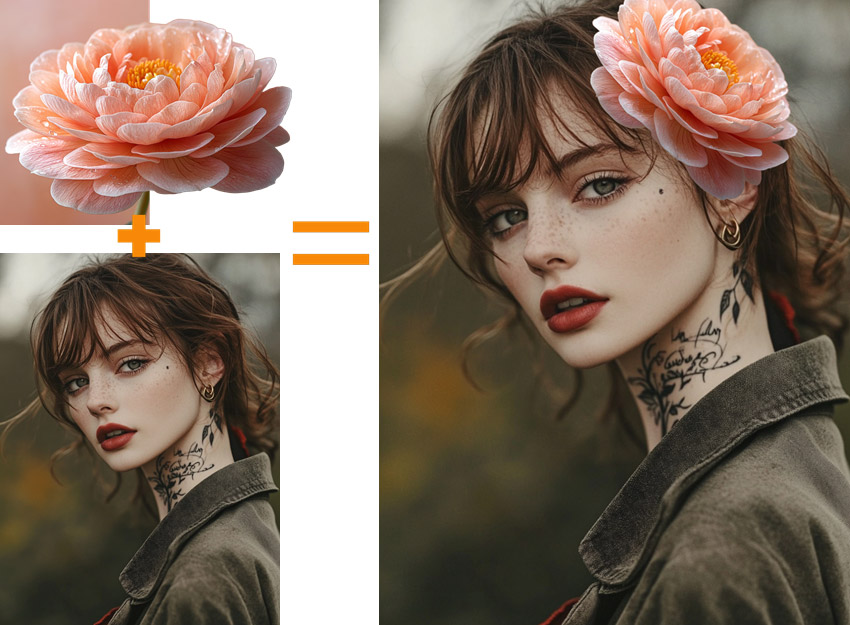
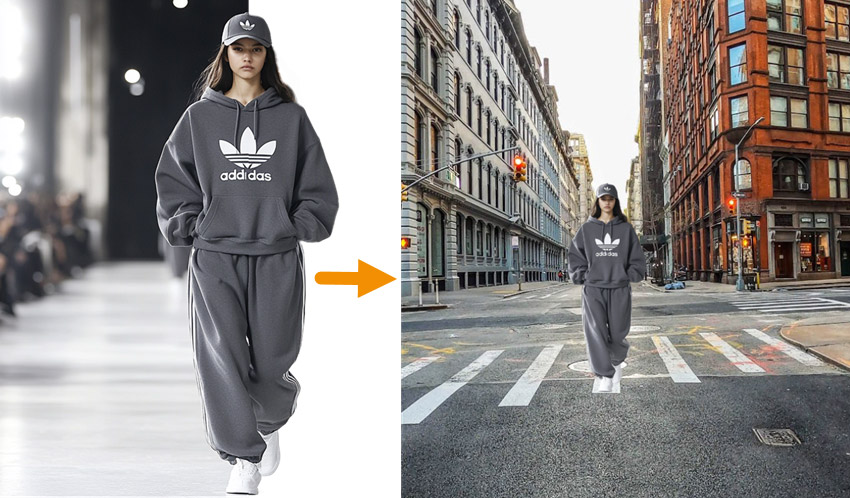
Clean Extraction and Perfect Blend with Aiarty Image Matting, Powered by AI
The results speak for themselves—check out the images below to see Aiarty in action. From clean edge extraction to seamless background replacement, these examples highlight how well the tool handles even the most challenging images.


Ready to try it yourself? Download Aiarty Image Matting and see how easily you can remove backgrounds and create professional results—no design skills needed.
 FAQ about Removing Background in Word
Yes. If you're using Word for Mac 2016 or later, the Remove Background tool is available. Just select your image, go to the "Picture Format" tab, and click "Remove Background." Use the preview to fine-tune the area before applying changes.
After removing the background, right-click the image and choose "Save as Picture." Select PNG format to retain the transparency. Avoid using JPG, as it does not support transparent backgrounds.
Make sure the image is selected—otherwise the button won’t appear. If it’s still missing, your Word version may not support this feature. Also, some image types or pasted screenshots may not work well with Word's tool.
For better accuracy, especially with complex or blurry images, consider using a dedicated background remover like Aiarty Image Matting.
No, Word does not support background removal for SVG or other vector formats. The feature works only with raster images like PNG, JPG, or BMP. To remove backgrounds from vector files, use professional tools like Illustrator or AI-based software such as Aiarty Image Matting after converting the image to a supported format.
You May Also Like
Brenda Peng is a seasoned editor at Digiarty Software who loves turning ordinary photos into extraordinary works of art. With years of experience behind the lens and in front of the computer, Brenda shares her passion for photography, image enhancement, and editing through easy-to-follow tutorials.