How to Print a Photo on Mac
Updated on
Printing photos on a Mac is a breeze when you know the right steps, and it's a great way to turn your digital memories into lasting keepsakes. Whether you're creating a photo album, crafting personalized gifts, or just want to frame that perfect shot, learning how to print your photos in top quality is essential. In this guide, we'll walk you through the quick and easy steps to print high-quality photos directly from your Mac.
How to Print a Photo on Mac Easily
Before we dive into the steps, it's important to make sure your photo is print-ready. If the image resolution is too low or the details are blurry, your prints may not turn out as expected. This is where Aiarty Image Enhancer comes in.
Aiarty Image Enhancer is a cutting-edge software that effortlessly upscales old, low-resolution, or blurry photos for stunning prints. Powered by advanced deep learning technology, this AI-driven tool effectively removes compression artifacts while enhancing overall photo quality by denoising, deblurring, and upscaling them up to 16K/32K resolution. Additionally, Aiarty excels at restoring intricate textures, facial details, and natural elements like hair. This comprehensive approach guarantees that your photos are restored to their original quality while achieving a level of sharpness ideal for high-quality prints.

- Batch improve photo quality by denoising, deblurring, sharpening, and image generation.
- Upscale photos/images to 16K/32K, ensuring that even old/low-res photos can be transformed into high-quality prints.
- Generate details for skin, hair, textures, lines, and the like.
- Prepares photos/images for printing at 300DPI, the standard resolution for high-quality prints.
- Suitable for various types of images, including older photos, selfies, and artistic prints, ensuring exceptional clarity and detail across the board.
- Upscale resolution presets tailored to your desired printing dimensions.
Step 1. Launch the Photos app or locate your image in Finder. Double-click the photo to open it.
Tips: If you want to select multiple photos for prints, press and hold the left mouse, then drag your cursor across a group of thumbnails. If you wish to select photos one by one, simply hold down the Command key while clicking on each photo.
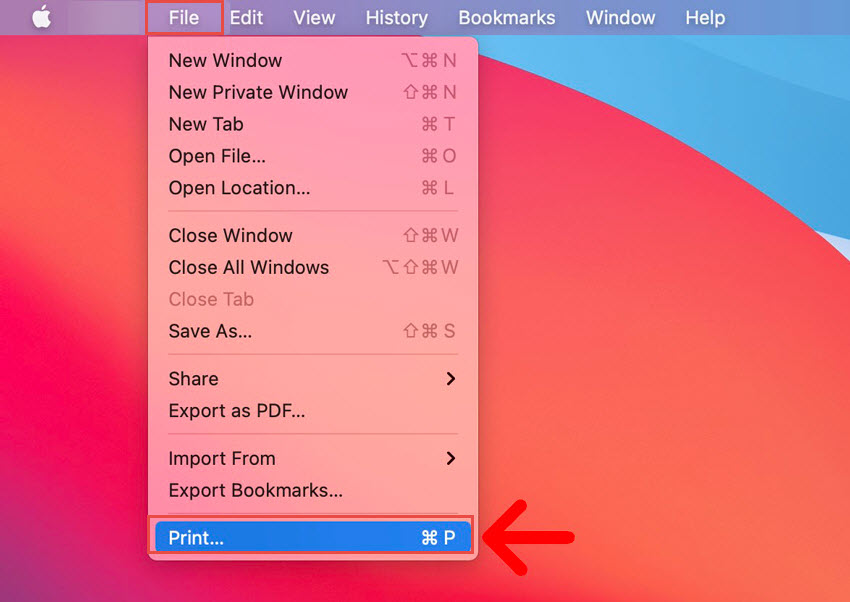
Step 2. Then go to the top-left corner of your screen and click File in the menu bar. From the dropdown menu, select Print. Alternatively, you can use shortcut key Command+P directly for easier access.

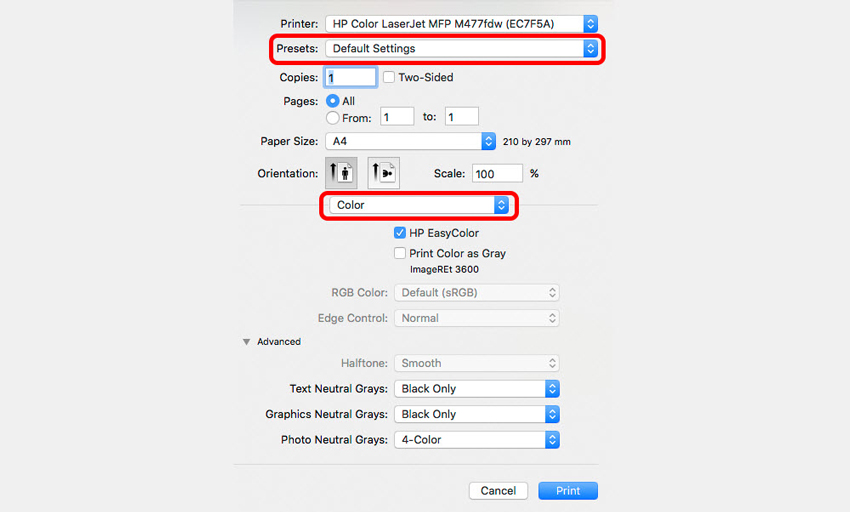
Step 3. A print dialog box will appear. Here, you can choose your printer, paper size, photo layout, and orientation, and also other options, such as quality, colors, or scaling.
Tip: If you want to print several images on one sheet of paper, click on the "Paper Size" menu and choose "Other." And you'll be presented with various layout options. This includes the ability to fit two 4"x6" photos on a standard letter-sized sheet, as well as a "Contact Sheet" layout that allows you to print multiple thumbnails at once.

Step 4. Ensure you preview your images. Once you're satisfied with your settings, click the Print button, and your Mac will send the photos to the printer.