Best Portrait Photography Settings for Your Camera & Tips
Updated on
Have you ever admired a portrait that seemed to capture not just a face, but a moment, a feeling, a story? Portrait photography allows you to create these timeless images, whether it's a glowing bride on her wedding day, a casual family photo under the golden sun, or a professional headshot that exudes confidence.
But how do you achieve portraits that stand out? It all starts with the best camera settings for portraits. In this guide, you'll uncover everything you need to know about portrait photography settings. Let's dive in and transform your photography skills today.
This guide introduces the best camera settings for portraits and some tips. While camera settings, lighting, and positioning are critical before taking your portrait shot, Aiarty Image Matting allows you to enhance your photo after the shot is taken. By applying a background blur effect in post-processing, you can recreate that beautiful bokeh effect without needing to worry about settings during the shoot. Whether your photo was taken on your iPhone or a DSLR, Aiarty Image Matting helps you fine-tune your images for a polished, artistic look.


Camera Settings for Portraits
Getting the perfect portrait is as much about your camera settings as it is about your creative vision. Here are some essential techniques and camera settings for portraits you can use to bring your portraits to life.
Camera Mode
Manual Mode gives you full control over all camera settings—aperture, shutter speed, and ISO. This mode allows you to create a truly customized look for your portrait. Aperture Priority Mode lets you set the aperture while the camera adjusts the shutter speed. A wider aperture (lower f-stop) gives you a blurred background while emphasizing the subject, perfect for portraits.
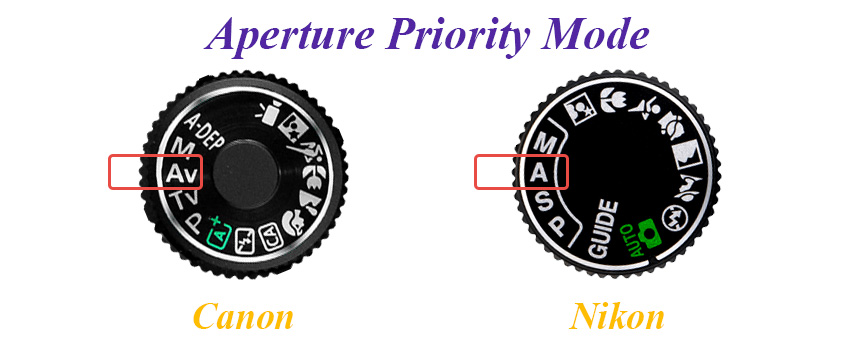
If you are using a DSLR or a mirrorless camera with a Portrait Mode setting, this mode is designed to help you achieve flattering, sharp portraits. The camera automatically adjusts settings like aperture and shutter speed to create a soft, blurred background (bokeh effect) while keeping the subject in focus. It's a good choice for quick, professional-looking shots, though it may not offer as much flexibility as Manual or Aperture Priority Mode.
Aperture
Aperture is one of the most important settings in portrait photography. It controls the size of the lens opening, determining how much light enters the camera. A wide aperture (like f/2.8 or lower) creates a shallow depth of field, which blurs the background and keeps the focus on your subject. This effect, known as bokeh, is ideal for portraits as it adds a professional touch.
Pro Tip: Use a wide aperture for solo portraits to isolate your subject. For group portraits, narrow the aperture (like f/4 or f/5.6) to keep everyone in sharp focus.
Shutter Speed
Shutter speed determines how long your camera's sensor is exposed to light. In portrait photography, it's essential to use the right speed to avoid motion blur. A fast shutter speed, like 1/125s or higher, is perfect for capturing sharp portraits, especially if your subject is moving or you're shooting handheld.

However, you can experiment with slower shutter speeds if you are looking for creative effects, like incorporating motion in the background.
Pro Tip: When shooting with natural light, pair a fast shutter speed with a wide aperture to achieve a beautifully balanced portrait.
ISO
ISO controls your camera's sensitivity to light. In portrait photography, keeping ISO as low as possible ensures sharper images with minimal noise. A setting between ISO 100 and 400 works well in well-lit environments. However, in low-light conditions, increasing ISO allows you to brighten your shot without relying solely on aperture or shutter speed adjustments.
Be cautious, though—higher ISO can introduce grain or noise to your image. To balance this, use noise reduction tools in post-processing when needed.
Pro Tip: For indoor portraits with limited light, start with ISO 800 and adjust based on the available lighting and your desired effect.
White Balance
White balance ensures that the colors in your portraits appear natural and true to life. It compensates for the color temperature of different light sources, such as warm indoor lights or cool daylight. Using the correct white balance prevents your photos from looking too yellow, blue, or green. Modern cameras offer preset white balance modes like Daylight, Tungsten, or Cloudy. You can also set a custom white balance for unique lighting situations, ensuring consistent and accurate colors.
Pro Tip: Use the "Cloudy" preset for outdoor portraits on overcast days to add a subtle warmth to your photos.
Focus
Focus is key to creating captivating portraits. In most cases, you'll want the subject's eyes to be the sharpest point in the image. Use autofocus for convenience or switch to manual focus for precision, especially in challenging lighting or with creative compositions.
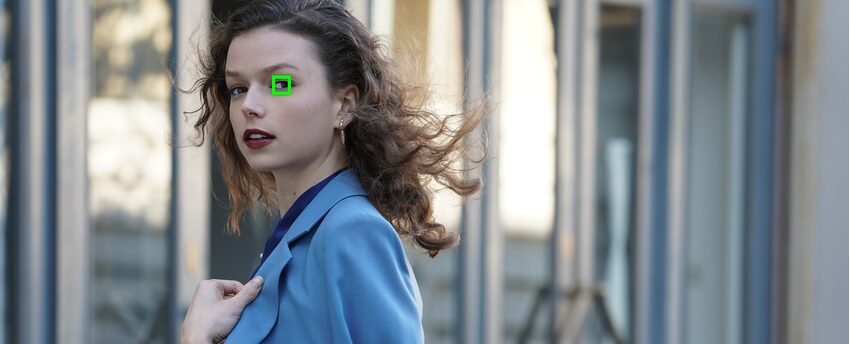
Modern cameras often include features like eye-detection autofocus, which ensures your subject's eyes remain sharp even as they move. If your camera doesn't have this feature, use a single focus point and lock it on the eyes.
Focal Length
Focal length shapes the perspective of your portraits and significantly affects how your subject appears in the frame. Shorter focal lengths, like 35mm, create a wider field of view but may distort facial features, making them better suited for environmental portraits. Longer focal lengths, like 50mm or 85mm, compress the background and create a flattering, natural look ideal for close-ups.
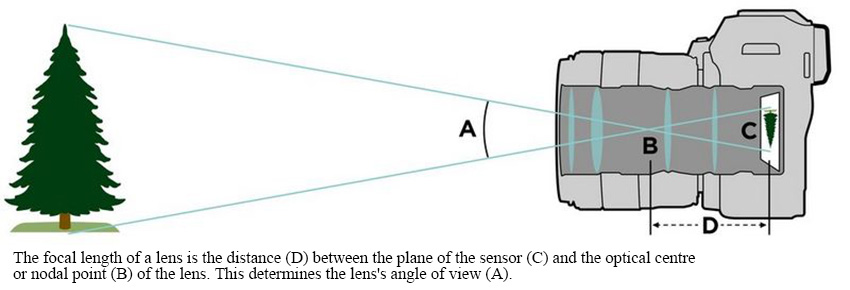
Prime lenses with fixed focal lengths are popular for portraits due to their sharpness and ability to open to wider apertures. Zoom lenses, on the other hand, offer versatility and allow you to adjust the focal length without changing lenses.
Pro Tip: Use an 85mm lens for traditional headshots to achieve stunning background compression and flattering proportions.
Camera Angles
The angle and orientation of your camera can dramatically change the mood and composition of your portrait. A straight-on shot often conveys a sense of balance and professionalism, while a slight angle can add more depth and interest. Experimenting with different angles allows you to highlight your subject's best features and add visual dynamism.
Outdoor Portrait Photography Settings
Outdoor lighting can vary greatly depending on the time of day and weather conditions. For the best results, consider the natural light and how it interacts with your subject.
- Golden Hour: The soft, warm light just after sunrise or before sunset, known as the "golden hour," is perfect for outdoor portraits. Set your aperture wide (f/2.8 to f/4) to achieve beautiful background blur, and lower your ISO (100-400) to avoid overexposure. Use a faster shutter speed (1/125s or higher) to freeze movement and avoid any motion blur.
- Midday Sun: The bright, harsh sunlight at noon can create strong shadows and highlights. To counteract this, use a smaller aperture (f/5.6 to f/8) and adjust your ISO to around 400-800. A reflector or diffuser can help soften the light and fill in shadows.
Indoor Portrait Photography Settings
Indoor photography presents unique challenges, especially when it comes to lighting. Without enough natural light, you'll need to adjust your settings accordingly to avoid dark or grainy photos.
- Using Available Light: If you're relying on natural light from windows, open the curtains and position your subject near the light source. Use a wide aperture (f/2.8 to f/4) to allow as much light as possible. Increase your ISO (800-1600) to brighten the shot without sacrificing sharpness. Keep your shutter speed at 1/125s or higher to avoid motion blur.
- Artificial Light: In low-light indoor settings, you can use speedlights or off-camera flashes to illuminate your subject. Set your aperture between f/4 and f/5.6 to maintain sharpness, and use a slower shutter speed (1/60s to 1/100s) to balance the exposure from the flash.
Low Light Portrait Photography Settings
Capturing portraits in low light can be tricky, but with the right settings, you can still create stunning images without relying on a flash.
- Increase ISO: Start by increasing your ISO (1600-3200) to brighten the image. Keep in mind that higher ISO can introduce noise, so find the balance between brightness and clarity.
- Use a Wide Aperture: Open up your aperture as wide as possible (f/1.8 to f/2.8) to allow more light into the camera. This also helps achieve a shallow depth of field, keeping the focus on your subject while blurring the background.
- Slow Down the Shutter Speed: A slower shutter speed (1/60s to 1/100s) allows more time for light to reach the sensor, but be cautious of motion blur. If your subject is moving, you may need to raise your ISO further or stabilize the camera using a tripod.
Cloudy Day Portrait Photography Settings
Cloudy days offer soft, diffused light that can be perfect for portraits, as the clouds act as a natural diffuser, reducing harsh shadows and creating an even exposure across your subject.
- Set Your Aperture: On a cloudy day, you'll still want to open up your aperture (f/2.8 to f/4) to create a beautiful background blur while allowing enough light in. Since the lighting is softer, you may not need to push your ISO too high. Keep it between ISO 100-400 for the best results.
- Shutter Speed and ISO: A shutter speed of 1/125s or higher is still ideal to avoid motion blur, especially for portraits. If the light feels a bit dim, raise your ISO to 400-800, but keep an eye on noise levels.
Golden Hour Portrait Photography Settings
While we mentioned golden hour earlier for outdoor portraits, it's worth emphasizing its power. The warm tones and soft light just before the sun sets or rises can add a magical, flattering glow to your subject. Use a wide aperture (f/2.8 to f/4) to capture the warm light, and adjust your ISO (100-400) to prevent overexposure.

Portrait Photography Tips
Here are some additional tips and techniques that can help you create more engaging and professional-looking portraits.
Build Trust with Your Subject
To capture genuine expressions, it's important to make your subject feel comfortable. Start by engaging in casual conversation and offering positive feedback throughout the shoot. The more relaxed your subject is, the more natural and authentic your portrait will be.
Speedlights
Speedlights are a great tool for adding controlled light to your portraits, especially in low-light situations. Position the speedlight off-camera for softer, more flattering lighting. You can bounce the light off walls or ceilings to create a more natural, diffused effect. Experiment with angles and power settings for different looks.
Image Format
Shooting in RAW gives you greater control over your image quality and editing. Unlike JPEGs, RAW files retain all the details, allowing you to adjust exposure, color, and sharpness without losing quality. Always set your camera to RAW format for the best possible flexibility in post-production.
Test Shots and Feedback
Before diving into your portrait session, take a few test shots to check your settings. Adjust the exposure, focus, and lighting based on what you see. Show your subject the images and give them feedback to improve their pose or expression, ensuring you capture the best shot.
Posing
Posing your subject is crucial for creating natural and dynamic portraits. Rather than having them stand stiffly, encourage movement and variety in their poses. Ask them to shift their weight, angle their body slightly, or play with their hands for more relaxed looks.
Backgrounds
The background plays a significant role in portrait photography, either enhancing or distracting from your subject. Choose simple, uncluttered backgrounds that complement your subject's look and don't steal attention.
If you are outdoors, look for natural elements like trees or walls that provide a clean backdrop. Indoors, use curtains or solid-colored walls. Also, adjust your aperture to blur the background and make your subject stand out more sharply.
Composition
Use the Rule of Thirds to position your subject slightly off-center, creating a balanced and dynamic image. Leading lines, like paths or fences, can guide the viewer's eye toward your subject, adding depth. Symmetry can be powerful too—center your subject against symmetrical backgrounds for a striking and harmonious shot. Experiment with these techniques to make your portraits more engaging and well-composed.
Best Settings for Portrait Photography iPhone
The iPhone has made it easier than ever to capture professional-quality portraits with its Portrait Mode. This built-in feature automatically blurs the background, creating that classic "bokeh" effect and helping your subject stand out. Simply open the Camera app, swipe to Portrait Mode, and focus on your subject. The iPhone will take care of the rest, adjusting depth of field for a polished look.
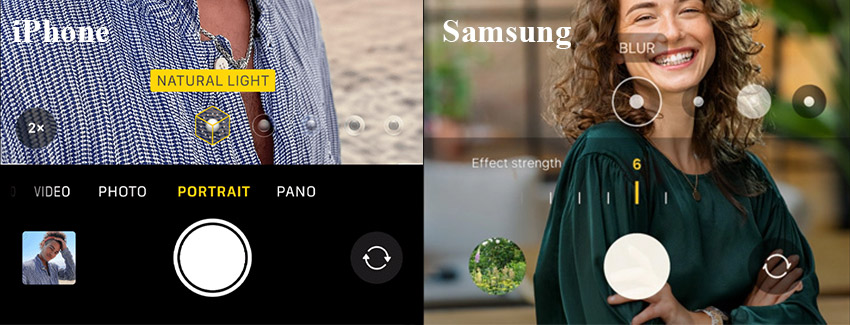
Once you've taken the shot, you can further enhance your photo by fine-tuning the exposure, highlights, and shadows using the built-in slider. Adjusting these elements allows you to perfect the lighting and mood of your portrait, making the final image look even more professional.
Blur Background of Portrait Already Taken
If you want to blur the background of an existing portrait photo, Aiarty Image Matting is a great solution. This software allows you to quickly add a professional-looking bokeh effect to your images, making the subject pop even more. It excels at separating the subject from the background, even in tricky areas like hair or semi-transparent objects. Whether it's a photo taken with your DSLR or iPhone, you can enhance it with just a few clicks.
After downloading and installing Aiarty Image Matting, follow the steps below to blur the background of your photo already taken.
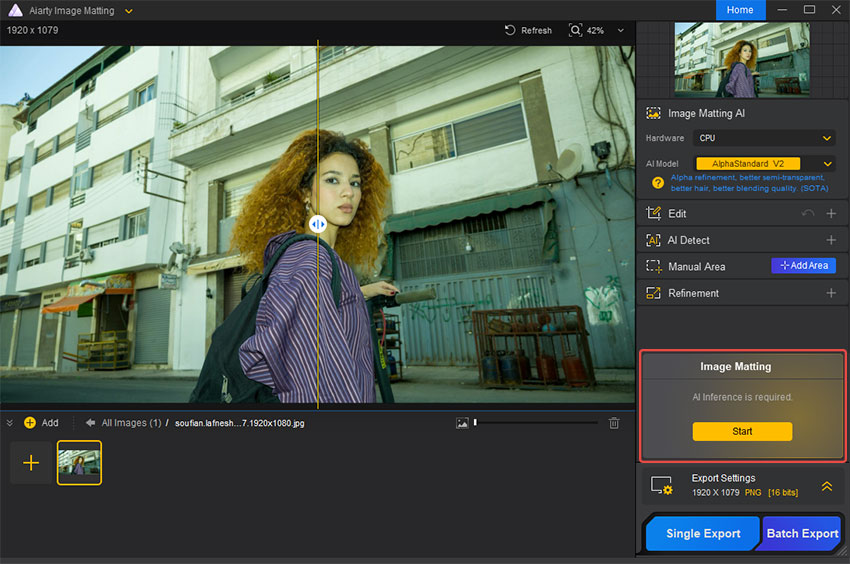
Step 1. Import your photos and click Start on the right for AI inference.
Drag and drop your photos into the main interface. It supports formats like PNG, JPG, WebM, TIFF, RAW, etc.
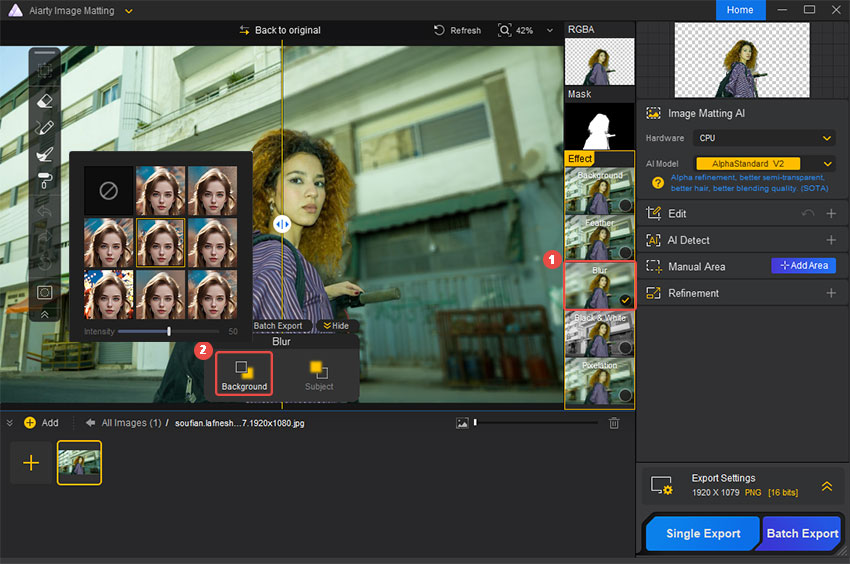
Step 2. Blur the background of your photo.
Enable the Blur feature on the right side in the preview window. Select Background in the pop-up Blur dialog box. Choose a blur effect like Gaussian or Center Focus Blur, then adjust the intensity as needed.
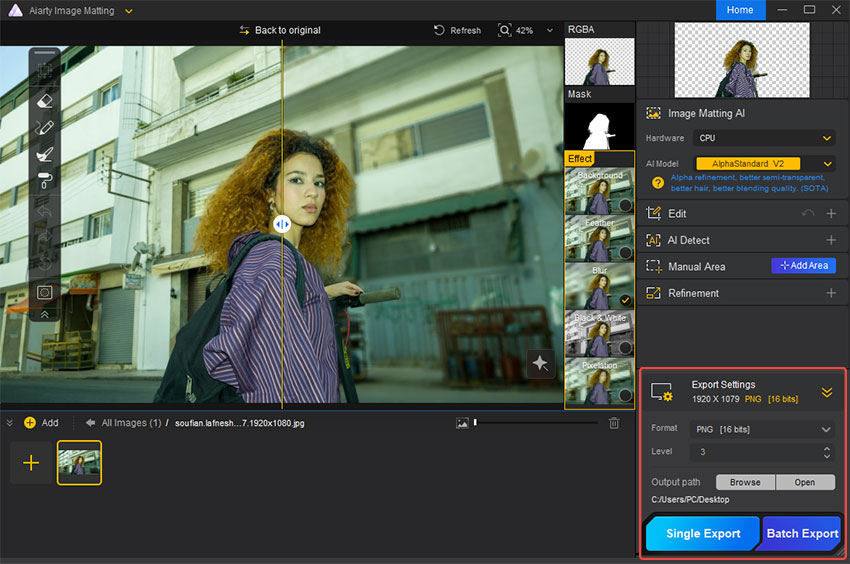
Step 3. Export and save the photo with a blurred background.
Set the export format and compression level. Click Single Export to save your photos to your specified path.
Conclusion
Mastering portrait photography settings can transform your photos from ordinary to extraordinary. Whether you are using a DSLR or your iPhone, understanding key camera settings for portraits like aperture, shutter speed, and lighting will help you capture stunning, professional-looking portraits. And if you want to perfect your background and add that beautiful bokeh effect to your portrait, Aiarty Image Matting is there to help.
Now it's your turn—grab your camera, put these settings into practice, and watch your portraits come to life!
