How to Get the Blurred Background in Photography
Updated on
A blurred background can completely transform your photos. It draws attention to your subject while giving your images a professional and artistic feel. Whether you are capturing portraits, landscapes, or even close-ups, mastering the blurred background technique adds depth and elegance to your photography.
But how do you achieve this stunning effect? Is it all about the camera settings, or can you use your smartphone? Can you blur the background of a photo you've already taken? This guide introduces how to create the blurred background in your photography, especially for beginners and those new to DSLR. Ready to elevate your photography skills? Let's dive in!
While mastering the art of blurred backgrounds during a photoshoot is a valuable skill, there are times when you might want to enhance or refine your photos after the fact. Whether it's adding a creative touch or achieving a look that wasn't possible in the moment, Aiarty Image Matting provides an effortless way to blur backgrounds or even replace them entirely. With its advanced AI and easy-to-use features, it's a perfect companion for photographers and hobbyists looking to elevate their images with just a few clicks.


Explanation of Blurred Background
The blurred background, often referred to as bokeh, isolates your subject and creates a sharp focus on what matters most while softening distractions in the background. This effect results from controlling the depth of field (DoF) in your photograph.
Depth of field refers to the range or the area in front or behind the point of focus where objects remain acceptably sharp and in focus. When the DoF is shallow, only a small part of the image is in focus—typically the subject—while the rest fades into a beautiful blur.
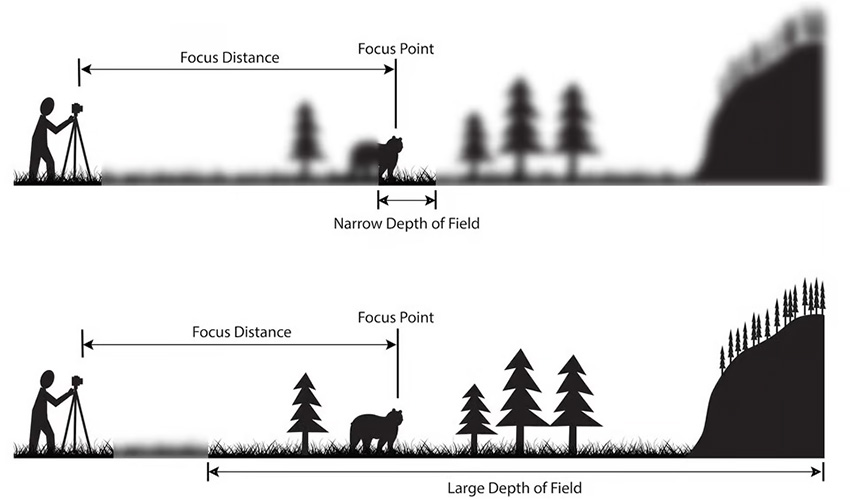
Controlling the DoF allows you to tell a visual story. By focusing sharply on a subject and blurring the rest, you guide the viewer's attention and create a sense of depth in your images. This technique is commonly used in portraits, macro photography, product photography, etc.
Blurred Background Photography Settings
There are several factors that can significantly affect the depth of field—or let's just say the blurred background. These factors correspond to some of the settings we can control when shooting.
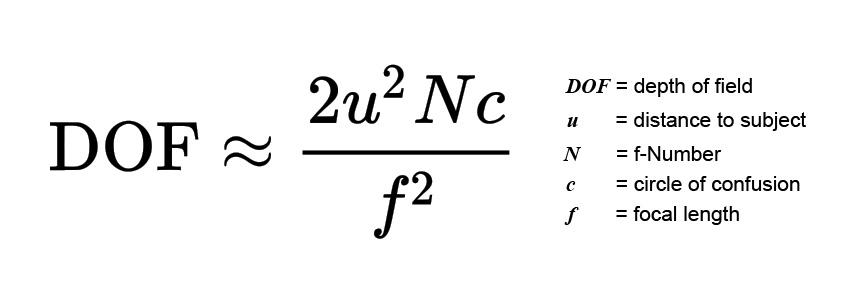
Aperture
The aperture is one of the most important settings for creating a blurred background. It refers to the opening in your camera lens that lets light in. The size of this opening is measured in f-stops, like f/1.8, f/2.8, or f/5.6. A wider aperture (lower f-stop number) creates a shallower depth of field, meaning only your subject is in focus while the background becomes soft and blurry.
For instance, if you're shooting a portrait, using an aperture of f/1.8 or f/2.8 isolates your subject beautifully. However, be cautious—while wide apertures enhance blur, they also reduce the area in sharp focus. This can be tricky when you want more of the subject (like a group photo) to appear sharp.
Different lenses have varying maximum aperture capabilities. Prime lenses, like a 50mm f/1.8, are excellent for achieving a wide aperture. On the other hand, kit lenses typically have higher minimum f-stop numbers, like f/3.5, which might limit your ability to blur the background as much.
Focal Length
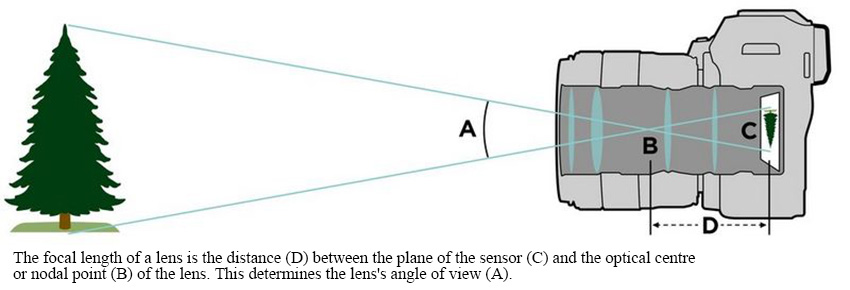
Focal length refers to the distance between the lens and the camera's sensor when the subject is in focus. Longer focal lengths, such as 85mm or 200mm, naturally enhance background blur by compressing the scene and isolating the subject from its surroundings.
When you use a telephoto lens or a lens with a long focal length, the effect is magnified. For example, shooting a portrait at 200mm will make the background appear closer and blurrier, even if the aperture and subject distance remain unchanged. This is why telephoto lenses are preferred for portraits and wildlife photography, where subject isolation is key.
Even with lenses that have a moderate maximum aperture, like f/4 or f/5.6, a longer focal length can still create significant background blur. This makes focal length a powerful tool for photographers who don't have access to wide-aperture lenses.
To maximize the effect, pair a longer focal length with the right aperture and subject-to-background distance. For instance, shooting with an 85mm lens at f/2.8 while keeping the subject far from the background will yield a beautifully blurred effect.
Geometry (Camera-Subject-Background Distances)
The physical distances between your camera, the subject, and the background significantly impact the depth of field and the amount of background blur. This spatial relationship, often referred to as "geometry," is one of the simplest yet most effective ways to control the blurred background in your photos. Here's how it works:
- Camera to Subject Distance: The closer your camera is to the subject, the shallower the depth of field. This means more blur in the background. For instance, when shooting a close-up human body, moving closer to the subject can enhance the separation between the subject and the background.
- Subject to Background Distance: Increasing the distance between your subject and the background intensifies the blur effect. A subject standing far from the background creates a more pronounced blur, even with lenses that have moderate apertures.

By carefully adjusting these distances, you can achieve professional-looking background blur even without expensive lenses. For example, placing your subject several meters in front of a distant tree line can create a smooth, creamy background, even if you're using a kit lens at f/3.5.
Geometry is also useful when working with less flexible settings, such as in low-light conditions where you can't widen the aperture. Simply increasing the subject-to-background distance can compensate for these limitations.
Aperture Mode
If you are new to this and haven't figured out all the manual settings yet, the aperture mode is a good start point. Aperture Priority mode is a camera setting designed to give you control over the aperture while the camera handles other adjustments, such as shutter speed and ISO. This mode is perfect for experimenting with depth of field and achieving a blurred background without worrying about overexposing or underexposing your shots.
- On Canon cameras, this mode is labeled as AV (Aperture Value).
- On Nikon, Sony, Panasonic, and many other brands, it's simply called A (Aperture Priority).
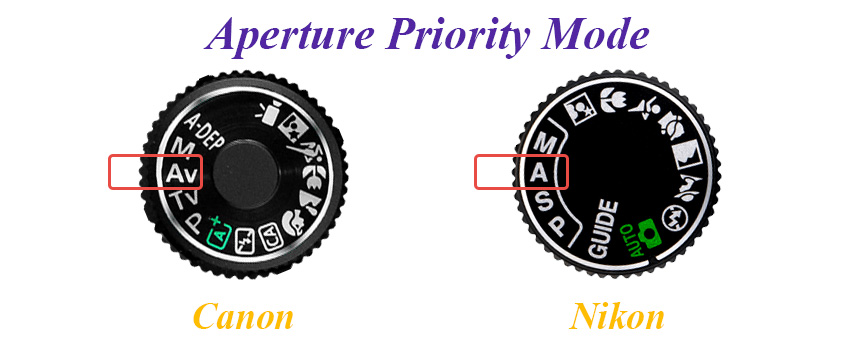
When you select this mode, you can adjust the f-stop to control the size of the aperture. A smaller f-stop number (e.g., f/1.8 or f/2.8) creates a wider aperture, which results in a shallower depth of field and more background blur. Meanwhile, the camera automatically calculates the shutter speed (e.g. for fast-moving objects like horses) and ISO (e.g. for poor lighting conditions) to balance the exposure. It's helpful for learning how aperture influences depth of field, valuable for beginners and seasoned photographers alike.
How to Blur Background on iPhone or Android
Smartphones have made it incredibly easy to create stunning blurred backgrounds without needing a professional camera. Whether you're using an iPhone or an Android device, modern phones come equipped with powerful camera modes and features that simulate shallow depth of field. By leveraging built-in modes like Portrait or even third-party accessories like macro lenses, you can achieve the same professional-level background blur as a DSLR.
Portrait Mode
Portrait Mode uses dual-lens systems or AI algorithms, to mimic the effect of a shallow depth of field. On an iPhone, you can activate Portrait mode directly from the Camera app. Simply swipe to Portrait, choose your subject, and adjust the depth effect if your model supports it. Newer iPhones allow you to tweak the intensity of the background blur after taking the shot.
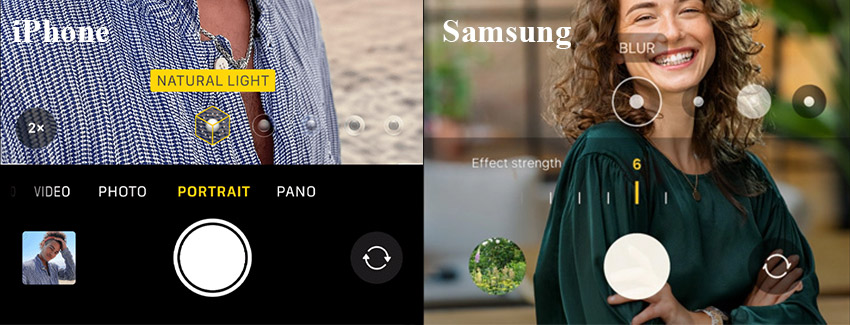
For Android devices, most flagship models like Samsung Galaxy, Google Pixel, and others offer a Portrait or Live Focus mode. These work similarly to Apple's Portrait mode, letting you capture photos with enhanced subject isolation and background blur.
Macro Lens
For smartphone users looking to achieve stunning background blur in close-up shots, a macro lens is a fantastic option. These small, attachable lenses allow your phone's camera to focus on subjects at extremely close distances, creating a sharp subject with a beautifully blurred background.
Macro lenses are typically sold as clip-on accessories compatible with most smartphones, whether you use an iPhone, Samsung Galaxy, or Google Pixel. They work by enhancing the phone's ability to magnify and focus on tiny details, such as the texture of leaves or the intricate design of jewelry.
How to Blur Background of Photo Already Taken
Sometimes, you might not capture the perfect blurred background in your shot. Thankfully, you can easily blur the background of any photo seamlessly with AI.
Aiarty Image Matting is a cutting-edge AI-powered tool that makes blurring backgrounds simple and professional. With advanced AI for precision and user-friendly features, it's perfect for beginners and professionals alike. The tool excels at separating the subject from the background, even in tricky areas like hair or semi-transparent objects. Plus, its customizable blur settings let you fine-tune the effect to match your creative vision.
After downloading and installing Aiarty Image Matting, follow the steps below to blur the background of your photo already taken.
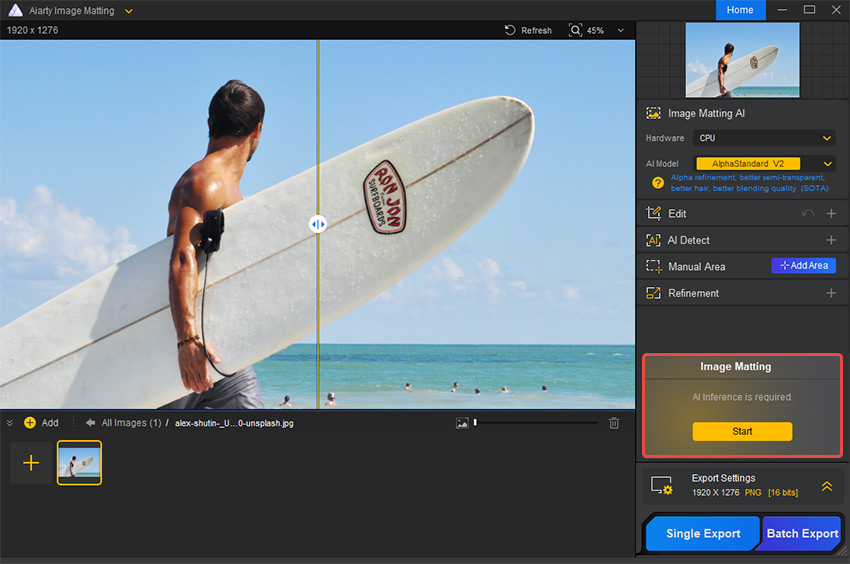
Step 1. Import your photos and click Start on the right for AI inference.
Drag and drop your photos into the main interface. It supports formats like PNG, JPG, WebM, TIFF, RAW, etc.
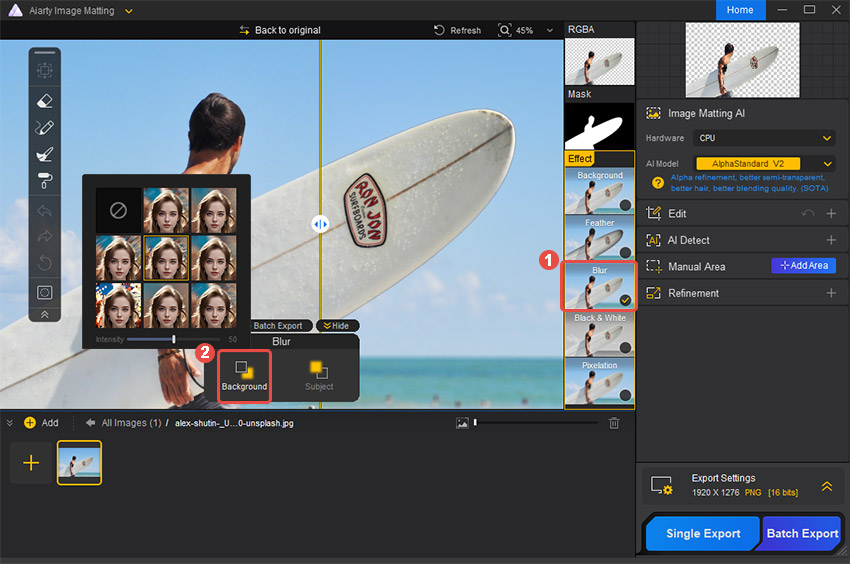
Step 2. Blur the background of your photo.
Enable the Blur feature on the right side in the preview window. Select Background in the pop-up Blur dialog box. Choose a blur effect like Gaussian or Center Focus Blur, then adjust the intensity as needed.
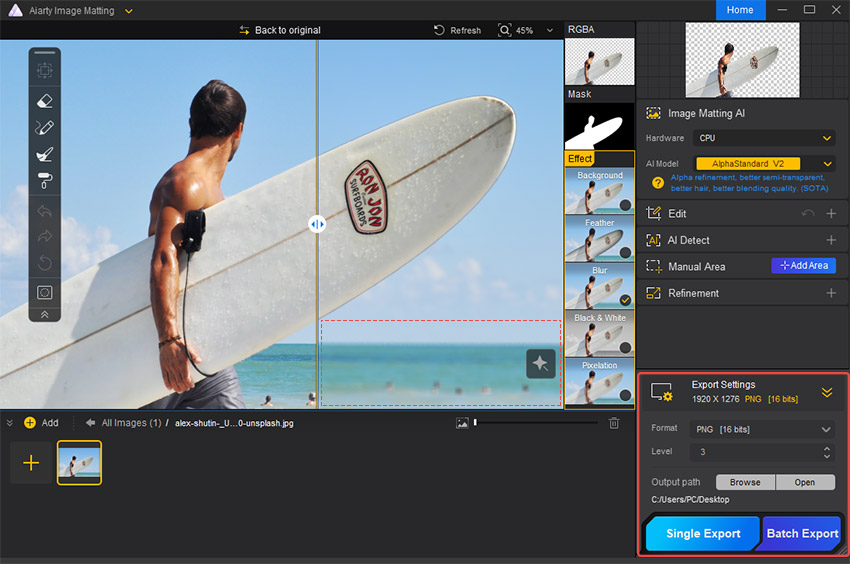
Step 3. Export and save the photo with a blurred background.
Set the export format and compression level. Click Single Export to save your photos to your specified path.
Conclusion
Creating a blurred background is a powerful way to make your photos stand out. Whether you are adjusting your camera settings, using your smartphone's Portrait mode, or editing an existing image, the techniques covered in this guide can help you achieve that dreamy, professional look.
For photographers and smartphone users alike, understanding the key elements—like aperture, focal length, and geometry—lays the foundation for mastering blurred backgrounds. And if you didn't capture the perfect blur during the shoot, Aiarty Image Matting offers an excellent solution. With its AI-powered precision and customizable blur settings, Aiarty makes it easy to enhance your photos and achieve stunning results.
