Quick Start
System Requirements
Aiarty Image Matting is optimized to run efficiently on both low-end and high-end systems, ensuring smooth performance across various hardware configurations.
- For low-end machines, optimizations include support for multi-core CPUs, hardware acceleration via OpenCL and OpenGL, and parallel computing tech (SIMD). This allows Aiarty to perform well even on lower specs.
- For high-end systems, Aiarty leverages machine learning acceleration frameworks like DirectML and CoreML, combined with efficient resource management, to maximize performance and ensure efficient processing. When running on AIPC systems, Aiarty is further optimized to take full advantage of AI-powered hardware acceleration, delivering enhanced speed and precision for image matting.
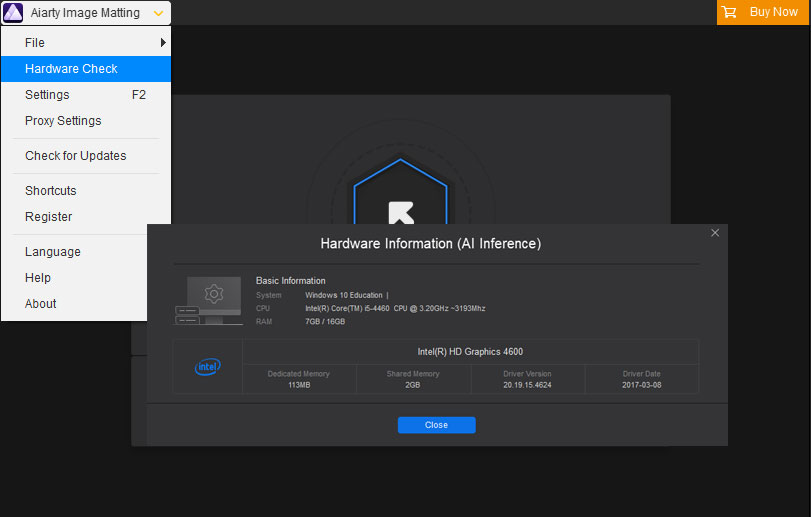
You can check your computer system by clicking the Hardware Check button in the top left, or just visit our tech specs page for more details.
Download & Install
1) Click the "Download Free" button to get the Aiarty Image Matting installer. It's completely safe and free of any adware.
2) Install it. On Windows, double-click the downloaded ".exe" file. On Mac, drag the downloaded ".dmg" file to your Applications folder. If a User Account Control (UAC) window appears, click "Yes" to proceed. Check the box "I agree to the User License Agreement" and click "INSTALL."
3) After installation, click "Open" to start Aiarty Image Matting (trial version).
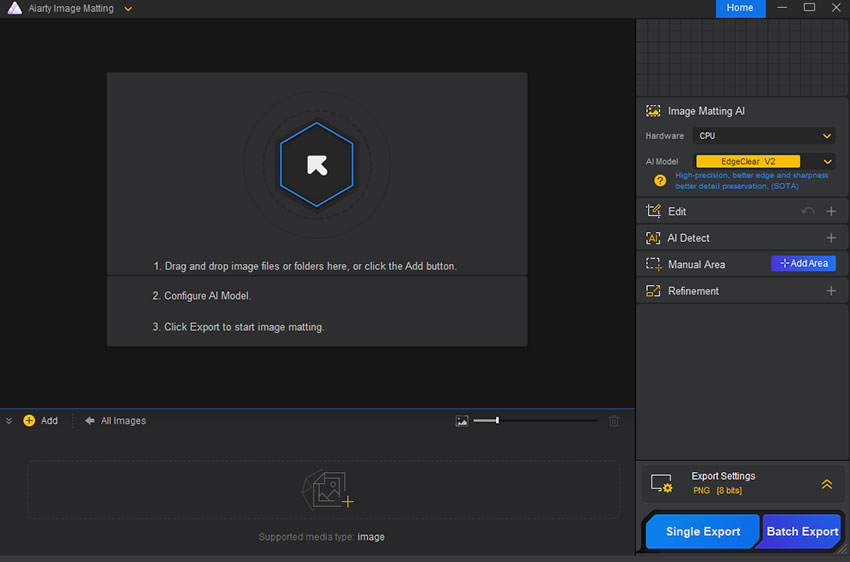
4) The main interface of Aiarty Image Matting (trial version) will now be displayed.
Register
To make it easier for you to explore Aiarty Image Matting, we offer a free version that allows you to experience the core features before deciding if the full version is right for you. However, the free version has some limitations:
- Batch export functionality is disabled.
- Single image export will include a watermark.
The trial version offers a preview of Aiarty Image Matting's capabilities, but unlocking the full version brings a range of additional benefits:
- Export without Watermarks: Save your processed images with no watermarks for clean, professional results.
- Batch Processing: Efficiently handle multiple images at once with options for background removal, cropping, enhancing, AI detection, and more.
- AI Model Updates: Benefit from continuous updates and training of AI models to improve accuracy and effectiveness in image matting.
- Unlimited Use: Remove background from images as many as you want, with no limits.
- Constant Upgrades: Receive frequent software updates that introduce new features to enhance your experience.
- Priority Support: Get prompt, priority customer support with responses within 24 hours for any questions or issues.
How to upgrade to the full version of Aiarty Image Matting
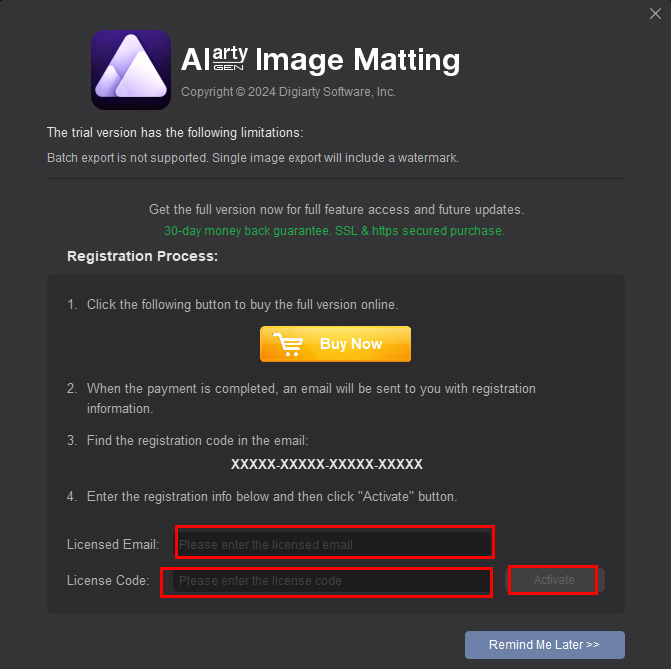
1. Click the "Buy Now" button below or on the main Aiarty Image Matting interface to purchase a full license.
2. Once you've completed the order, you'll receive product information with the license code via email.
3. Go to the drop-down menu in the top left corner, and select "Register". Enter your "Licensed Email"; and "License Code" you received, then click "Activate" to complete registration process.
Important Notes
- There are no spaces in the license code field. It's highly recommended to copy & paste your code to avoid any typos.
- Please make sure you have a proper Internet connection when registering Aiarty Image Matting.
- Once you have registered successfully, you can enjoy the full features of Aiarty Image Matting.
2. Basic Workflow for Image Matting
Aiarty Image Matting uses AI to automatically handle complex images, making it easy to work with products, portraits, logos, and more. With an optimized, user-friendly interface, anyone can achieve professional-quality results in just a few clicks - no manual editing required. This section outlines the simple steps for effective image matting.
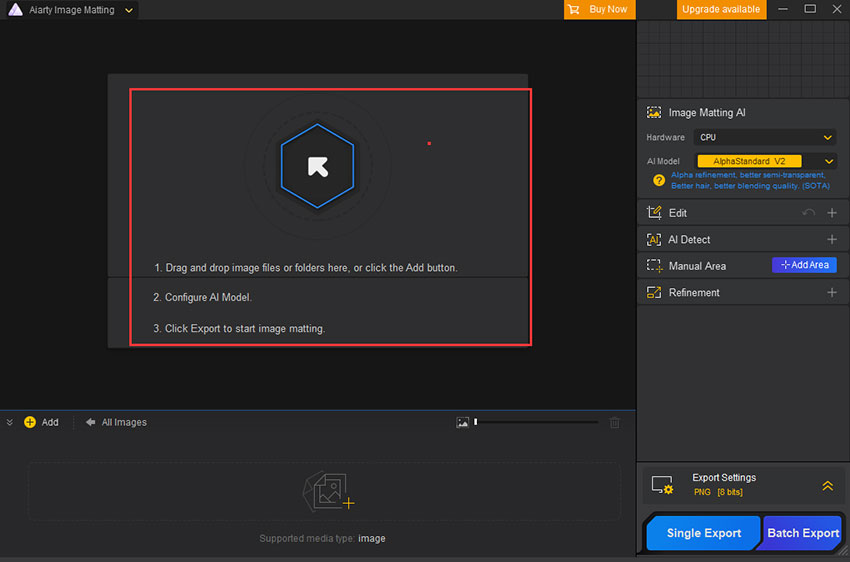
Step 1. Add Your Image(s)
Simply drag and drop one image, multiple files, or an entire folder into the main interface.
Aiarty Image Matting supports a wide range of image formats, including AVIF, PNG, JPG, WebM, TIFF, etc. (Check list of supported inputs & outputs format >>)
Once you've added your image(s) or folder, it will automatically load your images to get ready for matting.
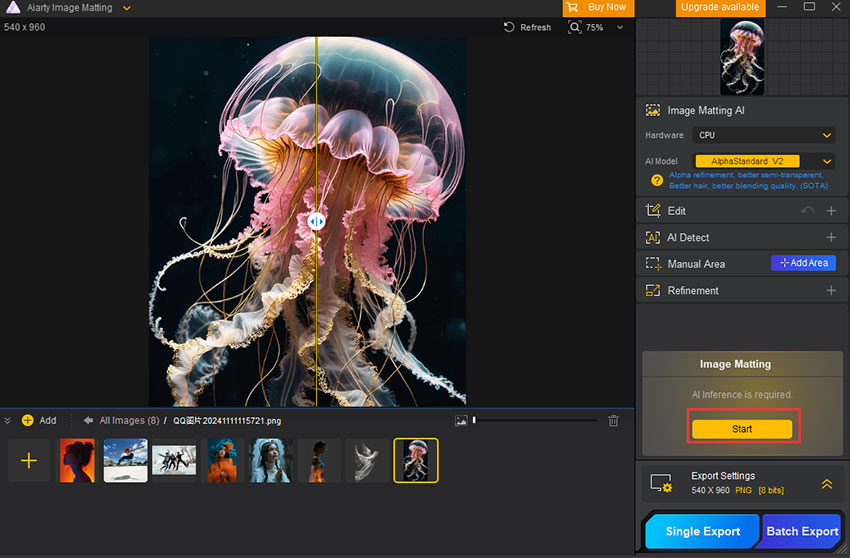
Step 2. Remove Background
Select an image you want to remove background, click the yellow "Start" button on the right. Wait for the processing to complete.
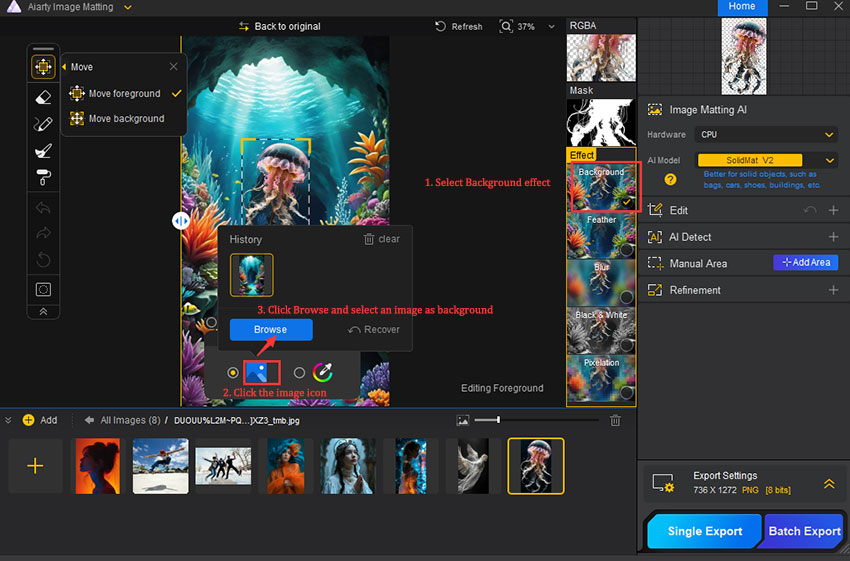
Step 3. Change Background(Optional)
After the AI Image Matting process is complete, an "Effect" panel will appear on the right side of the preview area.
- Click on the Background option in the "Effect" panel.
- Click the image icon and the Browse button appears.
- Click the "Browse" button to choose an image from your computer as the new background.
Tips: You can also click the color icon next to the image icon to change the background color.
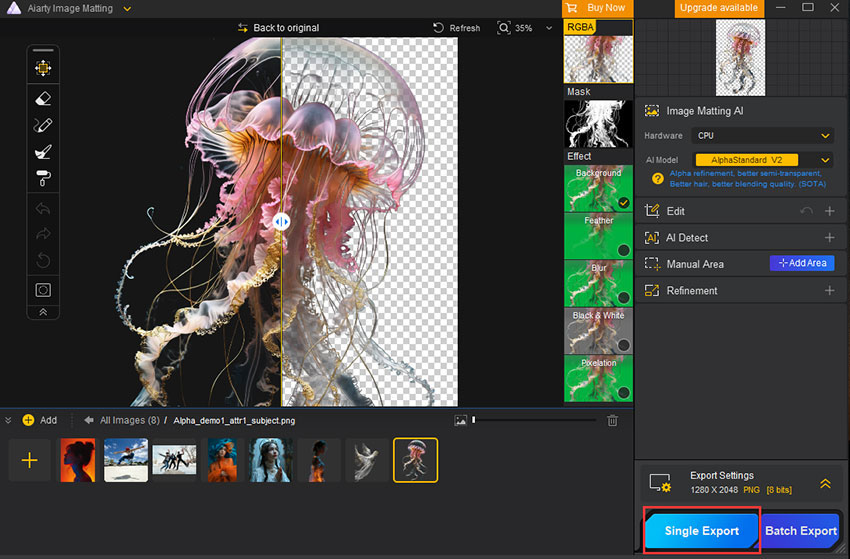
Step 4. Export
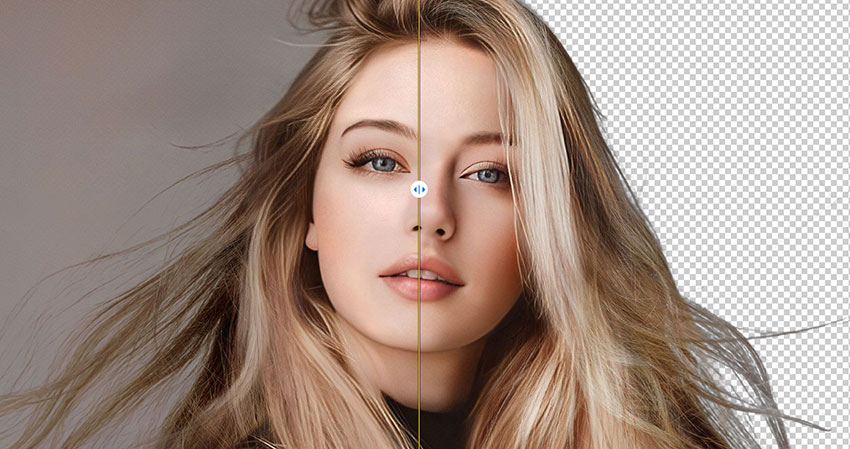
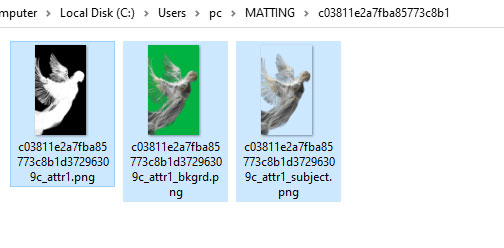
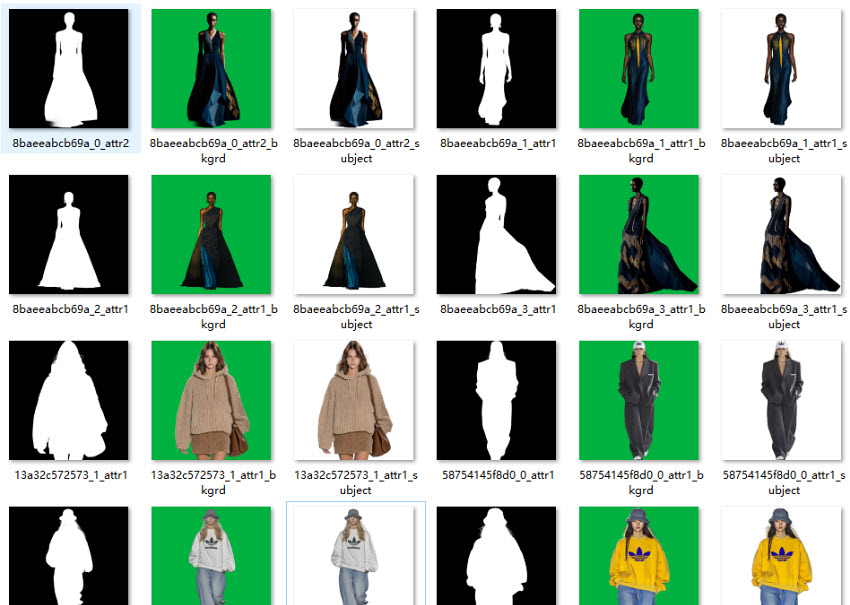
Click the blue "Single Export" button on the right to obtain the final output file. The outputs will include the mask image, the processed image with effect, and the image with an Alpha channel, as shown below.
Main Window and Detailed Guide
Main Window
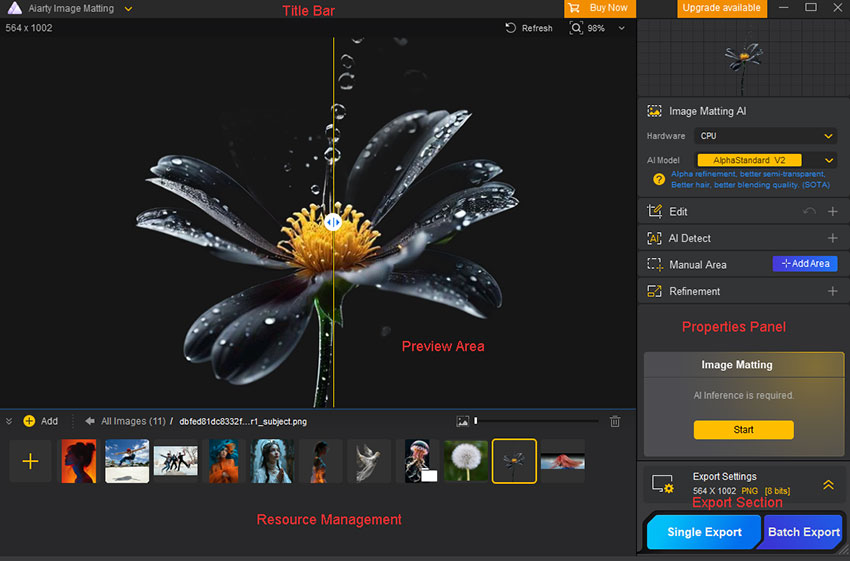
Before diving into the detailed matting operations, it's important to familiarize yourself with the key areas of the interface.The main window is divided into 5 key areas as below:
- Title Bar – Contains the main menu, the "Buy Now" button, and the "Upgrade Available" button.
- Preview Area – Preview and edit the selected image, with options to add various visual effects.
- Properties Panel – Optimize the original image and fine-tune the image matting parameters.
- Resource Management – Display the image(s) awaiting processing.
- Export Section – Configure the export formats, quality settings, and output destinations for images.
1. Title Bar
The title bar consists of 3 main components: the main menu, the "Buy Now" button, and the "Upgrade Available" button.
1.1 Menu
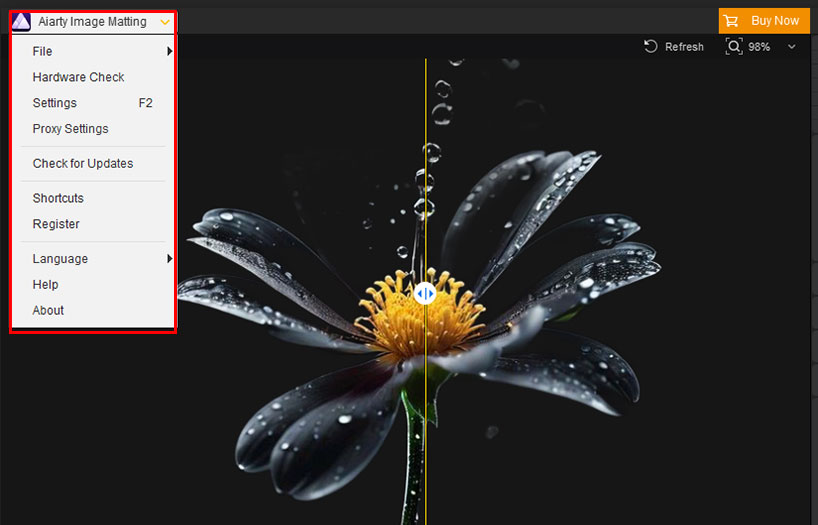
The main menu ![]() is located in the top left corner of the main interface. By default, it is collapsed, but clicking it will reveal the following items:
is located in the top left corner of the main interface. By default, it is collapsed, but clicking it will reveal the following items:
- File: Allow users to add images, select all, or clear selected items.
- Hardware Check: Check the device's hardware to optimize software performance.
- Settings: Configure software preferences and options.
- Proxy Settings: Set up a proxy server to manage network connections.
- Check for Updates: Check for software updates and upgrade to the latest version.
- Shortcut: View or customize software shortcuts.
- Register: Register to unlock the full version of the software.
- Language: Select or change the software's language.
- Help: Access help documentation or technical support.
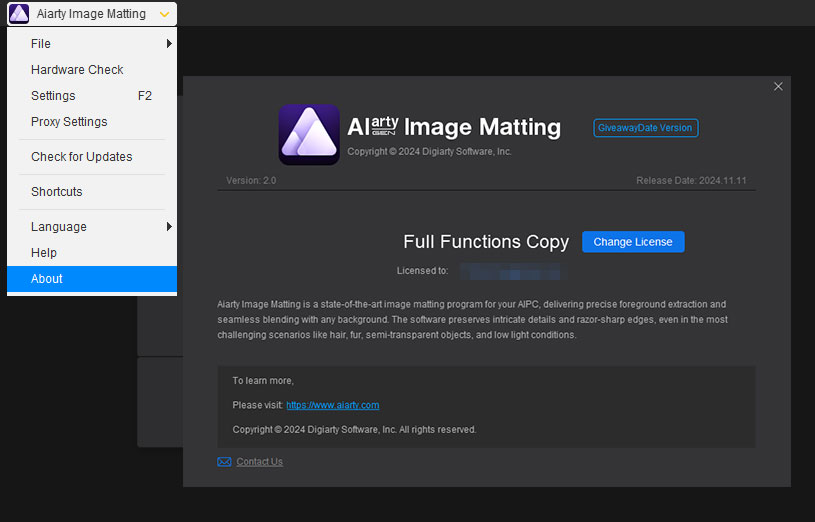
- About: View version and developer information.
Each item will be detailed in the following sections.
1.2 "Buy Now" Button
The "Buy Now" button, located on the right side of the title bar, allows you to purchase and register the full version of Aiarty Image Matting.
How to Buy the Full Version of Aiarty Image Matting
1). Click the "Buy Now" button below to purchase Aiarty Image Matting full license. Or click "Buy Now" on the main interface to purchase the full license.
2). Once you've completed the order, you'll receive product information with the license code via email.
3). Register
- 1. Open Aiarty Image Matting, and click on "Register" from the drop-down menu in the top left corner.
- 2. Enter your "Licensed Email" and the "License Code" you received.
- 3. Click "Activate" to complete the registration process.

1.3 "Upgrade available" Button
- When a new version is available, an "Upgrade Available" button will appear; clicking it opens the update log window, with steps similar to the "Check for Updates" option in the menu.
- If using the latest version, a "Home" button will be shown, linking to the product page.
2. Resource Management
The Resource Management section is used to manage and display images that are awaiting processing.
2.1 Manage Resources
There are three operations for resource management: add, select, and delete.
Add Resources
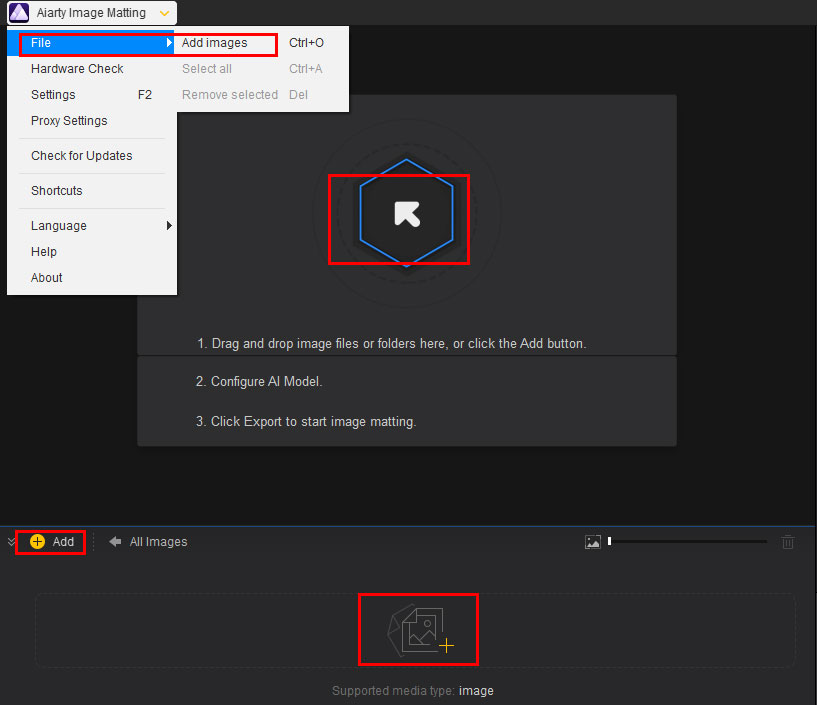
There are 4 methods to add resources: three through the file open window and one by directly dragging and dropping with the mouse.
- Option 1. Go to "Menu" > "File" > "Add Images". This method allows you to add individual image or multiple files.
- Option 2. Click the
 button in the Preview Area to add images.
 - Option 3. Use one of the three "+add", "+", or
 buttons in the Resource Management section.
 - Option 4. Directly drag and drop the image(s) or entire folder into the main interface.
Note: Aiarty Image Matting allows batch processing of up to 3,000 images, with a maximum side length of 10,000 pixels per image. The robust feature allows for handling high-resolution images and large batches, making it an ideal choice for efficiently tackling demanding background removal tasks.
Select Resources
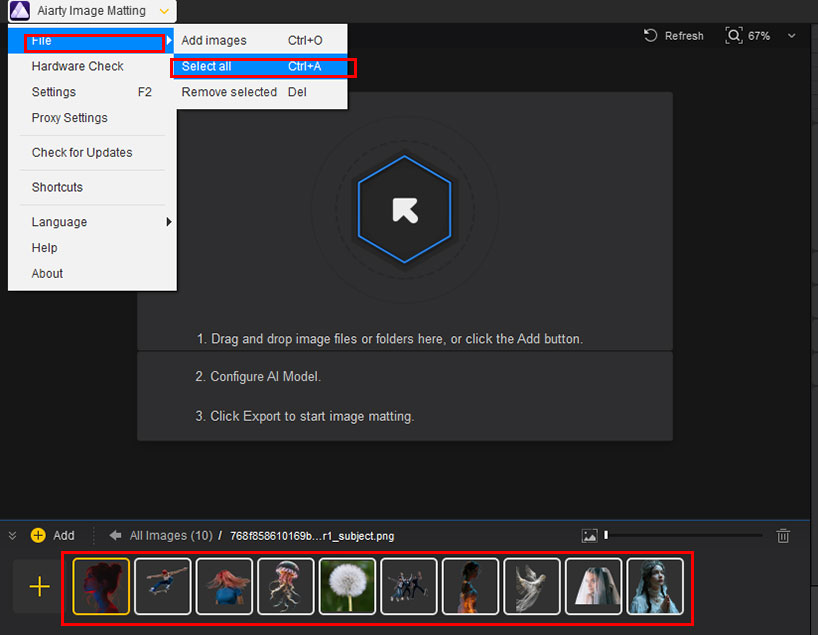
There are 4 ways to select resources: select a single image, consecutive images, non-consecutive images, or all images.
- Select a single image: Click on an image with the mouse. A white border indicates a selected image, while the yellow border shows the selected image that is also currently displayed.
- Select consecutive images: First, click the first image. Then hold down the Shift key and click the last image.
- Select nonconsecutive images: Hold down the Ctrl key and click each image you want to select.
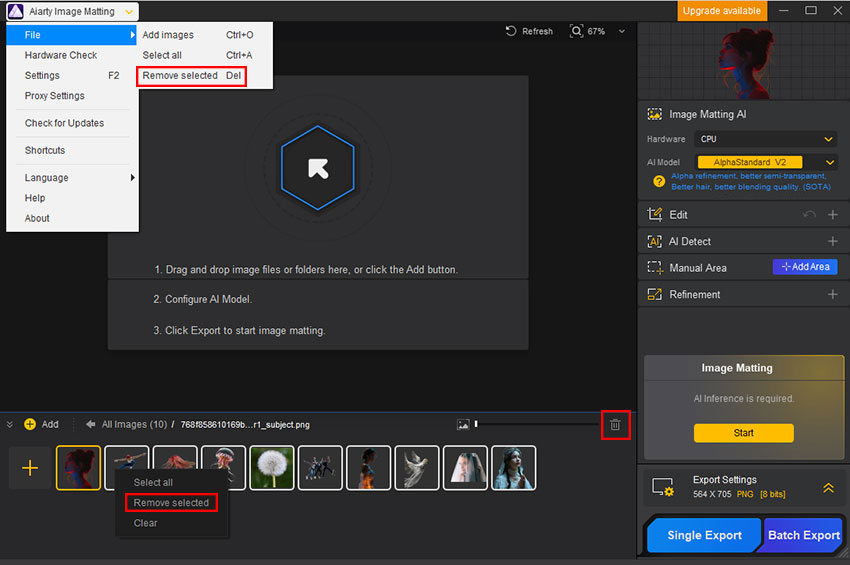
- Select all images: Right-click in the Resource Management section and choose "Select All". Or use the shortcut Ctrl + A. Alternatively, navigate to Menu > File > Select All.
Delete Resources
There are two ways to delete resources: delete all resources or delete selected resources.
- Delete All Resources: Right-click on the Resource Management section and select "Clear".
- Delete Selected Resources: There are 4 ways to delete selected images. You can directly use the Delete (Del) key,try the
 button, or right-click in the Resource Management section and choose "Remove selected". Alternatively, you can navigate to Menu > File > Remove Selected.
2.2 Display Resources
Image Size
In the Resource Management area, you can adjust the image display size using the slider.

Exported Images
After an image is exported, a folder icon will appear in the bottom right corner.
Clicking this icon will open a list of export records for that image. Each export will create a new record. Right-click the image to either remove unwanted effect or open it in File Explorer. You can also click the "Back" button on the left or white arrow to return to the original position.
Navigation Bar
If you've added a folder in the Resource Management area, you can double-click the folder icon to view more details.
Click the white arrow to navigate back from a subfolder to the main directory, or return from the "Exported Resources" directory.

Hide/Show Resource Management
In the top left corner of the resource management area, there is a hide/show ![]() button that allows you to toggle its visibility. When hidden, the preview area is maximized, providing more space for easier editing and previewing.
button that allows you to toggle its visibility. When hidden, the preview area is maximized, providing more space for easier editing and previewing.

3. Preview Area
3.1 Canva
The canva is the primary workspace where images are displayed and processed. Key operations include zooming and moving.
Zoom Canvas
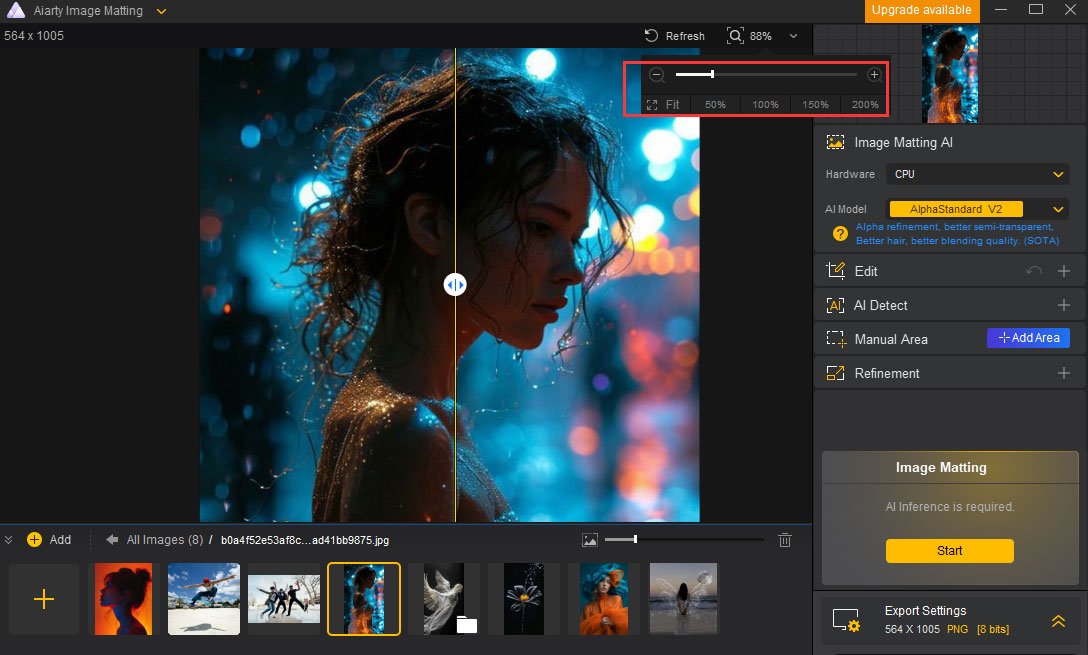
The zoom feature allows you to closely examine details or view the entire image. It is essential for fine-tuning your edits and ensuring precision. You can adapt the zoom level to suit your needs, whether you're making broad adjustments or focusing on intricate details. There are 3 main methods for zooming the canvas.
- Double-click in the display area: Quickly switch between "Fit to Screen" and "100%" view for an overview or detailed look.
- Magnifying glass icon: Located in the upper right of the preview area, this icon offers easy access to common zoom levels (50%, 100%, 150%, to 200%).
- Mouse scroll wheel: When the eraser, brush, dodge, or burn tool is inactive, you can zoom in up to 400% (4x). With one of these tools active, zooming extends up to 3000% (30x), ideal for pixel-level editing.
Move Canvas
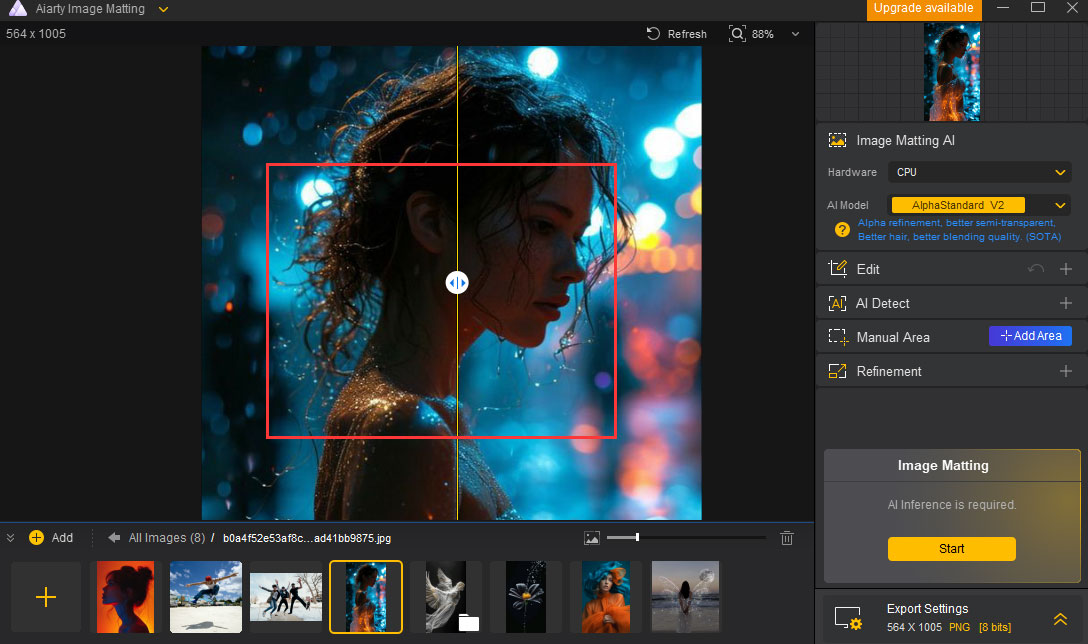
- In non-editing mode: you can move the canvas by clicking and dragging with either the left or right mouse button.
- In editing mode: you can hold down the spacebar and click-drag with the left mouse button to reposition the canvas. Alternatively, you can click and drag with the right mouse button for easy navigation.
3.2 Preview Mode
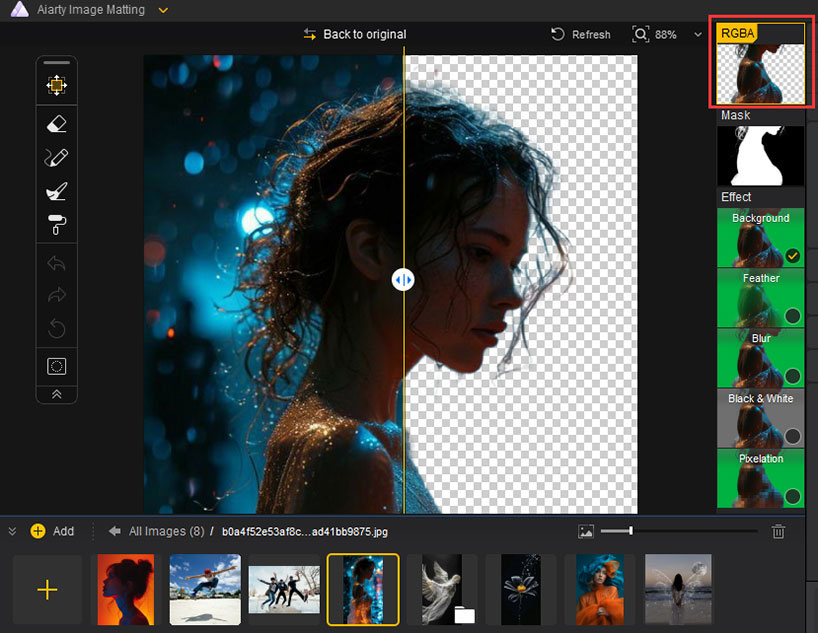
RGBA
RGBA stands for Red, Green, Blue, and Alpha, representing the color channels and transparency of an image. When displayed without a specified background, the grid in the preview window simply indicates the dimensions of the canvas. The grid style can be customized in the settings window, allowing for greater flexibility in how you visualize your image during editing.
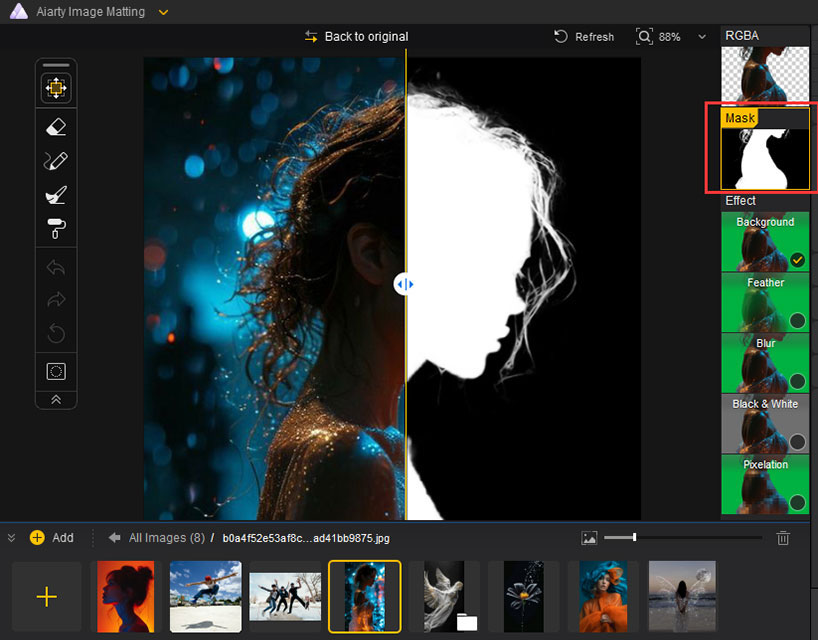
Mask
A mask, specifically the Alpha channel image, displays only the transparency information of an image. It can be used to erase subtle, semi-transparent areas that may not be easily visible in the original image. This allows for precise control over which parts of the image are visible or hidden, making it an essential tool for fine-tuning edits and achieving a polished look in your work.
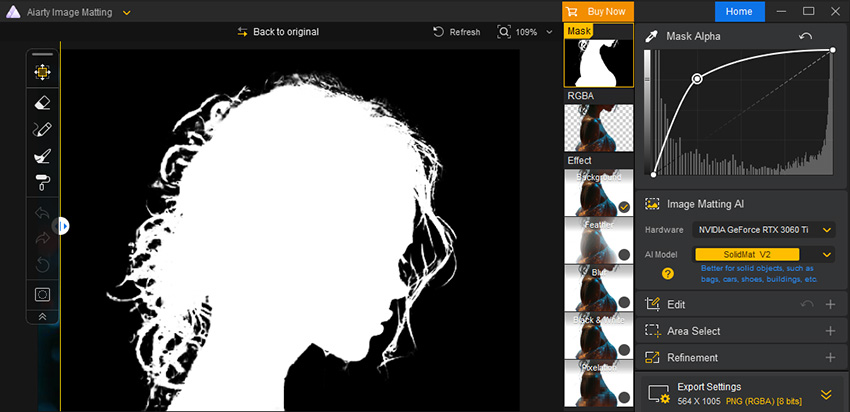
Alpha Curve Adjustment
This feature helps fine-tune and control mask more accurately. It allows adjustment of the Mask Alpha by modifying transparency levels based on grayscale values.
- Horizontal Axis (Input Value): Represents the original Alpha value of the Mask (0 indicates fully transparent, 255 indicates fully opaque).
- Vertical Axis (Output Value): Represents the adjusted Alpha value.

Lift Curve:
- Increases the transparency of the darker areas (low grayscale values) in the Mask Alpha.
- Softens the edges and reduces hard edge effects.
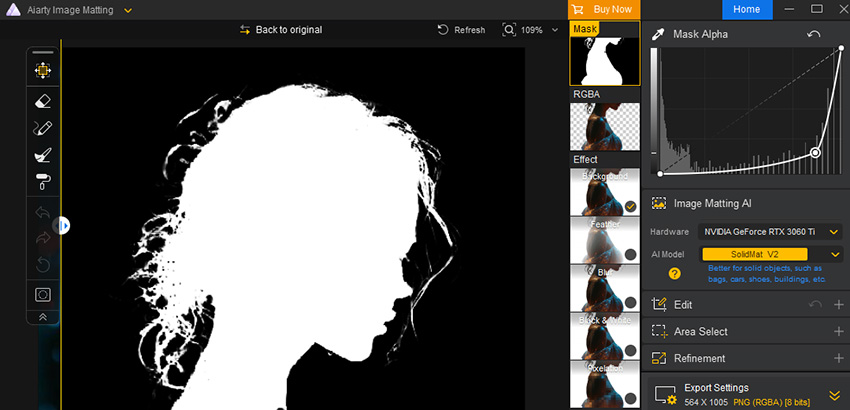
Lower Curve:
- Reduces the transparency of the lighter areas (high grayscale values) in the Mask Alpha.
- Makes the main subject stand out more and enhances edge contrast.
Effect
The Effect feature allows you to preview and apply various background effects to suit your project needs. Currently, Aiarty Image Matting offers five preset effects:
- Background
- Feather
- Blur
- Black & White
- Pixel
Here are the details of the available effects.
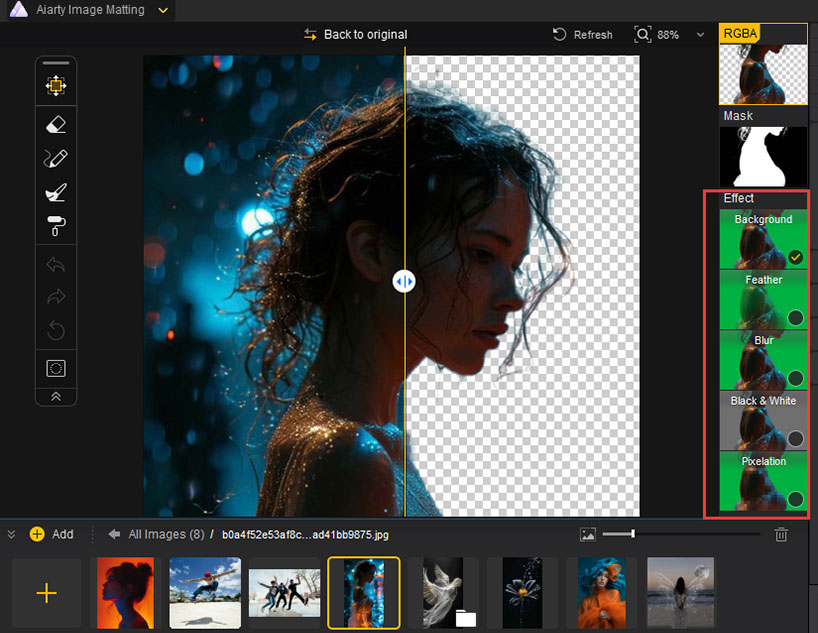
Background
The Background feature allows you to replace the original image background with a solid color, gradient, or another image.
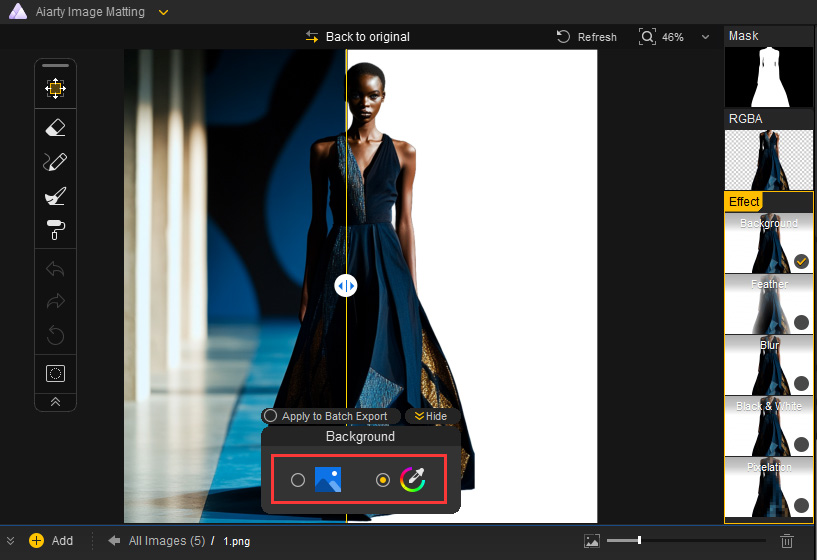
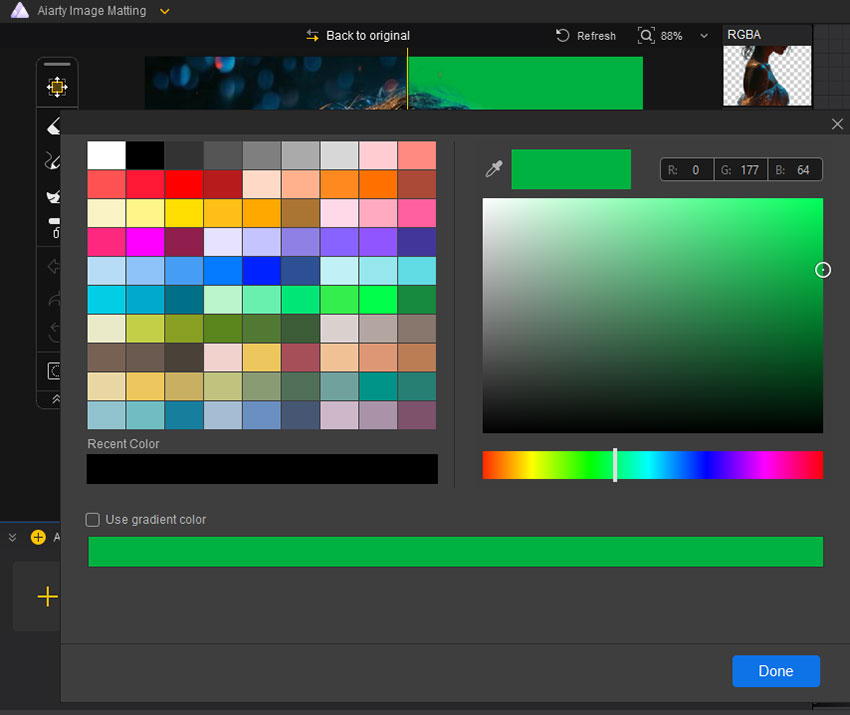
- Click the Eyedropper icon to open the color selection window, where you can choose your desired color or gradient.
- Click the Image icon to open the background image selection window, where you can select a previously used image or add a new one using the Browse button.
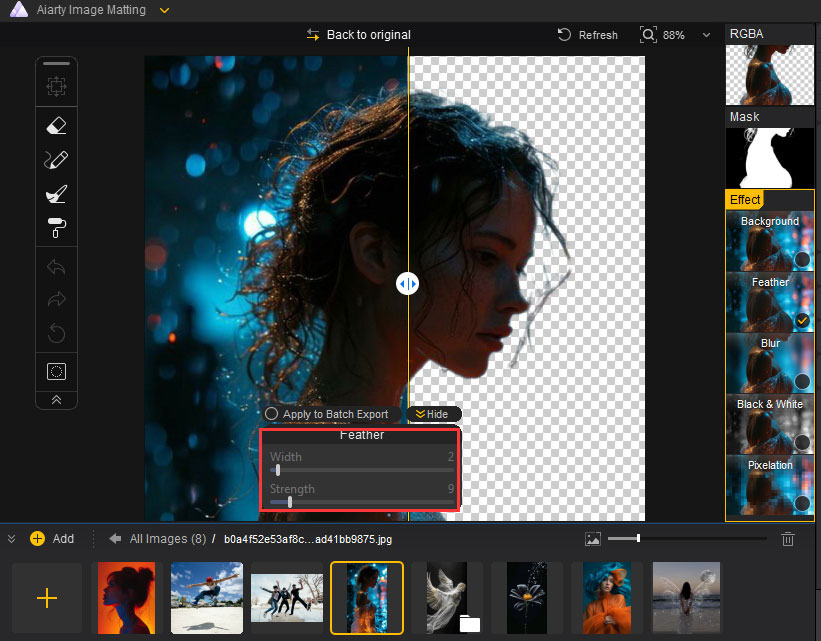
Feather
The Feather effect smooths the transition between the foreground and the background, enhancing overall cohesion. Be mindful, though, that higher feathering can soften edge details. You can adjust the Width and Strength settings to control the feathering level, allowing for smooth blending while preserving essential details.
- Width: Determine the range of the feather effect. A higher value increases the effect's impact on the original image.
- Strength: Control the softness of the transition. A higher value results in a smoother blend with the background but may soften edge details and reduce boundary definition.
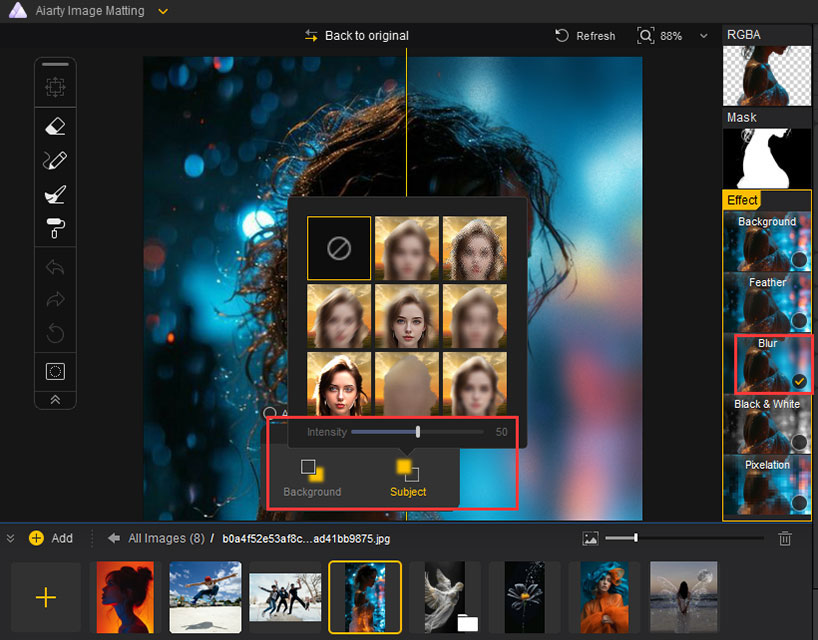
Blur
The Blur effect lets you apply blur to the subject, background, or both. You can use the Style and Intensity to do more control over the blur effect.
- Style: Choose from various blur styles for your creative needs. You can blur the background or subject, perfect for drawing attention to specific areas.
- Intensity: Control the strength of the blur. A higher value increases the blur effect, making the foreground or background softer and less detailed.
Black & White
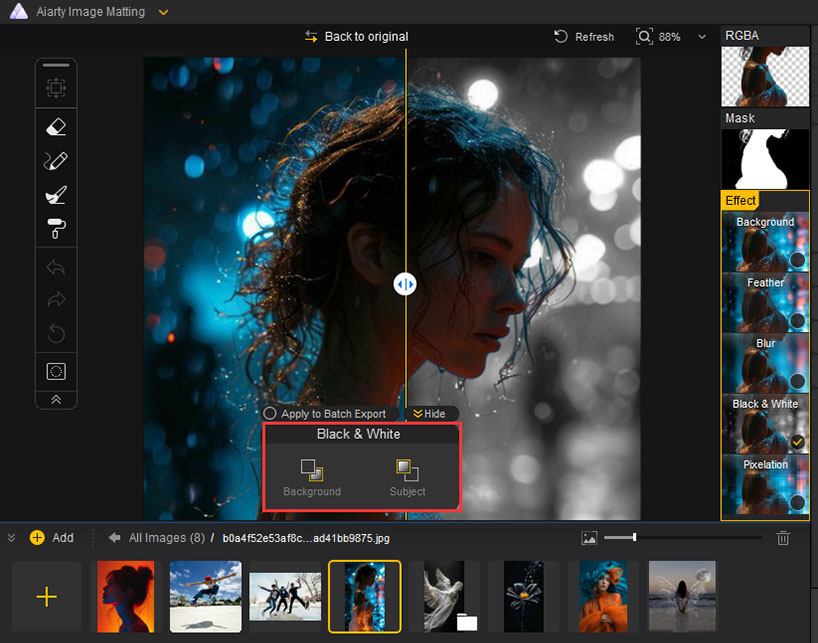
The Black & White effect converts the subject, background, or both into grayscale, allowing for a range of desaturated looks. You can adjust the GrayScale control the color intensity, from subtle desaturation to a completely monochromatic image.
GrayScale: Control the level of desaturation. As the value increases, color saturation decreases. At 100, the image is completely grayscale.
Pixel
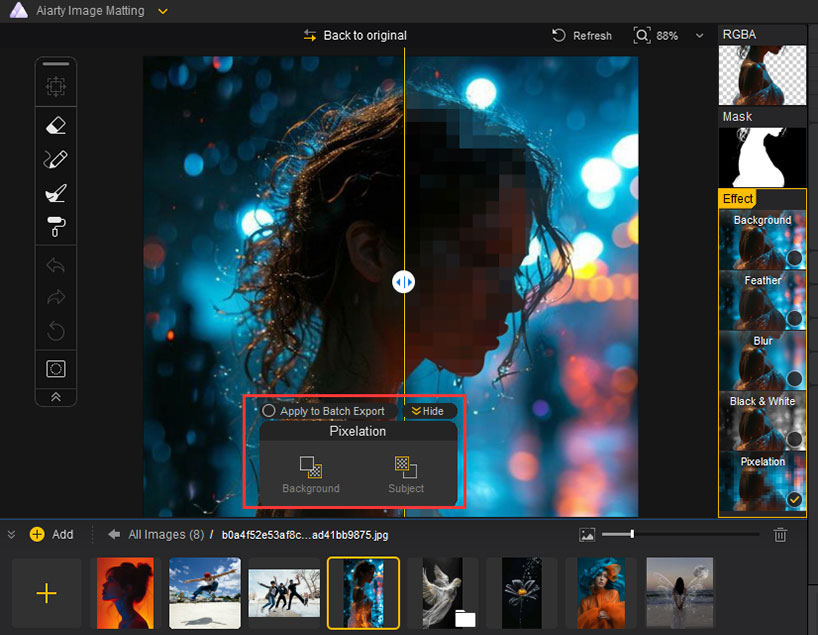
The Pixel effect applies pixelation to the subject, background, or both, creating a stylized, blocky appearance. You can use the PixelSize to adjust how pronounced the pixelation appears, from subtle texture to a bold, pixelated look.
PixelSize: Control the pixelation intensity. Higher values increase the pixel size, giving a stronger pixelated appearance.
Attributes Panel
The Attributes Panel offers three main operations: Move, Hide, and Apply to Batch Export. These functions make it easy to manage and apply settings across multiple images efficiently.
- Move: Click and drag the title bar to reposition the panel for convenient previewing.
- Hide: If the panel obstructs your view, click the "Hide" button to minimize it. A "Restore" button
 will appear in the lower-right corner of the preview window, letting you reopen the panel when needed.
 - Apply to Batch Export: During batch export, apply the current image's settings as the default for other images.

3.3 Editing Tools
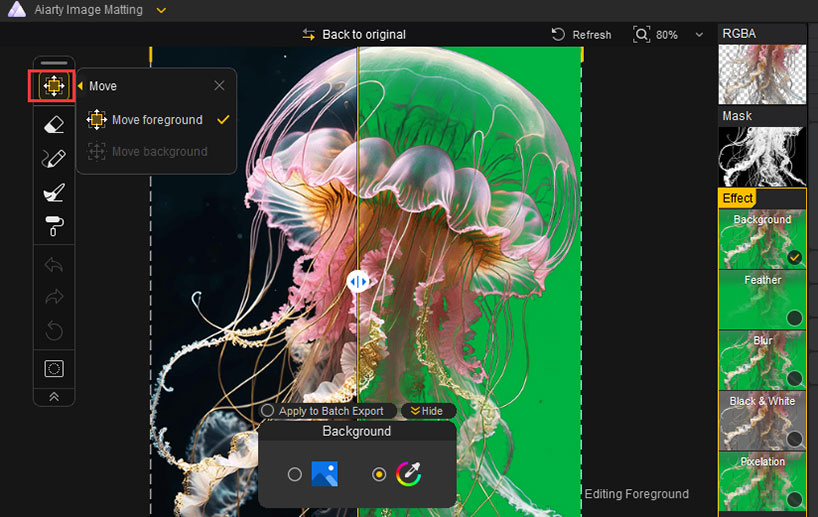
Aiarty Image Matting provides advanced editing including Select and Move function and 4 essential drawing tools, designed for precise adjustments to refine the final appearance of your images. You can enter the editing mode by selecting any of the available tools and exit quickly with the Esc key.Select and Move
Move Foreground: This tool allows you to reposition the foreground and adjust its size and angle. You can right-click to restore the foreground to its original size, fit it to the background size, or center it within the frame.
Move Background: Similar to the Move Foreground tool, this option enables scaling up the background, but it must be enlarged before it can be moved. You can right click to reset the background to its original size.
Drawing Tools
Aiarty Image Matting offers 4 essential drawing tools, including Eraser, Brush, Dodge, and Burn, for precise control over transparency adjustments, blending, and depth in images.
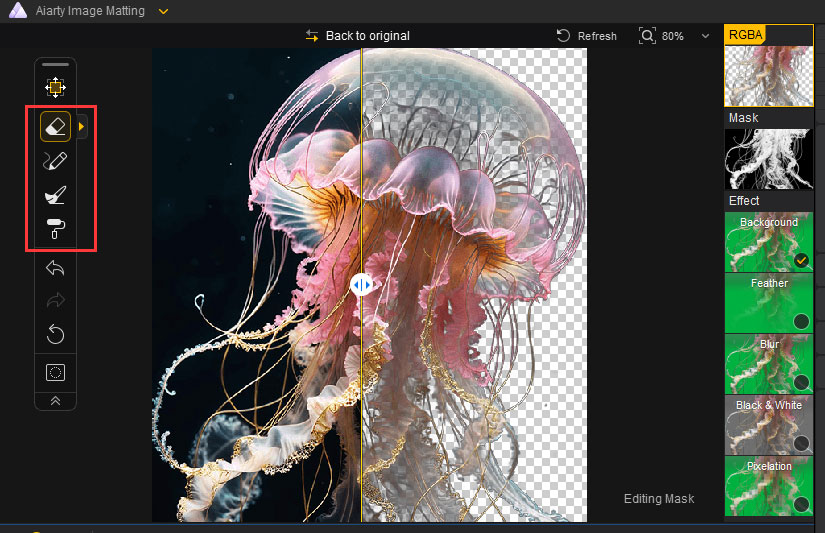
Eraser
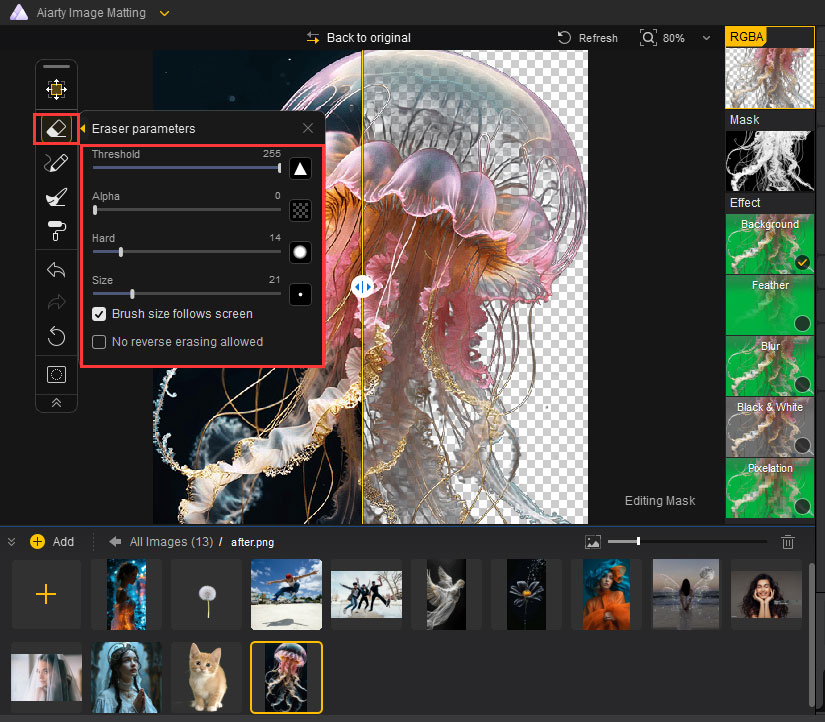
The eraser tool is used to set the transparency of the areas it affects to a specified value (Alpha parameter). It allows users to selectively erase parts of an image, making them transparent based on the configured settings. The eraser tool comes with the following parameters:
| Parameter | Explanation | Default value |
|---|---|---|
| Threshold | Define the editable area, highlighted in blue during adjustments, to help you focus on specific regions. | 230 |
| Alpha | Refer to the transparency level of an area. | 0 |
| Hard | Control the feathering of the eraser edges. A value of 50 provides a balance between soft and sharp edges. | 50 |
| Size | Define the brush size for the eraser, allowing for a versatile range of strokes from precise to broader areas. | 50 |
Specifically, when the Alpha is set to 0, it means the erased area will become fully invisible. If you set the Alpha value to something else (like 128), the erased area will become semi-transparent, remaining visible but not fully clear.
It's important to note that "setting to a specified value" refers to the center of the brush. If the hardness is not set to 100, the effect will gradually weaken towards the edges, similar to the previous points.
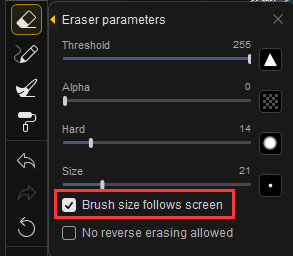
Brush size follows screen
When enabled, the brush size stays consistent on the screen. This is ideal for editing specific areas without needing to adjust settings when zooming in or out. When disabled, the brush size adjusts when the image is zoomed in or out.
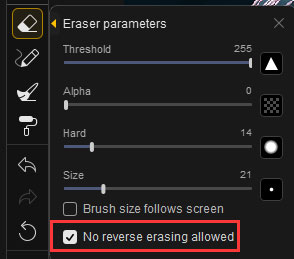
No reverse erasing allowed
This setting determines whether areas below the Alpha value are set to the specified Alpha parameter. When checked, the eraser will only affect areas that are greater than the Alpha value.
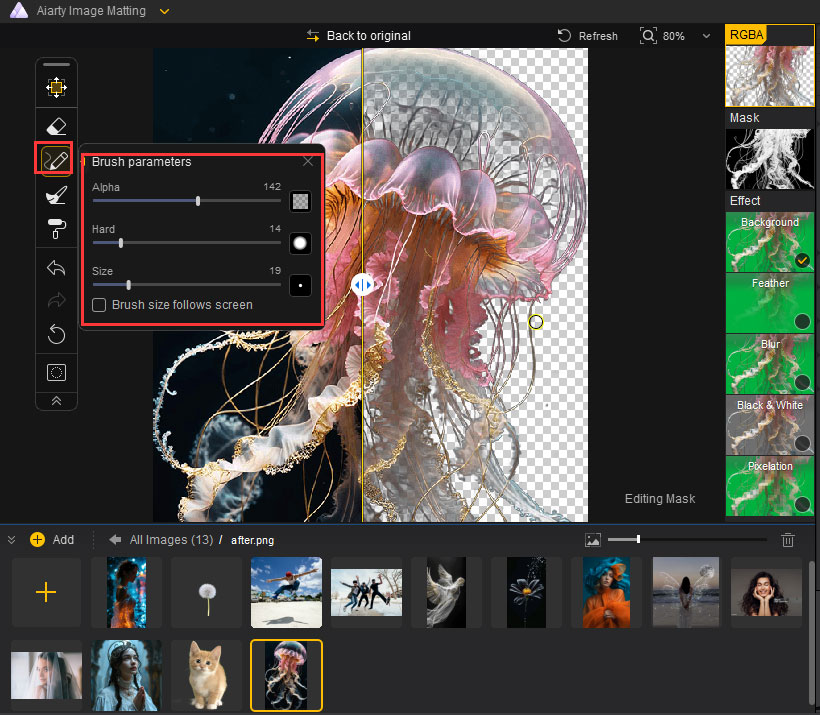
Brush
The brush allows you to adjust the transparency of specific areas in an image. It sets the transparency of points that are below the Alpha value to the specified Alpha parameter. Points that are greater than the Alpha value remain unaffected.
The brush tool comes with the following parameters:
| Parameter | Explanation | Default value |
|---|---|---|
| Alpha | Control the transparency of the brush, often used to create smooth transition effects. | 126 |
| Hard | Control the feathering of the brush edges, providing a balance between soft and sharp edges. | 50 |
| Size | Define the brush size, allowing for versatile strokes from precise detailing to broader applications. | 50 |
Dodge
The dodge tool is used to lower the transparency of the areas it affects. Unlike the brush tool, which sets a specific Alpha value, the dodge tool adjusts the transparency of the affected points by a percentage. This allows for more nuanced control over the visibility of the area, enabling users to create gradual transitions in transparency.
The dodge tool can be particularly useful for subtle adjustments in an image, such as softening edges or creating depth by manipulating transparency in specific areas. The dodge tool comes with the following parameters:
| Parameter | Explanation | Default value |
|---|---|---|
| Threshold | Determine the sensitivity of the tool, affecting how it interacts with adjacent pixels. | 230 |
| Value | Control the extent of the transparency reduction applied to the affected areas. | 50 |
| Hard | Define the feathering of the tool's edges, balancing between soft and sharp transitions. | 50 |
| Size | Set the brush size for the dodge tool, allowing for both detailed and broad applications. | 50 |
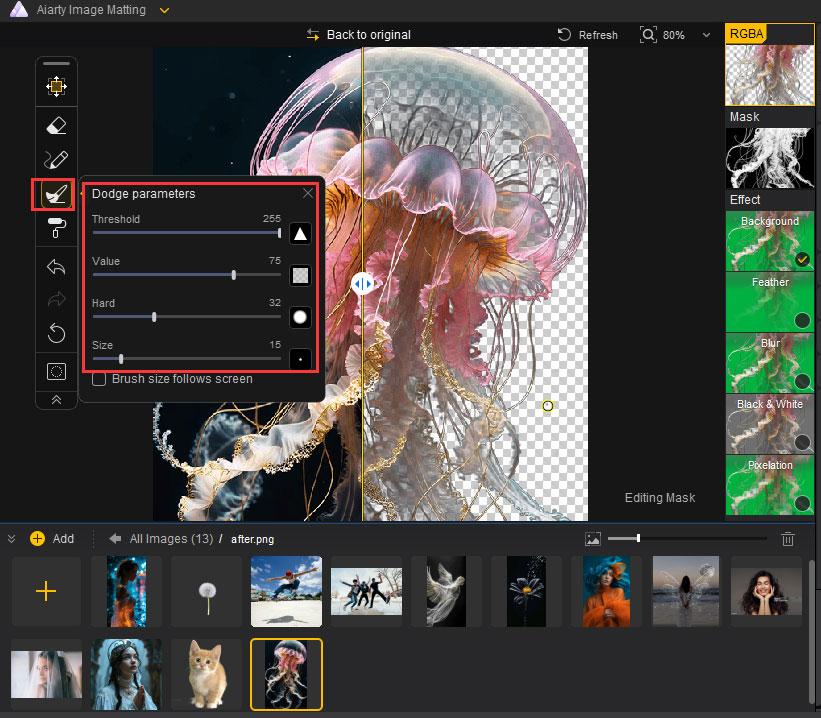
Note: By adjusting the value, you can control the degree of transparency change to achieve the desired effect.
- If you set the value to 50%, the transparency of the affected points will be reduced by half. For example, if the original transparency is 150, after the operation, it will become 75.
- If you release the mouse and then draw again, the overlap between the two strokes will result in a transparency of 37.
- If you do not release the mouse while drawing the second stroke, there will be no overlapping effect, meaning the two strokes will not combine their changes in transparency.
Burn
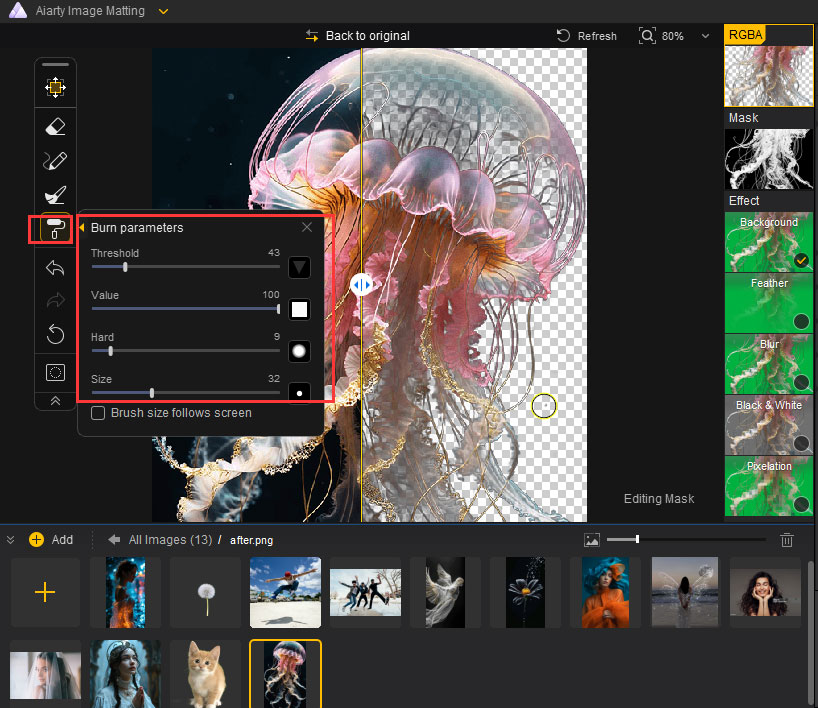
The burn tool is used to increase the transparency of the areas it affects. Its parameter settings and blending characteristics are similar to those of the dodge tool, but the calculation method differs. For example, if you set the value to 50%, the transparency of the affected points will be initially 100. After using the tool, the transparency of that point will increase to 150. However, it’s important to note that the transparency can never exceed 255, which represents full opacity.
The burn tool comes with the following parameters:
| Parameter | Explanation | Default value |
|---|---|---|
| Threshold | Determine the sensitivity of the tool and how it interacts with adjacent pixels. | 20 |
| Value | Control the extent of the transparency increase applied to the affected areas. | 50 |
| Hard | Define the feathering of the tool's edges, allowing for a balance between soft and sharp transitions. | 50 |
| Size | Set the brush size for the burn tool, making it suitable for both detailed work and broader applications. | 50 |
Mask highlight
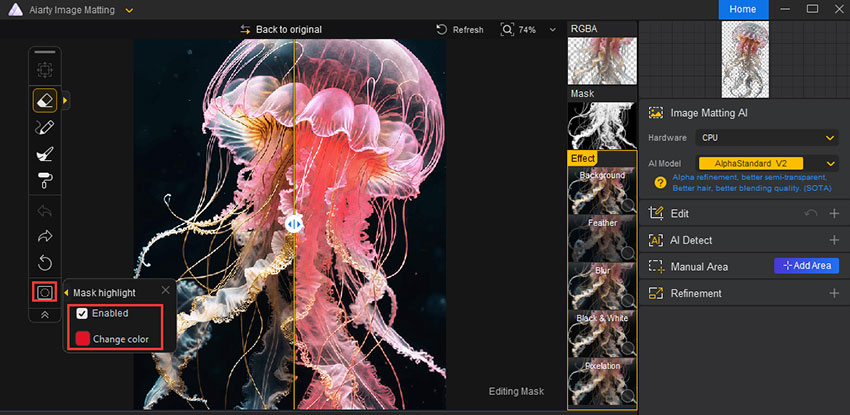
The Mark highlight feature is used to visually highlight areas you are editing or selecting, helping to precisely mark and distinguish different parts of the image.
- Check the "Enabled" box to activate the Mark highlight feature.
- Click the "Change color" option and choose different colors to highlight specific areas, allowing for better detail handling and editing.
4. Properties Panel
Fine-tuning certain parameters to achieve a more precise image matting. Any change to the following parameters will require a new AI image matting inference.
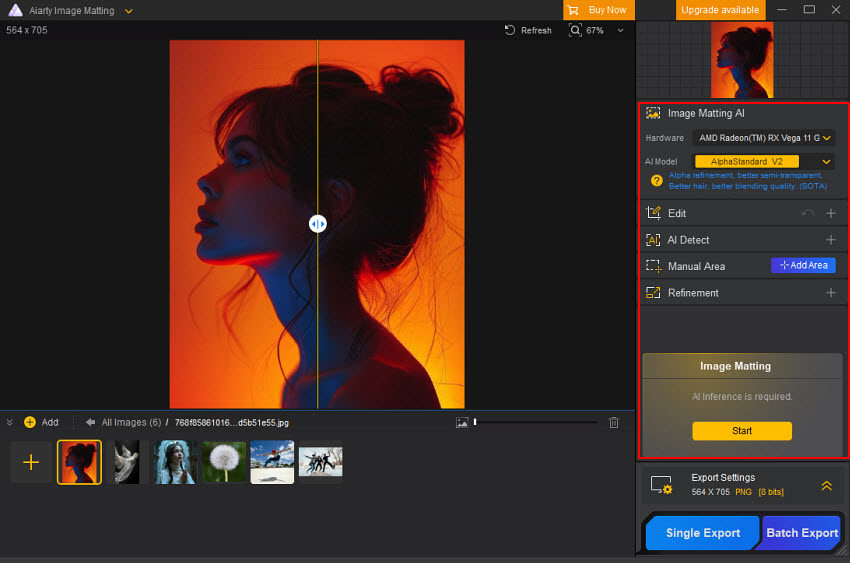
4.1 Image Matting AI
Hardware - Choose devices suitable for AI inference.
AI model - Choose the appropriate AI model for the current scenario.
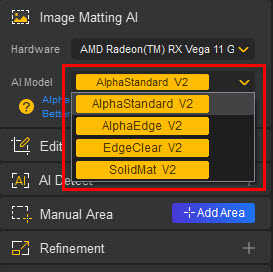
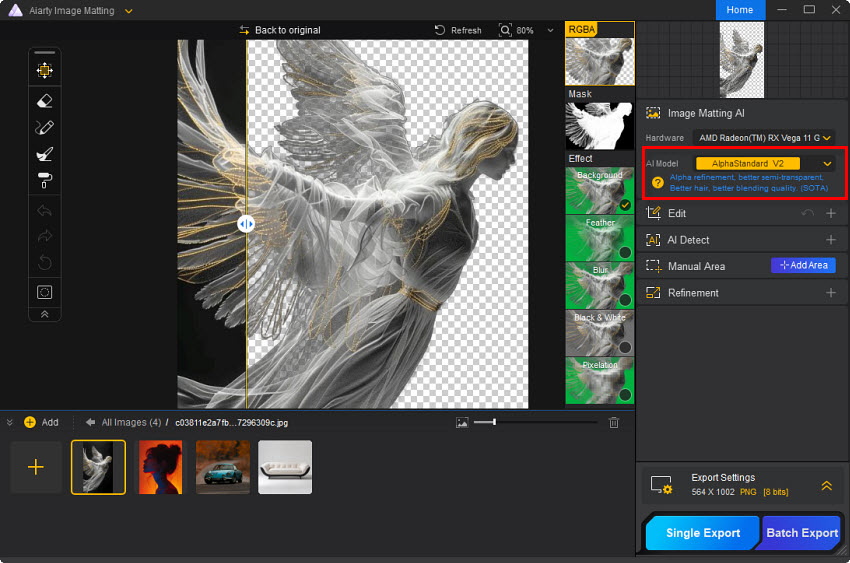
※ AlphaStandard V2
Feature: Alpha refinement, better semi-transparent, better hair, better blending quality. (SOTA)
Best for: Semi-transparent objects with hair. This mode can identify backgrounds through semi-transparent objects, optimize hair details, and achieve a more natural blend with the background.
Examples:
- Sheer Wedding Dress: The fabric is thin, with rich textures, soft edges, and the background subtly peeks through the sheer fabric.
- Transparent Objects: Objects like glass and water droplets are highly reflective, transparent, and have sharp edges.
- Hair: Hair has a complex texture, irregular edges, and fine strands.
- Animals: Animals like cats and dogs have abundant fur, irregular edges, and dynamic movement.
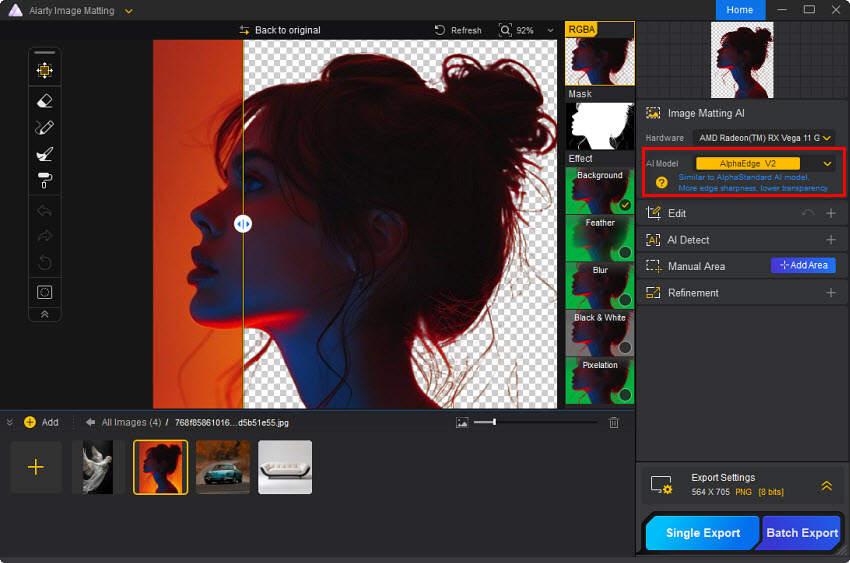
※ AlphaEdge V2
Feature: Similar to AlphaStandard AI model. More edge sharpness, lower transparency.
Best for: Semi-transparent objects with hair, but requiring lower overall transparency and sharper edges.
Examples:
- Silhouette images:Silhouette-style portraits, and animals have stark contrast, bold outlines, and sharp edges.
- Anime and cartoon: These images are characterized by dynamic lines and well-defined outlines.
- Tattoos: Tattoos are renowned for their intricate linework and clear contours.
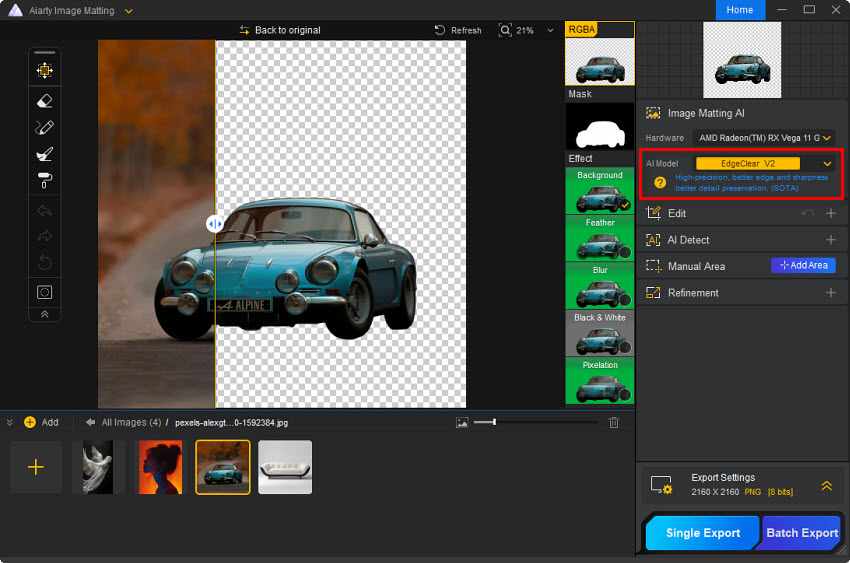
※ EdgeClear V2
Feature: High-precision, better edge and sharpness, better detail preservation. (SOTA)
Best for: Solid, non-transparent objects with intricate details.
Examples:
- Vehicles: Vehicles such as bicycles and cars typically have sharp edges, rich details, especially on metal surfaces and reflective parts.
- Accessories: Accessories like bags and jewelry have a variety of materials, including complex textures, intricate decorations, and reflective surfaces.
- Furniture: Furniture usually has complex material textures, such as wood grain and fabric, and clear edges.
- Birds: Birds have complex and layered feather textures, irregular and fine edges.
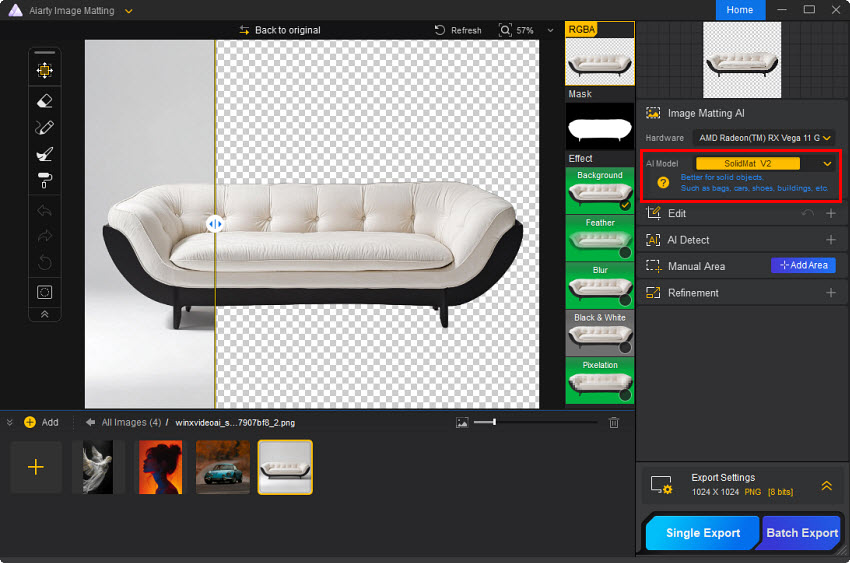
※ SolidMat V2
Feature: Similar to EdgeClear AI model. More edge sharpness.
Best for: Solid, non-transparent objects with intricate details, but requiring sharper edges.
Examples:
- Architectural photography: Windows, doors, and other architectural elements, with clear lines, distinct details, and strong contrast against the background.
- Electronics: Electronics like phones and computers often have smooth metal or glass surfaces, with sharp edges and strong reflections.
- Clothing: Clothing items such as clothes and shoes have varied materials, complex textures, rich layers, and natural edges.
- Books: Books have clear lines, smooth edges, and subtle transitions between the spine and pages.
4.2 Edit
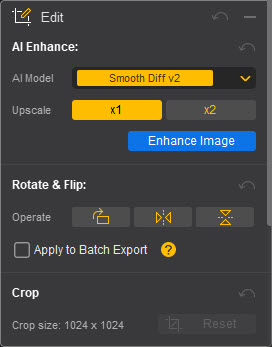
You can make simple edits to the source image with the following editing features offered by Aiarty Image Matting.
AI Enhance
Enhance the original image quality to extreme detail and upscale image by up to 2X. Three AI enhancement models are provided.
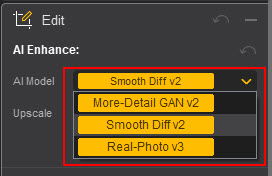
More-detail GAN
This model is designed for images with intricate details, such as hair, fur, and textures. It can generate details, reduce noise, and improve clarity.
Smooth Diff
This model is designed for images with fewer details, such as animations, cartoons, and glass. It can smoothen images, reduce noise, and improve clarity.
Real-Photo
This model is designed for high-quality photos, especially old or noisy ones. It can enhance details, reduce noise, and restore original quality.
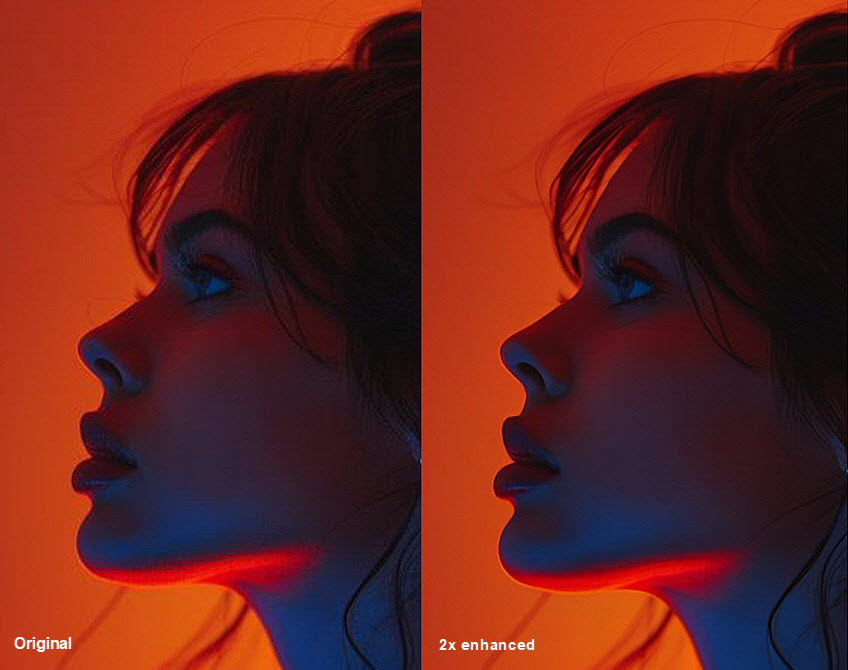
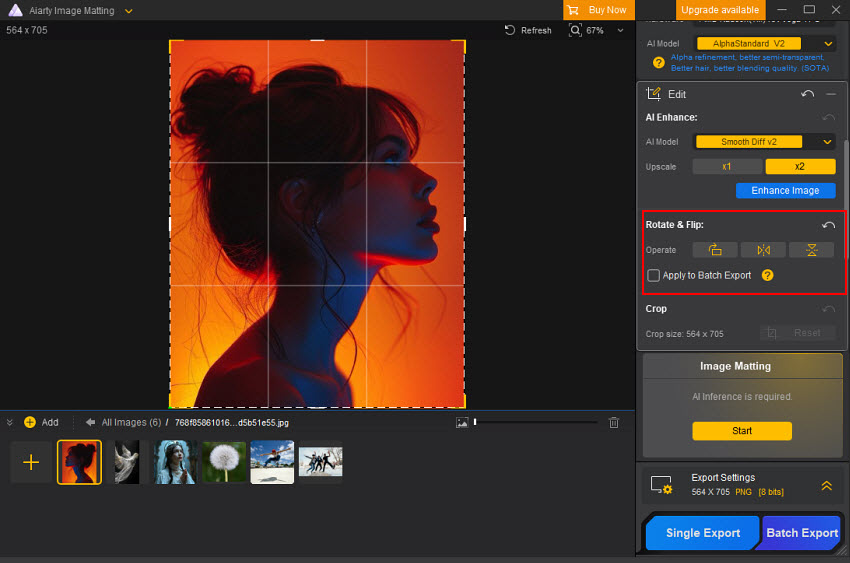
Rotate & Flip
Adjust the orientation and angle of the original image.
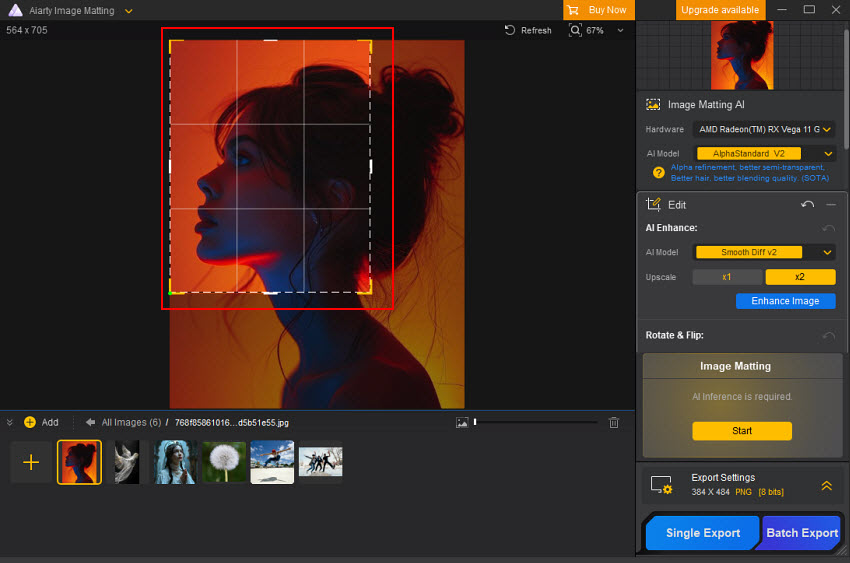
Crop
Crop the original image to highlight the subject for easier previews and edits. Define the crop area by manipulating the four corners of a selection box on the image.
4.3 Area Select
AI Detect
Click "Start" to auto-detect objects in the image. After the AI analysis, select the object you want to extract from the identified categories. Click to select, click again to deselect.
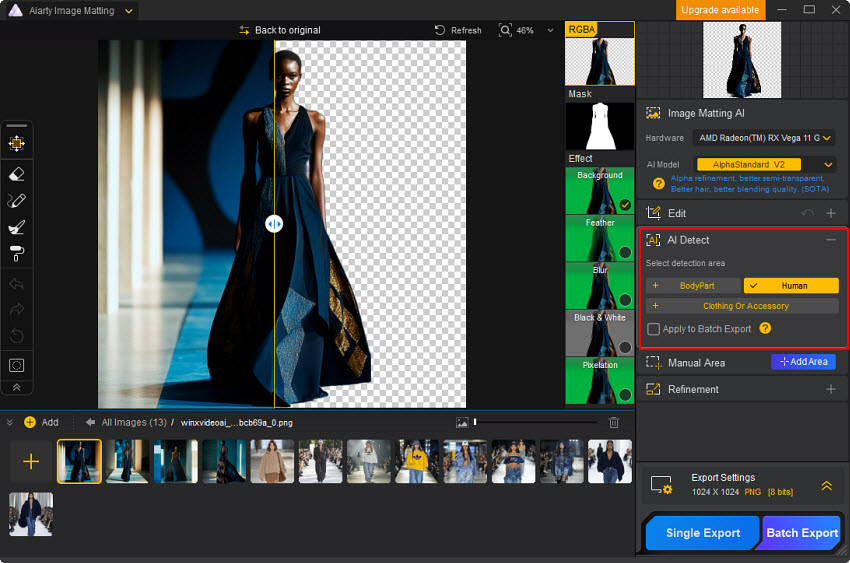
Apply to batch export. Automatically apply this parameter to all images upon batch export.
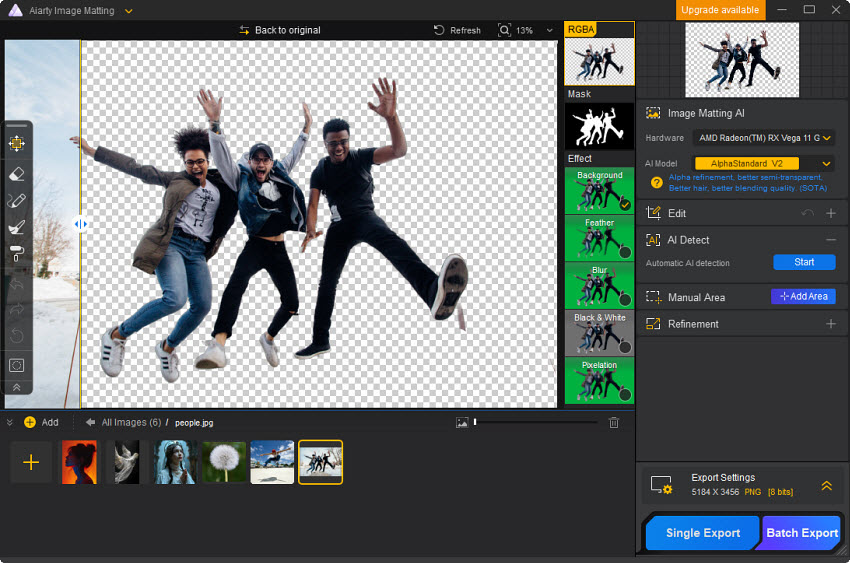
Manual Area
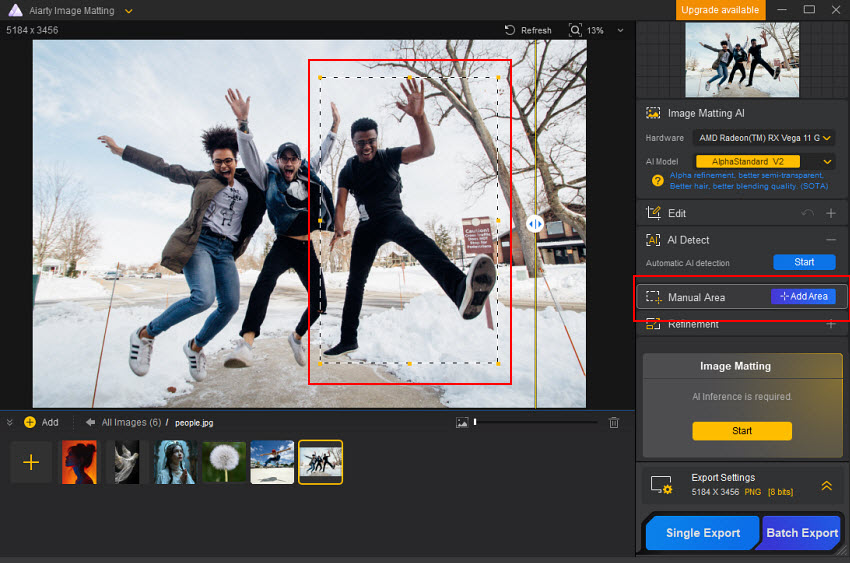
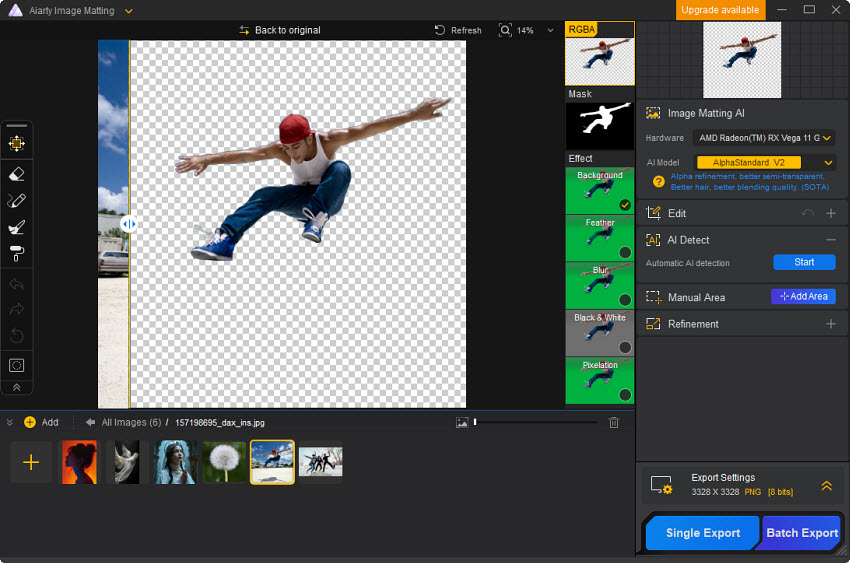
Manually select the specific area to be extracted from the image. This feature can be used in two situations.
1. If it extracts extra areas that you don't want to include,
you just need to select the main subject,
then you will get a clean subject that you want to extract.
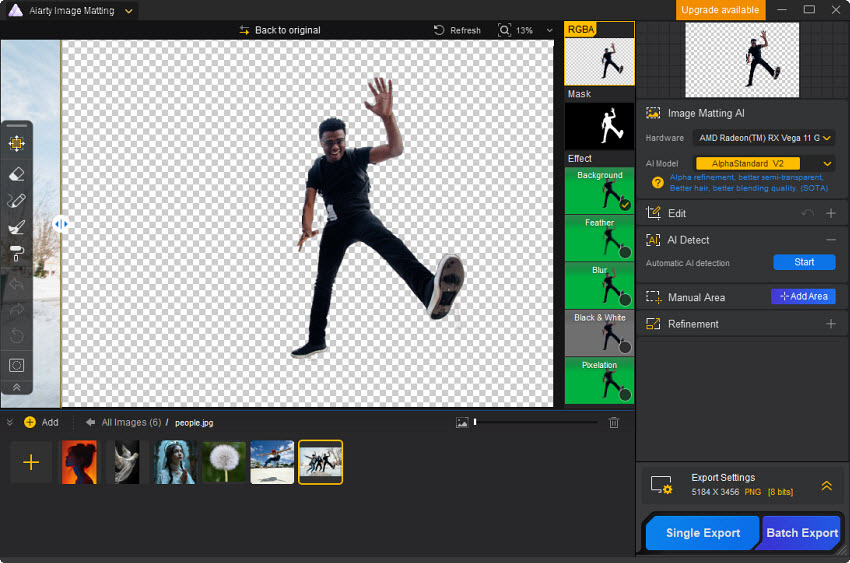
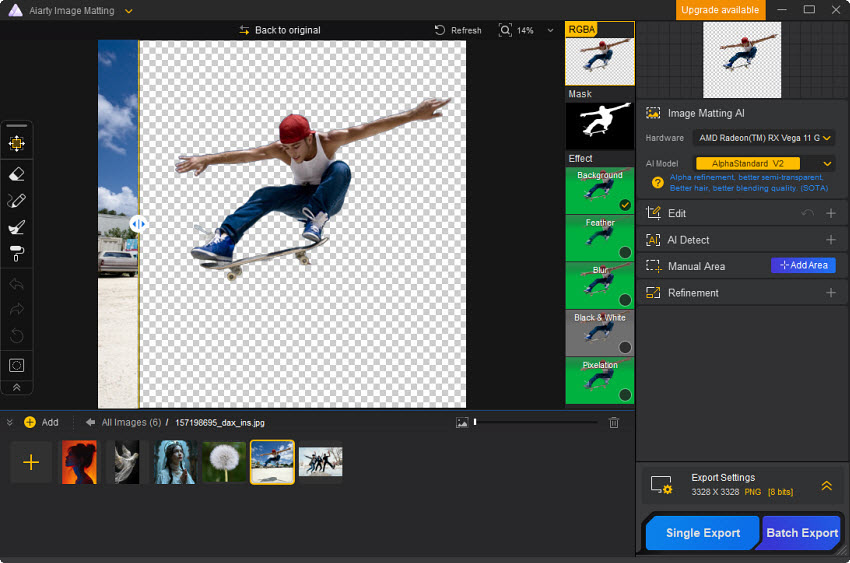
2. If it removes the part you want to retain,
you need to select all the parts you want to include,
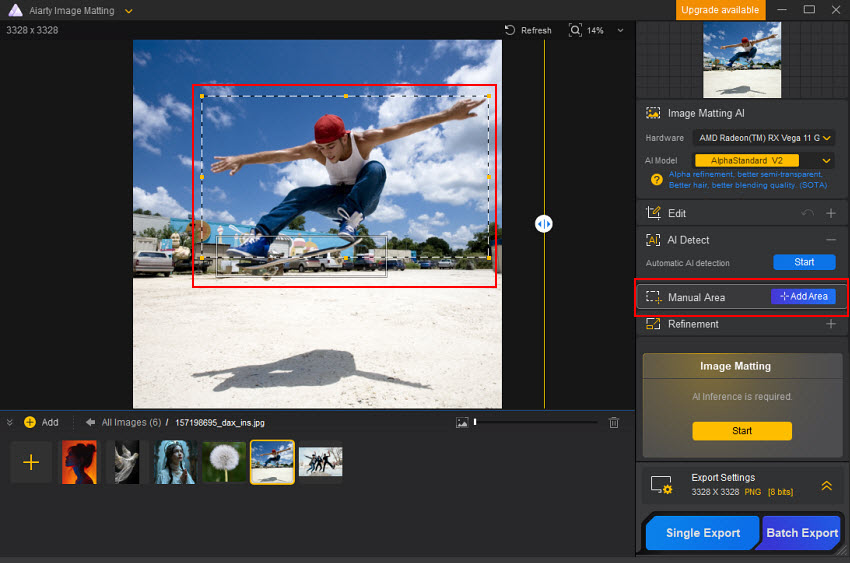
then it will extract all the necessary areas you want.
To cancel a selected area, click that selected area, right-click on it, and choose "Remove".
4.4 Refinement
Four options are offered to optimize the matting results in challenging situations: Smooth Processing, Outline Emphasis, Balance Brightness, and Invert Alpha Mask.
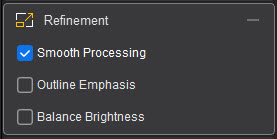
Smooth Processing
Smooth the edges of the extracted objects to create a more natural-looking outline and minimize jaggedness, especially for images with resolution higher than 2K.
Best for:
- Portrait photos: Smooth processing can enhance the quality of portrait matting results, especially in areas with intricate details like hair, resulting in a more natural and less jagged appearance that is more consistent with human perception.
- Product images: When products have straight or near-straight edges that aren't perfectly aligned to 90° or 180°, where minor deviations can result in jagged edges during image background removal. Smooth processing minimizes the imperfections for a cleaner edge.
- Images that require a soft appearance: Smoothing processing can enhance the overall softness and delicacy of the image, such as watercolor painting.
Outline Emphasis
When enabled, it will enhance the contour detection in the image and give more prominence to edges during the inference process.
Best for:
- Objects with sharp edges: This option works best for objects with clear-cut shapes like buildings and cars.
- Objects that require preservation of fine details: This option is ideal for preserving fine details, such as fine textures and edges.
- Images with low contrast between foreground and background: In this case, contours are easier to identify, resulting in better matting results.
Note: Enabling this option may optimize matting results in certain cases. However, it's generally not needed for typical images and is turned off by default.

Balance Brightness
When enabled, it will enhance the brightness detection in the image and giving it more weight during the inference process.
Best for:
- Subtle brightness contrast: When the foreground and background have similar brightness levels, enhancing brightness contrast can help better distinguish between them.
- Complex background: For images with complex backgrounds, boosting brightness contrast can better identify foreground objects.
- Accurate matting: For accurate image background removal, this option can improve overall removal accuracy.
Note: This option may optimize matting results in certain cases, but it's usually not necessary. By default, it is turned off.
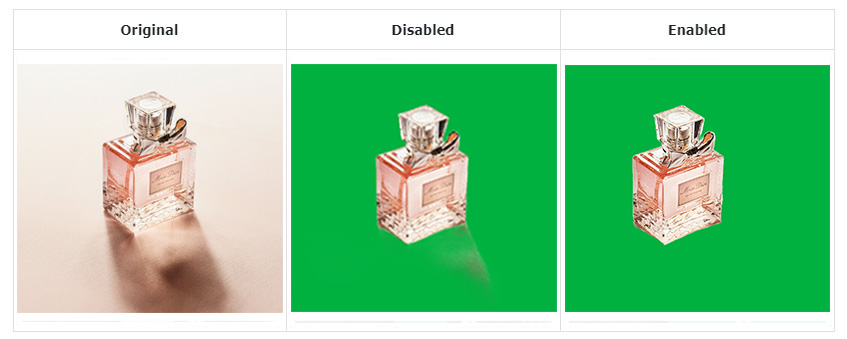
Sum
- If there are noticeable jagged edges in the image, enable Smooth Processing.
- For cases where the image background removal may be inaccurate or errors occur, enable the "Outline Emphasis" or "Balance Brightness".
Invert Alpha Mask
The function of "Invert Alpha Mask" is to reverse the selected area of the image, thus changing the object being extracted. If you enable the "Invert Alpha Mask" feature, the previously selected subject will become the "delete area," and the background will become the area to be retained.
The final image will retain the background, and the subject will either be deleted or turned transparent. This is useful when you need to turn the original background into the subject and remove the subject, such as when creating special effects or creative compositions.
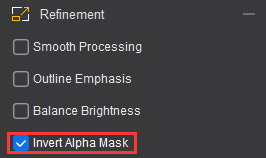
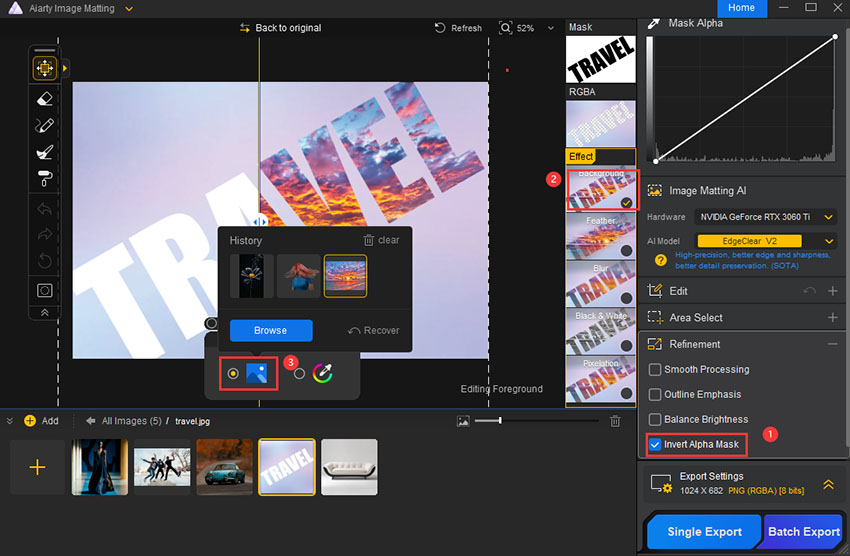
- Enable Invert Alpha Mask feature.
- Click "Background” from Effect options.
- Select the image icon and then the “Browse button to select an image to complete your creative compositions.
The Invert Alpha Mask feature is useful in various image editing and compositing tasks, including:
- Background Inversion: Selects the background instead of the subject, allowing background editing.
- Image Composition: Creates special masking effects, such as merging the outline of one image with the inner area of another, like blending a portrait with a city silhouette.
- Text Effects: Used in text editing to create hollowed-out text effects, such as in movie title design.
- Special Effects Production: Generates various visual effects, such as inverting image transparency to create a "negative film" effect.
- Layer Control: Quickly inverts the affected area of a layer for more precise adjustments.
5. Export Section
5.1 Export Settings
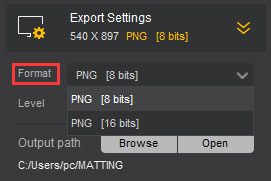
- Format
Aiarty Image Matting supports 3 export formats: JPG, PNG 8-bit, and PNG 16-bit.
JPG is best for photographs with many colors but not ideal for transparency or sharp edges due to its lossy compression.
PNG 8-bit is a good choice for simpler images like logos or illustrations with fewer colors and transparency, though it has a limited color palette.
PNG 16-bit, offering lossless compression and support for millions of colors, is perfect for high-quality, detailed cut-out images that require sharp edges and transparency, though it results in larger file sizes. If quality and transparency are a priority, PNG 16-bit is the best option.
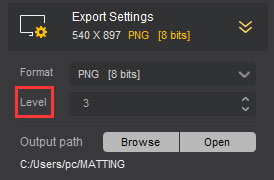
- Level
This setting determines the level of compression applied to the exported file. A higher compression level results in a smaller file size but longer processing time. Conversely, a lower compression level leads to faster file generation but larger output files.
Note: this is a lossless compression process, meaning the image quality remains unaffected; only the file size and loading time are impacted.
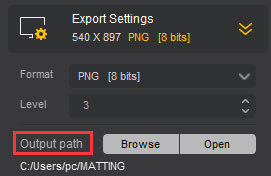
- Output Path
The output path specifies the location where exported files will be saved. It is essential to ensure that you have written permissions for this directory to avoid any issues during the export process.
Note: Make sure to choose a location that is accessible and organized for easy retrieval of your files.
5.2 Export Rules
The export process offers two methods: single export and batch export.
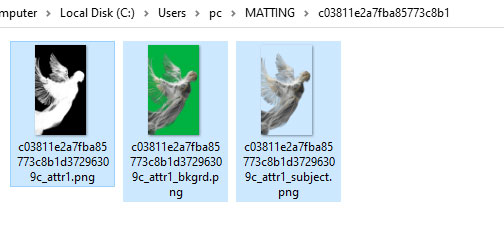
● Exported Files
By default, the exported files will include RGBA images and mask images, with the background effect selected. This means that if no changes are made, the software will automatically export the RGBA image, mask image, and a green background image.
For each additional effect selected, a corresponding image will be generated. If multiple effects are applied, the software will also create a composite image that combines all effects (the total effect image).
● Export File Naming Rules
When exporting images, the naming conventions help ensure clarity and organization. These conventions ensure that each file is easily identifiable, indicating its type, batch number, and any relevant effects applied.
● Differences Between Single Export and Batch Export
The primary distinction between single file export and batch export lies in the output location. These differences help you organize exports effectively based on your needs.
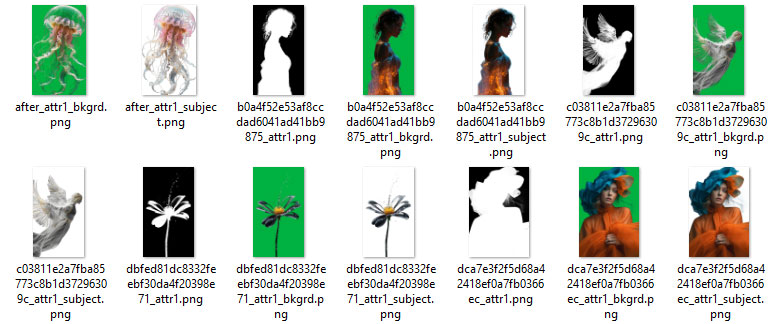
Single File Export: This method creates a new folder named after the original file within the specified output directory, storing all export results for that image in this dedicated folder.
Batch Export: In contrast, batch export creates a folder named "Batch_export" within the specified output directory. No new folder will be created if the 'Batch_export' folder already exists. The handling of files within this folder depends on the settings in the export window, specifically the option to "Create a separate folder for each resource file during export." If this option is not selected, all exported files will be stored in the newly created "Batch_export" folder.
5.3 Apply Batch Export Settings
When the "Apply to Batch Export" option is available, be sure to click "Batch Export" in the displayed settings; otherwise, the changes won't take effect. Batch export operates based on the current settings displayed.
6. Customization Settings
6.1 Hardware Check
The hardware check allows you to assess your computer's basic configuration, including CPU specifications, RAM size, graphics card model, and VRAM size.
To check if your PC supports hardware acceleration, click on "Hardware Check" from the drop-down menu in the top menu bar to view your computer's hardware information.
When the user's system meets the necessary requirements, the TensorRT detection option will be displayed. If the system does not support TensorRT, this option will not appear. Make sure to check your system configuration to ensure compatibility with TensorRT for optimal performance.
6.2 General Settings
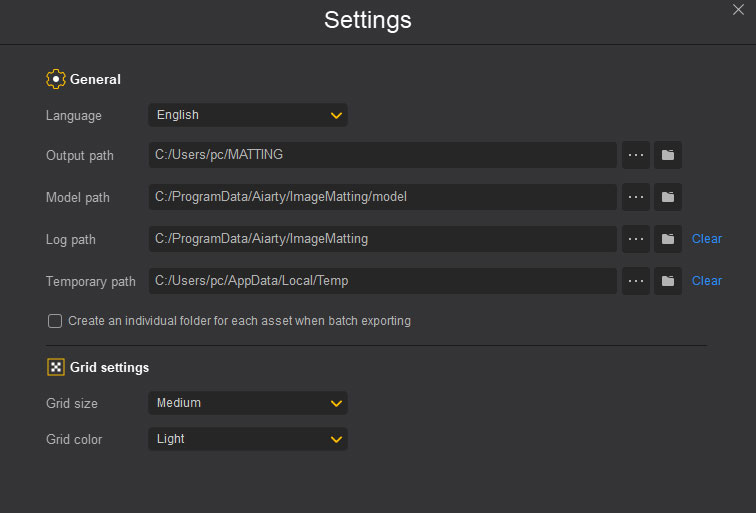
- Language: Select your preferred language from the drop-down menu. Currently, Aiarty Image Matting supports five languages.
- Output Path: Set the location where the enhanced images will be saved. You can also choose to keep the original location.
- Model Path: Defines the folder where AI models are stored.
- Log Path: Specifies the location where the software’s running logs are saved.
- Temporary Path: This is where buffer files are stored. When in preview mode, Aiarty Image Matting will not reanalyze images that have already been processed.
- Default Background Color: Specifies the color that will be used for the background when no image or transparent background is present.
- Create Separate Folders for Each Resource File During Export: When this option is selected, batch export will create a separate directory for each resource file.
- Grid Settings: Allows you to configure the background for RGBA image previews.
Tips: Grid Settings
The grid setting refers to the overlay of horizontal and vertical lines on an image to help you precisely select areas during the matting process. These lines divide the image into smaller squares, making it easier to perform selection tasks visually.
Grid Size Settings
Choose from three options: Large, Medium, and Small. This adjusts the density of the grid, with larger grids having fewer lines and smaller grids offering more precise control by increasing the number of squares.

Grid Color Settings
Select from three color options: Light, Medium, and Dark. This controls the visibility of the grid lines, ensuring they are distinguishable from the image content. By default, the grid color is set to Light to avoid interference with the image, but you can adjust it based on your needs for better contrast.

6.3 Proxy Settings
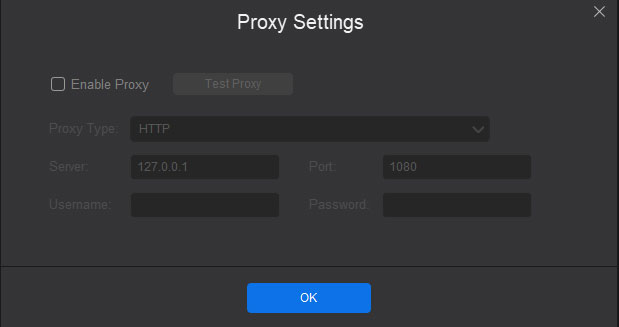
Some users may be operating within an internal network that requires a proxy server to access external resources. This situation is common in environments like campus networks or corporate intranets.
To enable proxy access, you will need to update settings according to your specific network configuration.
The "Test Proxy" feature allows you to verify the connectivity of the proxy server, ensuring that the application can successfully access external networks.
Make sure to enter the correct proxy details to facilitate smooth online access.
6.4 Check for Updates
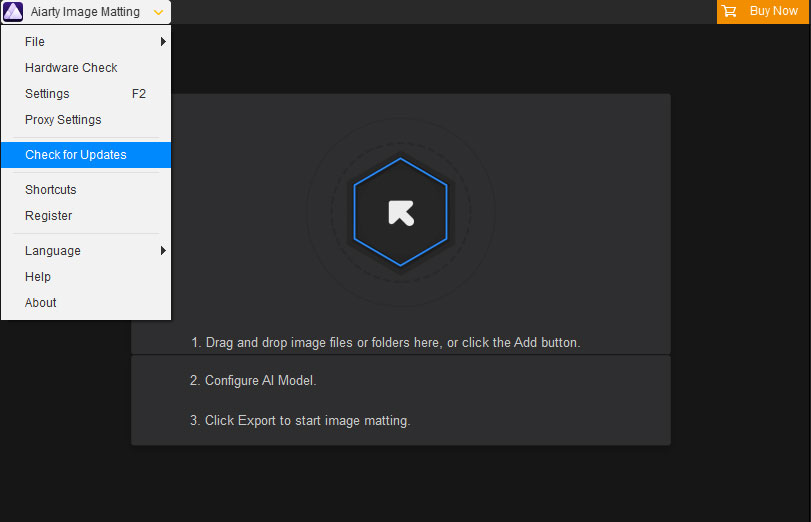
When performing a manual update check, a log detailing the new version's changes will be displayed if updates are available.
Click "Update Now" and the system will first check if the update program itself is up to date.
Once the update program is successfully downloaded, follow the on-screen instructions to complete the upgrade process. The software will automatically restart upon completion.
If no updates are found, a message will indicate that you are already using the latest version.
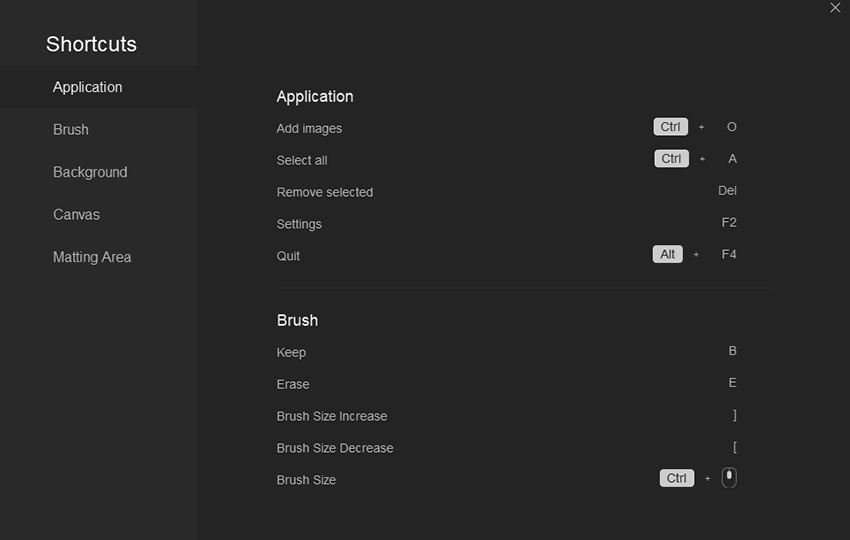
6.5 Shortcuts
The Shortcuts displays a list of supported keyboard shortcuts for quick operations. This feature provides a convenient way to familiarize yourself with time-saving commands.
Note that these shortcuts are for reference only and cannot be customized within the application.
6.6 About Window
The About window provides the software version number, release date, and registration details. When users report issues, these details can significantly narrow down the scope for troubleshooting and support.
