5 Ways to AI Upscale Stable Diffusion Images
Updated on
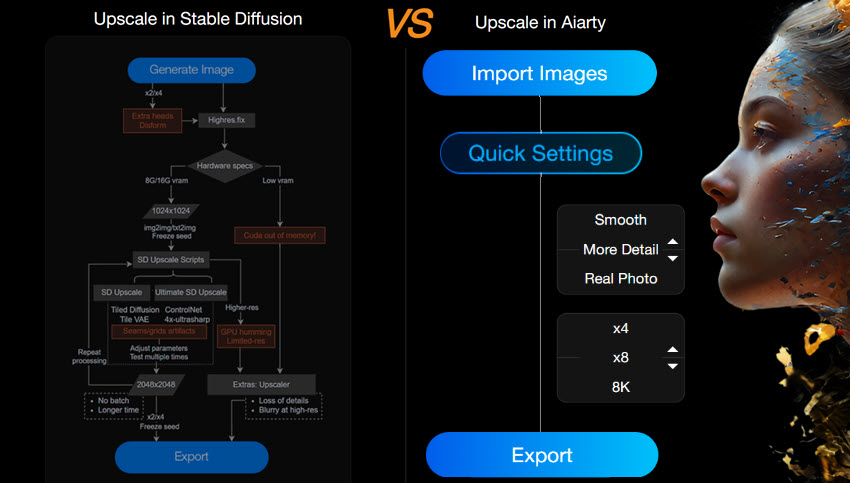
Here is the ultimate guide to upscale in Stable Diffusion, with Stable Diffusion upscaler comparisons. Besides built-in utilities and extensions, we also include a standalone software that can directly upscale from 512px to 4K and higher-res with details.
You may have already heard several workflows for different occasions:
- -Workflow 1: txt2img, highres.fix 2X
- -Workflow 2: txt2img, highres.fix 2X, img2img 2X (freeze seed, low denoising strength)
- -Workflow 3: txt2img, highres.fix 2X, SD upscale script 2X (+ControlNet)
- -Workflow 4: txt2img, highres.fix 2X, Ultimate SD upscale 2X (+ControlNet)
- -Workflow 5: txt2img. highres.fix 2X, Tiled Diffusion (MultiDiffusion) 2X +Tiled VAE
- -Workflow 6: One of above methods + Extras Upscaler
In this blog, you can learn about those upscaling utilities and extensions involved in the workflow. Better yet, you will find another standalone AI imager upscaler named Aiarty Image Enhancer (methods 2) that can replace those complex workflows while delivering great quality upscaling.
Workflow easy: txt2img, Aiarty Image Enhancer 2X/4X/8X and higher (with details)
1. Highres Fix in Stable Diffusion
Highres.Fix feature in Stable Diffusion is designed to avoid extra heads and distortion when generating images at a resolution higher than 512x512, especially when one side is longer that the other side.
For instance, if you generate 512x1024 without highres.fix turned on, you may see there are two heads or extras limbs in the generated image – unless you are using SDXL that are trained with 1024x1024 inputs.
How to Use Highres. Fix in Stable Diffusion
Step 1. Assuming you have set prompts, negative prompts and other necessary parameters in Stable Diffusion, click the Highres.fix option under txt2img tab.
Step 2. Choose an upscaling algorithms to use for Highres.fix from the drop down menu.
- For general purpose, choose R-ESRGAN 4x+
- For anime, choose R-ESRGAN 4x+ Anime6B
Step 3. Choose the number to upscale by.
For instance, if your source image is 512x768, choosing 2X here will give you an 1024x1536 image.
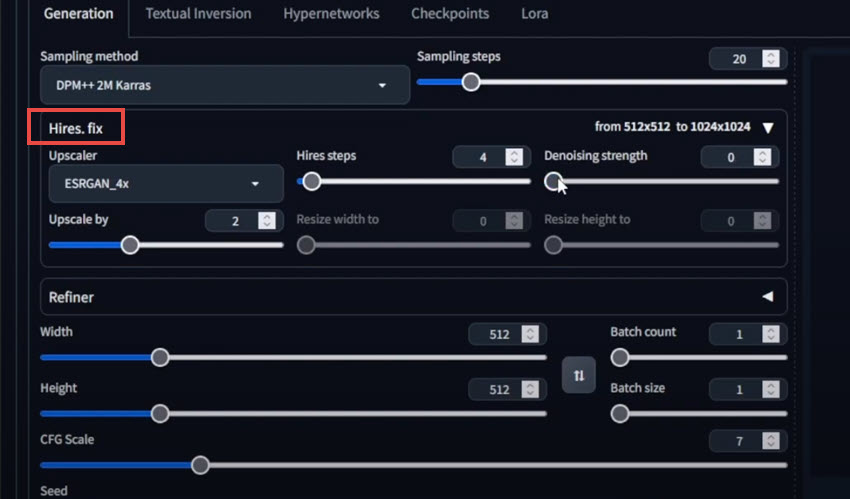
Hires steps: you can leave it at the default value at 0. I have tested different value for this parameter, but it's hard to notice any difference.
Denoising strength: leave it at the default value at 0.
Tips:
Highrex.fix is computing intensive, and can lead to CUDA out of memory error. It is recommended not to enable highres.fix if you haven't generated an image that you like. You can freeze the seed and then toggle on highres.fix after finding your favorite seed.
2. Standalone AI Image Upscaler for Stable Diffusion
For computers with low vram video cards (such as 4GB), upscaling in Stable Diffusion may not be working, or takes forever. For instance, it may take 20 minutes to upscale a single image with highres.fix. Enhance your visuals with AI-driven image enhancement tools that boost resolution and detail, perfect for refining Stable Diffusion-generated images to professional quality.
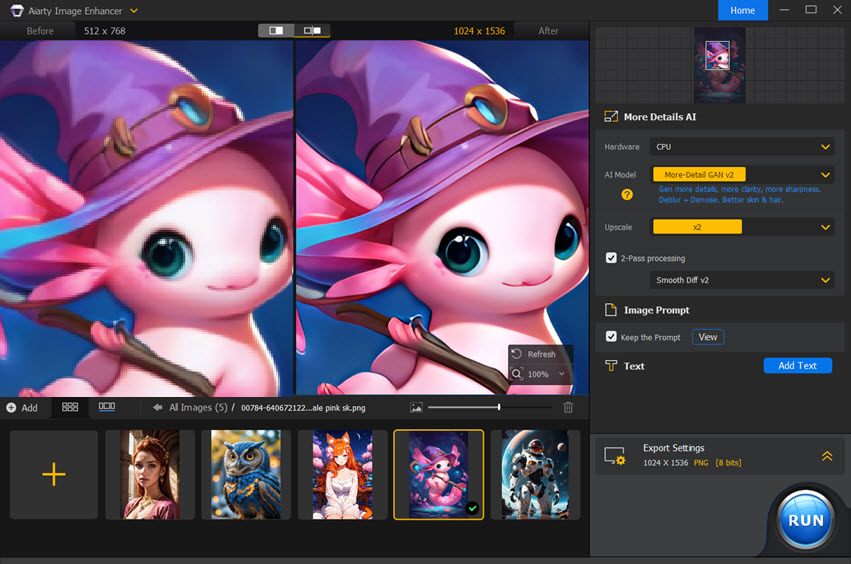
If you want to upscale 512 to higher resolution (2K/4K/8K/16K+) on average computer without fancy graphic cards, you can use didecated AI Image Upscaling tool – Aiarty Image Enhancer by Digiarty Inc. It helps you to get pro-quality images easily in 3 steps.
Aiarty Image Enhancer is the best Stable Diffusion Upscaler with these highlighted features:
- Faster process on old PC : Upscale 512px to 4K in 27s (tested on Nvidia GTX650, 8GB ram).
- Easier batch workflow: The AI model can auto inference and upscale AI art in batch.
- Realistic details: It can generate lifelike details upon upscaling, thanks to 6.78 million trained dataset.
- Low-vram friendly: Aiarty is optimized for Nvidia/AMD/Intel/CPU and can work with 4GB vram.
How to Upscale Stable Diffusion Images with Aiarty Image Enhancer
After downloading and installing Aiarty Image Enhancer for Windows or for Mac, launch the software and follow the steps below.
Step 1. Import Stable Diffusion Images into Aiarty Image Enhancer.
It also works for other AI-generated images, photos, and web images (such as your digital downloads).
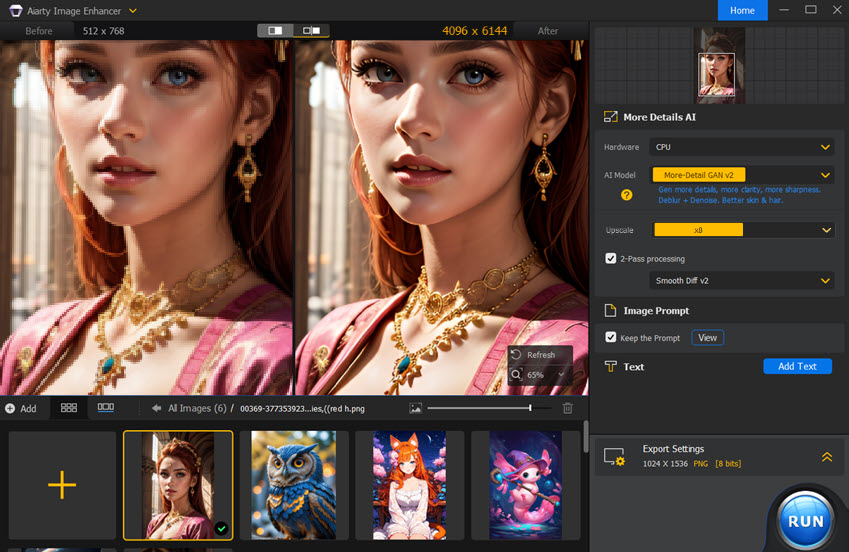
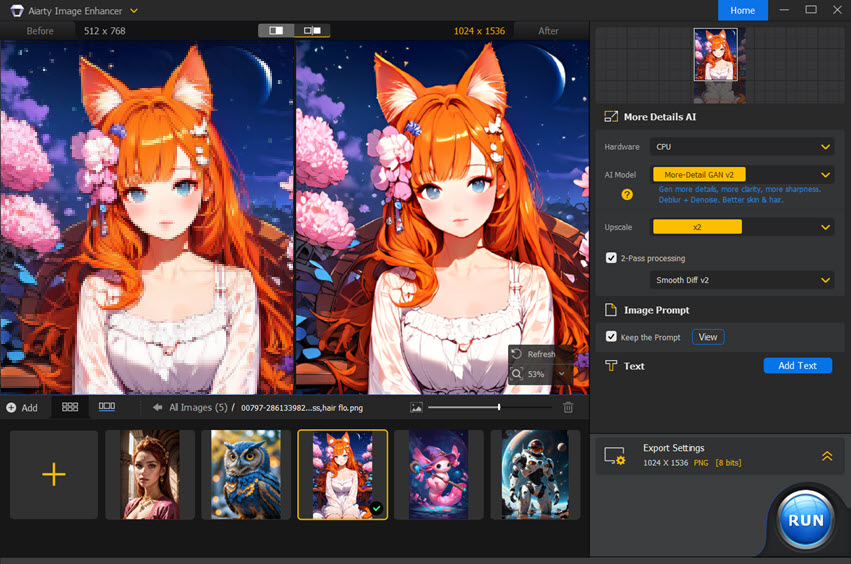
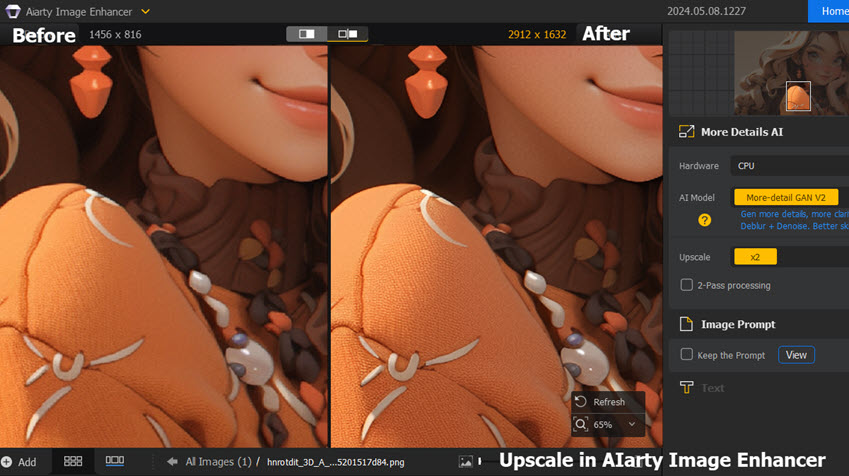
Step 2. Select the AI models and upscale multiples.
- More-detail model: upscale with proper details. Best for low-res AI art.
- Smooth model: upscale and restore flawed images without adding too much details.
- Photo model: best for photography quality improvement.
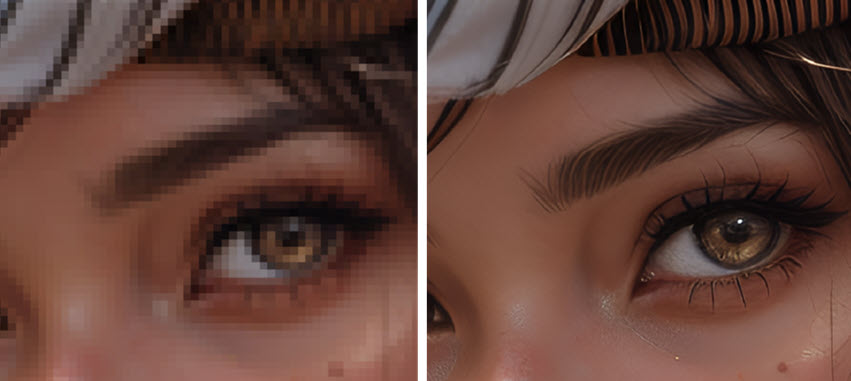
You can zoom in on the realtime previewer to inspect the details. Look how clear and realistic it is for the eyelashes and skins.
Step 3. Export the AI image to JPG or PNG.
You can repeat to process to achieve an even higher resolution such as 8K/16K.
It is amazing that with a mere 512x512 resolution, you can upscale it to higher resolutions with AI generated details that are faithful to the original image.
With Aiarty Image Enhancer, you can batch generate many 512x512 images, and handle them all in Aiarty for 4K/8K upscaling without losing details. It saves hours of effort when compared to the 1-by-1 slow upscale in Stable Diffusion. It is also one of the best AI image enhancer tools to deblur, denoise, and restore heavily-compressed image to pro-looking quality.
Watch Aiarty Image Enhancer in action:
🎬 Timestamp
00:35 Part 1. Why use Aiarty to enhance your workflow
01:10 Part 2. Image upscaling case #More-Detail Model
02:30 Part 3. Image upscaling case #Smooth Diff Model
3. Ultimate SD Upscale Script
You can use ultimate SD upscale in Stable Diffusion for large-size output. Before you jump into the steps below, make sure you have freezed seed for your desired image, entered prompts, negative prompts, CFG scale, steps, and other parameters regarding image generation.
Step 1. Install Ultimate SD upscale for Stable Diffusion Automatic1111.
Download this extension from Github:
https://github.com/Coyote-A/ultimate-upscale-for-automatic1111
Put it in your Stable Diffusion automatic1111 folder > extensions
Or you can directly install this extension from the automatic1111 WebUI: Extensions>Install from URL, and paste the URL listed above.
Step 2. Send the txt2img result to img2img.
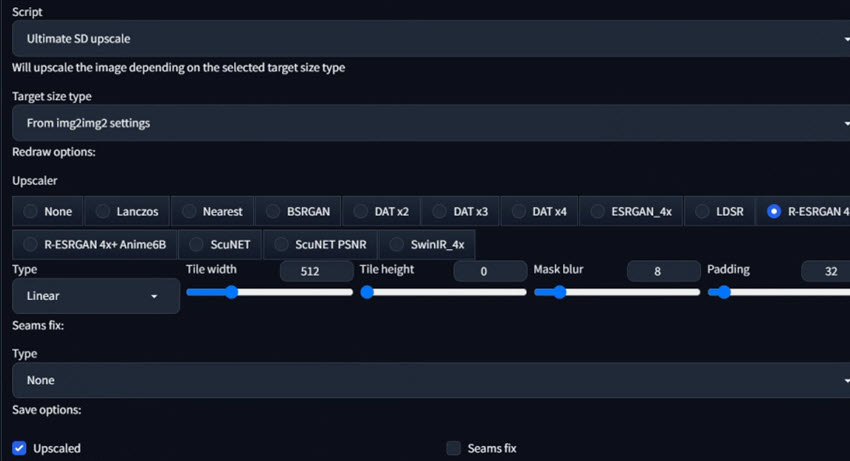
Step 3. In the "Script" dropdown menu select "Ultimate SD upscale".
Step 4. Tweak parameters in the Ultimate SD upscale.
For detailed information on what each parameter means, you can read the wiki page for Ultimate SD upscale extension.
For quick settings:
- Target size type: from img2img settings
- Upscaler: R-ESRGAN 4X+ recommended for general purpose and R-ESRGAN 4X+ Anime6B for anime.
- Padding: 32 or 64
You can also experiment with other upscaling algorithms.
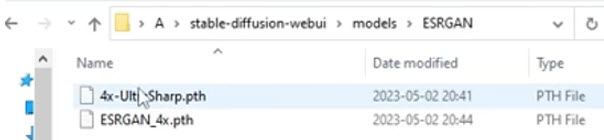
Another popular upscaling algorithm is 4x UltraSharp, though you need to manually install it as it doesn't come along with the automatic1111 installation.
You can download the 4x UltraSharp upscaling algorithms from https://huggingface.co/lokCX/4x-Ultrasharp/blob/main/4x-UltraSharp.pth
Then move it to [stable-diffusion-webui folder]\models\ESRGAN\
Step 5. Enable ControlNet into this workflow to control the composition.
If you don't toggle on ControlNet settings, there are chances that your upscaled image become distorted, or changes its original compositions.
Since the settings for ControlNet are complex, so I put the steps separately below.
Integrate ControlNet into the Workflow
If you don't integrate ControlNet into the Ultimate SD upscale workflow, you may notice the output image has artifacts like faces being created all over the place.
Workflow:
- txt2img at 512px/768px, (optional highres.fix 2X)
- send to img2img, freeze seed, configure prompts parameters
- Ultimate SD upscale (2X) + ControlNet
Assuming you have set up the parameters for Ultimate SD Upscale following the steps above, now go ahead and configure ControlNet.
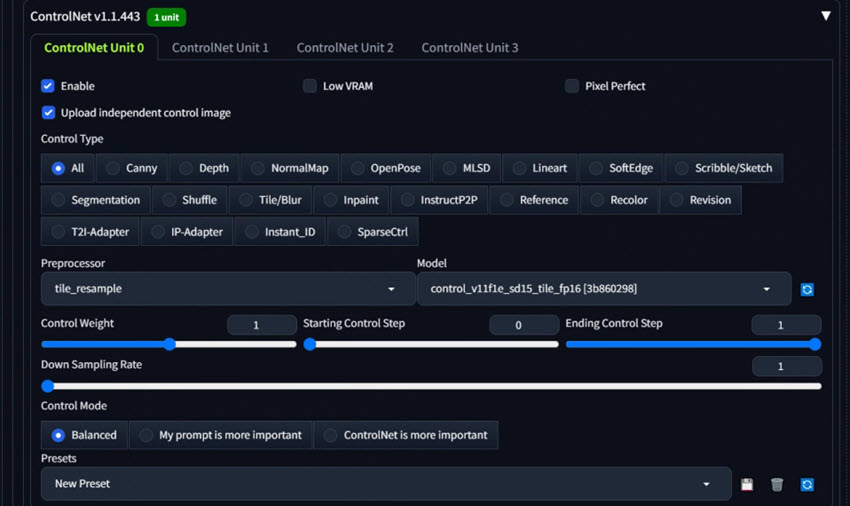
Step 1. Enable ControlNet and toggle on the option "Upload independent control image".
Drag and drop the image that you want to upscale as the reference here in ControlNet, so that when you use upscaling tools in Stable Diffusion, it won't distort the image.
Step 2. Tweak the parameters in ControlNet.

• Preprocessor: tile_resample
• Model: control_v11f1e_sd15_tile

• Control Mode (Guess Mode): Balanced or ControlNet is more important according to your specific scenarios.
When everything is settled, click Generate and wait for Stable Diffusion to generate and upscale your image.
Alternative Script: SD Upscale
If you don't want to manually install Ultimate SD Upscale, you can also use SD upscale which comes along with automatic1111.
Workflow:
- Experiment in txt2img and find your favorite seed.
- Optional: x2 Highres. fix
- Send to img2img, tweak prompt settings
- x2 with SD upscale + ControlNet.
Below are details about setting up SD upscale script:
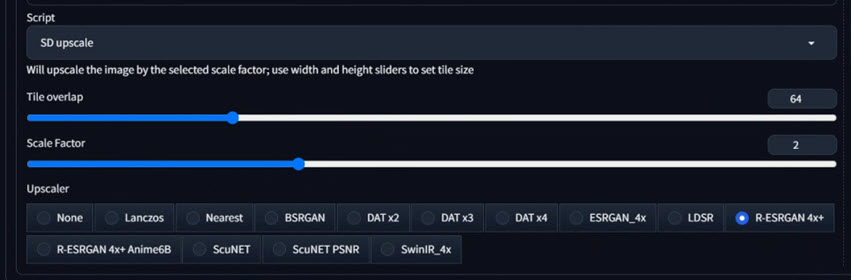
- Script: SD upscale
- Tile overlap: 64
- Scale Factor: 2 means upscale the image by 2 times.
- Upscaler: choose the upscaling algorithms.
If SD upscale is missing in your automatic1111 webui, you can download it here: https://github.com/AUTOMATIC1111/stable-diffusion-webui/tree/master/scripts
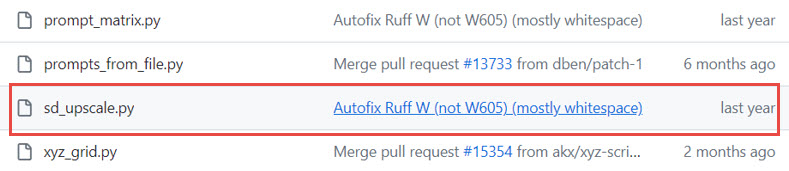
And paste the file here: [stable diffusion folder]>scripts>sd_upscale.py
4. Tiled Diffusion (MultiDiffusion)
Tiled Diffusion can process the original image in separate segments. Each segment then undergoes the process of image generation. When Tiled is rendering segments, it does not move by the distance of a complete segment each time, but only by the distance of overlapping pixels.
This has an advantage: when rendering a small segment, at least half of the area has already been completed. The remaining unrendered area will be drawn with reference to the already rendered area, ensuring that the content will be coherent when upscaled. If there's no overlap at all, the upscaled image will have obvious seams and grids.
Clearly, larger tile divisions lead to faster drawing speeds. More overlaps increase the number of tiles, slowing down the drawing speed, but result in smoother unnoticeable boundaries when upscaled.
Step 1: Install TiledDiffusion and Tiled VAE
- Automatic1111 WebUI > Tab "Extensions" > Tab "Install from URL"
- Paste the link: https://github.com/pkuliyi2015/multidiffusion-upscaler-for-automatic1111.git
- Hit "Install"
Step 2. Use Tiled Diffusion+Tiled VAE in txt2img or img2img
Set denoising strength to 0.3 or lower in img2img.
Configure Tiled Diffusion as shown below.

✔Enable Tiled Diffusion
✔Keep input image size
✔Method: MultiDiffusion
Optional: Move ControlNet tensor to CPU (if applicable). You can tick this if your video card has low vram such as 4GB.
Upscaler: R-ESRGAN 4X+ for reality, R-ESRGAN 4x+ Anime6B for anime. You can experiment with other algorithms.
✔Enable Noise Inversion (it guarantees that your image keep its composition).
Scale Factor: 2 means upscale the source image by 2 times.
Step 3. Configure Tiled VAE.
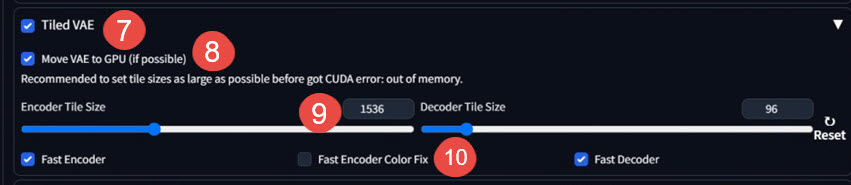
✔Enable Tiled VAE
Optional: Move VAE to GPU (if applicable)
Optional: lower the value for Encoder Tile Size if "CUDA of out memory" error occurs.
Optional: toggle on Fast Encoder Color Fix if the output image becomes grey or blurry.
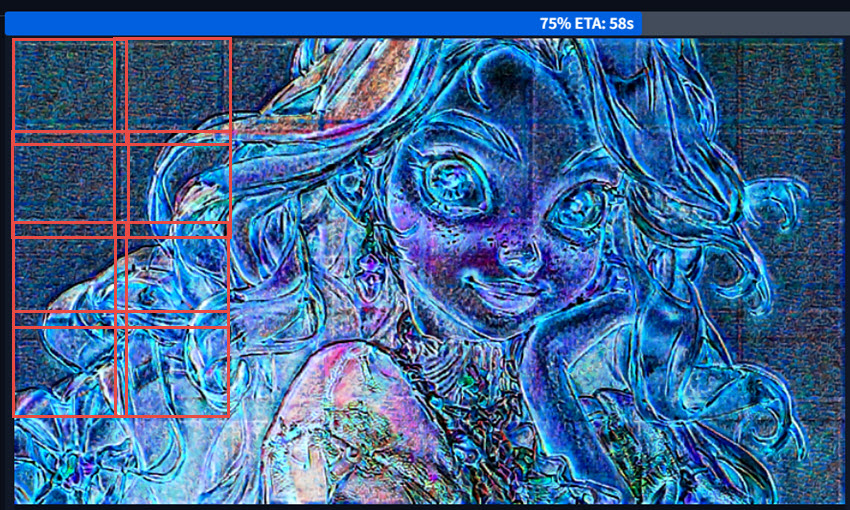
As you can see from above, there are some vaguely visible tiles upon upscaling.
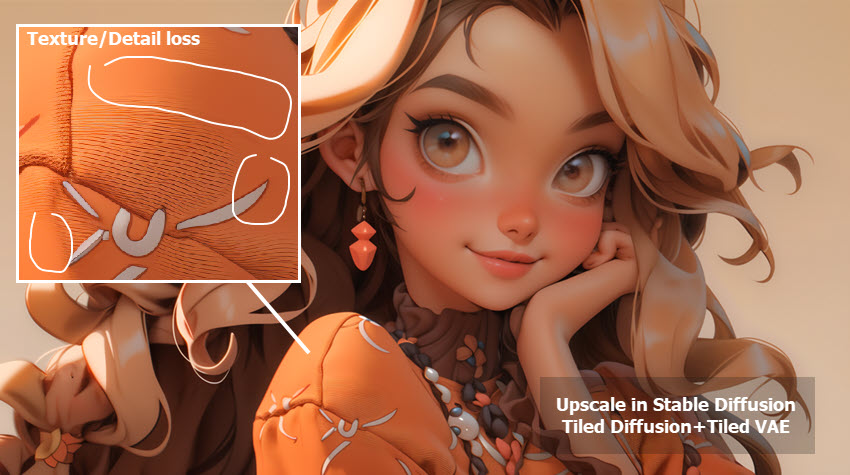
Sometimes, there will still be loss of details using the Tiled Diffusion method. For the above upscaled image, we can notice that the texture on the fabric is partly lost.
In comparison, upscaling in Aiarty Image Enhancer (see Method 2) is much easier and faster.
Best of all, it restores natural new details with AI models while remaining faithful to the original image. The surface materials retain their feel (fabric, glass, metal, wood, fur, etc.) with intricate textures.
5. Upscaler in Stable Diffusion Extras Tab
The upscaler under the Extras Tab in Stable Diffusion can batch process multiple images. Compared to highres.fix, Ultimate SD Upscale and Tiled Diffusion methods, Extras upscaler is faster, but it retains less detail in general, and can be blurry when aiming for huge size such as 4K and 8K.
Since it is post processing that won't go the diffusion process, the upscaler in Extras tab won't change the composition of the image.
Assuming you have gone through the workflow of image generation, follow the steps below.
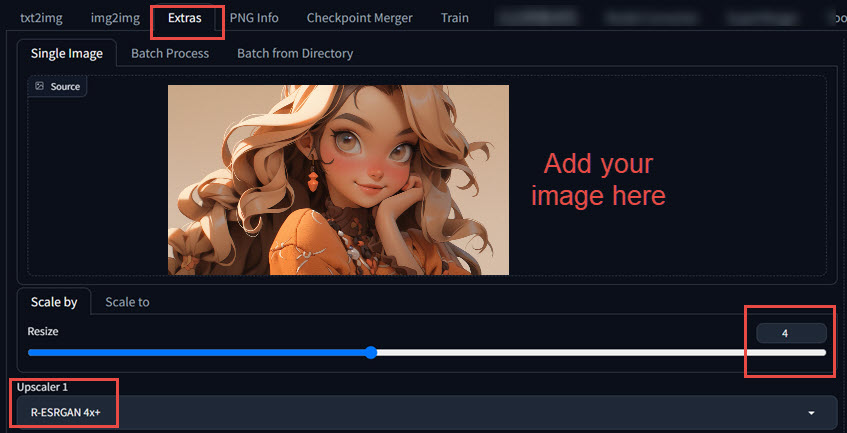
Step 1. Go to the Extras tab in Stable Diffusion Automatic1111 WebUI.
Step 2. Drag and drop your AI image. You can also go batch process.
Step 3. Adjust Resize value.
4 means upscale the image by 4 times.
Step 4. Choose the upscaling algorithms.
Stable Diffusion Upscaler Comparison
Upscale Images in Aiarty Image Enhancer
You can generate low-res images in Stable Diffusion, and directly throw them into Aiarty Image Enhancer for pro-quality upscaling.
Pros:
- Faster and easier with proper details kept upon upscaling.
- Achieve huge size without sacrificing quality, details and texture.
- Directly upscale from 512/786/1024px to 4K/8K/16K and higher.
- Low vram requirement, optimized for Nvidia/AMD/Intel/CPU/Mac Chips.
Cons:
No Linux version currently. Aiarty Image Enhancer works on Windows and Mac.
Upscale Images in Stable Diffusion
| Pros | Cons | |
|---|---|---|
| Highres.fix |
|
|
| Ultimate SD Upscale Script |
|
|
| Tiled Diffusion-MultiDiffusion |
|
|
| Extras Upscaler |
|
|
Wrap Up
That's all for the commonly used methods to upscale Stable Diffusion images. Highres. Fix is designed to fix extra heads and other body disformation errors; upscalers in the Extras Tab can batch process images but it has less details that other methods; SD upscale script allows you to achieve a higher resolution with the tiled methods, though there might be seams; tiled diffusion also segment images into tiles, with an image to use fewer computing resource, but it doesn't support batch tasks.
You can also use a standalone Stable Diffusion upscaler – Aiarty Image Enhancer – it has three AI model to upscale AI images up to 16K/32K, no seams artifacts, works on 4GB/8GB vram, and support batch tasks.
Brenda Peng is a seasoned editor at Digiarty Software who loves turning ordinary photos into extraordinary works of art. With years of experience behind the lens and in front of the computer, Brenda shares her passion for photography, image enhancement, and editing through easy-to-follow tutorials.